
In today’s digital landscape, the web browser is often the primary gateway to work, entertainment, and connection. Among the myriad of browsers available, Google Chrome stands out for its speed, robustness, and, critically, its vast ecosystem of extensions. These small, powerful software programs are designed to customize your browsing experience, adding new features, streamlining workflows, and enhancing productivity in ways you might not have thought possible. From managing your tasks and checking grammar to boosting your digital security and finding the best deals online, Chrome extensions are indispensable tools for anyone looking to optimize their time and experience online.
This comprehensive guide will walk you through everything you need to know about installing Chrome extensions, from the straightforward method of using the official Chrome Web Store to more advanced techniques for developers and those needing to load unpacked files. We’ll also cover best practices for managing your extensions, ensuring your browser remains secure and performs at its peak. By the end of this article, you’ll be well-equipped to harness the full potential of Chrome extensions, transforming your browser into a highly personalized and efficient digital assistant.
Understanding Chrome Extensions: What They Are and Why You Need Them
Before diving into the “how-to,” let’s clarify what Chrome extensions are and why they’ve become such a crucial part of the modern web experience. Essentially, a Chrome extension is a small software module that extends the functionality of the Google Chrome browser. Unlike full-fledged applications, extensions are typically lightweight, focusing on specific tasks or enhancements. They run within the browser environment, seamlessly integrating with your browsing activities without requiring separate installations on your operating system.
The brilliance of Chrome extensions lies in their ability to adapt the browser to your unique needs and preferences. Whether you’re a student, a professional, a casual browser, or a developer, there’s an extension designed to make your life easier.
The Power of Personalization and Productivity
One of the primary reasons millions of users flock to Chrome extensions is their unparalleled capacity for personalization and productivity enhancement. Imagine a tool that automatically blocks intrusive ads, allowing you to focus on content without distraction. Or an extension that checks your grammar and spelling in real-time across any web page, turning you into a more articulate communicator. Perhaps you need a quick way to save articles for later reading, capture screenshots, or manage your tabs more efficiently. All these capabilities and more are delivered through extensions.
For professionals, extensions can integrate project management tools directly into their browser, provide quick access to CRM systems, or even assist with data analysis by scraping information from websites. Students can benefit from research tools, citation managers, and distraction blockers. Even for casual users, extensions can enhance security by flagging malicious sites or improve the aesthetic of their browser with custom themes and visual tweaks. The sheer variety ensures that almost any niche need or desire for an improved browsing experience can be met. This level of customization transforms a generic web browser into a powerful, tailor-made workstation, aligning perfectly with the ethos of leveraging technology for peak performance.
Enhanced Security and Specialized Functionality
Beyond productivity and personalization, Chrome extensions play a significant role in bolstering digital security and offering specialized functionality that goes beyond Chrome’s native capabilities. In an age where digital threats are constant, many extensions are designed to act as vigilant guardians. These can include ad blockers that also prevent malicious ads, password managers that secure your credentials across different sites, and privacy tools that limit tracking by third-party cookies. Some extensions even offer VPN services, encrypting your internet connection and masking your IP address to provide an extra layer of anonymity and security, particularly vital when using public Wi-Fi networks.
Furthermore, for niche applications or professional use cases, extensions provide functionality that would otherwise require dedicated software. Developers, for instance, have access to a suite of extensions that aid in debugging web pages, inspecting elements, and testing responsiveness. Designers might use extensions to pick colors from a webpage or measure dimensions. Even everyday users can benefit from specialized tools like currency converters, weather widgets, or quick access to cloud storage services directly from their browser toolbar. This integration of specialized tools directly into the browser environment saves time, reduces context-switching, and makes complex tasks more accessible. The “Tech” aspect of this is evident in how extensions push the boundaries of browser capabilities, turning a simple web client into a versatile platform for a multitude of advanced operations and safeguarding measures.
The Standard Method: Installing from the Chrome Web Store
For the vast majority of users, installing Chrome extensions is a straightforward process performed through the official Chrome Web Store. This is Google’s curated marketplace for extensions and themes, offering a secure and reliable environment to discover and install new functionalities. Utilizing the Web Store ensures that extensions have undergone a basic level of review by Google, minimizing the risk of installing malicious software.
Navigating the Chrome Web Store Interface
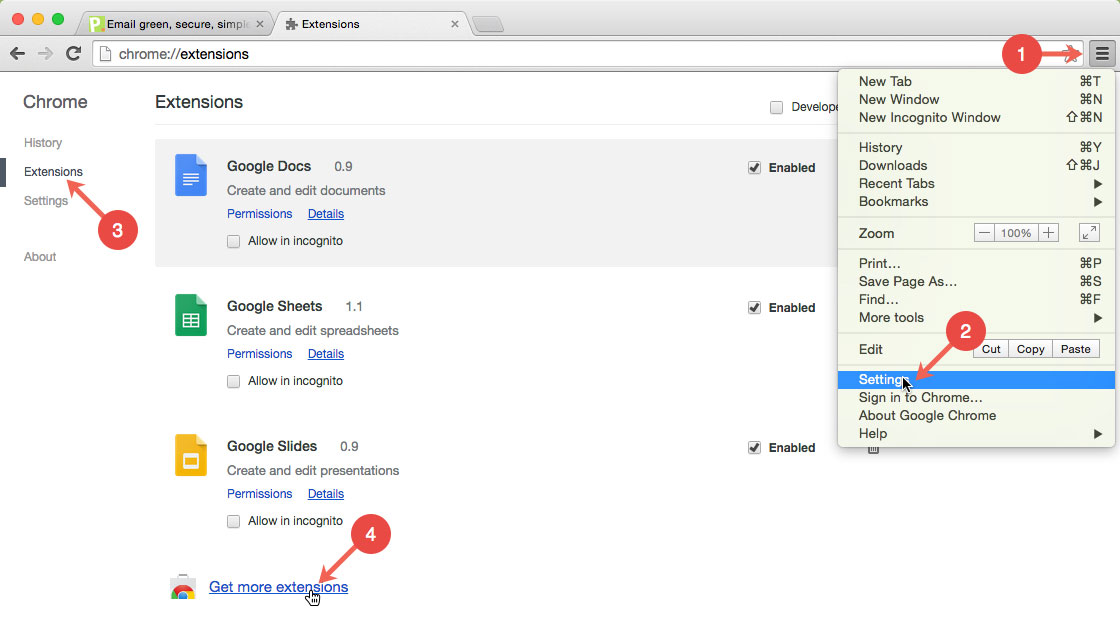
Accessing the Chrome Web Store is simple. You can either type chrome.google.com/webstore into your browser’s address bar or click the three-dot menu icon in the top-right corner of Chrome, navigate to “More tools,” and then select “Extensions.” From the Extensions page, you’ll see a menu icon (three horizontal lines) in the top-left corner; clicking it will reveal a “Open Chrome Web Store” link.
Once you’re in the Chrome Web Store, you’ll be greeted by a user-friendly interface reminiscent of an app store. Extensions are categorized, featured, and searchable. You’ll find sections for “Recommended for you,” “Trending,” and various categories like “Productivity,” “Shopping,” “Fun,” and “Accessibility.” There’s also a powerful search bar at the top, allowing you to find specific extensions by name or keyword. When searching, it’s often helpful to be as specific as possible to narrow down the results and find the most relevant and highly-rated options. Pay attention to the number of users, the average rating, and the reviews to gauge an extension’s popularity and reliability.
A Step-by-Step Guide to Adding an Extension
Once you’ve found an extension you wish to install, the process is incredibly intuitive:
- Click on the Extension: From the search results or a category page, click on the name or icon of the extension you’re interested in. This will take you to its dedicated product page.
- Review the Product Page: On the extension’s product page, you’ll find essential information. This typically includes a detailed description of what the extension does, screenshots or videos demonstrating its features, user reviews, a rating, and crucially, a list of permissions it requires. Take your time to read through this information. Understanding an extension’s purpose and its access requirements is vital for making an informed decision.
- Click “Add to Chrome”: If you’re satisfied with what you’ve read, locate the prominent blue “Add to Chrome” button, usually found in the top-right corner of the product page.
- Confirm Installation and Permissions: A pop-up dialogue box will appear, asking you to confirm the installation. This box will explicitly list the permissions the extension needs to operate (e.g., “Read and change all your data on websites you visit,” “Access your tabs,” “Read your browsing history”). This is a critical step. Carefully review these permissions. If an extension’s requested permissions seem excessive for its stated purpose (e.g., a simple calculator asking to read your browsing history), it might be a red flag.
- Click “Add extension”: If you’re comfortable with the permissions, click “Add extension” to proceed.
- Installation Complete: The extension will download and install in a matter of seconds. You’ll usually see a small confirmation pop-up from Chrome, indicating that the extension has been added. Often, the extension’s icon will appear in your Chrome toolbar, to the right of the address bar. If you don’t see it immediately, it might be hidden in the extensions menu (jigsaw puzzle icon).
And that’s it! The extension is now installed and ready to use. This method is the safest and most recommended way to expand your browser’s capabilities.
Understanding and Approving Permissions
The most critical step in installing a Chrome extension is understanding and approving its requested permissions. This isn’t just a formality; it’s a fundamental aspect of your digital security and privacy. When an extension asks for permission, it’s essentially requesting access to certain parts of your browser data or capabilities. These permissions dictate what the extension can see, do, and interact with on your behalf.
Common permissions include:
- “Read and change all your data on websites you visit”: This is a very broad permission, often required by extensions that modify webpage content (like ad blockers, grammar checkers) or scrape information. It means the extension can potentially see everything you do on any website.
- “Access your browsing history”: Allows the extension to view and potentially store your browsing history.
- “Read and change your bookmarks”: Gives the extension control over your saved bookmarks.
- “Manage your downloads”: Allows the extension to initiate, track, or modify downloads.
- “Access your tabs”: Enables the extension to see and interact with your open tabs.
Why is this important? Granting excessive or unnecessary permissions can expose you to privacy risks. A malicious extension, or even a legitimate one compromised by a hack, could abuse these permissions to track your online activity, inject unwanted ads, steal personal information, or redirect you to phishing sites. Therefore, always ask yourself: “Does this extension really need this level of access to perform its stated function?” If a simple calculator extension asks to “read and change all your data on websites you visit,” it’s a significant warning sign. Always opt for extensions that request the minimum necessary permissions. Reviewing permissions is your first line of defense against potential security vulnerabilities in the extension ecosystem, a crucial practice in maintaining robust digital security.
Advanced Installation Methods: Beyond the Web Store
While the Chrome Web Store is the primary and safest source for extensions, there are scenarios where users might need to install extensions from other sources. These methods are generally more suited for developers, beta testers, or specific situations where an extension isn’t publicly listed. It’s crucial to exercise extreme caution with these methods, as they bypass the security checks of the Web Store, increasing your exposure to potentially harmful software.
Installing Unpacked Extensions for Developers and Testers
“Unpacked extensions” refers to extensions that are not packaged into a .crx file but rather exist as a folder containing all their source files (manifest.json, JavaScript, CSS, images, etc.). This method is primarily used by developers who are actively building or testing their own extensions, allowing them to make changes to the code and see the effects immediately without having to repackage and reinstall.
Here’s how to install an unpacked extension:
- Enable Developer Mode:
- Open Chrome.
- Click the three-dot menu in the top-right corner.
- Go to “More tools” > “Extensions.”
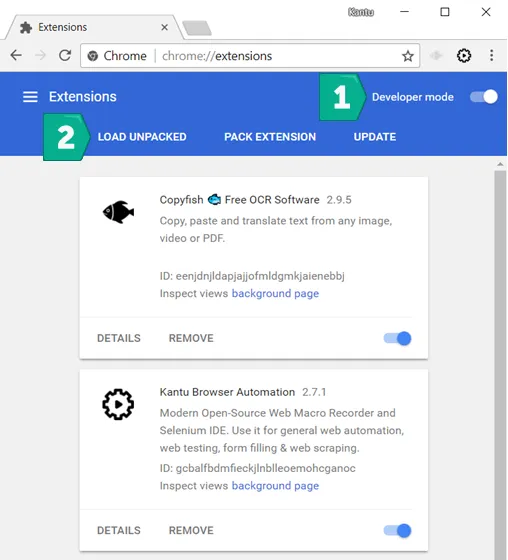
- On the Extensions page, toggle the “Developer mode” switch to the “On” position, usually found in the top-right corner.
- Enabling Developer Mode will reveal three new buttons: “Load unpacked,” “Pack extension,” and “Update.”
- Load Unpacked Extension:
- Click the “Load unpacked” button.
- A file browser window will appear. Navigate to the folder that contains your extension’s files (the folder that contains the
manifest.jsonfile). - Select the folder and click “Select Folder” (or “Open” on some operating systems).
- Verify Installation:
- The extension should now appear in your list of installed extensions on the Extensions page.
- Its icon will likely appear in your browser toolbar.
- You can disable or remove it from this page as you would any other extension.
Important Considerations for Unpacked Extensions:
- Persistence: Unpacked extensions loaded this way will remain installed even after you close and reopen Chrome.
- Updates: Unlike Web Store extensions, unpacked extensions do not update automatically. If you make changes to the code, you’ll need to click the “Update” button on the Extensions page to refresh the loaded extension.
- Security Risk: Only load unpacked extensions from sources you absolutely trust, preferably ones you have developed yourself or have thoroughly vetted the code. Since they bypass all Web Store security, they pose a significant security risk if sourced from untrusted locations.
Loading CRX Files (with Caution)
A CRX file is the packaged format for Chrome extensions – essentially a ZIP archive with a different extension. Historically, Chrome allowed users to drag and drop CRX files directly onto the Extensions page to install them. However, due to security concerns (malicious websites could trick users into downloading and installing harmful CRX files), Google has largely restricted this functionality.
As of recent Chrome versions, directly installing CRX files downloaded from outside the Chrome Web Store is blocked by default. If you try to drag and drop a CRX file, Chrome will typically display a message like “Extensions, apps, and themes cannot be added from this website.”
Workarounds (Use with Extreme Caution):
While Google actively discourages and blocks external CRX installations, there are some technical workarounds that are not officially supported and carry substantial security risks:
- Converting CRX to Unpacked: The most common method now is to treat the CRX file as a zipped unpacked extension.
- Change the
.crxfile extension to.zip. - Extract the contents of the zip file into a new folder.
- Then, use the “Load unpacked” method described above, pointing Chrome to the extracted folder.
- This effectively converts a packaged extension into an unpacked one for local loading.
- Change the
- Using Policies (Enterprise Environments): In managed enterprise environments, IT administrators can use Chrome policies to whitelist specific external extensions or allow installation from specific external sources. This is not for individual users.
WARNING: Installing extensions via CRX files or by converting them to unpacked folders from untrusted sources is highly dangerous. These files could contain malware, spyware, or other malicious code that could compromise your browser, your data, and your entire system. Only use this method if you have a compelling reason (e.g., testing a pre-release version from a trusted developer, or installing a custom in-house extension) and you are absolutely certain of the file’s integrity and origin. Always prioritize security, which is a core tenet of responsible tech usage.
Managing Your Chrome Extensions for Optimal Performance
Installing extensions is only half the battle; effective management is crucial for maintaining a fast, secure, and organized browsing experience. Too many extensions, or poorly managed ones, can slow down your browser, consume excessive memory, and even introduce security vulnerabilities. Regular maintenance ensures that your digital tools remain assets, not liabilities.
Enabling, Disabling, and Removing Extensions
The central hub for all your installed extensions is the “Extensions” page in Chrome. You can access it by typing chrome://extensions in your address bar or by going to the three-dot menu > “More tools” > “Extensions.”
On this page, each extension is listed with several controls:
- Toggle Switch (Enable/Disable): Each extension has a toggle switch. Flipping this switch to “Off” disables the extension without uninstalling it. This is useful if an extension is causing issues, or if you only need it occasionally. Disabling an extension means it stops running, consuming resources, and accessing your data. Flipping it back “On” reactivates it instantly.
- “Remove” Button: To completely uninstall an extension, click the “Remove” button (or a trash can icon) associated with it. Chrome will ask for confirmation. Removing an extension deletes all its files and data from your browser. This is ideal for extensions you no longer use or those causing persistent problems.
- “Details” Button: Clicking “Details” takes you to a page with more information about the extension, including its version, permissions, site access, and options to manage settings or view its source in the Web Store.
Best Practices: Regularly review your installed extensions. If you haven’t used an extension in months, or if you can’t remember why you installed it, consider disabling or removing it. This declutters your browser, frees up resources, and reduces your attack surface.
Controlling Permissions and Data Access
Permissions are not static; you can review and modify an extension’s granted permissions even after installation. On the “Details” page for each extension, you’ll find a section dedicated to “Permissions” and often “Site Access.”
- Permissions: This section lists all the permissions the extension requested and was granted during installation. While you typically cannot revoke individual permissions without reinstalling a modified version of the extension (which is usually not an option for Web Store extensions), reviewing them here serves as a reminder of what the extension has access to.
- Site Access: This is a powerful control that allows you to specify when an extension can run on a website. Options typically include:
- “On click”: The extension will only run and access data on a page when you explicitly click its icon in the toolbar. This is the most restrictive and privacy-friendly option.
- “On specific sites”: You can add a custom list of websites where the extension is allowed to run.
- “On all sites”: The default for many extensions, meaning it runs automatically on every website you visit. Only grant this for extensions you fully trust and that genuinely need universal access (e.g., ad blockers, grammar checkers).
By adjusting “Site Access,” you can limit an extension’s data access to only when and where it’s truly needed, significantly enhancing your privacy and browser performance. This is a critical “Tech” security feature many users overlook.
Keeping Extensions Updated and Organized
Like any software, Chrome extensions receive updates. These updates often include new features, bug fixes, and, crucially, security patches. Chrome automatically updates extensions by default, but you can manually check for updates:
- Go to
chrome://extensions. - Ensure “Developer mode” is enabled.
- Click the “Update” button. Chrome will then check for and install updates for all your installed extensions.
Organizing Your Toolbar: As you accumulate extensions, your browser toolbar can become cluttered. Chrome offers a clean way to manage this:
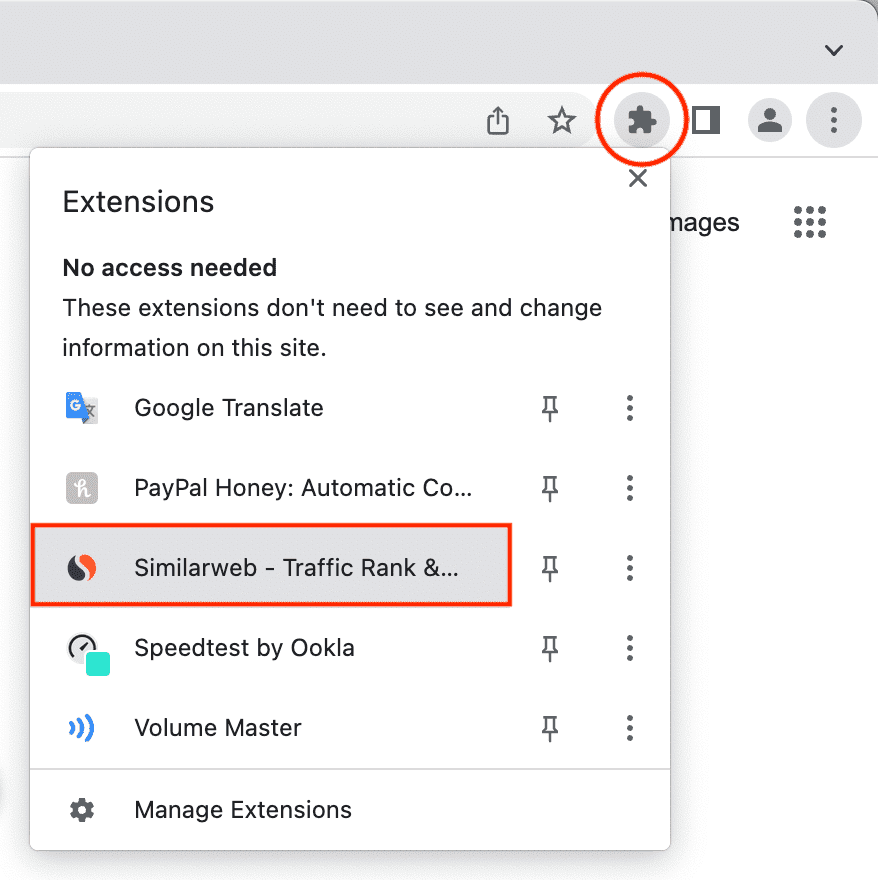
- Pinning/Unpinning: Click the jigsaw puzzle icon (Extensions menu) next to your profile picture in Chrome. This displays a dropdown list of all your installed extensions. Next to each extension, there’s usually a pin icon. Clicking the pin icon will either “pin” (display) the extension’s icon directly on your toolbar or “unpin” (hide) it within the extensions menu. Pin only the extensions you use frequently to keep your toolbar tidy and accessible.
Effective management is key to ensuring your browser remains a powerful, secure, and efficient tool. Neglecting your extensions can lead to a sluggish browsing experience and potential security risks, undermining the very benefits they are designed to provide.
Best Practices and Troubleshooting Tips
Maximizing the utility of Chrome extensions while maintaining a secure and efficient browsing environment requires adherence to a few best practices and knowing how to troubleshoot common issues. This proactive approach ensures that your digital tools work for you, not against you.
Prioritizing Security and Privacy
In the world of extensions, vigilance is paramount. Given the deep access extensions can have to your browsing data, security and privacy should always be your top concerns.
- Source from the Chrome Web Store Only (Preferably): The Chrome Web Store is Google’s vetted marketplace. While not foolproof, extensions there undergo a review process that filters out many malicious actors. Avoid downloading extensions from third-party websites unless you have an absolutely compelling and verified reason (e.g., official beta programs from reputable developers).
- Scrutinize Permissions Rigorously: As discussed, this is your first and strongest line of defense. If an extension’s requested permissions seem overreaching for its stated function, err on the side of caution and look for an alternative. A weather extension, for instance, has no business accessing your browsing history.
- Read Reviews and Check Developer Reputation: Before installing, check the extension’s user reviews and ratings. Look for a high number of active users and consistent positive feedback. Investigate the developer; do they have a reputable presence? Are there other extensions by them?
- Avoid Too Many Extensions: Each extension consumes system resources (CPU, RAM) and increases your browser’s “attack surface.” A lean set of essential, well-vetted extensions will perform better and be more secure than dozens of rarely used ones. Regularly review and uninstall extensions you no longer need.
- Keep Chrome and Extensions Updated: Ensure your Chrome browser is always on the latest version, as updates often include critical security patches. Similarly, allow extensions to update automatically or manually check for updates to benefit from the latest bug fixes and security improvements.
- Understand Data Collection Policies: If an extension offers specific privacy or security features, take a moment to understand its own data collection practices. Reputable extensions will have clear privacy policies.
Dealing with Common Extension Issues
Even with best practices, you might encounter issues with extensions. Here’s how to troubleshoot common problems:
-
Extension Not Working or Crashing Chrome:
- Restart Chrome: Often, a simple browser restart can resolve temporary glitches.
- Disable and Re-enable: Go to
chrome://extensions, toggle the problematic extension off, then back on. - Check for Updates: Ensure both Chrome and the extension are updated.
- Clear Browser Cache and Cookies: Sometimes, conflicts arise from cached data. Clear your browser’s cache and cookies.
- Isolate the Issue: If you have multiple extensions, disable them one by one (or in groups) to identify if there’s a conflict between extensions. Re-enable them gradually until the problem reappears.
- Reinstall the Extension: If nothing else works, uninstall the extension and reinstall it from the Chrome Web Store.
- Check Extension-Specific Settings: Many extensions have their own settings that can be accessed by right-clicking their icon or going to
chrome://extensions > Details > Extension options. - Contact Developer Support: If the issue persists, check the extension’s Web Store page for a “Support” or “Contact Developer” link.
-
Browser Slowdown or Excessive Resource Usage:
- Review Task Manager: Chrome has its own built-in Task Manager (Shift + Esc on Windows/Linux, or
Window > Task Manageron Mac) that shows which tabs and extensions are consuming the most CPU and memory. Identify resource-hungry extensions. - Disable Non-Essential Extensions: If an extension is a resource hog and not critical, disable or remove it.
- Adjust Site Access: Limit extensions to “On click” or “On specific sites” rather than “On all sites” to reduce their continuous background activity.
- Review Task Manager: Chrome has its own built-in Task Manager (Shift + Esc on Windows/Linux, or
-
Unwanted Ads or Pop-ups:
- This is a strong indicator of a malicious or “adware” extension.
- Immediately review recently installed extensions.
- Disable and remove any suspicious ones.
- Run a full scan with reputable antivirus/anti-malware software.
- Consider resetting Chrome settings to default (Settings > Reset settings > Restore settings to their original defaults).
By following these best practices and knowing how to troubleshoot, you can ensure that your Chrome extensions enhance your browsing experience without compromising your security, privacy, or browser performance. They are powerful tools, but like any powerful technology, they require responsible management.
In conclusion, Chrome extensions are transformative tools that can elevate your browser from a simple window to the internet into a highly personalized, efficient, and secure digital workstation. From boosting productivity and personalizing your online experience to fortifying your digital defenses, the right extensions, properly managed, can significantly enhance your interaction with the web. By understanding the installation processes, scrutinizing permissions, and committing to ongoing management and security best practices, you empower yourself to harness the full, incredible potential of this vast technological ecosystem. So go forth, explore the Chrome Web Store, and build the ultimate browsing experience tailored just for you.
aViewFromTheCave is a participant in the Amazon Services LLC Associates Program, an affiliate advertising program designed to provide a means for sites to earn advertising fees by advertising and linking to Amazon.com. Amazon, the Amazon logo, AmazonSupply, and the AmazonSupply logo are trademarks of Amazon.com, Inc. or its affiliates. As an Amazon Associate we earn affiliate commissions from qualifying purchases.