
In an increasingly connected world, the security of our homes and properties has become a paramount concern. Smart home security devices are no longer a luxury but an essential component of modern living, offering peace of mind and enhanced protection. Among the leading innovators in this space, Ring has established itself with a range of accessible and effective solutions. The Ring Floodlight Cam Wired Plus stands out as a robust outdoor security camera that combines powerful illumination with intelligent motion detection, two-way talk, and high-definition video recording. Designed to replace existing hardwired floodlights, it offers a formidable deterrent against intruders and a vigilant eye over your property.

This comprehensive guide is tailored for both seasoned DIY enthusiasts and those new to smart home installations, providing a clear, step-by-step walkthrough for installing your Ring Floodlight Cam Wired Plus. From ensuring electrical safety to configuring the device within the Ring app, we’ll cover every detail to help you achieve a secure and optimal setup. Understanding the process not only empowers you to install the device confidently but also ensures its longevity and effectiveness, transforming your outdoor space into a smarter, safer environment. This isn’t just about installing a gadget; it’s about integrating a vital piece of digital security infrastructure into your home, leveraging technology to protect what matters most.
I. Preparing for a Smooth Installation: Pre-Setup Essentials
Before you even think about connecting wires, a thorough preparation phase is crucial. This not only streamlines the installation process but, more importantly, ensures your safety and the optimal functioning of your new Ring device. Rushing this stage can lead to frustration, potential electrical hazards, or the need for a re-do, underscoring the importance of meticulous planning.
A. Gathering Your Tools and Supplies
Having the right tools at hand before you begin will save you countless trips to the toolbox and keep the process efficient. Here’s a comprehensive checklist of what you’ll likely need:
- Ring Floodlight Cam Wired Plus: Naturally, the star of the show. Ensure all components are present, including the mounting bracket, screws, and wire nuts.
- Screwdriver: A Philips head screwdriver is typically required for most screws on the mounting bracket and the camera itself. Sometimes a flathead might be useful.
- Pliers/Wire Strippers: Essential for manipulating wires, stripping insulation if needed, and twisting connections firmly.
- Voltage Tester/Non-Contact Voltage Detector: Absolutely critical for confirming that the power is off before you touch any wires. Never skip this step.
- Ladder: A sturdy and stable ladder is indispensable for reaching the existing floodlight fixture, especially if it’s mounted high. Ensure it’s rated for your weight and placed on a stable surface.
- Work Gloves: To protect your hands during the installation process, especially when handling tools or old fixtures that might have sharp edges.
- Safety Glasses: To shield your eyes from debris, dust, or accidental splashes.
- Caulking Gun and Weatherproof Sealant: For sealing the gaps around the mounting plate, preventing water ingress and ensuring long-term durability.
- Pencil: For marking drill holes if you’re installing a new mounting bracket.
- Drill (with appropriate drill bits): If you need to drill new pilot holes for the mounting bracket.
- Electrical Tape: For securing wire connections and additional insulation.
- Your Smartphone or Tablet: With the Ring app installed and updated. This will be crucial for the post-installation setup.
- Wi-Fi Password: Keep your home Wi-Fi network name (SSID) and password handy, as you’ll need them for connecting the device.
B. Prioritizing Electrical Safety: The Golden Rule
Working with electricity carries inherent risks, and safety must always be your top priority. The Ring Floodlight Cam Wired Plus is a hardwired device, meaning it connects directly to your home’s electrical system.
- Locate Your Circuit Breaker: Identify the circuit breaker that controls the power to the outdoor light fixture you intend to replace. This might be labeled in your electrical panel (e.g., “Outdoor Lights,” “Front Porch,” “Garage”).
- Toggle It OFF: Flip the identified circuit breaker to the “OFF” position. This severs the electrical current to the fixture.
- Test for Power (Crucial Step): Go back to the light fixture. Use your voltage tester to confirm that the power is indeed off. Touch the probes to the wires you will be working with. A non-contact voltage detector will also glow or beep if power is still present. If the tester indicates power, go back to the breaker box and try another breaker until you confirm the fixture is completely de-energized. Do not proceed until you are absolutely certain the power is off.
- Inform Others: If you live with others, inform them that you are working on the electrical system and that a specific circuit breaker is off. Consider taping a note to the breaker box to prevent anyone from accidentally turning the power back on.
II. The Physical Installation Process: From Old Fixture to New Cam
With safety measures in place and your tools ready, it’s time to tackle the physical replacement of your old floodlight with the advanced Ring Floodlight Cam Wired Plus. This phase involves careful handling of electrical wires and precise mounting techniques to ensure stability and weather resistance.
A. Disconnecting Your Old Fixture
- Access the Old Fixture: Carefully climb your ladder to reach the existing floodlight. You might need to remove a decorative cover or screws holding the fixture in place.
- Identify and Disconnect Wires: Once the old fixture is loose or removed from its mounting plate, you’ll see three main wires:
- Black (Hot): Carries the electrical current.
- White (Neutral): Returns current to the electrical panel.
- Green or Bare Copper (Ground): A safety wire that provides a path for fault currents.
- Carefully untwist the wire nuts connecting these wires from the old fixture to the wires coming out of your home’s electrical box. Make sure to keep the bare house wires separate so they don’t touch each other or the metal box.
- Remove the Old Mounting Plate: Unscrew and remove the old mounting plate or crossbar from the junction box. You’ll be replacing this with the Ring-provided mounting bracket.
B. Mounting the Ring Floodlight Cam Bracket
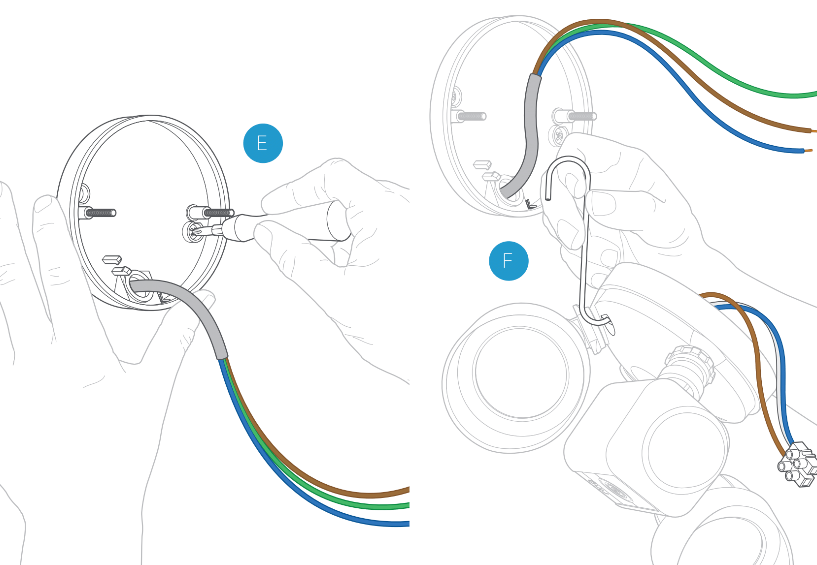
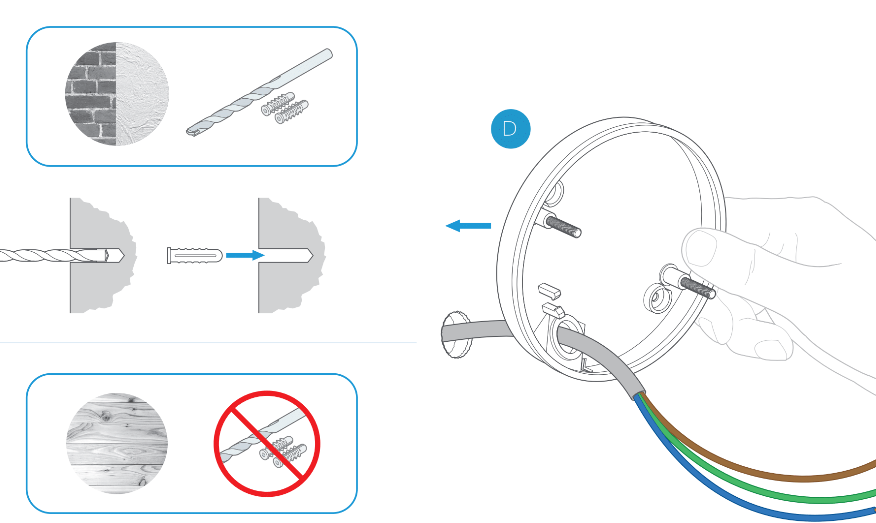
- Attach the Round Mounting Plate: The Ring Floodlight Cam Wired Plus comes with a round mounting plate. Align the holes on this plate with the screw holes on your existing outdoor junction box. Use the provided screws to secure the plate firmly to the junction box. Ensure it’s snug and doesn’t wobble.
- Install the Mounting Hook: The kit usually includes a small S-hook or similar device. Attach this hook to the round mounting plate. This clever feature will temporarily hold the heavy camera body during the wiring process, freeing up your hands.
C. Wiring the Device Securely
This is a critical step that requires attention to detail. Refer to the specific wiring instructions in your Ring manual, as variations can occur, but the general principle is consistent.
- Hang the Camera Body: Carefully hang the Ring Floodlight Cam Wired Plus onto the mounting hook you just installed. This will support its weight while you work on the electrical connections.
- Connect the Wires:
- Ground Wire (Green or Bare Copper): Connect the green wire from the Ring Floodlight Cam to the green or bare copper ground wire coming from your electrical box. Secure them together using a wire nut.
- Neutral Wire (White): Connect the white wire from the Ring Floodlight Cam to the white neutral wire from your electrical box. Secure them with a wire nut.
- Hot Wire (Black): Connect the black wire from the Ring Floodlight Cam to the black hot wire from your electrical box. Secure them with a wire nut.
- Secure Connections: After twisting on the wire nuts, give each wire a gentle tug to ensure the connection is secure and won’t pull apart. For added security, you can wrap electrical tape around each wire nut and the exposed wires to provide extra insulation and strain relief.
- Tuck Wires Neatly: Carefully push all the connected wires back into the junction box, ensuring they are not pinched or crimped. This is important for the camera to sit flush against the mounting surface.
D. Finalizing the Physical Setup
- Attach the Camera to the Mounting Plate: Remove the camera from the temporary hanging hook. Align the central screw hole on the camera’s base with the threaded hole in the center of the round mounting plate.
- Secure with the Cap Nut: Use the decorative cap nut provided with your Ring device to secure the camera firmly to the mounting plate. Tighten it by hand until snug, then use a screwdriver to give it a final quarter-turn to ensure it’s fully tightened without overtightening. The camera should now be flush against the wall and stable.
- Apply Weatherproof Sealant: To prevent water intrusion, apply a bead of weatherproof silicone sealant around the edges of the camera’s mounting plate where it meets the wall. This is a crucial step for outdoor installations, protecting your wiring and prolonging the life of your device.
- Restore Power: Once everything is securely mounted and sealed, return to your circuit breaker box and flip the breaker back to the “ON” position. Your Ring Floodlight Cam Wired Plus should now power on. You’ll likely see its lights flash or hear an audible prompt indicating it’s ready for setup.
III. Configuring Your Ring Device: Bringing Your Smart Cam to Life
Physical installation is only half the battle. The true intelligence and utility of your Ring Floodlight Cam Wired Plus come alive through its software configuration via the Ring app. This stage connects your device to your home network and allows you to customize its features to suit your specific security needs.
A. Connecting to Wi-Fi and Syncing with the Ring App
- Download and Open the Ring App: If you haven’t already, download the Ring app from your smartphone’s app store (iOS or Android). Log in with your existing Ring account or create a new one.
- Initiate Setup: In the Ring app, tap on “Set Up a Device” and then select “Security Cams.”
- Scan the QR Code: The app will prompt you to scan the QR code found on your Ring Floodlight Cam Wired Plus (usually on the side or back of the camera, or on the packaging). This identifies your specific device.
- Follow In-App Prompts: The app will guide you through connecting the camera to your Wi-Fi network. You’ll need to grant the Ring app permission to access your phone’s location and Bluetooth. The app will then instruct you to press a button on the camera (the “Setup” button) to put it into setup mode.
- Connect to Ring Wi-Fi Network: Your phone will temporarily connect to a special Wi-Fi network broadcast by your Ring device. Once connected, it will then transfer your home Wi-Fi credentials to the Floodlight Cam.
- Name Your Device: Assign a name to your camera (e.g., “Front Driveway Cam,” “Backyard Floodlight”). This helps with organization if you have multiple Ring devices.
- Complete Firmware Update: The device may undergo a firmware update. Allow this to complete without interruption.
B. Customizing Settings and Motion Zones
Once connected, delve into the app’s settings to optimize your Floodlight Cam’s performance. This personalization is key to its effectiveness and to minimizing unwanted alerts.
- Motion Detection Settings:
- Motion Zones: Define specific areas within the camera’s field of view where you want motion detection to be active. This is crucial for eliminating triggers from busy streets, public sidewalks, or moving foliage, reducing false alerts.
- Motion Sensitivity: Adjust how sensitive the camera is to motion. Lower sensitivity for less frequent, larger movements; higher for detecting smaller details.
- People Only Mode: If available, enable this feature to filter out motion from non-human sources, focusing on relevant events.
- Light Settings:
- Light Schedules: Set specific times for the floodlights to turn on and off automatically (e.g., dusk to dawn).
- Motion-Activated Lights: Configure whether the lights turn on when motion is detected, and for how long.
- Light Brightness: Adjust the intensity of the floodlights.
- Live View and Two-Way Talk: Test these features to ensure they are working correctly. Speak into your phone and listen for your voice from the camera, and vice-versa.
- Alerts and Notifications: Customize how you receive alerts (push notifications, email) and for what types of events.
- Privacy Settings: Explore options for privacy zones, which allow you to black out specific areas in the camera’s view that you don’t wish to record, respecting neighbors’ privacy.
IV. Optimizing Performance and Troubleshooting Common Issues
Even with careful installation, optimizing your Ring Floodlight Cam Wired Plus involves ongoing adjustments and knowing how to address potential hiccups. This ensures your investment in smart security delivers its full potential.
A. Maximizing Detection and Illumination
- Optimal Mounting Height: Ring generally recommends mounting the Floodlight Cam at about 9 feet (2.7 meters) off the ground for the best motion detection and light coverage. Adjust this slightly based on your property layout.
- Angle for Detection: Angle the camera to capture approaching activity, rather than objects moving across the frame. Motion detection is often more effective when subjects move towards or away from the camera.
- Leverage Motion Zones: Continuously refine your motion zones in the app. Use the “snapshot capture” feature or test live view to see what the camera sees and adjust zones to avoid common false alarm sources like tree branches swaying, reflections, or passing cars on a busy street.
- Wi-Fi Strength: A strong Wi-Fi signal is paramount for reliable performance. Use the “Device Health” section in the Ring app to check your RSSI (Received Signal Strength Indicator). An RSSI closer to 0 (e.g., -40 to -60) is excellent, while numbers closer to -70 or worse indicate a weak signal that could lead to connectivity issues, slow live view, and missed recordings. Consider a Wi-Fi extender if your signal is poor.
- Light Adjustment: Ensure your floodlights are aimed correctly to illuminate key areas of concern. They should light up paths, entryways, or specific zones you want to monitor.
B. Addressing Common Installation and Post-Setup Issues
- No Power to the Camera:
- Check Breaker: Double-check that the circuit breaker is ON.
- Verify Wiring: Review your wire connections (black-to-black, white-to-white, ground-to-ground). Ensure wire nuts are secure and no wires are loose.
- Voltage Tester: Use a voltage tester on the wires inside the junction box (after turning the breaker OFF then ON again, if safe) to confirm power is present at the box itself.
- Lights Don’t Turn On/Off Properly:
- Light Schedules: Verify your light schedules and motion-activated light settings in the Ring app.
- Ambient Light Sensor: Ensure nothing is obstructing the camera’s ambient light sensor (usually a small dome or circle on the camera body) that detects daylight.
- Frequent False Motion Alerts:
- Motion Zones: This is the most common culprit. Drastically reduce or reshape your motion zones to exclude areas with high activity (e.g., streets, trees, reflective surfaces).
- Motion Sensitivity: Lower the motion sensitivity in the app.
- People Only Mode: If available, enable this feature to focus only on human shapes.
- Pets: Large pets can trigger alerts; adjust zones accordingly.
- Poor Video Quality or Laggy Live View:
- Wi-Fi Strength: As mentioned, a weak Wi-Fi signal (high RSSI number) is often the cause. Improve your Wi-Fi signal at the camera’s location.
- Internet Speed: Ensure your overall home internet speed is sufficient, especially if you have many connected devices or are streaming.
- Obstructions: Physical obstructions between your Wi-Fi router and the camera (thick walls, metal objects) can degrade signal strength.
- Can’t Connect to Wi-Fi During Setup:
- Correct Password: Double-check your Wi-Fi password.
- 2.4GHz Network: Ensure your phone is connected to a 2.4GHz Wi-Fi network during setup, as many smart devices prefer or require this band. Some routers broadcast both 2.4GHz and 5GHz with the same name; you might need to temporarily disable 5GHz or separate the SSIDs.
- Proximity: Bring your phone closer to the Floodlight Cam during the initial setup phase.
- Device Offline:
- Power Cycle: Try turning the circuit breaker OFF for 30 seconds, then back ON.
- Wi-Fi Check: Ensure your home Wi-Fi network is active and running.
- Router Reboot: Reboot your home router.
V. Embracing Smart Home Security and Beyond
The successful installation and configuration of your Ring Floodlight Cam Wired Plus represent more than just adding a new gadget to your home; it’s a significant upgrade to your digital security posture and an integration into the ever-growing ecosystem of smart home technology. This device serves as a proactive guardian, capable of deterring potential threats with its powerful lights and siren, while simultaneously providing critical evidence through its high-definition video recording.
Beyond immediate security benefits, the Ring Floodlight Cam Wired Plus seamlessly integrates with other Ring devices and compatible smart home platforms, enhancing its utility. You can connect it to Ring doorbells, other Ring cameras, and even smart locks, creating a cohesive security network that you can monitor and control from anywhere in the world via your smartphone. This level of connectivity not only simplifies management but also provides a more comprehensive view of your property’s security.
Furthermore, being part of the “Tech” category on a website like GlobalizeThis, the Ring Floodlight Cam Wired Plus exemplifies several technological trends: the rise of IoT (Internet of Things) for home automation, the increasing sophistication of AI in motion detection and object recognition, and the emphasis on digital security in both physical and virtual realms. It provides a tangible example of how innovative gadgets are making our lives safer, more convenient, and more connected.
Regularly checking the Ring app for updates, refining your settings as your needs evolve, and conducting periodic maintenance (like cleaning the camera lens) will ensure your Floodlight Cam continues to perform optimally for years to come. By taking the time to install it correctly and understand its capabilities, you’re not just mounting a camera; you’re actively investing in the safety and peace of mind for yourself and your loved ones, leveraging the best of modern technology to secure your home in an intelligent, efficient manner.
aViewFromTheCave is a participant in the Amazon Services LLC Associates Program, an affiliate advertising program designed to provide a means for sites to earn advertising fees by advertising and linking to Amazon.com. Amazon, the Amazon logo, AmazonSupply, and the AmazonSupply logo are trademarks of Amazon.com, Inc. or its affiliates. As an Amazon Associate we earn affiliate commissions from qualifying purchases.