In the dynamic landscape of modern software development, efficiency, standardization, and robust project management are not just desirable but essential. For Java developers, Apache Maven stands as a cornerstone tool, streamlining the build process, managing dependencies, and enforcing project structure. Whether you’re a seasoned professional looking to refine your setup or a newcomer eager to dive into the world of enterprise-grade Java development, mastering Maven is a pivotal step. This comprehensive guide will walk you through the entire process of installing Apache Maven, ensuring you’re ready to harness its power for your projects.
Apache Maven is more than just a build tool; it’s a project management tool that provides a complete framework for building, testing, and deploying projects. Its convention-over-configuration paradigm simplifies project setups, making it a favorite in development teams globally. For any tech professional or aspiring developer, setting up Maven correctly is the gateway to unlocking greater productivity and contributing effectively to modern software ecosystems.

Understanding Apache Maven: Why It’s Indispensable for Modern Development
Before we delve into the installation specifics, let’s briefly unpack what Apache Maven is and why it has become an integral part of the Java development workflow. Understanding its core purpose will illuminate the value it brings to your development toolkit and, by extension, to your projects and career.
At its heart, Maven is a powerful declarative build automation tool primarily used for Java projects. It uses an XML file, known as the Project Object Model (POM), to describe a project’s dependencies, build lifecycle, and structure. This single source of truth ensures consistency across development environments and teams.
The Core Benefits Maven Brings to Your Workflow
The advantages of integrating Maven into your development process are numerous, touching upon aspects of technology, brand consistency, and even financial efficiency.
- Standardized Project Structure: Maven introduces a common directory layout for projects, making it easy for developers to navigate and understand any Maven-based project instantly. This reduces onboarding time and increases team collaboration – a key aspect of project productivity.
- Dependency Management: This is perhaps Maven’s most celebrated feature. Instead of manually downloading and managing JAR files, you declare project dependencies in the POM file. Maven automatically fetches these dependencies from central repositories, including transitive dependencies, ensuring that all required libraries are available and correctly versioned. This significantly cuts down on “dependency hell” and saves countless development hours, directly impacting project costs.
- Consistent Build Process: Maven defines a clear lifecycle with phases like
compile,test,package,install, anddeploy. This standardized lifecycle means that a project built on one machine will build identically on another, fostering reliability and predictability in software delivery. This consistency contributes directly to the quality and reputation of your software, enhancing your “Brand.” - Powerful Plugins: Maven’s functionality can be extended through a vast ecosystem of plugins. These plugins allow you to perform a wide range of tasks, from generating reports and static analysis to running unit tests and deploying artifacts, all integrated seamlessly into the build process.
- Simplified Project Documentation and Reporting: Maven can generate comprehensive project documentation and reports, offering insights into code coverage, test results, and dependency trees. This helps teams maintain high-quality code and track progress effectively.
In essence, Maven acts as a sophisticated project manager for your code, automating repetitive tasks, enforcing best practices, and providing a unified approach to building software. For individual developers, mastering Maven enhances marketability and efficiency; for organizations, it translates to faster development cycles, fewer errors, and a more robust product, all contributing to better “Money” management through reduced operational costs and quicker time-to-market.
Pre-Installation Checklist: Essential Prerequisites
Before you can install Apache Maven, there’s one critical prerequisite: a Java Development Kit (JDK) must be installed and correctly configured on your system. Maven is a Java-based tool, and it relies on the JDK to execute its operations.
Ensuring Java Development Kit (JDK) is Ready
Maven typically requires JDK 1.7 or higher. For modern development, it’s highly recommended to use JDK 11 or later, as older versions might have security vulnerabilities or lack features required by newer tools.
-
Check for Existing JDK:
Open your terminal or command prompt and type:java -version javac -versionIf Java is installed, these commands will display the version number. Ensure the
javaccommand also works, as it confirms that a JDK (not just a JRE) is present. If you see an error like “command not found” or “Java is not recognized as an internal or external command,” you need to install the JDK. -
Install or Update JDK (if needed):
If you don’t have a JDK or if your version is outdated, you can download one from:- Oracle JDK: Visit the official Oracle website.
- OpenJDK: Consider distributions like Adoptium (formerly AdoptOpenJDK), Amazon Corretto, or Microsoft Build of OpenJDK. These are popular open-source alternatives.
Follow the installation instructions provided by your chosen JDK vendor. After installation, ensure that the
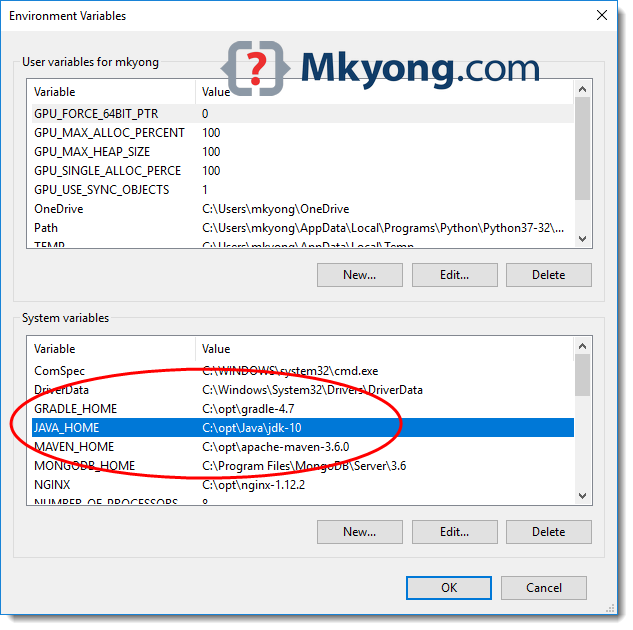
JAVA_HOMEenvironment variable is set to the JDK’s installation directory and that the JDK’sbindirectory is included in your system’sPATHenvironment variable.- Windows: Typically, the installer handles setting
JAVA_HOME. If not, you’ll need to set it manually in “System Properties” -> “Environment Variables.” - macOS/Linux: You might set
JAVA_HOMEin your shell’s profile file (e.g.,.bashrc,.zshrc,.profile) and add$JAVA_HOME/binto yourPATH. For example:
bash

export JAVA_HOME=/path/to/your/jdk

export PATH=$PATH:$JAVA_HOME/bin
Remember to source your profile file (source ~/.bashrc) or restart your terminal after making changes.
Once your JDK is properly installed and configured, you are ready to proceed with the Maven installation.
Step-by-Step Installation Guide: Downloading and Configuring Maven
The installation process for Apache Maven is straightforward, primarily involving downloading the binaries and setting up a few environment variables. We’ll cover the generic steps and then highlight platform-specific nuances.
Downloading Maven Binaries
- Visit the Official Apache Maven Website: Always download Maven from its official source to ensure you get a legitimate and secure version. Navigate to
https://maven.apache.org/download.cgi. - Choose the Binary Archive: Under the “Files” section, you’ll typically find two types of archives:
apache-maven-X.Y.Z-bin.zip(for Windows) andapache-maven-X.Y.Z-bin.tar.gz(for macOS/Linux), whereX.Y.Zis the latest stable version number. Download the appropriate binary archive for your operating system. - Verify the Download (Optional but Recommended for Digital Security): For enhanced digital security, Apache Maven provides checksums (SHA512) for its releases. You can compare the checksum of your downloaded file with the one listed on the download page to ensure the file hasn’t been tampered with during download.
Extracting Maven to a Suitable Location
After downloading, you need to extract the archive to a designated location on your file system. Choose a directory that is easy to remember, has no spaces in its path, and is accessible for system-wide use.
- Windows:
- Create a directory like
C:Program FilesApacheMavenorC:apache-maven. - Extract the contents of
apache-maven-X.Y.Z-bin.zipinto this directory. This will typically create a subdirectory likeC:apache-mavenapache-maven-X.Y.Z. For simplicity, you might rename this toC:apache-mavenmavenorC:Program FilesApacheMavenmaven.
- Create a directory like
- macOS/Linux:
- A common location is
/usr/local/apache-mavenor/opt/apache-maven. You might need administrator privileges (usingsudo) to extract here. - Open a terminal, navigate to your download directory, and use the
tarcommand:
bash

sudo tar -xvzf apache-maven-X.Y.Z-bin.tar.gz -C /usr/local/apache-maven
(Replace/usr/local/apache-mavenwith your chosen directory). - You might then create a symbolic link for easier updates:
bash

sudo ln -s /usr/local/apache-maven/apache-maven-X.Y.Z /usr/local/apache-maven/current
This allows you to just update thecurrentlink when a new Maven version is released.
- A common location is
The extracted directory contains the Maven distribution, including the bin directory which holds the mvn executable script.
Configuring Environment Variables
This is the most crucial step to ensure Maven is accessible from anywhere on your system. You need to set two environment variables: M2_HOME (or MAVEN_HOME) and PATH.
Setting MAVEN_HOME
This variable points to the root directory of your Maven installation (the directory containing bin, boot, conf, lib, etc.).
- Windows:
- Right-click on “This PC” or “My Computer” and select “Properties.”
- Click “Advanced system settings” on the left.
- Click the “Environment Variables…” button.
- Under “System variables,” click “New…”
- For “Variable name,” enter
M2_HOME(orMAVEN_HOME). - For “Variable value,” enter the path to your Maven installation directory (e.g.,
C:apache-mavenmaven). - Click “OK.”

- macOS/Linux:
- Open your shell’s profile configuration file. This is typically
~/.bashrc,~/.zshrc, or~/.profile. Use a text editor likenanoorvim.
bash

nano ~/.bashrc
- Add the following lines to the end of the file. If you used a symbolic link (e.g.,
/usr/local/apache-maven/current), use that path.
bash

export M2_HOME=/usr/local/apache-maven/current

# OR if no symlink

# export M2_HOME=/usr/local/apache-maven/apache-maven-X.Y.Z
- Save the file and exit the editor.
- Open your shell’s profile configuration file. This is typically
Adding Maven to Your PATH
This allows you to run the mvn command from any directory in your terminal without specifying its full path.
-
Windows:
- In the “Environment Variables” window (where you set
M2_HOME), find the “Path” variable under “System variables” and select it. - Click “Edit…”
- Click “New” and add
%M2_HOME%bin(orC:apache-mavenmavenbinif you didn’t setM2_HOME). - Make sure it’s at the end or towards the beginning of the list to avoid conflicts.
- Click “OK” on all open windows to apply the changes.
- In the “Environment Variables” window (where you set
-
macOS/Linux:
- In the same profile file (
.bashrc,.zshrc, etc.) where you setM2_HOME, add the following line:
bash

export PATH=$M2_HOME/bin:$PATH
This prepends the Mavenbindirectory to your existingPATH. - Save the file.
- Apply changes: For the new environment variables to take effect, you must either open a new terminal window or source your profile file:
bash

source ~/.bashrc  # or ~/.zshrc, ~/.profile
- In the same profile file (
Verifying Your Maven Installation
After completing the installation and environment variable setup, the final step is to verify that Maven is correctly installed and accessible.
- Open a New Terminal/Command Prompt: It’s crucial to open a new terminal or command prompt window after setting environment variables, as existing windows might not pick up the changes.
- Run the Maven Version Command: In the new terminal, type:
bash

mvn -version
or
bash

mvn --version
- Expected Output: If Maven is correctly installed, you should see output similar to this:
Apache Maven X.Y.Z (xxxxxxxxxxxxxxxxxxxxxxxxxxxxxxx; 2023-XX-XXTXX:XX:XX+XX:XX)

Maven home: /usr/local/apache-maven/current

Java version: 17.0.X, vendor: <Java Vendor>, runtime: <Java Runtime Path>

Java home: /Library/Java/JavaVirtualMachines/jdk-17.0.X.jdk/Contents/Home

Default locale: en_US, platform encoding: UTF-8

OS name: "mac os x", version: "13.X.X", arch: "aarch64", family: "mac"
(The version numbers, paths, and OS details will vary based on your installation and system).
If you receive an output indicating the Maven version, congratulations! You have successfully installed Apache Maven. If you encounter an error like “command not found” or “mvn is not recognized,” revisit the environment variable configuration steps, paying close attention to typos and paths.
Beyond Installation: Getting Started with Maven Projects
With Maven successfully installed, you’re ready to start leveraging its power. Here’s a brief introduction to how you might begin using it.
Running Your First Maven Command
The most basic command to check system-level information is mvn -version, which we just used. Another common command is to clean a project:
mvn clean
While this won’t do much without a project, it’s a good way to test that mvn executes properly.
Creating a Simple Maven Project
Maven can generate project archetypes, which are templates for various types of projects. Let’s create a simple “Hello World” Java application.
-
Navigate to your desired project directory:
bash

cd /path/to/your/projects
-
Generate the project using an archetype:
mvn archetype:generate -DgroupId=com.mycompany.app -DartifactId=my-app -DarchetypeArtifactId=maven-archetype-quickstart -DarchetypeVersion=1.4 -DinteractiveMode=false-DgroupId: Defines the unique identifier for your project.-DartifactId: Defines the name of your project artifact (e.g., JAR file).-DarchetypeArtifactId: Specifies the template to use (here, a basic Java project).-DarchetypeVersion: Version of the archetype.-DinteractiveMode=false: Skips interactive prompts.
Maven will download the necessary archetype and create a
my-appdirectory with a standard Maven project structure, including apom.xmlfile, source code, and test code. -
Navigate into the new project directory:
bash

cd my-app
-
Build the project:
mvn packageThis command compiles the source code, runs tests, and packages the compiled code into a JAR file, which you’ll find in the
target/directory. -
Run the application:
bash

java -cp target/my-app-1.0-SNAPSHOT.jar com.mycompany.app.App
You should see “Hello World!” printed to your console.
This simple exercise demonstrates the power of Maven in quickly scaffolding, building, and running a Java application, significantly enhancing developer productivity and allowing you to focus on writing code rather than managing build processes.
Common Pitfalls and Troubleshooting Tips
Even with a detailed guide, you might encounter issues. Here are some common problems and their solutions:
-
“mvn: command not found” or “mvn is not recognized…”:
- Cause: Environment variables (especially
PATH) are not set correctly or haven’t been applied to your current terminal session. - Solution:
- Double-check
M2_HOME(orMAVEN_HOME) and ensure it points to the root of your Maven installation. - Verify that
%M2_HOME%bin(Windows) or$M2_HOME/bin(macOS/Linux) is correctly added to your systemPATH. - Open a new terminal window after making changes.
- On macOS/Linux, run
source ~/.bashrc(or your relevant profile file) to apply changes to the current session.
- Double-check
- Cause: Environment variables (especially
-
“JAVA_HOME is not defined correctly”:
- Cause: Maven cannot find your Java Development Kit.
- Solution:
- Ensure
JAVA_HOMEis set to the correct path of your JDK installation (not JRE). - Verify that
$JAVA_HOME/binis also included in yourPATH. - Run
java -versionandjavac -versionto confirm your JDK setup.
- Ensure
-
Slow downloads or network errors during dependency resolution:
- Cause: Network issues, proxy server blocking, or slow internet connection.
- Solution:
- Check your internet connection.
- If you’re behind a corporate proxy, you might need to configure Maven’s
settings.xmlfile (located in~/.m2/or$M2_HOME/conf/) with your proxy details. Add a<proxy>section within the<proxies>tag. - For large downloads, ensure you have a stable connection.
-
Maven builds fail with specific errors related to dependencies:
- Cause: Corrupted local repository, incorrect dependency versions, or repository access issues.
- Solution:
- Clean local repository: Sometimes, corrupted or incomplete downloads can cause issues. Delete the problematic dependency folder from your local Maven repository (usually
~/.m2/repository/). Maven will re-download it. - Check POM: Carefully review your
pom.xmlfor typos ingroupId,artifactId, andversionof your dependencies. - Update project: Run
mvn clean install -Uto force Maven to update snapshots and releases from remote repositories.
- Clean local repository: Sometimes, corrupted or incomplete downloads can cause issues. Delete the problematic dependency folder from your local Maven repository (usually
By understanding these common issues and their solutions, you can efficiently troubleshoot most Maven installation and configuration problems, ensuring a smooth development experience.
Conclusion
Installing Apache Maven is a fundamental step for any Java developer aiming to build robust, scalable, and maintainable software projects. By following this detailed guide, you’ve successfully set up a powerful tool that standardizes your build processes, intelligently manages dependencies, and significantly boosts your development productivity.
Maven’s convention-over-configuration philosophy not only simplifies project setup but also promotes best practices, leading to more consistent and higher-quality software. For organizations, this translates into tangible benefits: reduced development costs, faster time-to-market, and a stronger brand reputation built on reliable software. For individuals, proficiency in Maven enhances your technical skill set, making you a more valuable asset in the competitive tech job market.
Now that Maven is integrated into your development environment, the next exciting phase is to explore its rich feature set further. Dive into its plugin ecosystem, customize your build processes, and leverage its reporting capabilities. Embrace Maven, and you’ll find your Java development workflow transformed, enabling you to build, test, and deploy applications with unparalleled ease and efficiency. Happy coding!
aViewFromTheCave is a participant in the Amazon Services LLC Associates Program, an affiliate advertising program designed to provide a means for sites to earn advertising fees by advertising and linking to Amazon.com. Amazon, the Amazon logo, AmazonSupply, and the AmazonSupply logo are trademarks of Amazon.com, Inc. or its affiliates. As an Amazon Associate we earn affiliate commissions from qualifying purchases.