In an increasingly digital world, a stable, secure, and high-performing operating system is the bedrock of productivity and digital security. Windows 10, despite the advent of Windows 11, remains a dominant force, powering billions of devices globally. Its reliability and vast ecosystem of applications make it an indispensable tool for both personal and professional use. However, over time, even the most robust systems can become sluggish, cluttered with residual files, and susceptible to performance degradation. This is where a clean installation of Windows 10 becomes not just a technical task, but a strategic move. Far more than just hitting a “reset” button, a fresh install offers a renewed digital canvas, optimizing your device for peak efficiency and bolstering your defenses against digital threats.

This comprehensive guide will walk you through every step of installing Windows 10, ensuring a smooth, error-free experience. Whether you’re upgrading an older system, replacing a faulty drive, or simply seeking to revitalize your current setup, understanding this process is a fundamental skill in maintaining a healthy digital life. We’ll delve into the necessary preparations, the step-by-step installation, crucial post-installation configurations, and even how this seemingly technical task intertwines with broader themes of digital security, productivity, and ultimately, your financial well-being through extended device longevity and enhanced operational efficiency.
Why a Fresh Windows 10 Installation Matters: Reinvigorating Your Digital Foundation
Beyond merely fixing a problem, a clean installation of Windows 10 offers profound benefits that extend across the spectrum of technology, personal brand management, and financial prudence. It’s an investment in your digital future, ensuring your hardware operates at its best and your data remains secure.
Reinvigorating Performance: Beyond the Upgrade
Over months or years of use, a Windows installation accumulates digital debris: temporary files, remnants of uninstalled programs, registry errors, and fragmented data. This digital clutter acts like sand in the gears of your system, slowing down boot times, application launches, and overall responsiveness. While Windows updates and defragmentation tools offer some relief, nothing quite compares to the pristine state of a freshly installed operating system.
A clean install wipes away all accumulated cruft, giving your system a blank slate. This immediately translates into faster performance, snappier application response, and a generally more fluid user experience. For power users, content creators, or even casual browsers, this performance boost can dramatically improve workflow efficiency and reduce frustration, allowing you to focus on tasks rather than waiting for your computer. It maximizes the potential of your existing hardware, often making an old PC feel new again, thus delaying the need for costly hardware upgrades.
Enhanced Security and Stability
Every piece of software installed, every website visited, and every file downloaded introduces potential vulnerabilities or conflicts. Over time, these can lead to system instability, crashes, and an increased risk of malware infections. A clean installation is like hitting a “reset” button on your digital security posture. You start with a pristine operating system, free from lingering malware, hidden vulnerabilities from old software, or corrupted system files.
This provides a robust foundation upon which to build your security layers, ensuring your antivirus and firewall are operating on an uncompromised system. From a digital security perspective, this proactive measure significantly reduces your attack surface. It also ensures greater system stability, minimizing unexpected errors and crashes that can lead to data loss or costly downtime, critical for anyone managing their finances or running an online business where reliability is paramount.
The Productivity Boost of a Clean System
Consider the impact of a slow, unstable computer on your daily productivity. Delays in opening applications, frequent freezes, or unexpected reboots can eat into valuable work time, disrupt creative flows, and diminish overall output. A freshly installed Windows 10 system, optimized for speed and stability, removes these digital roadblocks.
For professionals, a highly responsive system means faster task completion, more efficient multitasking, and the ability to handle demanding applications without bottlenecks. For students, it means quicker research and document creation. For entrepreneurs managing their brand online, it translates to seamless website updates, efficient marketing campaigns, and reliable communication. The time saved and the frustration avoided contribute directly to improved focus and higher quality work, effectively boosting your personal and professional brand by demonstrating efficiency and reliability. This efficiency can have a direct monetary impact, as time saved is money earned, especially in freelancing or business contexts.
Pre-Installation Essentials: Setting the Stage for Success
Before embarking on the installation journey, meticulous preparation is key. Skipping these crucial steps can lead to data loss, installation failures, or unnecessary headaches. Think of this as laying a solid groundwork, ensuring a smooth and successful transition to your revitalized system.
Meeting the System Requirements: A Quick Check
While Windows 10 is designed to run on a wide range of hardware, it’s essential to confirm your system meets the minimum specifications. This prevents compatibility issues and ensures a satisfactory performance post-installation.
- Processor: 1 gigahertz (GHz) or faster compatible processor or System on a Chip (SoC)
- RAM: 1 gigabyte (GB) for 32-bit or 2 GB for 64-bit
- Hard disk space: 16 GB for 32-bit OS or 20 GB for 64-bit OS
- Graphics card: DirectX 9 or later with WDDM 1.0 driver
- Display: 800×600 resolution
Most modern computers surpass these requirements, but it’s always good to double-check, especially for older machines. Ensuring your hardware is up to par also protects your investment in the operating system itself, ensuring you get the most out of its features.
Crucial Data Backup: Don’t Skip This Step!
This is perhaps the single most important step in the entire process. A clean installation will erase everything on the drive where Windows is installed. Back up all your important files, documents, photos, videos, and any other critical data to an external hard drive, USB stick, or a cloud storage service (like OneDrive, Google Drive, or Dropbox).
Consider backing up:
- Personal files: My Documents, My Pictures, My Videos, My Music folders.
- Browser bookmarks: Export them from your web browser.
- Emails: If you use an email client, back up your
.pstor.ostfiles. - Software licenses/keys: Note down any product keys for software you’ll need to reinstall.
- Drivers: While Windows usually finds most drivers, having a backup of specific hardware drivers (especially for network cards) can save time.
Ignoring this step can lead to irreversible data loss, causing immense frustration and potentially significant financial or reputational damage, particularly for businesses or individuals whose data is their livelihood. It’s a non-negotiable part of responsible digital hygiene.
Obtaining Your Windows 10 License Key
Before you begin, make sure you have your Windows 10 product key.
- If you purchased Windows 10: The key is usually on a sticker, in an email, or within your Microsoft account.
- If your PC came with Windows 10 pre-installed: The key is often embedded in the BIOS/UEFI firmware, and Windows will automatically activate after installation.
- If you upgraded from Windows 7/8/8.1: Your device likely has a digital license linked to your Microsoft account. You can often skip entering a key during installation and log in with your Microsoft account later to activate.
Having your key ready prevents delays and ensures your system is properly activated, validating your investment in the software. Without activation, your system will be limited in functionality, hindering productivity.
Creating Your Installation Media: USB Drive or DVD
To install Windows 10, you’ll need bootable installation media. Microsoft provides an official tool for this.
- Download the Media Creation Tool: Visit the official Microsoft Windows 10 download page.
- Run the tool: Accept the terms and choose “Create installation media (USB flash drive, DVD, or ISO file) for another PC.”
- Select Language, Architecture, and Edition: Ensure these match your desired installation.
- Choose Media Type:
- USB flash drive: Requires a USB drive with at least 8 GB of space. This is generally faster and more convenient than DVDs.
- ISO file: If you want to burn it to a DVD later or use it in a virtual machine.
- Follow the prompts: The tool will download the Windows 10 image and create your bootable media.
This step is critical as it provides the operating system files required for installation. A properly created bootable drive ensures the process starts smoothly, avoiding potential tech support costs down the line.
The Step-by-Step Installation Process: Your Digital Rebirth
With your preparations complete, it’s time to dive into the core installation. This section guides you through each prompt and decision point, turning a complex process into manageable steps.
Booting from Your Installation Media
- Insert the USB drive or DVD: Plug your created media into your computer.
- Restart your PC: As it starts, you’ll need to enter the BIOS/UEFI settings or a boot menu to tell your computer to boot from the USB/DVD instead of your hard drive.
- Common keys for BIOS/UEFI: Del, F2, F10, F12 (Varies by manufacturer; check your PC’s manual or look for on-screen prompts during boot).
- Within BIOS/UEFI, navigate to the “Boot Order” or “Boot Priority” section and set your USB drive or DVD-ROM drive as the first boot device.
- Save and Exit: Your PC will restart and boot from the installation media. You might see a “Press any key to boot from CD or DVD…” message. Press a key to proceed.
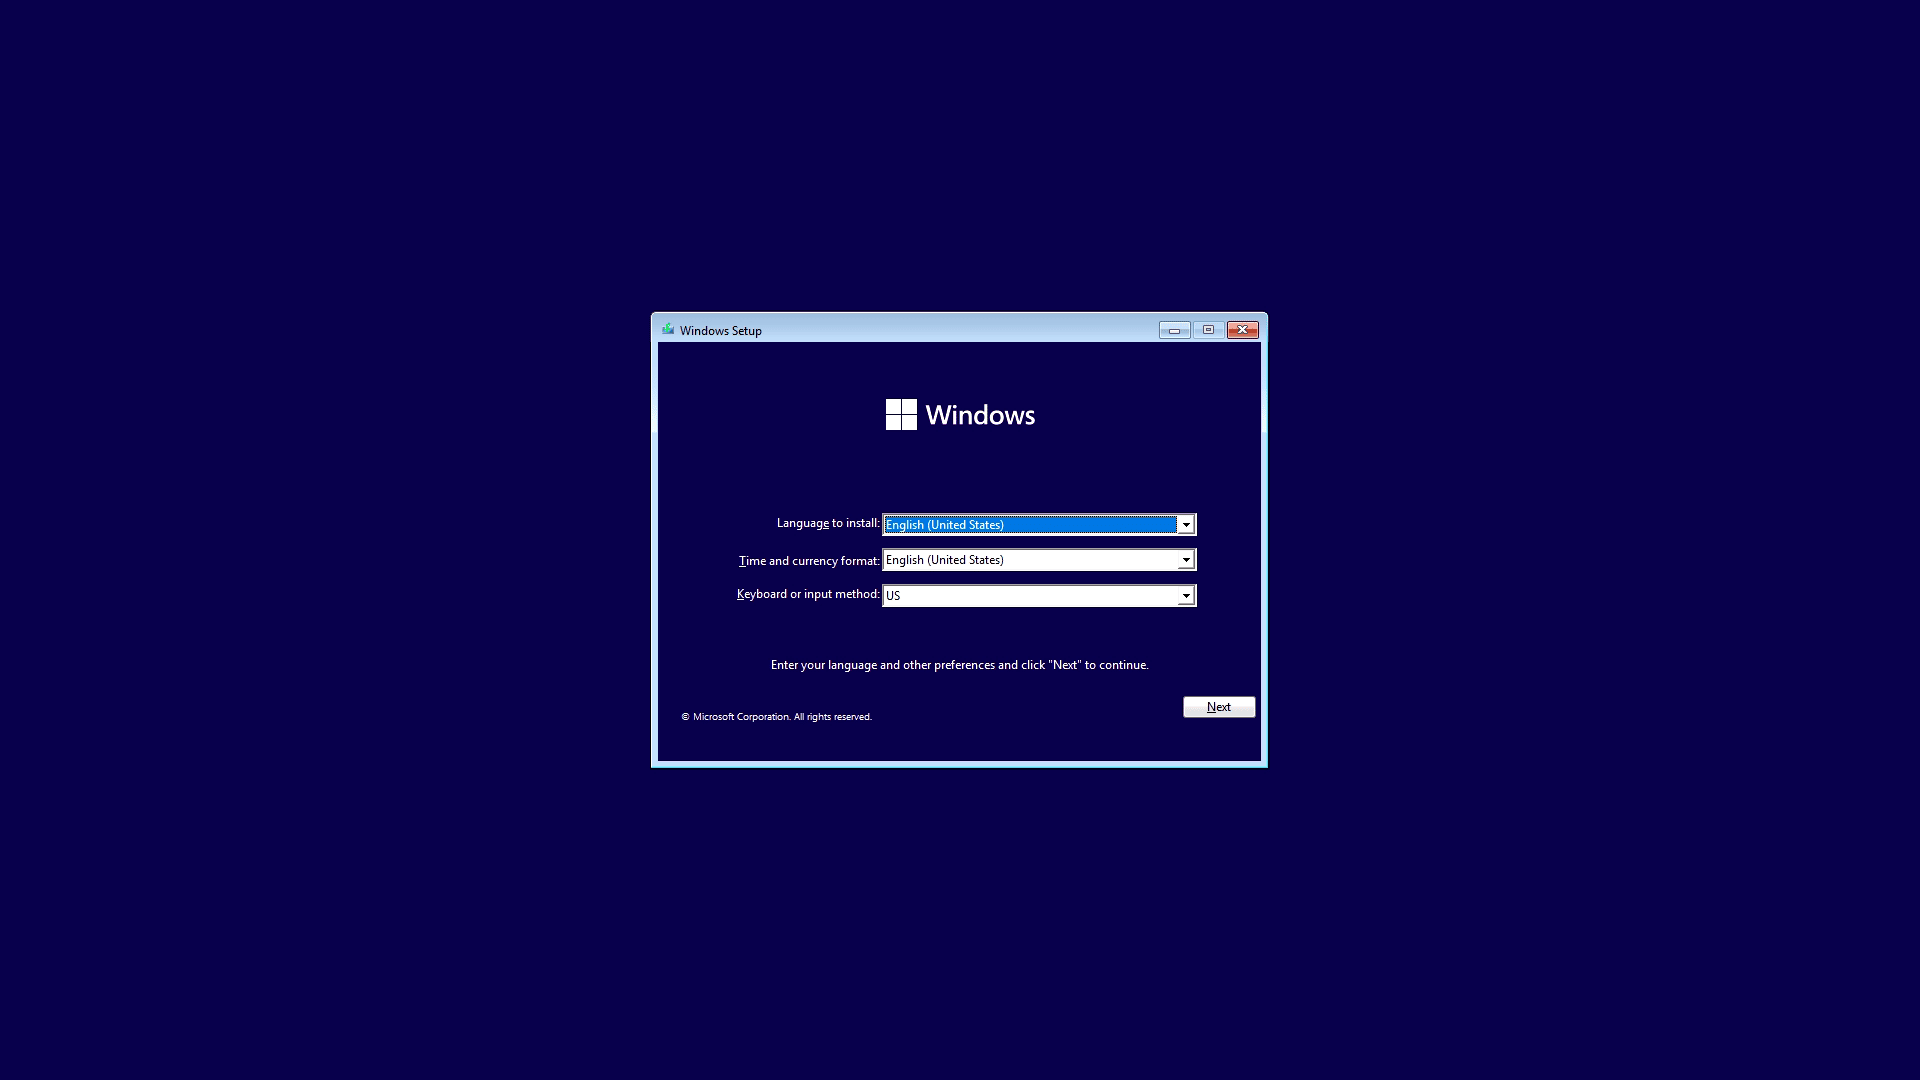
Navigating the Windows Setup Wizard: Language, Time, and Keyboard
The first screen you’ll encounter is the Windows Setup wizard.
- Language to install: Select your preferred language.
- Time and currency format: Choose your region.
- Keyboard or input method: Select your keyboard layout.
- Click “Next,” then “Install now.”
Entering Your Product Key (Or Choosing to Do It Later)
- A window will ask for your product key. If you have it, enter it now.
- If you have a digital license (e.g., from an upgrade) or plan to activate later, click “I don’t have a product key.” Windows will install but won’t be activated until you provide a key or link your Microsoft account. While you can proceed without a key, it’s wise to ensure activation after installation to access all features and maintain full system functionality, an essential aspect of leveraging your tech investment.
Choosing the Right Installation Type: Upgrade vs. Custom (Clean Install)
This is a critical decision.
- Upgrade: This option keeps your files, settings, and applications. However, it’s not a true clean install and may carry over existing issues. We are aiming for a clean install.
- Custom: Install Windows only (advanced): This is the option you want for a clean installation. It will erase all data on the selected drive partition. Select this and click “Next.”

Disk Partitioning and Drive Selection: A Critical Decision
This step allows you to manage your hard drive space.
- You will see a list of drives and partitions. Identify the drive where you want to install Windows 10. This is usually “Drive 0” if you have one main drive.
- Delete existing partitions: To perform a truly clean install, select each partition on the target drive (e.g., “Drive 0 Partition 1,” “Drive 0 Partition 2,” etc.) and click “Delete.” This will combine all space into “Drive 0 Unallocated Space.”
- CAUTION: Ensure you are deleting partitions only on the correct drive. Deleting partitions on an incorrect drive will lead to permanent data loss on that drive.
- Create a new partition: Select the “Drive 0 Unallocated Space” and click “New.” You can choose the size of your Windows partition (usually the full available space is fine). Windows will automatically create additional small system partitions.
- Select your main partition: Choose the largest partition (typically “Drive 0 Partition X” of type “Primary”) and click “Next” to begin the installation.
The Installation Unfolds: Patience is Key
Once you click “Next,” Windows will begin copying files and installing features. This process is largely automatic and can take anywhere from 15 minutes to an hour or more, depending on your system’s speed. Your computer will restart several times during this phase. Do not turn off your computer or remove the installation media until prompted.
Initial Setup: Account Creation and Privacy Settings
After the core installation, Windows 10 will guide you through initial setup questions.
- Region and Keyboard Layout: Confirm your choices.
- Network Connection: Connect to your Wi-Fi or Ethernet.
- Microsoft Account vs. Offline Account:
- Microsoft Account: Recommended for full functionality (OneDrive sync, Store apps, digital license linking).
- Offline Account (Local Account): If you prefer not to use a Microsoft account. You can always link one later.
- Create a PIN: For quick sign-ins.
- Privacy Settings: Carefully review and adjust these. Microsoft collects various data for diagnostics and personalized experiences. Choose what you’re comfortable sharing. This is a crucial step for maintaining digital security and protecting your personal brand’s data.
Post-Installation Checklist: Optimizing Your New System
The installation isn’t truly complete until you’ve taken these vital steps to ensure your system is fully functional, secure, and personalized. These steps are crucial for extracting maximum value from your clean installation, transforming it into a high-performance workspace.
Installing Essential Drivers: Unlocking Full Potential
While Windows 10 comes with many generic drivers, installing manufacturer-specific drivers is essential for optimal performance, especially for graphics cards, chipsets, network adapters, and specialized peripherals.
- Check Device Manager: Right-click the Start button, select “Device Manager.” Look for any devices with yellow exclamation marks.
- Visit Manufacturer Websites: Go to the support or download section of your computer or component manufacturer (e.g., Dell, HP, ASUS, NVIDIA, AMD, Intel). Download the latest drivers for your specific model.
- Start with Network Drivers: If your internet isn’t working, you’ll need to install network drivers first, perhaps using another device to download them to a USB stick.
- Install Graphics Drivers: Crucial for display performance and gaming.
- Install Chipset Drivers: For motherboard functionality.
Proper drivers ensure all hardware components communicate efficiently, boosting overall system stability and performance – a direct return on your time investment in the clean install.
Running Windows Updates: Staying Secure and Current
Immediately after installation, run Windows Update to download and install the latest security patches, bug fixes, and feature updates.
- Go to Settings > Update & Security > Windows Update.
- Click “Check for updates” and install everything available.
- Restart your PC as prompted and repeat the process until no more updates are found.
Keeping your system updated is fundamental for digital security. Microsoft regularly releases patches to close vulnerabilities that attackers could exploit. Neglecting updates is an open invitation for malware and can compromise your data, potentially harming your brand reputation and leading to financial losses.
Restoring Your Data and Personalizing Your Desktop
Now is the time to bring your personal touch back.
- Restore your backed-up files: Copy your documents, photos, and other personal data back to their respective folders.
- Personalize: Set your desktop background, theme, sound schemes, and Start menu layout.
- Browser Setup: Reinstall your preferred web browser and import your bookmarks.
This step transforms your generic Windows installation into your familiar, efficient workspace, making the transition seamless and restoring your personal brand’s digital environment.
Essential Software Installation: Your Daily Drivers
Finally, reinstall all the applications you regularly use.
- Productivity Suites: Microsoft Office, LibreOffice, etc.
- Communication Tools: Zoom, Slack, Skype.
- Creative Software: Photoshop, AutoCAD, video editors.
- Security Software: Antivirus (if you choose one beyond Windows Defender).
- Utilities: Compression software, PDF readers, etc.
Prioritize applications that are critical for your work or daily tasks. This brings your system to full operational readiness, ensuring productivity isn’t hampered by missing tools.
Troubleshooting Common Installation Hurdles
Even with careful preparation, issues can sometimes arise. Knowing how to address common problems can save time and frustration, reinforcing your tech self-sufficiency.
Boot Issues and Disk Errors
- “No bootable device found”: Double-check your BIOS/UEFI boot order. Ensure your installation media is properly connected and recognized.
- Disk partitioning errors: If you encounter errors during disk partitioning, try using the
diskpartcommand from the installation media’s command prompt (Shift + F10) to clean the drive completely before attempting partitioning again. (Uselist disk,select disk X,clean– use with extreme caution!) - Hardware failures: Persistent boot issues or BSODs not related to software might indicate a failing hard drive or RAM.
Activation Problems
- “Windows isn’t activated”: Ensure you’re connected to the internet. If you used a Microsoft account, verify it’s the one linked to your digital license. If using a product key, re-enter it carefully. For persistent issues, Microsoft’s activation troubleshooter (Settings > Update & Security > Activation) can help.
Driver Conflicts
- Black screen after driver install: Boot into Safe Mode (during startup, press F8 or Shift + F8; you might need to force-restart twice to get recovery options), uninstall the problematic driver, and try an older version or a generic driver.
- Peripheral not working: Ensure the correct driver is installed from the manufacturer’s website.
The Long-Term Benefits: Maximizing Your Windows 10 Experience
A clean Windows 10 installation is not a one-time fix but the beginning of a revitalized digital journey. By understanding its long-term implications, you can maximize your investment and ensure continued peak performance.
Maintaining System Health: A Proactive Approach
The benefits of a clean install can be extended indefinitely with good maintenance practices.
- Regular Updates: Keep Windows and all your applications updated.
- Sensible Software Installation: Only install software you truly need, avoiding bloatware.
- Disk Cleanup: Use Windows’ built-in Disk Cleanup tool or storage sense to remove temporary files periodically.
- Antivirus and Malware Scans: Regularly scan your system to catch threats early.
- Regular Backups: Continue to back up your critical data consistently.
Proactive maintenance prevents the slow degradation that necessitates another clean install, saving time and potential tech support costs in the long run.
Understanding Your Investment: ROI on System Performance
View your clean Windows 10 installation as a strategic investment. The time and effort spent on setup translate into:
- Extended Hardware Lifespan: A well-maintained OS puts less strain on hardware, potentially delaying the need for new device purchases. This is a clear financial benefit, making your tech investments last longer.
- Improved Productivity: Faster load times, stable operation, and fewer crashes mean more efficient work and less wasted time, directly impacting your earnings or academic performance.
- Enhanced Security: A secure system protects your valuable data and digital assets, mitigating the financial risks associated with breaches or data loss.
This holistic perspective highlights that good tech practices are intrinsically linked to sound financial management and the successful cultivation of a reliable personal or professional brand.
Future-Proofing Your Digital Workspace
While Windows 11 is out, Windows 10 remains fully supported and a highly capable operating system. A clean installation optimizes its performance, ensuring your system can handle current and near-future software demands. It makes your digital workspace more resilient, adaptable, and ready for whatever technological advancements come next. This preparedness underscores a forward-thinking approach to technology, reinforcing a positive brand image and ensuring your digital tools remain assets, not liabilities.
By diligently following this guide, you will not only master the technical aspects of installing Windows 10 but also gain a deeper appreciation for how this fundamental task contributes to a more secure, productive, and financially savvy digital existence. Embrace the power of a fresh start, and enjoy a revitalized Windows 10 experience.
aViewFromTheCave is a participant in the Amazon Services LLC Associates Program, an affiliate advertising program designed to provide a means for sites to earn advertising fees by advertising and linking to Amazon.com. Amazon, the Amazon logo, AmazonSupply, and the AmazonSupply logo are trademarks of Amazon.com, Inc. or its affiliates. As an Amazon Associate we earn affiliate commissions from qualifying purchases.