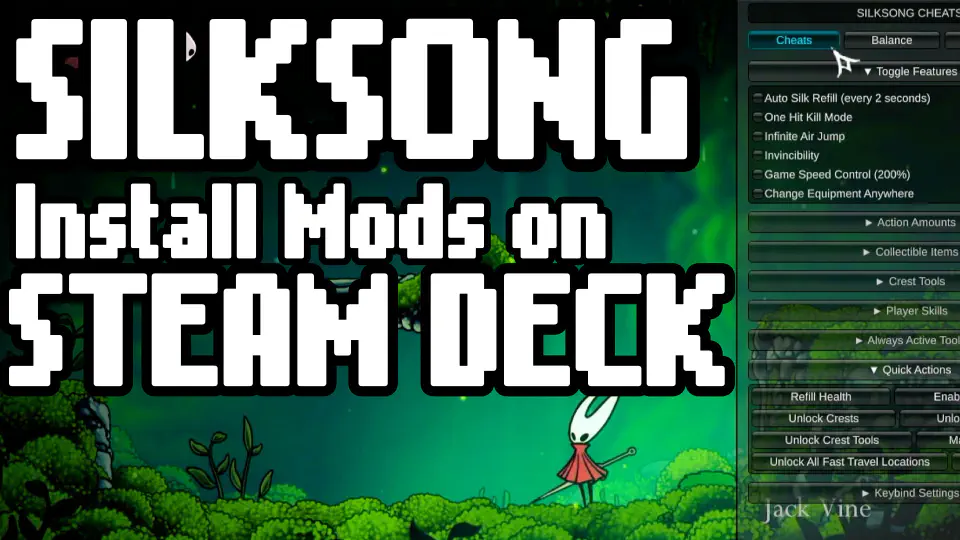
The Steam Deck has revolutionized portable PC gaming, offering a powerful handheld experience that blurs the lines between console and computer. While Valve’s portable powerhouse delivers an incredible out-of-the-box experience, the true magic for many PC gamers lies in customization – specifically, installing mods. Modding allows you to enhance graphics, introduce new gameplay mechanics, fix lingering bugs, or even completely transform your favorite titles. It unlocks a level of personalization that no console can match, extending the life and appeal of your game library far beyond its vanilla state.
However, modding on the Steam Deck presents a unique set of challenges compared to a traditional Windows desktop PC. The Steam Deck runs on SteamOS, a Linux-based operating system, which means familiar Windows-centric modding tools and file paths often require workarounds. This guide will walk you through the intricacies of installing mods on your Steam Deck, from basic manual file placement to leveraging advanced tools, ensuring you can unlock the full potential of your portable gaming experience. Get ready to transform your Steam Deck into the ultimate modding machine.

Unlocking Your Steam Deck’s Potential: Understanding Modding on SteamOS
Before diving into the technical steps, it’s crucial to understand why modding on the Steam Deck is both immensely rewarding and sometimes a bit more involved than on a typical Windows machine. This section will lay the groundwork, explaining the benefits and the foundational differences you’ll encounter.
Why Mod Your Steam Deck? Beyond Vanilla Gaming
The allure of modding is multifaceted, offering a range of enhancements that can dramatically alter and improve your gaming experience. For the Steam Deck, these benefits are even more pronounced, as mods can push the handheld’s capabilities and extend its longevity.
- Enhanced Visuals: Many older games, while classics, show their age graphically. Mods can introduce high-resolution textures, improved lighting, realistic weather effects, and even entirely new character models, breathing new life into familiar worlds. Imagine playing a visually stunning Skyrim or Fallout on the go, a feat once reserved for high-end gaming rigs.
- Expanded Gameplay: Mods aren’t just cosmetic. They can introduce new quests, characters, weapons, spells, or even entirely new game modes. From robust economy overhauls in RPGs to quality-of-life improvements that streamline inventory management, these additions can fundamentally change how you interact with a game. This continuous innovation from the modding community ensures that even games released years ago remain fresh and engaging.
- Bug Fixes and Performance Optimizations: Sometimes, official patches don’t quite catch every bug or optimize performance perfectly. Modders often step in to create unofficial patches that address these shortcomings, leading to a more stable and enjoyable experience. For the Steam Deck, performance-focused mods can be particularly beneficial, allowing you to squeeze more frames or improve graphical fidelity within the device’s thermal and power constraints.
- Personalization and Role-Playing: Modding empowers you to tailor games to your specific preferences. Want to play as a different race, customize your player home beyond official options, or experience a completely alternate storyline? Mods make it possible, transforming games into true digital sandboxes.
- Extending Game Lifespan: For many, mods are the reason they return to games years after release. The continuous influx of community-created content ensures that beloved titles remain relevant and offer fresh experiences, maximizing the value of your game purchases and keeping your Steam Deck library vibrant. This aligns perfectly with the ‘Tech Trends’ aspect of keeping technology relevant and user-centric.
Navigating the SteamOS Environment: A Linux Primer for Modders
The biggest hurdle for Windows users transitioning to Steam Deck modding is SteamOS itself. It’s built on Arch Linux, which has a different file system structure and handles applications differently than Windows. Understanding these fundamental differences is key to successful modding.
- File System Hierarchy: Unlike Windows, where drives are designated by letters (C:, D:), Linux uses a unified file system hierarchy starting from the root directory (
/). Your Steam Deck’s internal storage typically resides under/home/deck/. Crucially, Steam games and their associated Proton prefixes (the compatibility layer that allows Windows games to run on Linux) are stored in hidden directories. - Proton and Compatibility Layers: Most Windows games on your Steam Deck run through Proton, a compatibility layer developed by Valve. When a Windows game is installed, Proton creates a “prefix” for it, essentially a simulated Windows environment within your Linux system. This prefix contains a virtual
C:drive,Program Files (x86)folders, and all the necessary Windows registry entries and DLLs for the game to function. When installing mods, you’ll almost always be interacting with these virtual Windows directories inside the Proton prefix, not the native Linux file system directly. - Permissions: Linux has a robust permissions system. If you encounter issues copying files, it might be related to insufficient permissions. While typically not an issue for files within your user’s home directory, it’s something to be aware of.
- Terminal and Commands: While this guide aims to minimize command-line usage, understanding that Linux operations can often be performed via a terminal (Konsole in SteamOS Desktop Mode) is valuable. Many modding guides or troubleshooting tips might refer to Linux commands, which can seem daunting but are often straightforward copy-paste operations.
- Software Repositories and Flatpaks: Instead of
.exeinstallers, Linux users typically install software from package managers or, on SteamOS, often via Flatpaks (applications bundled with all their dependencies). The Discover Software Center in Desktop Mode is your primary source for installing Linux applications like ProtonUp-Qt, Lutris, or Bottles.
Embracing these differences rather than fighting them is the first step toward becoming a proficient Steam Deck modder.
Preparing Your Deck for the Modding Journey: Essential Prerequisites
Before you can start dropping files and tinkering with game configurations, a few preparatory steps are essential. These steps will ensure you have the right environment and tools to make the modding process as smooth as possible.
Setting Up Your Workspace: Desktop Mode and Peripherals
The Steam Deck’s Game Mode is optimized for playing, but modding requires the flexibility of a traditional desktop environment.
- Switch to Desktop Mode: This is paramount. Hold down the Power button, select “Switch to Desktop.” This will boot you into a KDE Plasma desktop environment, complete with a taskbar, file manager (Dolphin), and web browser.
- External Peripherals (Highly Recommended): While you can navigate Desktop Mode using the trackpads and on-screen keyboard, it’s cumbersome for file management and web browsing.
- USB-C Hub: A crucial accessory. This allows you to connect a wired or wireless keyboard and mouse, and often provides additional USB ports, HDMI out (for a larger monitor), and power delivery.
- Keyboard and Mouse: Essential for precision clicking, text input, and navigating complex folder structures. A wireless dongle for a combo keyboard/mouse is often the simplest setup.
- External Monitor (Optional): While not strictly necessary, connecting to a larger monitor significantly improves visibility and makes multitasking (e.g., following a guide while installing mods) much easier.
Having a comfortable and efficient workspace will save you a lot of frustration during the modding process. It transforms the handheld into a mini-PC, mirroring the experience of modding on a desktop.
Locating Game Files: The Heart of Your Modding Endeavor
Finding the correct game installation directory is arguably the most critical step in modding, as misplaced files will simply not work. Due to the Proton compatibility layer, game files aren’t where you might intuitively expect them.
- Identify the Game ID: Every game on Steam has a unique numerical ID. To find it, switch back to Game Mode, select the game you want to mod, go to its settings (gear icon) > “Manage” > “Properties.” The Game ID will often be visible in the URL if you view the game’s store page in a browser, or you can find it by right-clicking the game in Steam on Desktop mode and selecting ‘Browse local files’ (though this might only take you to the Proton prefix root).
- A more reliable way in Desktop Mode: Open Steam, right-click the game, select “Properties,” go to “Local Files,” and click “Browse…” This should open the game’s actual folder inside its Proton prefix.
- Navigate to the
compatdataDirectory: If the “Browse local files” option doesn’t work or you want to understand the structure, you’ll need to manually navigate to the Proton prefix.- Open Dolphin File Manager (the blue folder icon in Desktop Mode).
- In the address bar, type or navigate to:
/home/deck/.steam/steam/steamapps/compatdata/ - Note: The
.steamfolder is hidden. You might need to click the hamburger menu (three horizontal lines) in Dolphin and select “Show Hidden Files” to see it. - Inside
compatdata, you’ll find numerous folders named with numerical IDs. Find the folder corresponding to your game’s ID.
- Explore the Proton Prefix: Inside your game’s ID folder, you’ll find a
pfxfolder. This is the heart of its virtual Windows environment.- Navigate into
pfx/drive_c/. - From here, the structure will look exactly like a Windows C: drive:
Program Files (x86)/Steam/steamapps/common/<GameName>/. - Example Path for Skyrim Special Edition:
/home/deck/.steam/steam/steamapps/compatdata/489830/pfx/drive_c/Program Files (x86)/Steam/steamapps/common/Skyrim Special Edition/(where489830is Skyrim SE’s Game ID).
- Navigate into
Bookmark these locations or add shortcuts in Dolphin for easy access. Knowing precisely where your game files reside is the foundation for all subsequent modding steps.
Mod Installation Methods: From Manual Control to Advanced Managers
With your Steam Deck prepared, it’s time to delve into the actual process of installing mods. This section covers various methods, from straightforward manual placement to more complex solutions involving external tools and compatibility layers.
The Manual Approach: Direct File Placement
Many simpler mods, especially those that involve replacing textures, adding custom configuration files, or minor script injections, can be installed manually. This method gives you direct control but requires careful attention to detail.
- Download Mods from Trusted Sources: Always acquire mods from reputable websites.
- Nexus Mods (nexusmods.com): The largest and most popular modding community, especially for single-player RPGs like Skyrim, Fallout, Cyberpunk, and Witcher. Requires a free account.
- ModDB (moddb.com): Another excellent source, often featuring larger total conversions and mods for a broader range of games.
- Steam Workshop: For games that natively support it, the Steam Workshop is the easiest method. Subscribe to mods directly from the game’s workshop page in Steam (either Desktop or Game Mode), and they’ll usually download and integrate automatically. However, many complex mods are not available here.
- Caution: Exercise discretion when downloading files from unknown sources. Malicious software can sometimes be disguised as mods. Stick to well-known sites with active communities and user reviews. This echoes the ‘Digital Security’ aspect of our website topics.
- Extract Mod Files: Downloaded mods are typically compressed in
.zip,.rar, or.7zformats.- In Desktop Mode, right-click the downloaded archive file.
- Select “Extract Archive Here” (or similar option provided by Ark, the default archive manager on SteamOS).
- This will create a new folder containing the mod’s actual files.
- Read Mod Instructions Carefully: This step is paramount. Every mod is different. Its creator will provide instructions on where to place the files. These instructions might say “copy to your game’s Data folder,” “replace files in the main game directory,” or “install using a mod manager.” Pay close attention to these details.
- Copy Files to the Game Directory:
- Open two Dolphin windows: one for your extracted mod files and one for your game’s installation directory (as found in the previous section, e.g.,
Program Files (x86)/Steam/steamapps/common/<GameName>/). - Drag and drop or copy/paste the mod files into the specified location within your game’s directory.
- If prompted to replace files, confirm, especially if the mod intends to overwrite vanilla assets.
- Open two Dolphin windows: one for your extracted mod files and one for your game’s installation directory (as found in the previous section, e.g.,
- Test the Game: After installing each mod or a small batch of mods, launch the game to ensure it runs correctly and the mods are active. This incremental approach helps you identify conflicts or issues quickly.
Embracing Mod Loaders and Script Extenders
For more complex games like Skyrim, Fallout, or Grand Theft Auto V, many mods rely on “mod loaders” or “script extenders” (e.g., SKSE for Skyrim, Script Hook V for GTA V). These are separate utilities that inject code into the game’s executable at runtime, allowing mods to do things the vanilla game never intended.
- Purpose: They provide a framework for more sophisticated mods, enabling deep changes to gameplay mechanics, UI, and scripting.
- Installation: These tools usually involve copying specific files (often
.dlland.exefiles) directly into your game’s main directory. Crucially, they often require you to launch the game through their specific executable (e.g.,skse64_loader.exeinstead ofSkyrimSE.exe). - Running on Steam Deck: Since these loaders are Windows executables, they must also run through Proton.
- After copying the loader files to your game directory, go back to Steam (in Desktop Mode).
- Right-click your game > “Properties” > “General.”
- In the “Launch Options” field, you’ll need to specify the path to the mod loader’s executable relative to the game’s root directory, usually preceded by
eval %command%. For example:eval %command% -sksefor Skyrim oreval %command% -launcherif the loader has its own launcher. - Alternatively, you can add the mod loader executable as a “Non-Steam Game” in Steam, then configure it to launch through the same Proton prefix as your main game. This is more complex but can offer more control.
This is where modding on Steam Deck starts to get a bit more intricate, requiring a good understanding of Proton and launch commands.
Advanced Modding with ProtonGE and External Tools (Lutris/Bottles)
For the most demanding modding scenarios, or when native Linux support for Windows mod managers is absent, you’ll need to bring in more powerful tools.
ProtonGE: Enhanced Compatibility for Tricky Mods
ProtonGE (Proton GloriousEggroll) is a community-maintained fork of Valve’s Proton. It often includes newer multimedia codecs, patches, and libraries that aren’t yet in official Proton builds, making it indispensable for specific games or mods that rely on these components.
- Why use it? Some mods might cause crashes or graphical glitches with standard Proton due to missing dependencies. ProtonGE frequently resolves these issues, especially for games with complex video codecs or DRM schemes.
- Installation:
- Switch to Desktop Mode.
- Open the Discover Software Center.
- Search for “ProtonUp-Qt” and install it. This is a fantastic utility for managing ProtonGE versions.
- Launch ProtonUp-Qt, select “Add a version,” choose the latest ProtonGE version, and click “Install.”
- Applying ProtonGE:
- Switch back to Game Mode.
- Select the game you want to mod.
- Go to its settings (gear icon) > “Properties” > “Compatibility.”
- Check “Force the use of a specific Steam Play compatibility tool.”
- From the dropdown, select the ProtonGE version you just installed (e.g., “Proton-GE-8-25”).
- Launch the game.
ProtonGE can be a lifesaver for stubborn mods, providing the necessary compatibility layer for them to run smoothly.
Lutris and Bottles: Managing Windows Mod Managers on Linux
For games with hundreds of mods or intricate load orders (think Fallout: New Vegas with a dozen texture packs and quest mods), a dedicated mod manager like Vortex or Mod Organizer 2 (MO2) is essential. However, these are Windows applications. Lutris and Bottles provide elegant solutions to run them on your Steam Deck.
- Lutris: An open-source gaming platform for Linux that helps you manage, install, and run games from various sources, including Steam, GOG, Epic Games Store, and emulators. It excels at creating isolated “runners” or “wine prefixes” where you can install Windows applications.
- Installation: Install Lutris from the Discover Software Center.
- Usage (Simplified): You can install a game or even a “Windows application” runner through Lutris. Within this runner’s environment, you can then install Vortex or MO2. This separates the mod manager from your main Steam game installation, offering a cleaner environment. You’ll then configure the mod manager to point to your Steam game’s Proton prefix. This is an advanced topic that often requires specific community guides for individual games and mod managers.
- Bottles: A newer, more user-friendly alternative to Lutris for managing Wine/Proton environments (called “Bottles”). It’s simpler for creating distinct “bottles” for different Windows applications.
- Installation: Install Bottles from the Discover Software Center.
- Usage (Simplified): Create a new “Gaming” bottle. Within this bottle, you can install a mod manager like Vortex. The mod manager will then operate within this isolated environment, allowing you to manage mods for your Steam games. Bottles provides a cleaner GUI and is often recommended for those new to Linux Wine environments.
Using Lutris or Bottles for mod managers is often the most robust solution for heavily modded games, allowing you to handle complex load orders, detect conflicts, and easily enable/disable mods. However, it represents the most advanced tier of modding on the Steam Deck and typically involves a steeper learning curve. It’s an excellent example of using sophisticated ‘Software’ and ‘AI Tools’ (if considering the underlying logic of Proton) to enhance ‘Productivity’ in gaming.
Troubleshooting and Best Practices for a Seamless Modding Experience
Modding is an art, not an exact science. You’re altering game files in ways the developers didn’t intend, so encountering issues is part of the journey. However, by following best practices and knowing common troubleshooting steps, you can minimize frustration and maximize your enjoyment.
Common Pitfalls and Solutions
- Game Crashes on Launch or During Gameplay:
- Conflict: The most common cause. Two or more mods are trying to alter the same game asset or script in incompatible ways.
- Solution: Disable recently installed mods one by one to identify the culprit. Check mod compatibility patches.
- Incorrect Load Order: For games with many mods, the order in which they load matters.
- Solution: If using a mod manager, optimize the load order (e.g., LOOT for Skyrim/Fallout). Manually, ensure dependent mods load after their masters.
- Missing Dependencies: A mod requires another mod or a specific game version to function.
- Solution: Read the mod description thoroughly to ensure all prerequisites are met.
- Memory Issues: Over-modding can exceed available RAM, especially on the Steam Deck.
- Solution: Reduce the number of very high-resolution texture mods, or lower in-game graphics settings to free up VRAM.
- Mods Not Appearing/Working:
- Incorrect File Path: Files are not in the exact location the game or mod loader expects.
- Solution: Double-check your manual installation steps and game directory navigation. Ensure hidden files are visible.
- Mod Loader Not Running: If using SKSE, Script Hook V, etc., ensure you’re launching the game through the loader’s executable and that it’s configured correctly in Steam’s launch options.
- Proton/Compatibility Issues: The specific Proton version might not be compatible with the mod or loader.
- Solution: Try a different ProtonGE version.
- Performance Dips:
- Over-modding: Too many graphically intensive mods can strain the Steam Deck’s hardware.
- Solution: Prioritize performance-friendly mods, reduce texture resolutions, disable demanding visual effects.
- Game Updates Break Mods:
- Solution: This is inevitable. When a game updates, its files change, often rendering mods incompatible. Wait for mod authors to update their mods or for mod loader developers to release new versions. Always back up your saves before updating a game if you have mods installed.
Safeguarding Your Setup: Backups and Smart Modding Habits
Prevention is always better than cure. Adopting smart modding habits will save you countless hours of troubleshooting.
- Backup Your Saves! This cannot be stressed enough. Before installing any new mods, especially those that alter game mechanics or saves, copy your save files to a safe location (e.g., a separate folder on your Deck, a cloud drive, or an SD card). Most save files are located within the game’s Proton prefix, typically under
pfx/drive_c/users/steamuser/Documents/My Games/<GameName>/Saves. - Backup Vanilla Game Files (Optional but Recommended): For critical game files that mods might overwrite, consider making a copy of the original files before replacing them. This allows for a quick rollback if a mod causes irreversible issues.
- Read Mod Descriptions and Comments Thoroughly: Before downloading, read everything. Look for installation instructions, compatibility notes, known issues, and user feedback. The comments section is a goldmine for troubleshooting tips specific to that mod.
- Install Mods Incrementally: Don’t install 50 mods at once. Start with one or two, test them extensively, then add more. This makes it much easier to pinpoint the source of a problem.
- Follow Established Community Guides: For highly modded games, dedicated community wikis or video guides often provide step-by-step instructions for modding on Linux or Steam Deck. Leverage this collective knowledge.
- Engage with the Modding Community: If you encounter an issue, search forums (Nexus Mods, Reddit communities like r/SteamDeck or r/Linux_Gaming). Chances are, someone else has faced and solved the same problem.
- Stay Organized: Keep your downloaded mod archives in a dedicated folder. Rename them if necessary for easier identification. This makes it easier to track what you’ve installed. This ties into ‘Productivity’ by streamlining your digital workflow.
Conclusion
Modding your Steam Deck is a journey into the heart of PC gaming customization. While the Linux-based SteamOS introduces a few extra steps compared to Windows, the rewards are immense. From breathtaking graphical overhauls and expansive new content to vital bug fixes and personalized gameplay, mods allow you to continually reinvent your favorite titles and extend their lifespan far beyond what their developers originally envisioned.
This guide has walked you through the essential steps: understanding the SteamOS environment, preparing your Deck, employing manual installation methods, leveraging powerful tools like ProtonGE, and navigating the complexities of mod managers through Lutris or Bottles. While it requires patience and a willingness to learn, the satisfaction of playing a perfectly curated, heavily modded game on the go is unparalleled. Embrace the tinkering, follow best practices, and enjoy a truly unique and personalized gaming experience on your Steam Deck. The world of modding awaits, ready to transform your handheld into an even more extraordinary gaming companion.
aViewFromTheCave is a participant in the Amazon Services LLC Associates Program, an affiliate advertising program designed to provide a means for sites to earn advertising fees by advertising and linking to Amazon.com. Amazon, the Amazon logo, AmazonSupply, and the AmazonSupply logo are trademarks of Amazon.com, Inc. or its affiliates. As an Amazon Associate we earn affiliate commissions from qualifying purchases.