In today’s digitally interconnected world, a reliable and efficient web browser is an indispensable tool. While macOS comes with its own robust browser, Safari, many users find themselves drawn to the widespread popularity, extensive features, and cross-platform compatibility offered by Google Chrome. Whether you’re a student needing seamless integration with Google Workspace, a developer testing web applications, or simply someone who prefers the Chrome ecosystem, installing this powerful browser on your Mac is a straightforward process. This guide will walk you through every step, from downloading the installer to understanding its key features and benefits, ensuring you can get up and running with Google Chrome on your Mac in no time.

The decision to install Chrome on a Mac often stems from various practical considerations. For many, it’s about syncing their browsing data – bookmarks, history, passwords, and extensions – across multiple devices. If you use Chrome on your iPhone, iPad, or Windows PC, having it on your Mac creates a unified and fluid digital experience. Furthermore, Chrome is renowned for its vast library of extensions, which can dramatically enhance productivity, customize your browsing experience, and offer specialized tools for everything from academic research to graphic design. Beyond individual preferences, businesses and educational institutions might standardize on Chrome for its compatibility with web-based applications and its managed deployment options.
The beauty of installing software on a Mac, especially popular applications like Google Chrome, lies in the simplicity of the macOS operating system. Apple has designed its platform to be intuitive, and the process of acquiring and installing new applications is generally user-friendly. You won’t need to delve into complex command lines or registry edits, as is sometimes the case on other operating systems. The primary method involves downloading an installer file from the official Google website and then running it through a guided setup.
Downloading and Installing Google Chrome
The journey to having Google Chrome on your Mac begins with obtaining the correct installer file. This is a critical first step, and it’s always recommended to download software directly from the developer’s official website to ensure you’re getting a legitimate and malware-free version. For Google Chrome, this means heading to Google’s dedicated Chrome download page.
Step 1: Access the Official Google Chrome Download Page
Open your current web browser on your Mac – this is likely Safari. Navigate to the following web address: google.com/chrome. This URL will take you directly to the official download page for Google Chrome. You’ll be greeted with a prominent “Download Chrome” button.
Step 2: Initiate the Download
On the Chrome download page, you should see a button that says “Download Chrome.” Clicking this button will initiate the download process. Before the download begins, you might be presented with a license agreement. It’s good practice to quickly review this, and then proceed by accepting the terms. The installer file, typically named googlechrome.dmg, will then start downloading to your Mac. The .dmg extension signifies a disk image file, which is a common format for distributing Mac applications.
The size of the download is relatively small, and it should complete within a few moments, depending on your internet connection speed. Once the download is finished, you’ll find the googlechrome.dmg file in your default Downloads folder, which is usually located in your user directory.
Step 3: Open the Disk Image and Install
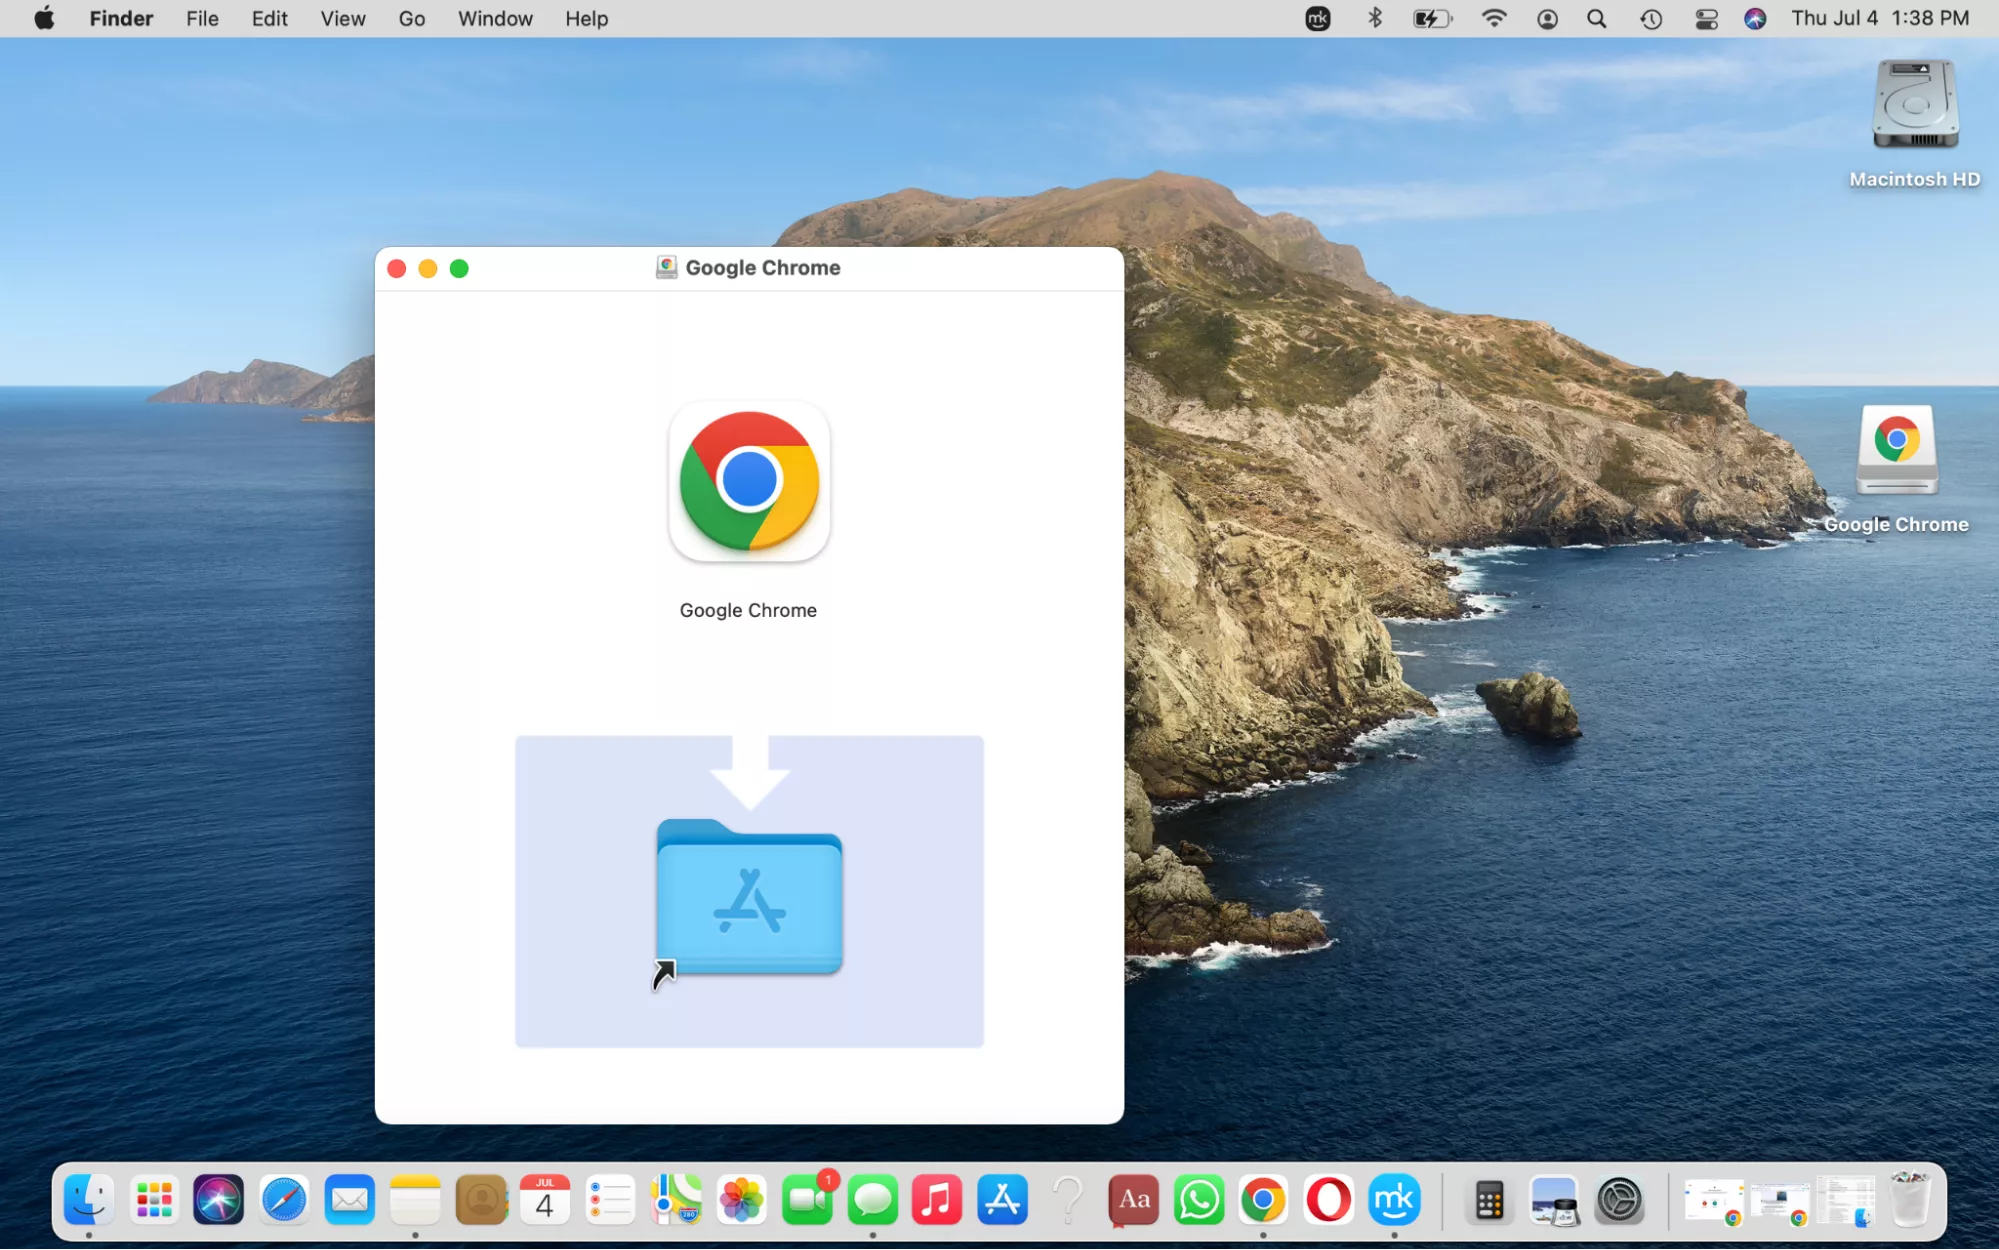
Locate the downloaded googlechrome.dmg file. Double-clicking this file will “mount” the disk image, essentially creating a virtual drive on your Mac’s desktop. This virtual drive will contain the Google Chrome application icon.
Inside the mounted disk image window, you will see the Google Chrome application icon and, usually, a shortcut to your Applications folder. To install Chrome, simply drag and drop the Google Chrome icon into the Applications folder. macOS will then copy the application files to the correct location.
After the copying process is complete, you can eject the disk image. You can do this by dragging the virtual drive icon from your desktop or sidebar in Finder to the Trash icon (which will transform into an eject symbol) or by right-clicking (or Control-clicking) on the disk image icon and selecting “Eject.”
Step 4: Launch Google Chrome for the First Time
Now that Chrome is installed in your Applications folder, you can launch it. Open your Applications folder (you can find it in the Finder sidebar or by going to Go > Applications from the menu bar). Locate the Google Chrome icon and double-click it.
The first time you open Chrome, macOS will likely present a security warning, asking if you’re sure you want to open an application downloaded from the internet. Click “Open” to proceed.
Configuring Google Chrome on Your Mac
Once Chrome has been launched, you’ll be guided through a brief setup process. This is where you can personalize your Chrome experience and connect it to your Google account.
Signing In and Syncing Your Data
Upon launching Chrome for the first time, you’ll be prompted to sign in with your Google account. If you have a Gmail address, you already have a Google account. Signing in is highly recommended for several reasons:
- Syncing: This is arguably the most powerful feature. By signing in, Chrome will sync your bookmarks, browsing history, passwords, extensions, and settings across all devices where you are signed into Chrome with the same account. This means if you bookmark a page on your Mac, it will instantly appear on your iPhone and vice-versa.
- Personalization: Your Google account allows Chrome to personalize your experience, offering tailored search results and suggestions based on your activity.
- Access to Google Services: Signing into Chrome provides seamless access to other Google services like Google Drive, Gmail, and Google Docs without needing to log in separately for each.
If you don’t wish to sign in immediately, you can choose to “Continue without signing in.” However, you will miss out on the significant benefits of syncing and personalization. You can always sign in later by clicking the profile icon in the top-right corner of the Chrome window.
Setting Chrome as Your Default Browser
After signing in or opting to continue without it, Chrome will likely ask if you want to make it your default browser. Making Chrome your default browser means that whenever you click on a web link in an email, document, or another application, it will automatically open in Chrome rather than Safari or any other browser you may have installed.
To set Chrome as your default browser:
- In Chrome, click the three vertical dots (the “More” menu) in the top-right corner of the window.
- Select “Settings” from the dropdown menu.
- In the Settings menu, look for the “Default browser” section.
- If Chrome is not already your default, you’ll see a button or option to “Make default.” Click this. macOS will likely prompt you to confirm this change in System Settings or Preferences. Follow the on-screen instructions to finalize the change.
If you’re not prompted during the initial setup, you can always change your default browser later through your Mac’s System Settings. Go to Apple menu > System Settings (or System Preferences on older macOS versions), then navigate to Desktop & Dock (or General on older versions) and find the “Default web browser” option. Select Google Chrome from the dropdown list.
Exploring Key Features and Benefits of Google Chrome on Mac
Google Chrome is more than just a browser; it’s a powerful platform for accessing the internet. Its popularity is well-deserved, thanks to a robust set of features that enhance both productivity and user experience.
Speed and Performance
One of Chrome’s most lauded attributes is its speed. It’s built on the open-source Chromium project, which is known for its efficient JavaScript engine (V8) and streamlined architecture. This translates to faster page loading times, quicker execution of web applications, and a generally responsive browsing experience, even with multiple tabs open. On a Mac, Chrome leverages the operating system’s capabilities to further optimize performance, making it a swift companion for your daily tasks.
Extensive Extension Library
The Google Chrome Web Store is a treasure trove of extensions that can transform your browsing. These small software modules add new functionalities or customize existing ones. You can find extensions for:
- Productivity: Tools like password managers (LastPass, 1Password), note-taking apps (Evernote Web Clipper, Notion Web Clipper), and task managers (Todoist) can be integrated directly into your browser.
- Customization: Themes and extensions that alter the appearance of websites or provide new visual elements.
- Security: Ad blockers (uBlock Origin, AdBlock Plus), VPN extensions, and tools to check website security.
- Developer Tools: For web developers, Chrome offers an incredibly powerful set of built-in developer tools, accessible by pressing
Command + Option + I, which allow for inspecting HTML, CSS, JavaScript, network activity, and more. - Learning & Research: Tools for language translation, citation generation, and summarizing articles.
Cross-Platform Syncing and Integration
As mentioned, the ability to sync your browsing data across devices is a major advantage. Whether you’re switching between your Mac, iPhone, or an Android tablet, your bookmarks, history, open tabs, and even the pages you’re currently viewing are available everywhere. This seamless integration is a cornerstone of the Google ecosystem and makes managing your digital life significantly easier.
User Interface and Tab Management
Chrome’s user interface is clean, minimalist, and intuitive. The omnibox (the address bar) serves a dual purpose, acting as both an address bar and a search bar, allowing you to type search queries directly into it. Tab management is also robust. You can open numerous tabs without significant performance degradation, and Chrome offers features to organize them, such as grouping tabs by color or creating profiles for different browsing contexts (e.g., personal, work, or testing).
Enhanced Digital Security
While no browser is entirely immune to threats, Google Chrome incorporates several security features to protect you:
- Safe Browsing: Chrome actively warns you about dangerous websites, phishing attempts, and malware, helping you avoid malicious content.
- Automatic Updates: Chrome automatically updates in the background, ensuring you always have the latest security patches and features without manual intervention. This is crucial for staying protected against evolving online threats.
- Sandboxing: Chrome uses a sandboxing technique where each tab runs in its own isolated process. This means that if one tab encounters a security issue, it is less likely to affect other tabs or the entire browser.
Troubleshooting Common Installation Issues
While the installation process is typically smooth, occasionally users might encounter minor hiccups. Here are a few common issues and their solutions:
Download Interruption
If your download of the googlechrome.dmg file gets interrupted, the most common solution is to simply try downloading it again. Ensure you have a stable internet connection. If you are using a public Wi-Fi network, these can sometimes be unreliable.
googlechrome.dmg Won’t Open
If you double-click the googlechrome.dmg file and nothing happens, or you receive an error message:
- Check File Integrity: The download might have been corrupted. Try downloading the file again.
- Disk Image Utility: Sometimes, macOS’s built-in Disk Image Utility can have issues. You can try re-downloading the file or ensuring your macOS is up to date.
- Permissions: While rare, check the permissions on the Downloads folder. Ensure your user account has read and write access.

Chrome Doesn’t Install or Crashes on Launch
If you drag Chrome to the Applications folder but it won’t open or crashes immediately:
- Re-download and Re-install: The most effective solution is to delete the partially installed Chrome from your Applications folder and download the
googlechrome.dmgfile again, then repeat the installation process. - System Requirements: Ensure your Mac meets the minimum system requirements for the version of Chrome you are trying to install. Google usually lists these on their download page.
- Restart Your Mac: A simple restart can often resolve temporary software glitches.
By following these steps, you should be able to successfully install and start using Google Chrome on your Mac. Enjoy the vast capabilities and seamless experience this powerful browser offers!
aViewFromTheCave is a participant in the Amazon Services LLC Associates Program, an affiliate advertising program designed to provide a means for sites to earn advertising fees by advertising and linking to Amazon.com. Amazon, the Amazon logo, AmazonSupply, and the AmazonSupply logo are trademarks of Amazon.com, Inc. or its affiliates. As an Amazon Associate we earn affiliate commissions from qualifying purchases.