When you encounter the phrase “install an iGPU into a motherboard,” it often points to a common misconception in PC building. Unlike a discrete graphics card (dGPU) that plugs into a PCIe slot, an Integrated Graphics Processing Unit (iGPU) is not a standalone component you “install” separately. Instead, an iGPU is a crucial part of your Central Processing Unit (CPU) that shares your system’s main memory (RAM) for its operations. Therefore, this guide isn’t about physically installing an iGPU as if it were a new component, but rather about the comprehensive process of setting up, enabling, and optimizing the integrated graphics capabilities inherent in your chosen CPU and motherboard combination.
Modern iGPUs, such as Intel’s Iris Xe or AMD’s Radeon Graphics found in their Ryzen G-series processors, offer remarkable performance for a wide range of tasks. From browsing the web and handling office productivity suites to streaming high-definition media and even engaging in light gaming, integrated graphics provide a cost-effective and power-efficient solution. This tutorial will walk you through everything you need to know to successfully leverage your system’s integrated graphics, ensuring a smooth and responsive visual experience. Whether you’re building a new budget-friendly PC, setting up a home theater system, or simply looking to understand your hardware better, mastering the setup of your iGPU is an essential skill for any tech enthusiast.
Understanding the Core Components: What is an iGPU?
Before diving into the setup process, it’s vital to clarify what an iGPU truly is and how it differs from its discrete counterpart. This foundational understanding will demystify the “installation” process and help you make informed decisions about your system’s graphics capabilities.
iGPU vs. Discrete GPU (dGPU)
The primary distinction lies in their physical integration and resource allocation:
- Integrated Graphics Processing Unit (iGPU): An iGPU is a graphics processing unit that is built directly into the CPU die. This means that if your CPU has an iGPU, it’s an inseparable part of that processor. Because it doesn’t have its own dedicated memory, an iGPU relies on your system’s main RAM to store graphical data (often referred to as shared VRAM). This design makes iGPUs highly power-efficient and reduces overall system cost and complexity. While generally less powerful than dGPUs, modern iGPUs have come a long way, offering impressive capabilities for non-gaming and light gaming scenarios. Examples include Intel’s UHD Graphics and Iris Xe, and AMD’s Radeon Graphics found in their Ryzen APUs (Accelerated Processing Units).
- Discrete Graphics Processing Unit (dGPU): A dGPU, commonly known as a graphics card or video card, is a completely separate component that plugs into a PCI Express (PCIe) slot on your motherboard. It comes with its own dedicated memory (VRAM), a dedicated cooling solution, and a specialized GPU chip optimized for heavy graphical workloads. dGPUs are designed for high-performance tasks like serious gaming, professional video editing, 3D rendering, and AI acceleration. Examples include NVIDIA’s GeForce RTX series and AMD’s Radeon RX series.
The phrase “install an iGPU into a motherboard” is thus technically imprecise. What we’re actually doing is installing a CPU that contains an iGPU onto the motherboard, and then configuring the system to utilize that integrated graphics component.
Why Choose Integrated Graphics?
Despite their performance limitations compared to high-end dGPUs, iGPUs offer compelling advantages for many users and specific applications, particularly aligning with smart financial and practical technology choices:
- Cost-Effectiveness: This is arguably the biggest advantage. Opting for a CPU with integrated graphics eliminates the need to purchase a separate, often expensive, discrete graphics card. For budget-conscious builders or those who don’t require extreme graphical horsepower, this can lead to significant savings, allowing more budget allocation for faster storage (like an NVMe SSD) or more RAM. This makes iGPUs an excellent choice for student PCs, office workstations, and general home use.
- Lower Power Consumption: Since iGPUs are part of the CPU and share system resources, they consume less power than a discrete graphics card. This translates to lower electricity bills and a smaller environmental footprint, making your PC more energy-efficient.
- Reduced Heat and Noise: Less power consumption generally means less heat generation. This allows for quieter cooling solutions and can even facilitate smaller PC builds without extensive airflow requirements, perfect for compact Mini-ITX systems or Home Theater PCs (HTPCs).
- Smaller Form Factor: Without the bulk of a dGPU, iGPU-based systems can be built into much smaller cases, ideal for minimalist setups or environments where space is a premium.
- Sufficient Performance for Common Tasks: For web browsing, word processing, email, video streaming (Netflix, YouTube), and even casual gaming (like esports titles at moderate settings), modern iGPUs are more than capable. They provide a smooth, responsive desktop experience without breaking the bank.
- Backup Solution: Even if you plan to use a dGPU, having an iGPU can serve as a valuable backup. If your discrete card fails, you can switch to the integrated graphics to troubleshoot or continue using your PC until a replacement arrives.
For those looking to build a functional, reliable PC without the financial investment or space requirements of a dedicated graphics card, understanding and utilizing integrated graphics is a smart and practical choice.
The “Installation” Process: Setting Up Your CPU and Motherboard
The true “installation” of an iGPU is intrinsically linked to installing the CPU that houses it. This section guides you through the physical assembly steps required to get your integrated graphics system up and running.
Pre-Assembly Checklist
Before you begin the physical assembly, gather all necessary components and tools, and prepare your workspace to ensure a smooth and safe build.
- Gather Your Components:
- Motherboard: Ensure it’s compatible with your chosen CPU socket (e.g., LGA 1700 for Intel 12th-14th gen, AM4/AM5 for AMD Ryzen). Crucially, the motherboard must have video output ports (HDMI, DisplayPort, DVI, VGA) to connect your monitor.
- CPU with iGPU: Select a processor specifically designed with integrated graphics. For Intel, these are typically non-“F” series CPUs (e.g., Core i5-13600K, not i5-13600KF). For AMD, look for “G” series Ryzen processors (e.g., Ryzen 5 5600G, Ryzen 7 8700G).
- RAM (Memory): Compatible DDR4 or DDR5 RAM modules. Ensure they are compatible with your motherboard and CPU. Faster RAM is especially beneficial for iGPUs as they share system memory.
- CPU Cooler: Either the stock cooler that comes with your CPU or an aftermarket cooler.
- Power Supply Unit (PSU): Sufficient wattage for your entire system.
- Storage Device: An NVMe SSD (recommended for speed) or SATA SSD/HDD for your operating system and files.
- PC Case: To house all your components.
- Display Monitor: And a compatible display cable (HDMI, DisplayPort are most common) to connect from your motherboard to the monitor.
- Keyboard and Mouse: For navigating BIOS/UEFI and the operating system.
- Essential Tools:
- Phillips head screwdriver (magnetic tip is a plus).
- Anti-static wrist strap or mat (highly recommended to prevent electrostatic discharge).
- Thermal paste (if your CPU cooler doesn’t have it pre-applied).
- Zip ties or Velcro straps for cable management.
- Safety First:
- Work on a clean, well-lit, and non-conductive surface (e.g., a wooden desk, not carpet).
- Always wear an anti-static wrist strap connected to a grounded metal object (like your PC case’s bare metal) to prevent static electricity from damaging sensitive components.
- Handle components gently, especially the CPU and RAM. Avoid touching the pins or gold contacts.
Physical Assembly Steps
This sequence focuses on the core components necessary to get a display output from your iGPU.
- Prepare the Motherboard: Carefully remove your motherboard from its anti-static bag and place it on your non-conductive workspace. It’s often easier to install the CPU and RAM before mounting the motherboard into the PC case.
- Install the CPU:
- Locate the CPU socket on the motherboard.
- Gently push down and away on the small metal retention lever next to the socket to release and lift the CPU cover/frame.
- Carefully align your CPU with the socket. Look for a small gold triangle or arrow on one corner of the CPU and match it with a corresponding marker on the CPU socket or the retention frame. Do not force the CPU into the socket. If it doesn’t drop in easily, re-check your alignment.
- Once the CPU is seated correctly, lower the metal cover/frame over the CPU (if applicable) and push the retention lever back into its locked position. This will secure the CPU in place.
- Apply Thermal Paste (if needed) & Install CPU Cooler:
- If your CPU cooler does not have thermal paste pre-applied, apply a small, pea-sized dot to the center of the CPU’s integrated heat spreader (IHS).
- Carefully mount your CPU cooler onto the motherboard, following the cooler’s specific instructions. Ensure it makes firm, even contact with the CPU and is securely fastened. Connect the CPU cooler’s fan cable to the “CPU_FAN” header on the motherboard.
- Install RAM:
- Locate the RAM slots on your motherboard. If you have two sticks of RAM, refer to your motherboard manual for the correct slots to use for dual-channel operation (often slots 2 and 4, or A2 and B2).
- Open the plastic clips at both ends of the chosen RAM slots.
- Align the notch on the bottom edge of the RAM module with the key in the RAM slot.
- Place the RAM module in the slot and press down firmly on both ends until the clips snap into place.
- Mount Motherboard into Case (if applicable):
- Install the necessary standoffs in your PC case according to your motherboard’s form factor.
- Install the I/O shield (the metal plate for your motherboard’s ports) into the case cutout from the inside.
- Carefully lower the motherboard onto the standoffs, aligning it with the I/O shield and screw holes.
- Secure the motherboard with screws.
- Connect Power Supply Unit (PSU) Cables:
- Connect the large 24-pin ATX power cable from your PSU to the corresponding port on the motherboard.
- Connect the 4-pin or 8-pin EPS (CPU power) cable from your PSU to the port near the CPU socket.
- Connect SATA power cables to your storage drives.
- Connect Peripherals:
- Crucially: Connect your display cable (HDMI, DisplayPort, etc.) directly to one of the video output ports on the motherboard’s I/O panel. Do NOT connect it to any discrete graphics card if one is installed; for iGPU use, the connection must be to the motherboard.
- Connect your keyboard and mouse to USB ports.
- Connect the PSU to a wall outlet.
With these physical connections made, you’re ready to power on your system and move to the software configuration.

Configuring and Optimizing Your iGPU
Physical assembly is just the first step. To fully utilize your iGPU, you need to configure its settings in the BIOS/UEFI and install the appropriate drivers. This phase is critical for achieving optimal performance and stability.
Accessing and Adjusting BIOS/UEFI Settings
The BIOS (Basic Input/Output System) or its modern successor, UEFI (Unified Extensible Firmware Interface), is the firmware that controls your motherboard’s hardware. You’ll need to enter it to ensure your iGPU is enabled and configured correctly.
- Power On and Enter BIOS/UEFI: Turn on your PC. Immediately and repeatedly press the designated key to enter BIOS/UEFI. This key varies by motherboard manufacturer but is commonly
DEL,F2,F10, orF12. Consult your motherboard’s manual if you’re unsure. - Locate Graphics Settings: Once in BIOS/UEFI, navigate through the menus. Look for sections typically named “Advanced,” “Chipset,” “Integrated Peripherals,” “Graphics Configuration,” or “PEG/PCI Slot/iGPU.”
- Enable iGPU:
- Find an option related to “Integrated Graphics,” “Internal Graphics,” “iGPU Multi-Monitor,” or “IGD Video.” Ensure this setting is set to “Enabled” or “Auto.”
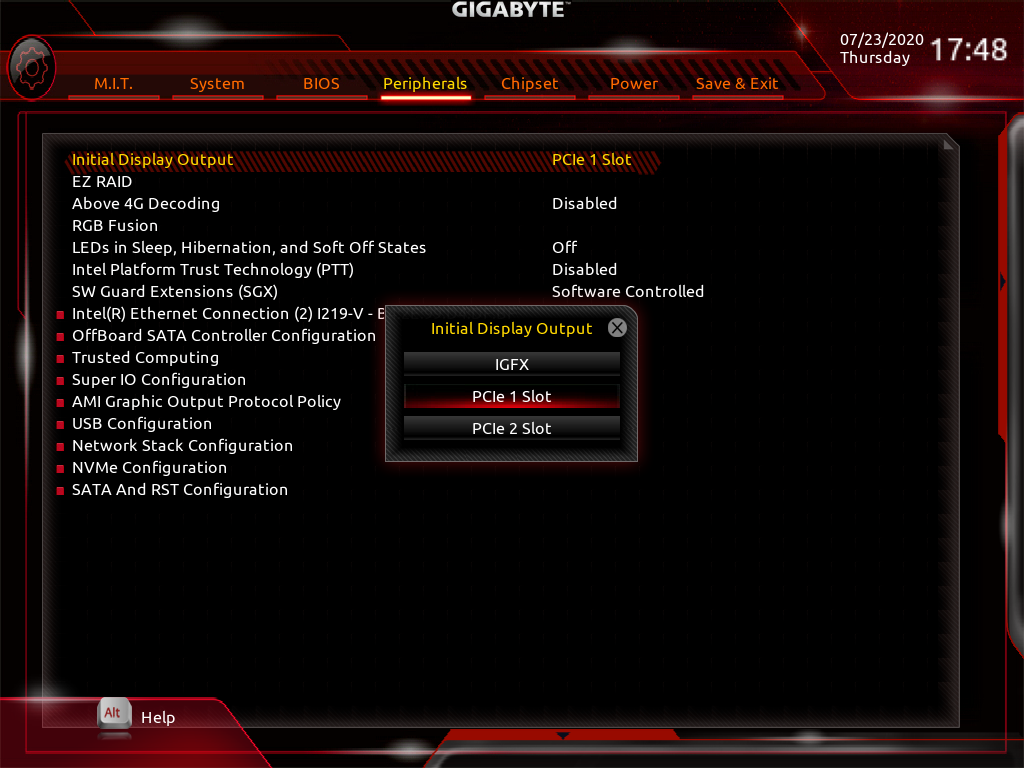
- If you have both a discrete GPU and an iGPU installed, you might find an option like “Primary Display Adapter” or “Initial Display Output.” To prioritize your iGPU for display output, select “iGPU,” “IGD Video,” or “Integrated Graphics” here. If you only have an iGPU, this setting usually defaults correctly.
- Allocate VRAM (Shared Memory):
- Many motherboards allow you to manually allocate a portion of your system RAM to the iGPU to be used as VRAM. This setting is often called “DVMT Pre-Allocated,” “Graphics Memory Allocation,” “Shared Memory Size,” or similar.
- While often set to “Auto,” you can typically increase this from 256MB/512MB to 1GB, 2GB, or even 4GB for modern iGPUs. More VRAM can improve performance in graphics-intensive tasks, but remember this reduces the amount of RAM available to your CPU. Adjust based on your total system RAM and usage needs. For most general tasks, 1GB-2GB is sufficient.
- Save and Exit: After making your changes, be sure to save them before exiting BIOS/UEFI. The system will then restart.
Installing Drivers and Updating Windows
Once your system boots into the operating system (Windows, Linux, etc.), you’ll need to install the latest graphics drivers to unlock the iGPU’s full potential. Generic drivers might allow for basic display, but dedicated drivers are crucial for performance, stability, and access to advanced features.
- Boot into Operating System: Allow your PC to boot into your installed operating system. Windows will likely install generic display drivers, which provide basic functionality but lack optimization.
- Download Latest Drivers:
- Visit the official website of your CPU manufacturer:
- For Intel CPUs: Go to Intel’s official website (intel.com), navigate to their “Support” or “Downloads” section, and search for drivers based on your specific Intel processor model (e.g., Core i7-13700K).
- For AMD CPUs: Go to AMD’s official website (amd.com), visit their “Drivers & Support” page, and select your AMD Ryzen APU (e.g., Ryzen 7 8700G).
- Download the latest graphics drivers compatible with your operating system version (e.g., Windows 10 64-bit, Windows 11 64-bit).
- Run the downloaded installer and follow the on-screen instructions. This process might involve screen flickering or temporary blackouts, which is normal.
- Visit the official website of your CPU manufacturer:
- Windows Update: After installing the manufacturer’s drivers, run Windows Update. Sometimes, Windows Update delivers critical updates or even newer versions of graphics drivers, ensuring your system is fully patched.
Verifying iGPU Operation
After driver installation, it’s good practice to verify that your iGPU is recognized and functioning correctly.
- Display Settings: Right-click on your desktop and select “Display settings.” Ensure your monitor is detected and running at its native resolution and refresh rate.
- Task Manager: Press
Ctrl+Shift+Escto open Task Manager. Go to the “Performance” tab. You should see “GPU 0” listed, displaying your specific iGPU model (e.g., “Intel Iris Xe Graphics,” “AMD Radeon Graphics”). This indicates the system is recognizing and using your integrated graphics. - Device Manager: Press
Windows Key + Xand select “Device Manager.” Expand “Display adapters.” Your iGPU should be listed here without any yellow exclamation marks or error symbols, signifying a successful driver installation.
Optimizing and Troubleshooting Common iGPU Issues
Even with a proper setup, you might encounter performance bottlenecks or minor issues. Here’s how to optimize your iGPU and troubleshoot common problems.
Performance Optimization Tips
To get the most out of your integrated graphics, consider these optimizations:
- Allocate More VRAM (If Necessary): As mentioned, some BIOS/UEFI settings allow you to dedicate more system RAM to the iGPU. If you have plenty of RAM (e.g., 16GB or 32GB) and find your iGPU struggling with specific tasks, try increasing the allocated VRAM to 2GB or 4GB in your BIOS/UEFI settings.
- Fast, Dual-Channel RAM: This is critical for iGPU performance. Since iGPUs share system memory, their performance is directly tied to the speed and configuration of your RAM.
- Speed: Invest in the fastest RAM your motherboard and CPU support.
- Dual-Channel: Always install RAM in matched pairs in the correct motherboard slots to enable dual-channel mode, which significantly boosts memory bandwidth and, consequently, iGPU performance. Ensure XMP (Extreme Memory Profile) or DOCP/EXPO (for AMD) is enabled in BIOS/UEFI to run RAM at its advertised speed.
- Keep Drivers Updated: Regularly check Intel or AMD’s websites for the latest graphics drivers. These updates often include performance enhancements, bug fixes, and compatibility improvements for new applications and games.
- Adjust In-Game/Application Settings: For gaming or demanding applications, lower the resolution, texture quality, anti-aliasing, and other graphical settings to achieve smoother frame rates.
- Power Settings: Ensure your operating system’s power plan is set to “High Performance” (in Windows, go to Control Panel > Power Options) to prevent the iGPU from throttling its performance to save power.
Troubleshooting Common Problems
Even with careful assembly and configuration, issues can arise. Here’s how to address some common iGPU-related problems:
- No Display Output / Black Screen:
- Cable Check: Double-check that your display cable is connected firmly to a motherboard video output port and not to an empty dGPU slot or another port.
- Monitor Input: Ensure your monitor is turned on and set to the correct input source (e.g., HDMI 1, DisplayPort).
- Clear CMOS: If you made incorrect BIOS/UEFI settings, clear the CMOS (Complementary Metal-Oxide-Semiconductor) to reset BIOS to default. This usually involves removing the small battery on the motherboard for a few minutes or using a dedicated jumper.
- CPU and RAM Reseat: Ensure your CPU is properly seated in its socket and the RAM modules are firmly clicked into place.
- Verify CPU: Confirm your specific CPU model actually has integrated graphics.
- Poor Performance / Laggy UI:
- Update Drivers: This is always the first step.
- VRAM Allocation: Check BIOS/UEFI to ensure sufficient VRAM is allocated.
- RAM Speed and Configuration: Verify RAM is running in dual-channel mode at its XMP/DOCP speed in BIOS/UEFI.
- System Resources: Check Task Manager to see if other components (CPU, disk) are bottlenecking performance. Close unnecessary background applications.
- Temperatures: Use monitoring software (e.g., HWiNFO) to check CPU/iGPU temperatures. Overheating can lead to throttling.
- Driver Crashes / Instability:
- Clean Driver Installation: If you suspect driver corruption, use a tool like DDU (Display Driver Uninstaller) in Windows Safe Mode to completely remove existing drivers, then install the latest drivers fresh.
- Windows Updates: Ensure your OS is fully updated, as some stability fixes come from Microsoft.
- BIOS Update: Check your motherboard manufacturer’s website for the latest BIOS/UEFI firmware update, as these often include stability improvements and better hardware compatibility.
- iGPU Not Detected in OS/Device Manager:
- BIOS/UEFI Check: Re-enter BIOS/UEFI and ensure “Integrated Graphics” is explicitly enabled and set as the primary display output (if applicable).
- CPU Compatibility: Confirm your CPU model indeed features integrated graphics.

Conclusion
Successfully setting up your integrated graphics processing unit is a foundational skill in modern PC building, especially for those prioritizing efficiency and budget. We’ve navigated the common misunderstanding that an iGPU is a separate installable component, clarifying that it’s an integral part of your CPU. From the careful physical assembly of your CPU and motherboard to the crucial steps of configuring BIOS/UEFI settings, installing drivers, and optimizing performance, you now possess the knowledge to fully harness your system’s integrated graphics capabilities.
Modern iGPUs represent a significant leap in technology, offering impressive performance for everyday tasks, media consumption, and even light gaming, making them a remarkably smart choice for a wide array of users. By understanding these components and knowing how to properly set them up, you empower yourself to build and maintain efficient, cost-effective systems that meet your specific needs without unnecessary expenses. This tutorial not only guides you through a technical process but also reinforces the principles of making informed tech decisions, aligning perfectly with smart spending and leveraging technology for productivity and enjoyment.
aViewFromTheCave is a participant in the Amazon Services LLC Associates Program, an affiliate advertising program designed to provide a means for sites to earn advertising fees by advertising and linking to Amazon.com. Amazon, the Amazon logo, AmazonSupply, and the AmazonSupply logo are trademarks of Amazon.com, Inc. or its affiliates. As an Amazon Associate we earn affiliate commissions from qualifying purchases.