Ubuntu, a name synonymous with accessible open-source computing, has emerged as a formidable alternative in an operating system landscape often dominated by Windows and macOS. Its popularity stems from a robust blend of security, flexibility, and a vibrant community, making it a go-to choice for developers, system administrators, and everyday users seeking a refreshing and powerful computing experience. If you’ve been contemplating a switch, a dual-boot setup, or simply wish to explore the world of Linux, installing Ubuntu from a USB drive is the most common and straightforward method.
This comprehensive guide will walk you through every step, transforming a standard USB stick into your gateway to the Ubuntu ecosystem. From initial preparation and bootable media creation to configuring your system’s firmware and navigating the installation process, we’ll demystify each stage. By the end, you’ll not only have a freshly installed Ubuntu system but also a deeper understanding of the underlying principles, empowering you to embrace a new era of digital productivity and control.
Preparing for Your Ubuntu Installation: The Foundation for Success
A smooth installation begins long before you even plug in a USB drive. Thorough preparation is key to avoiding common pitfalls and ensuring your journey into Ubuntu is as seamless as possible. This involves safeguarding your existing data, understanding basic hardware requirements, and gathering the necessary tools.
Essential Prerequisites and Preparations
Before embarking on the installation, take a moment to collect everything you need and complete crucial preliminary steps.
-
Backup Your Data: The Golden Rule of System Changes
This cannot be stressed enough: Always back up all critical data from any drive you intend to modify or install an operating system on. Even if you plan a dual-boot setup or a clean install on a separate drive, accidents happen. Data loss is a devastating, irreversible consequence of unforeseen errors. Use an external hard drive, cloud storage services (like Google Drive, Dropbox, or OneDrive), or a network-attached storage (NAS) device to create a comprehensive backup. Verify your backups are accessible before proceeding. This step is your ultimate safety net. -
Hardware Requirements: Ensuring Compatibility and Performance
Ubuntu is known for its efficiency, often breathing new life into older hardware. However, understanding the minimum and recommended specifications will ensure a satisfactory experience.- Minimum Requirements for Ubuntu Desktop:
- 2 GHz dual-core processor
- 4 GB RAM (system memory)
- 25 GB of free hard-drive space
- Either a DVD drive or a USB port for the installer media
- Internet access is helpful but not strictly required for the basic installation
- Recommended Specifications for a Smoother Experience:
- 2.5 GHz dual-core or better processor
- 8 GB RAM or more
- SSD (Solid State Drive) for the operating system, ideally 256 GB or more
- Modern graphics card (integrated or dedicated) for smoother UI and multimedia.
While Ubuntu can run on less, meeting the recommended specs will significantly enhance performance, especially when multitasking or running resource-intensive applications.
- Minimum Requirements for Ubuntu Desktop:
-
Download the Ubuntu ISO File: Your Operating System Image
The “ISO” file is a disk image containing the entire Ubuntu operating system. You’ll need to download the correct version.- Where to Download: Always download from the official Ubuntu website (ubuntu.com/download/desktop).
- Choosing a Version: Ubuntu offers different releases. LTS (Long Term Support) versions are recommended for most users due to their 5-year support cycle, providing stability and fewer major updates. Non-LTS releases offer the latest features but have shorter support windows (9 months). For this guide, we’ll assume the standard Ubuntu Desktop LTS version.
- Verification (Checksums): After downloading, it’s good practice to verify the integrity of the ISO file using its SHA256 checksum. This ensures the file wasn’t corrupted during download and hasn’t been tampered with. Checksum values are usually provided on the download page.
-
A Reliable USB Drive: The Installation Medium
You’ll need a USB flash drive to create your bootable installer.- Size: A minimum of 8 GB is recommended, though 16 GB provides more flexibility for persistent storage if desired (though not covered in this basic installation guide).
- Condition: Ensure the USB drive is in good working order.
- Data Warning: All data on this USB drive will be permanently erased during the process of making it bootable. Make sure it contains nothing you need.
-
Internet Connection: While not strictly mandatory for the core installation, an active internet connection during the setup process is highly recommended. It allows the installer to download updates, install third-party drivers (for Wi-Fi, graphics, etc.), and acquire additional software, leading to a more complete and up-to-date system from the get-go.
Choosing the Right Tool to Create Your Bootable USB
Once you have your Ubuntu ISO and an empty USB drive, the next step is to “flash” the ISO onto the USB, making it bootable. Several excellent tools can accomplish this, each with its own advantages.
-
Rufus (for Windows Users): Fast and Feature-Rich
Rufus is a popular, lightweight, and incredibly fast utility for creating bootable USB drives on Windows.- Download Rufus: Get it from the official Rufus website (rufus.ie). Choose the portable version for convenience.
- Insert USB: Plug your USB drive into your Windows PC.
- Launch Rufus: Run the downloaded executable.
- Select Device: In the “Device” dropdown, ensure your USB drive is selected (double-check this to avoid erasing the wrong drive!).
- Select Boot Selection: Click “SELECT” and browse to your downloaded Ubuntu ISO file.
- Partition Scheme: For modern systems, choose “GPT” for UEFI systems. If you have an older machine or are unsure, “MBR” for BIOS (or UEFI-CSM) is a safer general bet. Rufus will often auto-detect the best option.
- File System: Leave as default (usually FAT32 or NTFS, Rufus will select what’s appropriate).
- Start: Click the “START” button. You’ll likely be prompted to download some additional files (like
syslinux) or confirm writing in ISO Image mode. Confirm any prompts. - Wait: The process will take a few minutes. Once it says “READY,” you can close Rufus and safely remove the USB drive.
-
Etcher (Balena Etcher – for Windows, macOS, and Linux): Simple and Cross-Platform
Etcher is renowned for its user-friendly interface and cross-platform compatibility, making it an excellent choice for beginners regardless of their current operating system.- Download Etcher: Get it from the official Balena Etcher website (balena.io/etcher).
- Install/Launch: Install it like any other application or run the portable version.
- Insert USB: Plug your USB drive into your computer.
- Flash from file: Click “Flash from file” and select your Ubuntu ISO.
- Select target: Click “Select target” and choose your USB drive. Again, double-check you’re selecting the correct drive.
- Flash!: Click the “Flash!” button. Etcher will then write the image and validate it, which might take a few minutes.
- Wait: Once completed, you can safely remove the USB drive.
-
ddcommand (for Linux and macOS Users): The Power User’s Choice
For users comfortable with the command line, theddcommand offers a robust and often faster way to create a bootable USB. However, extreme caution is advised, as a single typo can lead to data loss on your hard drives.- Identify USB Drive: Open a terminal and run
lsblk(Linux) ordiskutil list(macOS) to identify your USB drive’s device name (e.g.,/dev/sdbon Linux,/dev/disk2on macOS). Be absolutely certain you have the correct one! - Unmount (macOS): On macOS, you might need to unmount the drive first:
diskutil unmountDisk /dev/diskX(replaceXwith your drive number). - Execute
dd:- Linux:
sudo dd if=/path/to/ubuntu.iso of=/dev/sdX bs=4M status=progress(replace/path/to/ubuntu.isoand/dev/sdXwith your paths). - macOS:
sudo dd if=/path/to/ubuntu.iso of=/dev/rdiskX bs=4m(userdiskfor raw disk access, often faster).
- Linux:
- Wait: The
ddcommand provides no progress by default unless you addstatus=progress(Linux) or pressCtrl+T(macOS) during execution. It can take a while. - Sync: Once finished, run
syncto ensure all data is written to the USB.
- Identify USB Drive: Open a terminal and run
Booting into the Ubuntu Installer: Guiding Your System to the USB
With your bootable USB ready, the next step is to instruct your computer to start from this drive instead of its internal hard disk. This usually involves entering your system’s firmware (BIOS or UEFI) settings and adjusting the boot order.
Configuring Your System’s BIOS/UEFI
BIOS (Basic Input/Output System) and its successor, UEFI (Unified Extensible Firmware Interface), are low-level software that starts when you power on your computer. They manage hardware initialization and boot processes.
-
Accessing Firmware Settings:
Immediately after powering on your computer, you need to press a specific key repeatedly to enter the BIOS/UEFI setup utility. This key varies by manufacturer:- Common Keys:
F2,Del,F10,F12,Esc - Manufacturer Specifics:
- Dell:
F2orF12 - HP:
F10orEsc - Lenovo:
F1,F2,Fn+F2 - Acer:
F2orDel - ASUS:
DelorF2 - Microsoft Surface: Volume Up button
If you miss the window, simply restart and try again. Look for a message like “Press F2 for Setup” or “Press DEL to enter BIOS.”
- Dell:
- Common Keys:
-
Setting Boot Order Priority:
Once inside the BIOS/UEFI setup:- Navigate: Look for a section often labeled “Boot,” “Boot Options,” “Startup,” or “Security.”
- Change Order: Find the “Boot Order” or “Boot Priority” list. Your USB drive will likely be listed under a name like “USB HDD,” “USB-FLASH,” or by its brand name.
- Move Up: Use the arrow keys,
+/-keys, or specific function keys (often indicated on-screen) to move your USB drive to the very top of the boot order list. This tells your computer to try booting from the USB first. - Save and Exit: Select “Save Changes and Exit” (often
F10). Your computer will then restart and attempt to boot from the USB.
-
Disabling Secure Boot (Optional but Often Necessary):
Secure Boot is a UEFI feature designed to prevent malicious software from loading during startup. While it’s a security measure, it can sometimes interfere with Linux distributions, including Ubuntu, particularly with older versions or specific hardware.- Locate Setting: In your UEFI settings, look under “Security,” “Boot Options,” or “Authentication” for “Secure Boot.”
- Disable: Change the setting from “Enabled” to “Disabled.”
- Save and Exit: Remember to save your changes. If Ubuntu fails to boot after trying, disabling Secure Boot is a common troubleshooting step. You can usually re-enable it after installation if desired.
-
Disabling Fast Startup (Crucial for Windows Dual Booters):
If you plan to dual-boot Ubuntu alongside Windows, it’s absolutely critical to disable Windows’ “Fast Startup” feature. Fast Startup hibernates part of the Windows kernel when you shut down, which can lead to file system corruption and data loss when Linux tries to access the Windows partitions.- In Windows: Go to Control Panel > Power Options > Choose what the power buttons do > Change settings that are currently unavailable.
- Uncheck: Uncheck “Turn on fast startup (recommended).”
- Save changes.
The Step-by-Step Ubuntu Installation Process: Bringing Your System to Life
With your system configured to boot from the USB, you’re ready to launch the Ubuntu installer and begin the process of setting up your new operating system.
Initial Setup and Basic Configuration
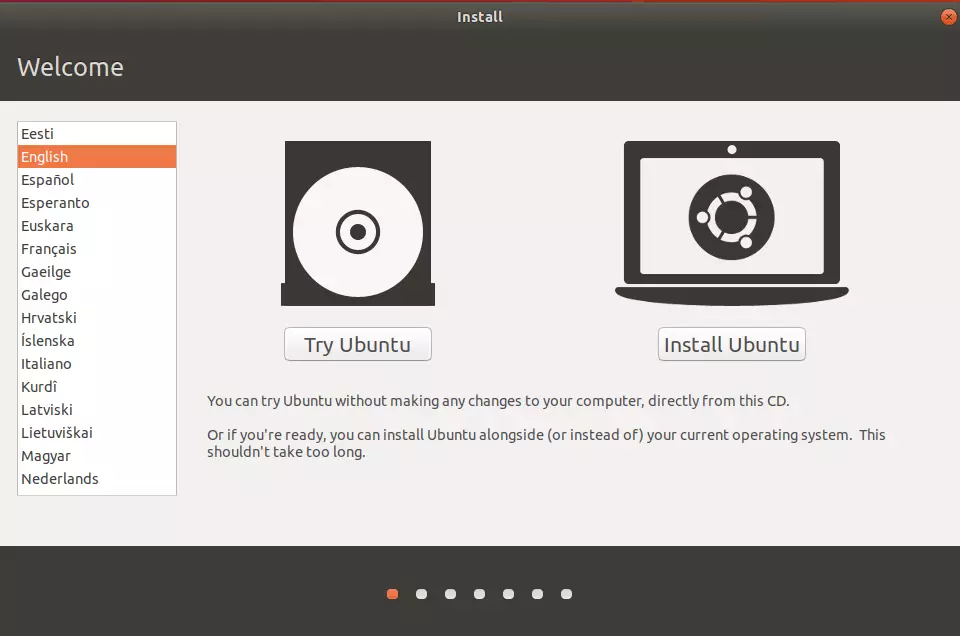
As your computer boots from the USB, you’ll be greeted by the Ubuntu boot menu.
-
Booting from USB:
- You’ll typically see a GRUB menu with options like “Try or Install Ubuntu,” “Ubuntu (safe graphics),” etc.
- “Try Ubuntu” (Recommended): This option lets you run Ubuntu directly from the USB drive without installing it. It’s a fantastic way to test hardware compatibility (Wi-Fi, sound, display) and get a feel for the OS before committing to an installation. If everything works well, you can click the “Install Ubuntu” icon on the desktop.
- “Install Ubuntu”: This directly launches the installer. Choose this if you’re confident in your hardware compatibility.
-
Language Selection: The first screen after launching the installer will ask you to choose your preferred language for the installation process. Select your language and click “Continue.”
-
Keyboard Layout: Next, select your keyboard layout. The installer usually auto-detects this, but you can test it in the provided text field. Select your layout and click “Continue.”
-
Network Connection: If you have an Ethernet cable connected, you’ll likely already have internet access. For Wi-Fi, you’ll see a list of available networks. Connect to your Wi-Fi network and enter the password if prompted. Having an internet connection allows the installer to download updates and third-party software during the installation, saving you time later. Click “Continue.”
-
Updates and Other Software: This is an important step for a fully functional system.
- Installation Type:
- Normal installation: Installs a web browser, utilities, office software, games, and media players. Recommended for most users.
- Minimal installation: Installs only a web browser and basic utilities. Good for users who want a lean system and prefer to add specific software later.
- Other options:
- Download updates while installing Ubuntu: Highly recommended. This ensures your newly installed system is up-to-date with the latest security patches and bug fixes from the start.
- Install third-party software for graphics and Wi-Fi hardware and additional media formats: Crucially important for many users! This option installs proprietary drivers for things like Nvidia or AMD graphics cards, Broadcom Wi-Fi adapters, and codecs for playing MP3s, videos, and other non-open source media formats. Unless you have a strong reason not to, check this box.
- Installation Type:
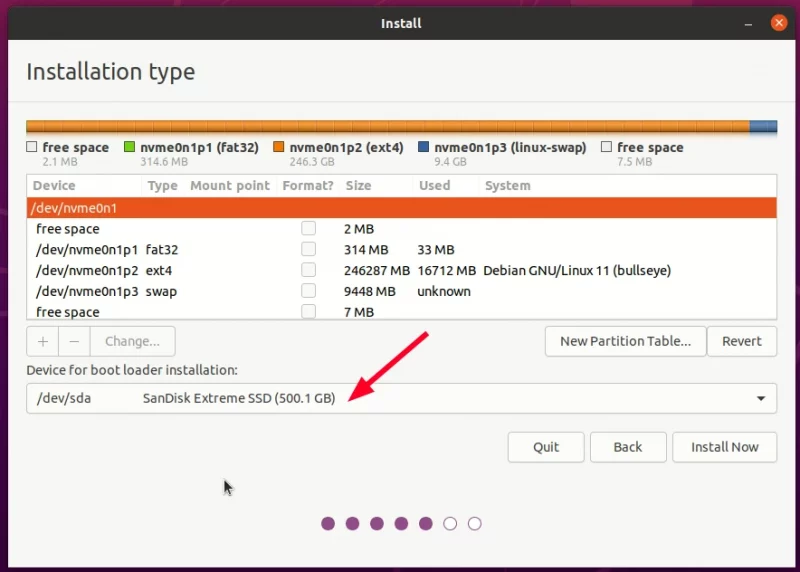
Partitioning Your Disk: Where Ubuntu Will Live
This is arguably the most critical step, especially if you’re dual-booting or have multiple drives. This section determines how Ubuntu will use your hard drive space.
-
Installation Type Options:
- Erase disk and install Ubuntu:
- Simplest option. This will wipe the entire selected hard drive and install Ubuntu as the sole operating system. ONLY choose this if you are absolutely sure you want to remove everything else from the drive, including Windows/macOS if present, and have backed up all data.
- The installer will automatically create the necessary partitions (e.g., root
/, swap).
- Install Ubuntu alongside Windows Boot Manager / macOS (Dual Boot):
- The installer detects your existing operating system and offers to shrink its partition to create space for Ubuntu.
- You’ll usually see a slider to graphically adjust how much space to allocate to Ubuntu. Drag the slider to your desired size (at least 25-50 GB is recommended for Ubuntu).
- This option is generally safe if Fast Startup is disabled in Windows, and it automatically manages the bootloader.
- Something else:
- For advanced users or specific setups. This option gives you full control over partitioning. You’ll manually create, resize, and assign partitions.
- When to use it:
- You want a custom partition layout (e.g., separate
/home,/boot, or more swap space). - You’re installing on a specific partition that isn’t automatically detected.
- You’re experienced with disk management.
- You want a custom partition layout (e.g., separate
- Manual Partitioning Guide (Brief):
- Root Partition (
/): Essential. This is where the operating system files reside. Minimum 20 GB, recommended 50-100 GB. Format asext4, mount point/. - Swap Area: Used as virtual memory when RAM is full. Generally, 4GB to 8GB is sufficient. You can also use a swap file instead of a separate partition.
- Home Partition (
/home): Optional but recommended. Keeps your personal files, documents, and settings separate from the system. If you reinstall Ubuntu, you can keep your/homepartition intact. Useext4, mount point/home. - EFI System Partition (ESP): If you’re on a UEFI system, you need a small FAT32 partition (100-500 MB) mounted at
/boot/efi. If Windows is already installed, you likely have one you can use; do NOT format it if it contains Windows boot files. - Boot Loader Installation: Ensure the boot loader (GRUB) is installed to the correct drive (usually the drive containing your root partition, e.g.,
/dev/sda).
- Root Partition (
- Erase disk and install Ubuntu:
-
Choose Your Location: Select your geographical location on the map or from the dropdown. This sets your time zone. Click “Continue.”
-
Who are you? (User Setup):
- Enter your name, desired computer name, username, and password.
- Password Importance: Choose a strong, unique password. This is your administrative password for performing system-level tasks.
- Login Options: Choose between “Require my password to log in” (default, recommended for security) or “Log in automatically” (less secure, but faster for personal use). Click “Continue.”
Completing the Installation
-
The Installation Slideshow: Ubuntu will now proceed with the installation, copying files, installing packages, and configuring your system. A slideshow will display various features of Ubuntu while you wait. This process can take anywhere from 10 to 30 minutes, depending on your system’s speed and internet connection.
-
Restart and Remove USB: Once the installation is complete, you’ll see a message prompting you to restart your computer. Crucially, remove your USB installation drive when instructed. If you don’t, the computer might boot back into the installer.
-
First Boot: Your computer should now boot into your brand new Ubuntu system. Enter your password at the login screen, and welcome to your new desktop!
Post-Installation: Optimizing Your New Ubuntu System
Installing Ubuntu is just the first step. To ensure a secure, high-performing, and personalized experience, a few essential post-installation tasks are recommended.
Essential First Steps After Installation
-
Update Your System: Stay Secure and Current
Even if you downloaded updates during installation, new updates might have been released. It’s crucial to update your system immediately.- Open the “Software Updater” application from the applications menu. It will check for updates and prompt you to install them.
- Alternatively, use the terminal (Ctrl+Alt+T):
bash

sudo apt update          # Refreshes the list of available packages

sudo apt upgrade         # Installs available updates

sudo apt dist-upgrade    # Handles more complex dependency changes (for kernel updates, etc.)

sudo apt autoremove      # Removes unnecessary packages
Regular updates are a cornerstone of digital security and performance.
-
Install Graphics Drivers: Unlock Full Performance
For optimal display performance, especially with dedicated graphics cards (Nvidia, AMD), you might need proprietary drivers.- Go to “Software & Updates” in your applications menu.
- Select the “Additional Drivers” tab.
- Ubuntu will search for proprietary drivers. Select the recommended or desired driver (e.g., Nvidia driver for Nvidia GPUs) and click “Apply Changes.” Restart your system after installation.
-
Install Your Favorite Software: Personalize Your Workspace
Ubuntu comes with a good set of default applications (Firefox, LibreOffice, Thunderbird, etc.), but you’ll likely want to add more.- Ubuntu Software Center: This is your primary graphical interface for discovering and installing applications. It’s user-friendly and features a vast catalog.
- Terminal (
aptcommand): For faster and more direct installation:
bash

sudo apt install <package_name>
Examples:sudo apt install chromium-browser(for Chromium),sudo apt install vlc(for VLC media player). - Snap and Flatpak: Ubuntu supports Snap packages out of the box, offering containerized applications that run across various Linux distributions, ensuring you always get the latest version. Flatpak is another similar universal packaging system. Explore these for a wider selection of modern software.
-
Customize Your Desktop Environment: Make Ubuntu Your Own
Ubuntu’s default GNOME desktop is highly customizable.- Settings: Explore the “Settings” application to change wallpapers, themes, dock position, notification settings, and more.
- GNOME Extensions: For deeper customization, install the
gnome-shell-extensionspackage (sudo apt install gnome-shell-extensions) and a browser add-on (Firefox/Chrome) to browse and install extensions from extensions.gnome.org. These can dramatically alter the look and feel of your desktop.
-
Enhance Digital Security: Protect Your System
Ubuntu is inherently more secure than some other operating systems, but best practices are still essential.- Firewall (UFW): Ubuntu includes
ufw(Uncomplicated Firewall), which is disabled by default.- Enable it:
sudo ufw enable - Allow specific ports if needed (e.g., for SSH):
sudo ufw allow ssh
- Enable it:
- Regular Updates: As mentioned, keep your system updated.
- Strong Passwords: Use robust passwords for your user account.
- Only Install Trusted Software: Stick to official repositories, Snap Store, or Flatpak for software. Be cautious with third-party PPAs (Personal Package Archives).
- Firewall (UFW): Ubuntu includes
Conclusion: Embrace Your New Ubuntu Journey
You’ve successfully navigated the intricacies of installing Ubuntu from a USB drive! This process, while sometimes daunting for newcomers, is a fundamental skill that unlocks a world of open-source possibilities. From the initial preparation and safeguarding of your data to the meticulous partitioning and post-installation refinements, each step has brought you closer to a powerful, secure, and highly customizable operating system.
Ubuntu empowers you with greater control over your computing environment, offering a refreshing departure from proprietary ecosystems. Whether you’re a budding developer, a privacy-conscious individual, or simply someone looking for a responsive and modern desktop, Ubuntu provides a robust platform for productivity, creativity, and exploration. Dive into its vast software library, engage with its supportive community, and discover the freedom that open-source technology offers. Your journey with Ubuntu has just begun – enjoy exploring its depths!
aViewFromTheCave is a participant in the Amazon Services LLC Associates Program, an affiliate advertising program designed to provide a means for sites to earn advertising fees by advertising and linking to Amazon.com. Amazon, the Amazon logo, AmazonSupply, and the AmazonSupply logo are trademarks of Amazon.com, Inc. or its affiliates. As an Amazon Associate we earn affiliate commissions from qualifying purchases.