In an increasingly digital world, the need for physical documents remains surprisingly persistent. Whether for business reports, creative projects, legal paperwork, or simply printing a cherished photo, a reliable printer is an indispensable tool in any modern home or office setup. For Mac users, the process of integrating a new printer into their ecosystem is typically straightforward, thanks to macOS’s intuitive design and robust driver support. This comprehensive guide will walk you through every step, from unboxing to advanced setup, ensuring a seamless and efficient printing experience on your Apple device. We’ll delve into various connection methods, troubleshoot common issues, and offer best practices to optimize your printer’s performance, aligning with our focus on practical technology tutorials and maximizing productivity.
Preparing Your Printer for Seamless Integration
Before diving into the digital configuration, a few crucial physical and preliminary steps are necessary to ensure your printer is ready for action. Neglecting these initial stages can lead to frustrating delays down the line, so it’s worth taking the time to set everything up correctly from the start.
Unboxing and Physical Setup
The journey begins with carefully unboxing your new printer. Most manufacturers provide clear instructions, but here’s a general checklist to follow:
- Remove all packaging materials: Printers often come with protective tapes, plastic inserts, and foam blocks designed to prevent damage during shipping. Be meticulous in removing all these materials, especially from the ink/toner cartridge bays and paper trays. These can cause jams or malfunction if left in place.
- Place the printer in a suitable location: Choose a stable, flat surface that can support the printer’s weight. Ensure there’s enough space around it for proper ventilation, especially if it’s a laser printer that generates heat. Consider proximity to a power outlet and, if you plan to use a wired connection, your Mac.
- Connect power: Plug the printer’s power cord into a wall outlet directly, if possible, rather than a power strip or surge protector. This minimizes potential power fluctuations that could interfere with its operation. Power on the printer and allow it to complete its initial startup sequence, which often includes internal calibrations.
Powering Up and Loading Consumables
Once powered, your printer will likely prompt you to load its essential consumables. This step is critical for a successful first print.
- Install ink cartridges or toner: Open the access panel and install the ink cartridges (for inkjet printers) or toner cartridge (for laser printers) according to the manufacturer’s instructions. Ensure they are seated firmly until they click into place. Many printers will run an alignment or calibration process after this step, which is normal.
- Load paper: Open the paper tray and load the appropriate paper size and type (e.g., standard A4, letter, photo paper). Adjust the paper guides to snugly fit the stack, preventing misfeeds. Double-check the printer’s display to confirm it recognizes the paper size you’ve loaded.
- Check for display prompts: Many modern printers feature an LCD screen. Pay attention to any initial setup prompts it might display, such as language selection, date/time settings, or network configuration options. Addressing these now can streamline the setup process later.
Initial Software and Driver Considerations
While macOS is excellent at automatically detecting and installing generic drivers for many printers, some advanced features or specific functionalities might require proprietary software or drivers from the manufacturer.
- Check the manufacturer’s website: Even if your Mac automatically recognizes the printer, it’s a good practice to visit the printer manufacturer’s official support website. Search for your specific printer model and look for the “Drivers & Software” section. Download the latest macOS drivers and any utility software they recommend. These often provide enhanced control, ink/toner level monitoring, and troubleshooting tools.
- Avoid bloatware (if possible): Some manufacturers bundle unnecessary software. Read the installation prompts carefully and deselect any optional programs you don’t need, focusing only on essential drivers and utilities.
- Consider firmware updates: While on the manufacturer’s site, check if there are any firmware updates for your printer model. Firmware updates can improve performance, add new features, or fix bugs, much like software updates for your Mac. Follow the instructions carefully for any firmware update process.
Connecting Your Printer to Your Mac: Diverse Methods
Mac users have several convenient options for connecting their printers, ranging from the classic wired USB connection to modern wireless and networked solutions. Understanding each method will help you choose the best approach for your setup, optimizing for convenience, speed, or shared access.
The Simplicity of Wireless Setup (Wi-Fi and AirPrint)
Wireless connectivity is often the preferred method for its flexibility and convenience, allowing you to place the printer almost anywhere within your Wi-Fi network’s range without being tethered to your Mac.
Setting Up Via Wi-Fi Direct or Printer Display
Many modern printers can connect directly to your Wi-Fi network without needing a computer initially.
- Access printer settings: On your printer’s control panel (the LCD screen), navigate to the network or Wi-Fi settings.
- Join your Wi-Fi network: Select “Wireless Setup Wizard” or a similar option. The printer will scan for available Wi-Fi networks. Select your home or office network from the list.
- Enter Wi-Fi password: Input your Wi-Fi password (WPA/WPA2 security key) using the printer’s keypad or touchscreen. Once connected, the printer will display a confirmation message, often showing an IP address.
- Add printer on Mac:
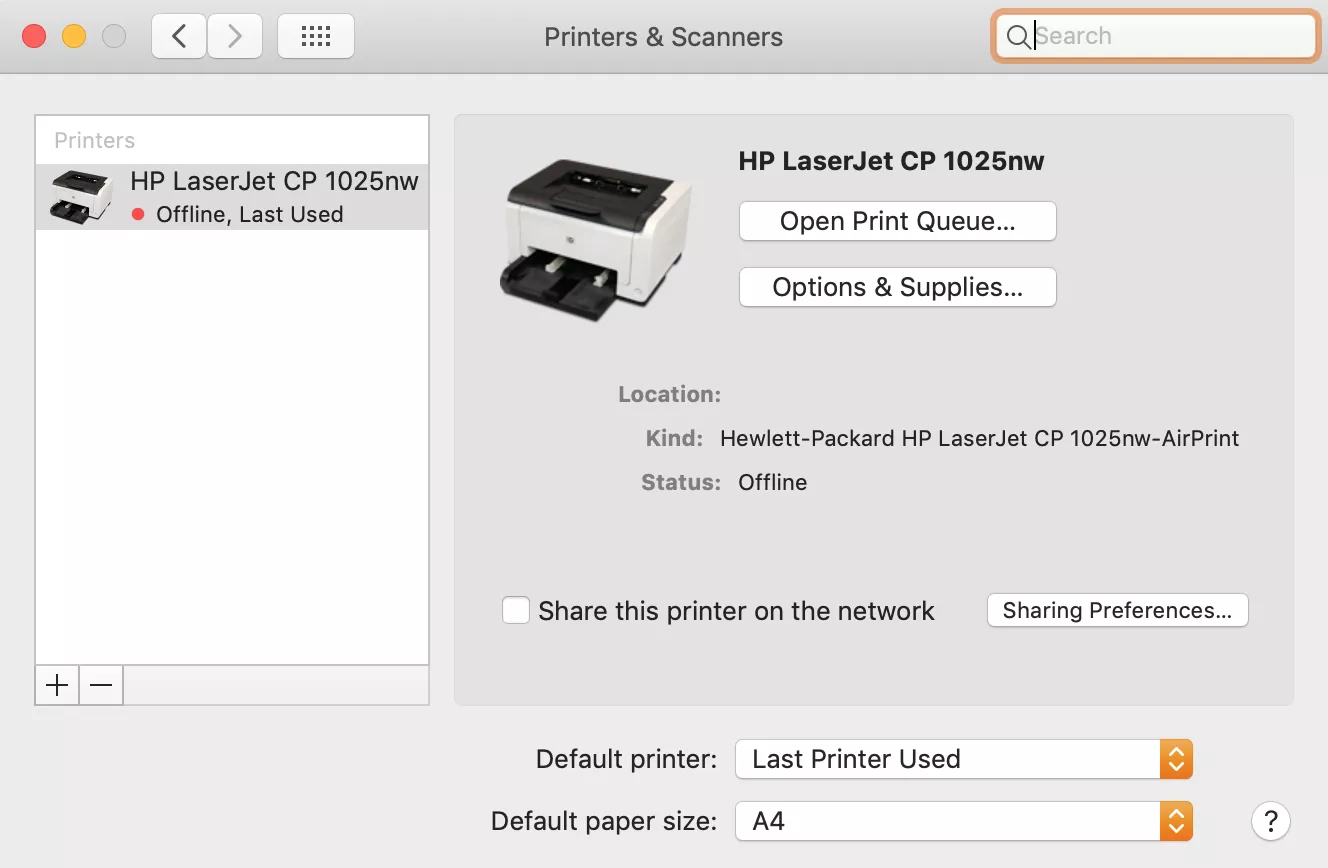
- Go to System Settings (or System Preferences on older macOS versions).
- Click on Printers & Scanners.
- Click the + (Add Printer, Scanner, or Fax) button.
- Your Mac should automatically detect the printer on the network. Select it from the list.
- macOS will usually suggest the correct driver. If not, choose “Select Software” and locate the appropriate driver for your model.
- Click Add.
Leveraging AirPrint for Instant Printing
AirPrint is an Apple technology that allows most modern printers to work with Macs, iPhones, and iPads without needing to download or install drivers. If your printer is AirPrint-enabled and connected to the same Wi-Fi network as your Mac, it’s often an instant setup.
- Ensure AirPrint compatibility: Check your printer’s specifications or manufacturer’s website to confirm it supports AirPrint. Most printers made in the last decade do.
- Connect printer to Wi-Fi: Ensure your AirPrint printer is powered on and connected to the same Wi-Fi network as your Mac.
- Add printer on Mac:
- Open System Settings > Printers & Scanners.
- Click the + button.
- If your AirPrint printer is active and on the network, it should appear in the list with “AirPrint” indicated in its description or Kind column.
- Select the printer. macOS will automatically use the AirPrint driver.
- Click Add. You’re ready to print!
Direct Connection via USB
The most traditional method, connecting a printer directly to your Mac via a USB cable, offers a reliable and often plug-and-play experience, especially for personal use where the printer doesn’t need to be shared across a network.
- Power off printer and Mac: It’s good practice to power down both devices before making a physical connection.
- Connect USB cable: Plug one end of the USB-B cable (the squarish end) into the printer and the other end (USB-A or USB-C, depending on your Mac) into an available USB port on your Mac. If your Mac only has USB-C ports, you might need a USB-C to USB-A adapter or a USB-C hub.
- Power on devices: Turn on your printer first, then your Mac.
- Automatic detection: macOS is usually excellent at detecting new USB devices.
- It may automatically download and install the necessary drivers. You might see a notification indicating “Setting up [Printer Name]”.
- If not, go to System Settings > Printers & Scanners.
- Click the + button.
- The USB-connected printer should appear in the list. Select it.
- macOS will automatically detect the driver. Click Add.
Adding a Network Printer Manually
Sometimes, especially in office environments or when dealing with older network printers, your Mac might not automatically discover a printer connected via Ethernet or a more complex network setup. In such cases, manual addition is required.
- Obtain printer’s IP address: You’ll need the printer’s IP address. You can usually find this by printing a network configuration page from the printer’s control panel (look for “Network Settings,” “Information,” or “Print Config”) or by accessing your router’s connected devices list.
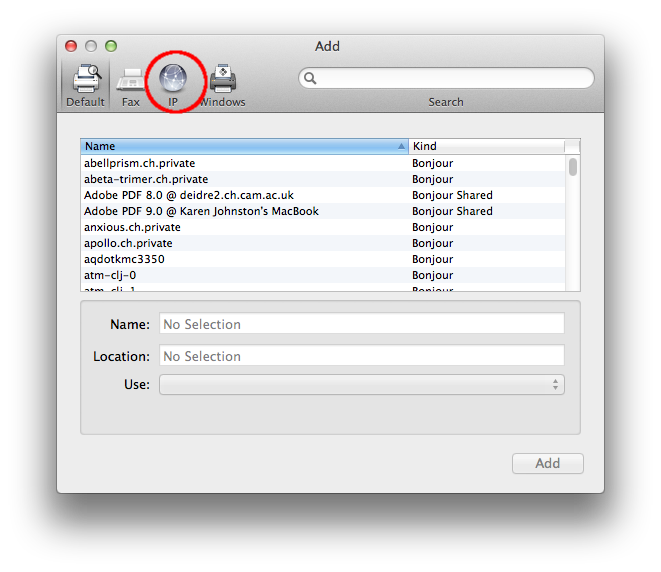
- Open Add Printer window: Go to System Settings > Printers & Scanners, then click the + button.
- Select IP tab: In the Add Printer dialog, click the IP tab (represented by a globe icon).
- Enter printer details:
- Address: Enter the printer’s IP address (e.g., 192.168.1.150).
- Protocol: macOS usually defaults to “HP Jetdirect – Socket.” This is a common and generally reliable protocol for most network printers. If it doesn’t work, you might try “LPD” (Line Printer Daemon) or “IPP” (Internet Printing Protocol).
- Name: Give the printer a descriptive name (e.g., “Office Main Printer”).
- Location: (Optional) Add a location for easier identification.
- Use: macOS might automatically detect the driver. If not, click the dropdown and select “Select Software” to manually choose the correct driver for your printer model. If you downloaded drivers earlier, they should be available here.
- Click Add: macOS will attempt to connect and configure the printer.
Verifying Installation and Essential Troubleshooting
After adding your printer, it’s crucial to confirm that it’s functioning correctly. If you encounter issues, a systematic approach to troubleshooting can quickly resolve most common problems.
Running a Test Print
The simplest way to verify a successful installation is to print a test page.
- Open a document: Open any document on your Mac (e.g., a Word document, a PDF, or even a blank TextEdit document).
- Initiate print: Go to File > Print (or press Command + P).
- Select printer: In the print dialog box, ensure your newly installed printer is selected from the “Printer” dropdown menu.
- Print: Click Print.
- Check output: If the page prints successfully, congratulations! Your printer is ready to use. If not, proceed to the troubleshooting steps.
Common Installation Hurdles and Their Solutions
Even with a seemingly smooth setup, issues can arise. Here’s how to tackle the most frequent problems:
-
Printer Not Found or Offline:
- Check power and cables: Ensure the printer is powered on and all cables (USB, Ethernet, power) are securely connected.
- Wi-Fi connection: For wireless printers, verify it’s connected to the correct Wi-Fi network and that the network is operational. Restarting your router can sometimes help.
- Restart everything: Power cycle your printer, Mac, and router. This can clear temporary glitches.
- Remove and re-add: In System Settings > Printers & Scanners, select the problematic printer, click the “–” (Remove Printer) button, then try adding it again using the appropriate method.
- Check Firewall: Your Mac’s firewall or third-party security software might be blocking network communication. Temporarily disable it to test, then reconfigure it to allow printer access.
-
“Driver Not Installed” or Printing Errors:
- Download latest drivers: Revisit the manufacturer’s website and ensure you have downloaded and installed the absolute latest macOS drivers for your specific printer model. Generic drivers might not support all features or might have compatibility issues.
- Reset printing system: This is a powerful troubleshooting step that can resolve many driver-related issues.
- Go to System Settings > Printers & Scanners.
- Control-click (or right-click) anywhere in the blank space of the Printers list.
- Select “Reset Printing System…”.
- Confirm the action. This will remove all printers and drivers. You’ll then need to re-add your printer(s) from scratch. This can often resolve deep-seated driver conflicts.
- Check Apple Software Update: Sometimes, Apple provides printer drivers through its macOS updates. Ensure your macOS is fully updated.
-
Slow Printing or Jams:
- Paper type/size mismatch: Ensure the paper loaded in the tray matches the settings in your print dialog. Incorrect settings can cause misfeeds or slow processing.
- Ink/Toner levels: Low consumables can sometimes lead to print quality issues or slow performance.
- Firmware update: An outdated printer firmware can cause various operational problems. Check the manufacturer’s site for updates.
- Clean print heads/nozzles: Many inkjet printers have a utility (accessible through the printer’s software on your Mac or the printer’s display) to clean print heads, which can resolve quality issues.
-
Scanning Not Working (if multifunction printer):
- Separate Scanner Driver: Some multifunction printers require a separate scanner driver or utility to be installed, even if the printer portion works with AirPrint.
- Image Capture: For basic scanning, try using macOS’s built-in “Image Capture” app (found in Applications). It often detects network scanners that the Printers & Scanners utility might miss.
- Manufacturer Scan Utility: The dedicated scanning software from the manufacturer usually offers more features and better performance.
Maximizing Your Printer’s Potential: Advanced Tips and Best Practices
A successfully installed printer is just the beginning. To truly leverage your investment and ensure long-term, hassle-free operation, consider these advanced tips that contribute to productivity and digital security.
Keeping Drivers Up-to-Date for Optimal Performance
Much like any software, printer drivers are regularly updated by manufacturers to improve performance, add new features, fix bugs, and enhance compatibility with the latest macOS versions.
- Regularly check manufacturer’s website: Make it a habit to periodically visit the support section for your printer model on the manufacturer’s website (e.g., quarterly or semi-annually).
- Install updates proactively: Download and install the latest drivers, utilities, and firmware updates. These can prevent future compatibility issues, improve print quality, enhance security, and sometimes even boost print speeds.
- macOS Software Updates: Always keep your macOS updated to the latest version. Apple often includes generic printer driver updates and improvements within its system updates, ensuring broader compatibility and performance.
Sharing Your Printer Across Your Network
For multi-Mac households or small offices, sharing a single printer can be a cost-effective and efficient solution, enhancing productivity.
- Enable printer sharing on the host Mac:
- Connect the printer (preferably via USB) to the Mac that will act as the “host.”
- Go to System Settings > General > Sharing.
- Turn on Printer Sharing.
- In the details for Printer Sharing, select the printer you wish to share.
- You can choose to allow “All Users” or specify particular user accounts on your network.
- Add the shared printer on client Macs:
- On other Macs on the same network, go to System Settings > Printers & Scanners.
- Click the + button.
- The shared printer should appear under the “Default” tab, often with the host Mac’s name appended (e.g., “[Printer Name] @ [Host Mac Name]”).
- Select it and click Add.
- The client Macs can now print to the shared printer wirelessly, as long as the host Mac is on and connected.
Security and Productivity Considerations
Beyond basic functionality, thoughtful management of your printer can impact both your digital security and overall productivity.
- Network Security: For Wi-Fi or networked printers, ensure your home or office Wi-Fi network is secured with a strong password (WPA2/WPA3). An unprotected network leaves your printer vulnerable to unauthorized access, potentially allowing others to print unwanted documents or even access internal network information if the printer has advanced networking capabilities.
- Privacy: Be mindful of what you print. For sensitive documents, ensure that printed copies are securely disposed of when no longer needed. Consider shredding.
- Ink/Toner Management: Use the manufacturer’s utility software to monitor ink or toner levels. This allows you to order replacements proactively, preventing downtime when you urgently need to print. Subscribing to automated ink/toner delivery services offered by some manufacturers can also be a significant productivity booster, ensuring you never run out.
- Energy Saving: Utilize your printer’s energy-saving features (e.g., sleep mode, auto power-off). Not only does this save electricity, but it also prolongs the life of the printer.
- Regular Maintenance: Follow manufacturer recommendations for cleaning print heads, rollers, and trays. A well-maintained printer lasts longer and performs more reliably.
Conclusion: Printing Made Easy on macOS
Installing a printer on a Mac is typically a straightforward process, thanks to macOS’s user-friendly interface and robust built-in support for a wide array of devices. By following the systematic steps outlined in this guide—from careful physical preparation to understanding the nuances of different connection methods and proactive troubleshooting—you can ensure a smooth setup and a reliable printing experience.
Remember that a printer isn’t just a peripheral; it’s a tool that supports your productivity, allows you to manifest digital ideas into tangible form, and connects the digital and physical aspects of your work. By keeping drivers updated, exploring sharing options, and adopting best practices for security and maintenance, you’ll not only install a printer but integrate it seamlessly and effectively into your Mac ecosystem, making printing a hassle-free part of your daily workflow. Embrace the power of print, made simple with macOS.
aViewFromTheCave is a participant in the Amazon Services LLC Associates Program, an affiliate advertising program designed to provide a means for sites to earn advertising fees by advertising and linking to Amazon.com. Amazon, the Amazon logo, AmazonSupply, and the AmazonSupply logo are trademarks of Amazon.com, Inc. or its affiliates. As an Amazon Associate we earn affiliate commissions from qualifying purchases.