
The hum of a printer, the crisp sound of paper emerging, the tangibility of a digital document brought to life – for many, it’s a satisfying and often necessary part of both personal and professional life. Whether you’re a student printing assignments, a creative bringing your designs to life, a small business owner producing invoices, or simply someone who prefers hard copies of important information, a functional printer is indispensable. However, the seemingly straightforward task of installing a printer can sometimes feel like navigating a complex technological maze, especially for those less familiar with the inner workings of their computers. This comprehensive guide will demystify the process, empowering you to confidently connect and set up your printer, no matter your operating system or printer type.
Understanding the Printer Connection: Wired vs. Wireless
Before diving into the installation process, it’s crucial to understand the two primary ways printers connect to your computer: wired and wireless. Each method has its own set of advantages and considerations, and knowing which you’re dealing with will streamline the setup.
Wired Connections: The Reliable Classic (USB)
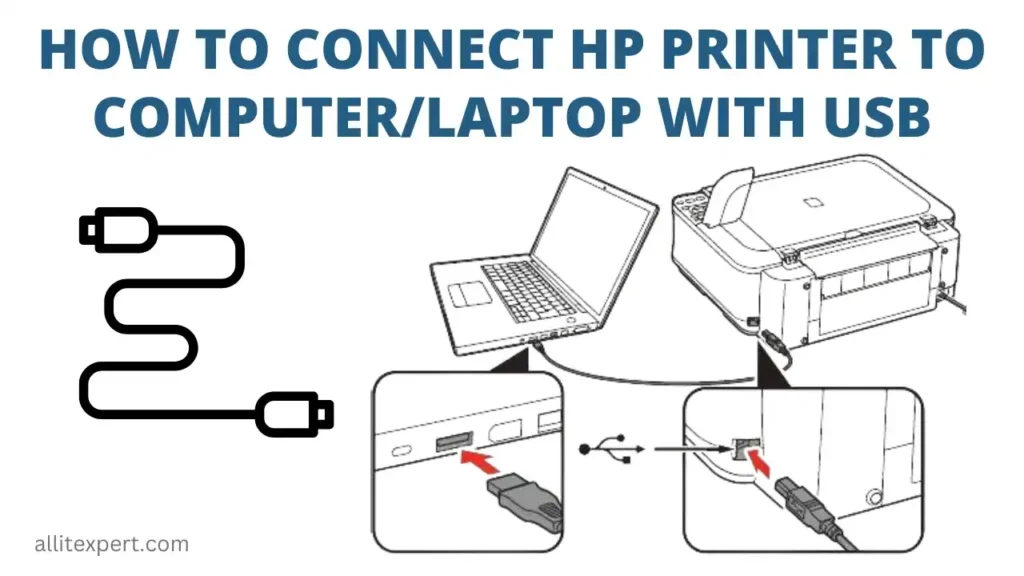
The most common and often the simplest method of connecting a printer is through a USB cable. This direct connection provides a stable and reliable link between your printer and computer.
The USB Advantage
- Simplicity: Often, it’s a plug-and-play experience. Connect the USB cable, and your computer might automatically detect and install the necessary drivers.
- Speed: For large print jobs, a direct USB connection can offer faster data transfer compared to some wireless setups.
- Reliability: Less susceptible to network interference, ensuring consistent printing.
When to Use Wired
Wired connections are ideal for single-computer setups or when network stability is paramount. If your printer is located close to your computer and you don’t anticipate needing to print from multiple devices, a USB connection is an excellent choice.
Wireless Connections: The Freedom of Flexibility (Wi-Fi)
Wireless printers leverage your home or office Wi-Fi network to communicate with your computer. This offers greater flexibility in placement and allows multiple devices to share a single printer.
The Wireless Advantage
- Convenience: Print from anywhere within your Wi-Fi network, freeing you from cable clutter and physical proximity constraints.
- Multi-Device Sharing: Easily allows laptops, smartphones, and tablets to print to the same printer.
- Modern Integration: Many modern printers offer cloud printing services, enabling printing from virtually anywhere with an internet connection.
When to Use Wireless
Wireless connections are perfect for households or small offices with multiple devices. If you value the freedom to print from different locations or want to easily share a printer among family members or colleagues, a wireless setup is the way to go.
Step-by-Step Printer Installation: A Comprehensive Guide
The installation process can vary slightly depending on your operating system (Windows or macOS) and the type of printer you have (USB or wireless). However, the core principles remain the same. We’ll cover the general steps, followed by specific considerations for each operating system.
Before You Begin: Essential Preparations
Before you even think about plugging in your printer or downloading drivers, a few preparatory steps will ensure a smooth installation.
1. Unboxing and Initial Setup
- Read the Manual: This is the golden rule. Your printer’s user manual is your best friend. It contains specific instructions tailored to your model, including any unique setup steps or troubleshooting tips.
- Remove All Packaging: Carefully unpack your printer. Remove all protective tapes, foam inserts, and plastic coverings from both the exterior and interior of the printer. Pay close attention to any packaging around the ink cartridges or toner.
- Install Ink or Toner: Follow the manual’s instructions to install the ink cartridges or toner. Ensure they are seated correctly. Many printers will guide you through an initial ink charging or alignment process upon powering on.
- Power On: Connect the power cord to the printer and plug it into a wall outlet. Turn on the printer.
2. Connecting to Your Computer
This is where the distinction between wired and wireless connections becomes critical.
For USB Printers:

- Locate the USB Port: Find the USB port on your printer. It’s typically a rectangular slot.
- Connect the USB Cable: Connect one end of the USB cable to the printer and the other end to an available USB port on your computer.
- Do Not Install Software Yet: In most cases, it’s best to wait for your operating system to detect the printer before running any installation software provided by the manufacturer.
For Wireless Printers:
This process typically involves connecting the printer to your Wi-Fi network first.
- On-Printer Setup: Many modern wireless printers have a touchscreen or control panel that allows you to connect to your Wi-Fi network directly. You’ll usually need to select your network name (SSID) and enter your Wi-Fi password.
- WPS (Wi-Fi Protected Setup): Some printers and routers support WPS. This is a simpler method where you press a WPS button on both your router and printer (within a short timeframe), and they automatically connect.
- Manufacturer App/Software: Some manufacturers provide a mobile app or desktop software that guides you through connecting the printer to your Wi-Fi network. This is often the most user-friendly method.
- Ethernet Cable (Temporary): If your wireless setup proves challenging, you can temporarily connect your printer to your router using an Ethernet cable to configure its wireless settings via a web interface. Once connected to Wi-Fi, you can disconnect the Ethernet cable.
3. Installing Printer Drivers and Software
Printer drivers are essential software that allows your operating system to communicate with your printer. Without them, your computer won’t know how to send print commands or interpret the printer’s status.
Method A: Using the Manufacturer’s CD/DVD (If Provided)
- Insert the Disc: If your printer came with an installation CD or DVD, insert it into your computer’s optical drive.
- Run the Installer: The installation program should launch automatically. If it doesn’t, navigate to the disc in File Explorer (Windows) or Finder (macOS) and double-click the setup or installer file.
- Follow On-Screen Prompts: The installer will guide you through the process, asking you to accept license agreements, choose installation options (e.g., full software suite or basic driver), and confirm the printer connection type.
Method B: Downloading Drivers from the Manufacturer’s Website (Recommended)
This is often the preferred method as it ensures you have the latest, most up-to-date drivers, which can fix bugs and improve performance.
- Identify Your Printer Model: Find the exact model number of your printer. This is usually located on the front, top, or back of the device.
- Visit the Manufacturer’s Support Website: Go to the official website of your printer manufacturer (e.g., HP, Canon, Epson, Brother). Look for a “Support,” “Downloads,” or “Drivers” section.
- Enter Your Model Number: Type your printer’s model number into the search bar on the support page.
- Select Your Operating System: Crucially, choose the correct operating system (Windows 10, Windows 11, macOS Ventura, etc.) and its architecture (32-bit or 64-bit). You can usually find your system information by right-clicking “This PC” (Windows) and selecting “Properties,” or by going to the Apple menu > “About This Mac” (macOS).
- Download the Latest Driver/Software: Download the recommended driver or full software package. It might be a large file, so ensure you have a stable internet connection.
- Run the Downloaded Installer: Once the download is complete, locate the file (usually in your Downloads folder) and double-click it to start the installation process.
- Follow On-Screen Instructions: The installer will guide you through connecting your printer (if not already connected and detected) and installing the necessary software.
Method C: Using the Operating System’s Built-in Printer Detection
Both Windows and macOS have built-in tools to detect and install printers.
On Windows:
- Open Settings: Click the Start button and select the gear icon for Settings.
- Go to Devices (or Bluetooth & devices): Click on “Devices” (or “Bluetooth & devices” in newer Windows versions).
- Select Printers & scanners: In the left-hand menu, click “Printers & scanners.”
- Add a printer or scanner: Click the “+ Add a printer or scanner” button.
- Let Windows Search: Windows will begin searching for available printers on your network or connected via USB.
- Select Your Printer: If your printer is found, select it from the list and click “Add device.” Windows will attempt to install the drivers automatically.
- “The printer that I want isn’t listed”: If your printer isn’t found, click this option. This will open a troubleshooter that guides you through adding a printer manually, allowing you to specify connection types and driver locations.
On macOS:
- Open System Settings (or System Preferences): Click the Apple menu and select “System Settings” (or “System Preferences” on older macOS versions).
- Navigate to Printers & Scanners: Scroll down and click on “Printers & Scanners.”
- Add Printer, Scanner, or Fax: Click the “+” button below the list of existing printers.
- Select Your Printer: macOS will search for nearby printers connected via USB or on your network. Select your printer from the list.
- Use Driver: macOS usually automatically selects the correct driver (“Use: Auto Select” or the specific driver name). If not, you might need to click the dropdown and choose your printer model.
- Add: Click the “Add” button.
Troubleshooting Common Installation Issues
Even with the best intentions, you might encounter a hiccup during the printer installation. Here are some common problems and their solutions.
Printer Not Detected
- Check Connections: Ensure all cables (USB, power, Ethernet) are securely plugged in.
- Restart Devices: Try restarting both your printer and your computer. Sometimes a simple reboot can resolve temporary communication glitches.
- Try a Different USB Port: If using a USB connection, try a different port on your computer.
- Verify Wi-Fi Connection (Wireless): For wireless printers, confirm that the printer is successfully connected to your Wi-Fi network. Check the printer’s display or network settings. Ensure your computer is on the same Wi-Fi network as the printer.
- Firewall/Antivirus: Your firewall or antivirus software might be blocking the printer from being detected. Temporarily disable them to see if that resolves the issue, and then re-enable them and add an exception for your printer software.
Driver Installation Errors
- Download Latest Drivers: Ensure you are using the most recent drivers from the manufacturer’s website. Old drivers can cause compatibility issues.
- Uninstall and Reinstall: If you previously attempted to install drivers, it’s a good idea to uninstall any existing printer software and drivers before attempting a fresh installation.
- Administrator Privileges: Ensure you are running the installer with administrator privileges on your computer.
Printer Offline or Not Responding
- Check Printer Status: Look at the printer’s display for any error messages or indicator lights.
- Printer Queue: Open the print queue on your computer (usually by double-clicking the printer icon in the system tray or through the Printers & Scanners settings). Ensure the printer is not set to “Use Printer Offline.” If it is, right-click the printer and uncheck that option. Clear any stuck print jobs.
- Restart Print Spooler (Windows): Sometimes the print spooler service can get stuck. Search for “Services” in the Windows search bar, find “Print Spooler,” right-click it, and select “Restart.”
By following these steps and understanding the nuances of wired versus wireless connections, you’ll be well-equipped to install your printer successfully. A functional printer is a gateway to productivity and creativity, and with this guide, that gateway is now open to you.
aViewFromTheCave is a participant in the Amazon Services LLC Associates Program, an affiliate advertising program designed to provide a means for sites to earn advertising fees by advertising and linking to Amazon.com. Amazon, the Amazon logo, AmazonSupply, and the AmazonSupply logo are trademarks of Amazon.com, Inc. or its affiliates. As an Amazon Associate we earn affiliate commissions from qualifying purchases.