
In today’s fast-paced digital world, efficiency and seamless connectivity are paramount. Whether you’re a professional juggling multiple devices for work, a student managing assignments, or a home user looking for ultimate convenience, the ability to print wirelessly from your mobile devices or computers has become a necessity. Apple’s AirPrint technology is a prime example of this innovation, offering a remarkably straightforward way to print documents, photos, and web pages directly from your iPhone, iPad, iPod Touch, or Mac without the hassle of installing drivers or complex software setups. This comprehensive guide will walk you through everything you need to know about AirPrint, from its fundamental principles to advanced installation techniques for non-compatible printers, troubleshooting common issues, and optimizing your wireless printing experience for peak productivity.

Understanding AirPrint: Seamless Wireless Printing
Before diving into the “how-to,” it’s crucial to grasp what AirPrint is and why it has become such a cornerstone of Apple’s ecosystem. Its elegance lies in its simplicity, but beneath that user-friendly surface is a robust technology designed to streamline a common, often cumbersome, task.
What is AirPrint and Why It Matters
AirPrint is a proprietary technology developed by Apple Inc. that allows macOS and iOS devices to print wirelessly to AirPrint-enabled printers. The magic of AirPrint lies in its driverless nature. Traditionally, connecting a printer to a computer required downloading and installing specific software drivers, often a multi-step process that could vary significantly between printer manufacturers and operating systems. AirPrint eliminates this need entirely. When an AirPrint-compatible printer is connected to the same Wi-Fi network as an Apple device, the device automatically discovers the printer, making it immediately available for printing.
This capability significantly enhances productivity and convenience. Imagine needing to print an important document from your iPhone while rushing out the door, or effortlessly producing high-quality photos from your iPad. AirPrint makes these scenarios possible with just a few taps, freeing users from the constraints of USB cables or the need to transfer files to a computer first. For businesses, especially those leveraging Apple’s ecosystem, AirPrint simplifies IT management by reducing the need for driver installations and support calls related to printing. It’s a testament to Apple’s philosophy of making complex technology intuitively simple.
Core Requirements for Native AirPrint Functionality
For AirPrint to work out of the box, a few fundamental conditions must be met. Understanding these prerequisites is the first step towards a smooth printing experience:
- An AirPrint-Enabled Printer: This is the most critical requirement. Not all wireless printers support AirPrint. Look for the “AirPrint” logo or mention in the printer’s specifications or packaging. Most modern printers from major brands like HP, Canon, Epson, Brother, and Samsung now include AirPrint support.
- An Apple Device: You’ll need an iPhone, iPad, or iPod Touch running iOS 4.2 or later, or a Mac running OS X Lion (10.7) or later. Given the widespread adoption of newer iOS and macOS versions, most users will comfortably meet this requirement.
- Shared Wi-Fi Network: Both your Apple device and the AirPrint-enabled printer must be connected to the same Wi-Fi network. This is how they discover and communicate with each other. If your network has multiple subnets or guest networks, ensure both devices are on the primary network segment that allows device discovery.
- Printer Readiness: The printer needs to be powered on, have paper loaded, sufficient ink or toner, and be in a ready state. Any error messages on the printer’s display should be resolved before attempting to print.
The Simple Steps to Print Natively with AirPrint
Once you have an AirPrint-enabled printer and your Apple device connected to the same Wi-Fi network, printing is incredibly straightforward. Here’s a general step-by-step guide:
- Open the App: Navigate to the app from which you want to print (e.g., Photos, Mail, Safari, Pages, Numbers, Keynote, or any third-party app with printing capabilities).
- Find the Print Option: Look for the Share icon (a square with an upward arrow) or a direct “Print” option within the app’s menu. In many apps, you might need to tap the three-dot menu icon (…) or the wrench icon to reveal more options, including “Print.”
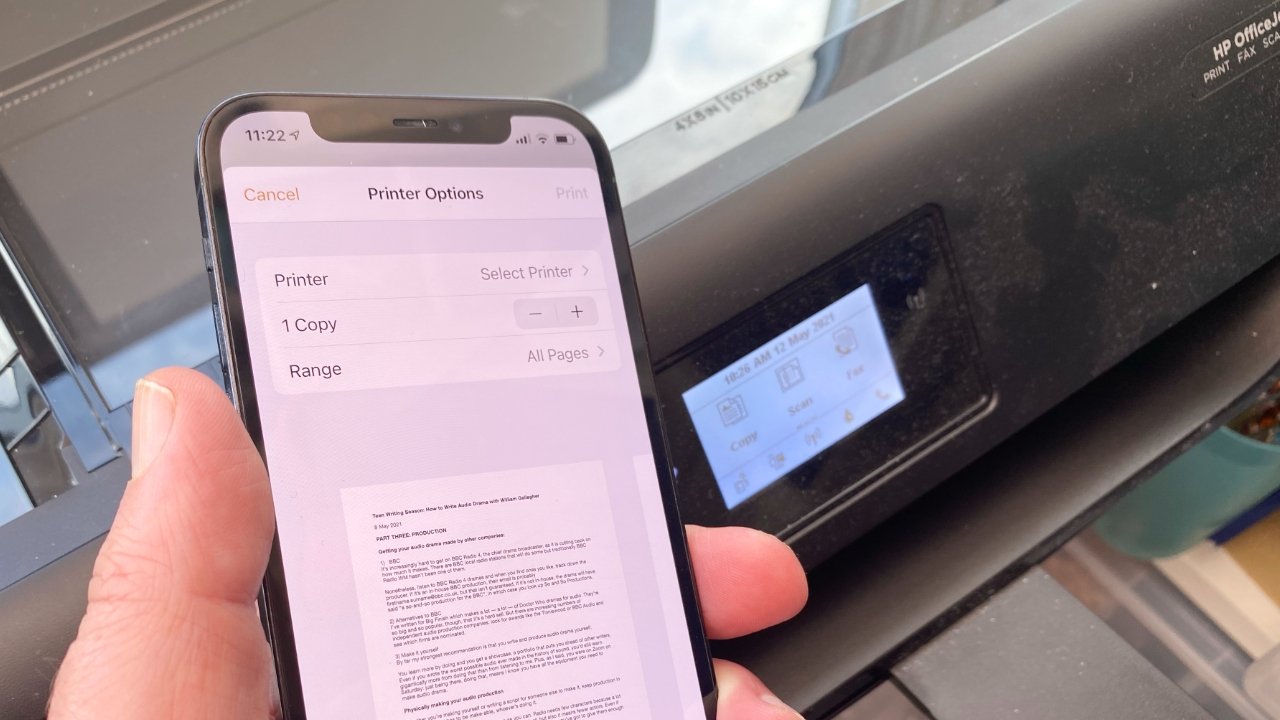
- Select “Print”: Tap on the “Print” option. This will open the Printer Options screen.
- Choose Your Printer: Tap “Select Printer.” Your AirPrint-enabled printer should automatically appear in the list of available printers. Tap on its name to select it. If you don’t see your printer, ensure it’s on, connected to Wi-Fi, and on the same network as your device.
- Adjust Print Options: On the Printer Options screen, you can typically configure settings such as the number of copies, specific page range, duplex printing (two-sided), color/grayscale, and paper size (depending on the app and printer capabilities).
- Tap “Print”: Once you’ve customized your settings, tap the “Print” button in the upper-right corner. Your document will then be sent wirelessly to the printer.
This native functionality exemplifies ease of use and is a major productivity booster for anyone within the Apple ecosystem.
Enabling AirPrint for Non-Compatible Printers: Bridging the Gap
While having a natively AirPrint-enabled printer is the ideal scenario, many users own perfectly functional, older printers that lack this feature. Throwing out a good printer just because it doesn’t support AirPrint isn’t practical, nor is it environmentally sound. This is where “installing AirPrint” truly comes into play, referring to the process of enabling AirPrint functionality for these legacy devices using various software and hardware workarounds.
The Challenge of Legacy Printers
The primary challenge with older or non-AirPrint-compatible printers is the absence of the embedded Apple Bonjour (mDNS) service and specific AirPrint communication protocols. AirPrint relies heavily on Bonjour for device discovery over the local network. Without this, your Apple device simply won’t “see” the printer. However, clever software developers and network solution providers have devised methods to act as a bridge, essentially making a non-AirPrint printer appear as an AirPrint-compatible one to your iOS or macOS devices. These solutions typically run on a computer (Mac or PC) that is connected to the non-AirPrint printer (via USB or network) and is also on the same Wi-Fi network as your Apple mobile devices.
Software Solutions for macOS: Printopia and Beyond
Mac users have excellent options for turning their non-AirPrint printers into AirPrint-enabled ones. One of the most popular and reliable solutions is Printopia.
Using Printopia for macOS:
Printopia is a commercial software application that runs on your Mac and shares any printer connected to that Mac (via USB or network) as an AirPrint printer on your local network.
- Download Printopia: Visit the Decisive Tactics website (the developer of Printopia) and download the trial version. You’ll typically want to purchase the full version for continued use.
- Install Printopia:
- Once the
.dmgfile is downloaded, open it. - Drag the Printopia icon to your Applications folder.
- Launch Printopia from your Applications folder. You may need to grant it accessibility permissions in System Settings (or System Preferences for older macOS versions) the first time you run it.
- Once the
- Configure Printopia:
- Printopia runs as a small utility in your Mac’s menu bar (or as a preference pane).
- Upon launch, it will automatically detect printers connected to or configured on your Mac.
- In the Printopia interface, you’ll see a list of your printers. Simply check the box next to each printer you want to share via AirPrint.
- You can also configure options like “Send to Mac” (which can save print jobs as PDFs on your Mac) or “Send to Dropbox” (for cloud integration).
- Test AirPrint:
- Ensure your Mac running Printopia is powered on and connected to the same Wi-Fi network as your iPhone/iPad.
- On your iOS device, open an app (e.g., Photos) and try to print following the native AirPrint steps mentioned earlier.
- Your non-AirPrint printer, now shared by Printopia on your Mac, should appear in the “Select Printer” list.
- Select it and initiate a print job. The job will be sent to your Mac, which then forwards it to the physical printer.
Other macOS Options: While Printopia is highly recommended for its ease of use and reliability, other tools or manual configurations (e.g., using specific scripts or CUPS configurations) exist, though they often require more technical expertise.
Bringing AirPrint to Windows and Linux: Third-Party Tools
Windows and Linux users aren’t left out when it comes to enabling AirPrint for non-compatible printers. The concept remains the same: a piece of software runs on the computer connected to the printer, acting as an AirPrint proxy.
For Windows:
Several third-party applications can provide AirPrint support on Windows. Historically, solutions like handyPrint (formerly AirPrint Activator) or O’Print have been popular.

-
handyPrint (formerly AirPrint Activator): This application runs as a service on your Windows PC.
- Download and Install: Find a reliable source to download handyPrint. Install it on your Windows machine.
- Configure: The software typically provides a simple interface where you can select which installed printers you want to share via AirPrint.
- Firewall Configuration: You might need to adjust your Windows Firewall settings to allow handyPrint to communicate over your network, specifically allowing traffic on ports used by Bonjour (e.g., UDP port 5353).
- Test: Just like with Printopia, ensure your Windows PC is on, connected to the same Wi-Fi network, and then attempt to print from your iOS device.
-
O’Print: Another commercial solution offering similar functionality. The installation and configuration process would be similar to handyPrint, focusing on sharing existing printers on the Windows system.
For Linux:
Linux, known for its flexibility, can also serve as an AirPrint server, typically by leveraging CUPS (Common Unix Printing System), which is the standard printing system for most Unix-like operating systems, and Avahi-daemon (Linux implementation of Bonjour/mDNS).
- Install CUPS: CUPS is usually pre-installed on most Linux distributions. If not, install it using your distribution’s package manager (e.g.,
sudo apt install cupson Debian/Ubuntu,sudo yum install cupson Fedora/RHEL). - Install Avahi-daemon:
sudo apt install avahi-daemonorsudo yum install avahi - Configure CUPS for Sharing:
- Access the CUPS web interface, usually at
http://localhost:631. - Go to “Administration” and ensure “Share printers connected to this system” and “Allow remote administration” (temporarily, for setup) are checked.
- Add your printer to CUPS if it’s not already there.
- Access the CUPS web interface, usually at
- Create Avahi Service File: This is the most technical part. You need to create an XML service file in
/etc/avahi/services/that describes your printer to Avahi, making it discoverable as an AirPrint printer. This file typically contains details like the printer’s name, type (e.g.,_ipp._tcp), and port (631 for CUPS). Numerous online guides provide example.servicefiles for AirPrint integration. - Restart Services: After creating the Avahi service file, restart Avahi and CUPS:
sudo systemctl restart avahi-daemonandsudo systemctl restart cups. - Test: Your Linux-shared printer should now appear as an AirPrint option on your Apple devices.
This Linux method offers a powerful, free, and open-source way to enable AirPrint, but it does require more command-line proficiency.
Network-Attached Storage (NAS) and Router-Based Solutions
Beyond dedicated computers, some advanced network devices can also act as AirPrint servers.
- NAS Devices: Many Network-Attached Storage (NAS) devices from manufacturers like Synology or QNAP include print server functionality. If you connect a USB printer to your NAS, its software might have an option to enable AirPrint for that printer. This is an excellent solution as NAS devices are typically always on, providing continuous AirPrint availability without needing a separate computer.
- Router Firmware: Certain advanced routers, particularly those that support custom firmware like DD-WRT or OpenWRT, can also be configured to host a print server with AirPrint capabilities for a USB-connected printer. This is typically for technically proficient users but offers a very robust, low-power solution.
These methods essentially replicate the function of Printopia or handyPrint but embed it directly into network hardware, often leading to a more stable and always-available AirPrint server.
Troubleshooting Common AirPrint Issues
Even with the most robust setup, technology can sometimes be temperamental. Here are common AirPrint issues and their solutions, helping you minimize downtime and maintain productivity.
Printer Not Found: Network and Device Checks
This is perhaps the most frequent issue. Your device simply doesn’t see the printer.
- Verify Wi-Fi Connection: Ensure both your Apple device and the printer are connected to the same Wi-Fi network. Check the Wi-Fi indicator on your printer and your device’s Wi-Fi settings. If your router broadcasts both 2.4GHz and 5GHz networks with different SSIDs, ensure both devices are on the same band if possible, or at least on bands that allow local network communication.
- Reboot Everything: The classic IT solution often works wonders.
- Turn off your printer, wait 30 seconds, and turn it back on.
- Restart your Wi-Fi router. Unplug it for about 60 seconds, then plug it back in.
- Restart your iOS/macOS device.
- If using a software solution (Printopia, handyPrint), restart the computer running that software.
- Check Printer Status: Is the printer displaying any error messages? Is it out of paper or ink? Resolve any printer-side issues first.
- Proximity: While not strictly necessary, sometimes having the printer closer to the Wi-Fi router can improve signal strength and discovery.
- Firewall Settings: If you’re using a software solution (e.g., handyPrint on Windows), ensure your computer’s firewall isn’t blocking Bonjour (mDNS) traffic or the specific application. Add an exception if necessary.
- Router Settings: Some advanced router settings like “AP Isolation,” “Client Isolation,” or certain guest network configurations can prevent devices from seeing each other on the local network. Disable these settings if they are active and you intend for devices to communicate.
Print Jobs Failing or Not Completing
If your device sees the printer but print jobs aren’t completing or are stuck, consider these points:
- Printer Firmware: Ensure your AirPrint-enabled printer has the latest firmware installed. Manufacturers frequently release updates that improve compatibility and fix bugs. Check your printer manufacturer’s website for instructions.
- Printer Queue: On your Apple device, double-tap the Home button (or swipe up from the bottom for newer iPhones) to access the App Switcher. If a print job is active, you’ll see a “Print Center” icon. Tap it to view the print queue. You can cancel or pause jobs here. Sometimes, simply canceling a stuck job and re-sending it resolves the issue.
- Network Congestion: A very busy Wi-Fi network can sometimes cause print jobs to time out or fail. Try printing when network activity is lower.
- Large Files: Extremely large print files (e.g., high-resolution photos or complex documents) might take longer to transfer and could occasionally lead to timeouts. Try printing a smaller, simpler document to test.
- Printer Memory: Older or basic printers might struggle with very large or complex print jobs due to limited memory.
Ensuring Optimal Performance and Security
Maintaining a robust and secure printing environment is key to a smooth experience.
- Strong Wi-Fi Signal: Place your printer and Wi-Fi router in locations that ensure good signal strength to avoid connectivity drops.
- Dedicated IP (Optional but Recommended): For printers that are always on, consider assigning them a static IP address or a reserved DHCP IP address through your router. This prevents the printer’s IP from changing, which can sometimes lead to discovery issues.
- Network Security: AirPrint relies on your local network. Ensure your Wi-Fi network is secured with WPA2 or WPA3 encryption and a strong, unique password. This prevents unauthorized access to your printer and protects your data from being intercepted. Avoid using open or unsecured Wi-Fi networks for printing sensitive documents.
- Regular Maintenance: Keep your printer clean, ensure ink/toner levels are adequate, and perform any recommended maintenance routines to ensure it’s always ready to print.
The Broader Impact and Future of Wireless Printing
AirPrint is more than just a convenience feature; it’s a testament to the evolving landscape of digital connectivity and its impact on how we work and live.
Enhancing Productivity and Workflow
The true value of AirPrint, and wireless printing in general, lies in its ability to enhance productivity and streamline workflows. In an era where mobile devices are central to personal and professional life, removing barriers to essential tasks like printing is crucial. For small businesses and home offices, it means less time spent on IT issues and more time focused on core tasks. For individuals, it empowers spontaneous printing of everything from travel itineraries to cherished family photos. The driverless nature of AirPrint saves valuable time and reduces frustration, making technology work for you, not against you. This aligns perfectly with the “Productivity” aspect of our website’s core topics, demonstrating how technology trends (like AirPrint) directly improve daily efficiency.
The Evolving Landscape of Printing Technology
AirPrint’s success has also spurred innovation across the printing industry. While it remains a powerful tool, the future of printing continues to evolve. Cloud printing services (like Google Cloud Print, though deprecated, set a precedent), advanced security features, and deeper integration with cloud storage platforms are continuously being developed. We’re seeing printers that can directly access cloud drives, print from email, or even integrate with voice assistants. However, for sheer local network simplicity and reliability, AirPrint continues to hold a significant place. It represents a fundamental shift towards a more connected, less tethered computing experience, mirroring broader “Technology Trends” in seamless device interaction and minimal user intervention.
In conclusion, “installing AirPrint” encompasses not just the act of using a natively compatible device, but also the clever workarounds that extend its invaluable functionality to a wider range of hardware. By understanding its requirements, leveraging software solutions when needed, and knowing how to troubleshoot, you can unlock a truly seamless and productive printing experience from all your Apple devices. Embrace the convenience and efficiency that AirPrint brings to your digital life, ensuring that your printing needs are met with unparalleled ease.
aViewFromTheCave is a participant in the Amazon Services LLC Associates Program, an affiliate advertising program designed to provide a means for sites to earn advertising fees by advertising and linking to Amazon.com. Amazon, the Amazon logo, AmazonSupply, and the AmazonSupply logo are trademarks of Amazon.com, Inc. or its affiliates. As an Amazon Associate we earn affiliate commissions from qualifying purchases.