In an increasingly interconnected digital world, the lines between operating systems are blurring, offering users unprecedented flexibility and power. For years, Windows and Linux have represented distinct computing philosophies, each with its own strengths and dedicated user base. However, the modern tech landscape encourages synergy, allowing users to harness the best of both worlds. Whether you’re a developer seeking robust command-line tools, a student exploring open-source software, or simply someone looking to expand their digital toolkit, running Linux alongside or within Windows 10 offers a compelling solution.
This comprehensive guide will walk you through the primary methods of integrating Linux with your Windows 10 environment: the revolutionary Windows Subsystem for Linux (WSL) and the classic dual-boot setup. We’ll delve into the benefits, essential preparations, and detailed step-by-step instructions to ensure a smooth transition and empower you to unlock new levels of productivity and technological exploration.
Why Blend Linux with Your Windows 10 Experience?
The decision to combine Linux with a Windows 10 setup isn’t merely a technical exercise; it’s a strategic move that can significantly enhance your digital life. The benefits span across development, security, customization, and even long-term cost-effectiveness.
Unlocking Enhanced Productivity and Development Workflows
For developers, system administrators, and tech enthusiasts, Linux is often considered the gold standard for its powerful command-line interface, extensive scripting capabilities, and robust open-source ecosystem. Integrating Linux allows Windows users to access a wealth of tools not natively available or as efficiently implemented in Windows. Imagine running Docker containers directly, utilizing advanced shell commands like grep, awk, and sed, or compiling code with compilers like GCC and G++ in a native Linux environment, all without leaving your familiar Windows desktop. This fusion streamlines development workflows, making it easier to build, test, and deploy applications across various platforms, ultimately boosting your productivity.
Furthermore, many cutting-edge technologies and frameworks are either developed primarily for Linux or offer superior performance and stability on a Linux base. By having access to a Linux environment, you gain immediate access to these innovations, staying ahead in the rapidly evolving tech landscape. This integration transforms your Windows machine into a versatile powerhouse, capable of handling diverse computing tasks with efficiency.
The Power of Open Source and Customization
One of Linux’s most appealing aspects is its foundation in open-source principles. This philosophy fosters a vibrant community of developers and users who continuously contribute to its improvement, security, and innovation. With Linux, you gain access to thousands of free, high-quality open-source applications – from office suites like LibreOffice to advanced graphical editors like GIMP and Inkscape, and powerful video editors like Kdenlive. This commitment to openness means greater transparency, flexibility, and often, more efficient software.
Beyond the software, Linux offers unparalleled customization. Users can tweak virtually every aspect of their operating system, from the desktop environment (GNOME, KDE Plasma, XFCE, etc.) to kernel parameters. This level of control allows you to tailor your computing environment precisely to your preferences and needs, optimizing it for specific tasks or simply personalizing it for aesthetic appeal. For those who value freedom and control over their digital tools, Linux is an empowering choice, fostering a deeper understanding of how their technology works.
Cost-Effectiveness and Security Considerations
From a financial perspective, embracing Linux can be remarkably cost-effective. The vast majority of Linux distributions are completely free to download, use, and distribute, eliminating licensing fees associated with proprietary software. This is particularly beneficial for students, small businesses, or anyone looking to minimize software expenditure while still accessing powerful and reliable tools. While Windows 10 is often pre-installed, the ability to run open-source alternatives for specific tasks or even as a primary OS in a dual-boot setup can lead to significant savings on additional software licenses over time. This aligns well with principles of smart personal finance and resource management.
Regarding digital security, Linux has historically been lauded for its robust architecture and lower susceptibility to malware compared to Windows, primarily due to its permission model and smaller market share (making it less of a target for widespread attacks). While no system is entirely impregnable, running Linux can add an extra layer of security, especially for sensitive tasks or when dealing with potentially risky applications. Moreover, the rapid patching cycles within the open-source community often mean security vulnerabilities are identified and addressed quickly. For users concerned about digital security and maintaining a secure computing environment, integrating Linux provides an excellent opportunity to diversify their protection strategies and explore different security paradigms.
Choosing Your Path: Dual Boot vs. Windows Subsystem for Linux (WSL)
Before diving into the installation process, it’s crucial to understand the two primary methods for running Linux on Windows 10 and decide which approach best suits your needs and technical comfort level. Each method offers distinct advantages and trade-offs.
Understanding Dual Booting: Full Immersion and Performance
Dual booting involves installing a Linux distribution directly onto your computer’s hard drive alongside Windows 10, creating two completely separate operating systems. When you power on your computer, a boot manager (usually GRUB for Linux) presents you with an option to choose which OS to load.
Advantages:
- Native Performance: Linux runs directly on your hardware, providing optimal performance and full access to system resources without any virtualization overhead. This is ideal for resource-intensive tasks, gaming, or specific hardware compatibility.
- Complete Linux Experience: You get the full, uncompromised Linux desktop experience with your chosen desktop environment (GNOME, KDE Plasma, XFCE, etc.), driver support, and system utilities.
- Separation: Windows and Linux are entirely isolated, which can be beneficial for security and stability, as issues in one OS are less likely to affect the other.
Disadvantages:
- Switching Requires Reboot: To switch between Windows and Linux, you must restart your computer, which can interrupt your workflow.
- Disk Partitioning: Requires careful manipulation of disk partitions, which carries a risk of data loss if not done correctly.
- Learning Curve: Setting up dual boot can be more complex and intimidating for beginners, involving BIOS/UEFI settings and manual partitioning.
Dual booting is generally recommended for users who want to fully immerse themselves in the Linux ecosystem, require maximum performance from Linux applications, or have specific hardware that performs better with native Linux drivers.
Embracing WSL: Seamless Integration and Convenience
The Windows Subsystem for Linux (WSL) is a compatibility layer developed by Microsoft that allows users to run a Linux command-line environment directly on Windows 10. It essentially provides a lightweight virtual machine that integrates deeply with Windows, enabling you to run Linux binaries and tools without the overhead of traditional virtualization. WSL 2, the latest iteration, uses a true Linux kernel, offering even greater compatibility and performance.
Advantages:
- Seamless Integration: Run Linux commands and applications directly from Windows Terminal, PowerShell, or Command Prompt. Access Windows files from Linux and vice-versa.
- No Reboot Required: Switch between Windows and Linux environments instantly without restarting your machine.
- Easier Installation: Generally much simpler to set up than a dual-boot system, requiring no disk partitioning or complex BIOS/UEFI configurations.
- Resource Efficiency: Lighter on system resources than a full virtual machine while still providing a robust Linux environment.
Disadvantages:
- Command-Line Focus (Primarily): While GUI applications are increasingly supported, WSL is primarily designed for command-line tools. Running complex GUI applications can be less performant or require additional setup.
- Not a Full Linux OS: While powerful, it’s not a complete, standalone Linux operating system. It relies on the Windows kernel (for WSL1) or a virtualized Linux kernel (for WSL2), and some niche hardware interactions might not be fully supported.
- Performance Differences: While good, it might not always match the raw performance of a natively installed dual-boot Linux system, especially for tasks requiring direct hardware access.
WSL is an excellent choice for developers, power users, and anyone who needs quick access to Linux command-line tools, scripting environments, and specific Linux-based applications without the commitment or complexity of a full dual-boot setup. It’s perfect for enhancing productivity within a largely Windows-centric workflow.
Making the Right Choice for Your Needs
- Choose WSL if: You primarily work in Windows but need robust Linux command-line tools, development environments (e.g., Node.js, Python, Ruby, Docker), or want to experiment with Linux without altering your system’s core configuration. It’s ideal for enhancing your existing Windows workflow with Linux capabilities.
- Choose Dual Boot if: You require a complete, uncompromised Linux desktop experience, need maximum performance for Linux-specific tasks (e.g., certain video editing, 3D rendering, or specific hardware drivers), or want to fully transition to Linux for extended periods while still retaining Windows as an option.
For most users looking to integrate Linux with minimal hassle, WSL 2 is the recommended starting point due to its ease of installation and excellent integration.
Method 1: Installing Linux with Windows Subsystem for Linux (WSL)
The Windows Subsystem for Linux (WSL) has revolutionized how Windows users interact with Linux. WSL 2, in particular, leverages a lightweight virtual machine with a real Linux kernel, offering superior performance and compatibility. This section will guide you through setting up WSL 2 on Windows 10.
Prerequisites for WSL Installation
Before you begin, ensure your system meets these requirements:
- Windows 10 Version: You need Windows 10 version 1903 or higher, with Build 18362 or newer. To check your version, type
winverin the Windows search bar and press Enter. - Virtualization Enabled: Your computer’s BIOS/UEFI settings must have virtualization enabled (often labeled as Intel VT-x or AMD-V). This is usually enabled by default, but it’s worth checking if you encounter issues.
- Sufficient Disk Space: While WSL installations are relatively small, ensure you have enough free disk space for the Linux distribution you plan to install.
Step-by-Step Guide to Setting Up WSL 2
The installation process for WSL 2 has become significantly streamlined, making it more accessible than ever.
1. Enable Windows Features
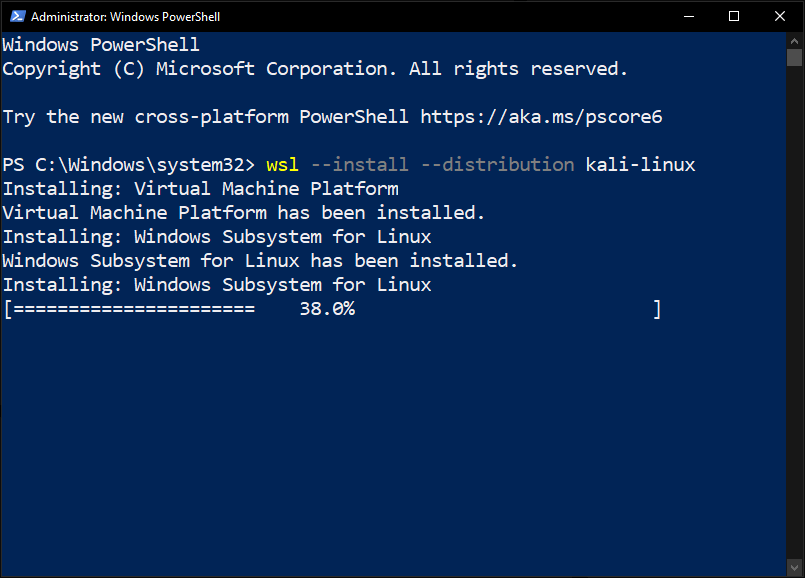
Open PowerShell as an administrator. You can do this by typing “PowerShell” in the Windows search bar, right-clicking “Windows PowerShell,” and selecting “Run as administrator.” Then, execute the following commands:
dism.exe /online /enable-feature /featurename:Microsoft-Windows-Subsystem-Linux /all /norestart
dism.exe /online /enable-feature /featurename:VirtualMachinePlatform /all /norestart
The first command enables the Windows Subsystem for Linux feature, and the second enables the Virtual Machine Platform, which is necessary for WSL 2. After running these, restart your computer when prompted.
2. Install WSL Kernel Update Package
WSL 2 requires an update to the Linux kernel component. Download the latest WSL 2 Linux kernel update package from Microsoft’s official GitHub repository:
https://wslstore.blob.core.windows.net/wsl2kernel/wslupdatex64.msi
Run the downloaded .msi installer. It’s a straightforward wizard that will guide you through the process.
3. Set WSL 2 as Your Default Version
After installing the kernel update, open PowerShell as an administrator again and set WSL 2 as the default version for any new Linux distribution installations:
wsl --set-default-version 2
You should see a message confirming the operation. If you get an error about the kernel component missing, ensure you’ve completed step 2.
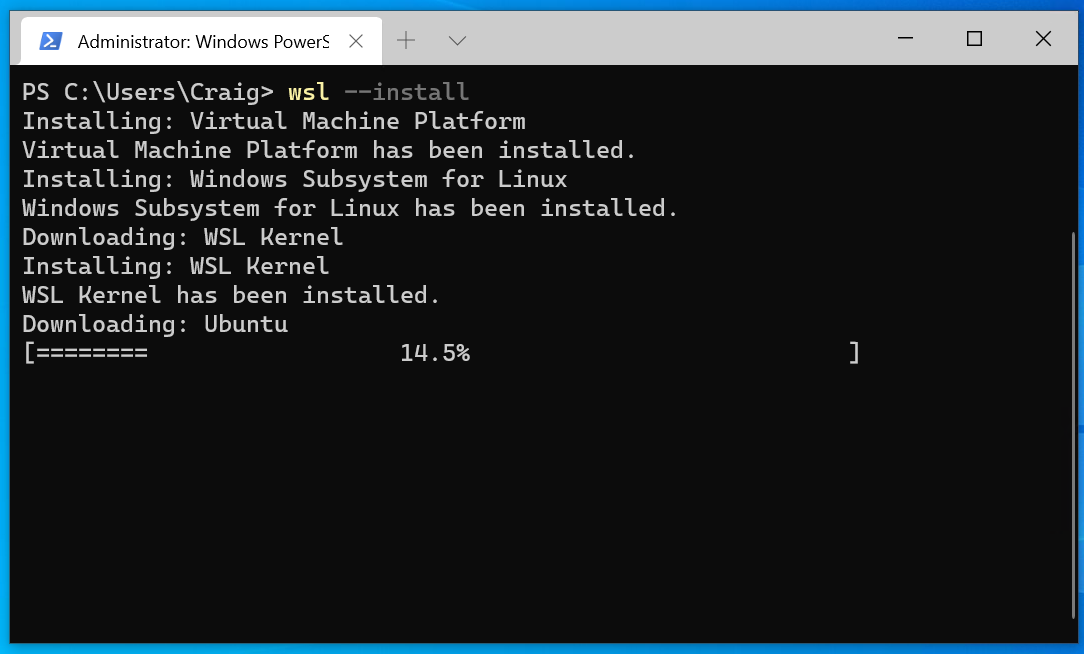
4. Install a Linux Distribution (e.g., Ubuntu)
Now you’re ready to install a Linux distribution. The easiest way is through the Microsoft Store.
- Open the Microsoft Store.
- Search for “Linux” or specific distributions like “Ubuntu,” “Debian,” “OpenSUSE,” or “Kali Linux.”
- Select your preferred distribution (Ubuntu is a popular choice for beginners due to its vast community support and comprehensive documentation).
- Click Get or Install.
5. Initial Setup and First Run

Once the distribution is installed from the Microsoft Store, click Launch. A console window will open, and you’ll be prompted to create a UNIX username and password for your new Linux environment. Remember this password, as you’ll need it for administrative tasks within Linux (using sudo).
Congratulations! You now have a functional Linux environment running directly on your Windows 10 machine.
Enhancing Your WSL Experience
With WSL 2 up and running, there are several ways to further enhance your experience:
- Windows Terminal: Install Windows Terminal from the Microsoft Store. It’s a modern, fast, and powerful terminal application that allows you to manage multiple command-line interfaces (including PowerShell, Command Prompt, and all your WSL distros) in a single window with tabs.
- VS Code Integration: If you use Visual Studio Code, install the “Remote – WSL” extension. This allows you to open your WSL project folders directly in VS Code, with all extensions running within the Linux environment, providing a truly native development experience.
- GUI Applications (Optional): While primarily command-line focused, WSL now supports running graphical Linux applications. You’ll need to enable a specific Windows feature and install an X server (like VcXsrv or X410) on Windows, and then configure your Linux environment to display GUI applications through it. More recently, Microsoft introduced WSLg, which provides direct support for GUI apps, making the process even simpler if your Windows 10 version is up to date (usually Insider builds or 21H2 and later).
Method 2: Dual Booting Linux (e.g., Ubuntu) Alongside Windows 10
For those who desire the full power and native performance of a standalone Linux installation, dual booting is the answer. This method involves installing a Linux distribution on a separate partition, allowing you to choose between Windows and Linux at boot time. We’ll use Ubuntu, one of the most user-friendly Linux distributions, as our example.
Essential Preparations Before Dual Booting
Dual booting is a more involved process and carries a higher risk of data loss if not performed carefully. Do not skip these preparatory steps.
1. Backup Your Data (Crucial!)
Before making any changes to your disk partitions, create a complete backup of all important data from your Windows installation to an external drive or cloud storage. This is the single most critical step to prevent irreversible data loss.
2. Create a Windows Recovery Drive
It’s wise to create a Windows 10 recovery drive on a USB stick (at least 16GB) in case you need to repair your Windows installation or reinstall it later. Search for “Create a recovery drive” in Windows and follow the instructions.
3. Free Up Disk Space (Shrink Partition)
You need unallocated space on your hard drive for the Linux installation.
- Right-click the Start button and select Disk Management.
- Locate your main Windows partition (usually
C:). Right-click it and select Shrink Volume. - Enter the amount of space you want to shrink (in MB). A minimum of 20-30 GB is recommended for a comfortable Linux installation, but more is better, especially if you plan to store files or install many applications. For a target of 1300 words, let’s suggest a more generous 60-100GB to ensure ample space for user data and future expansion. Note down the amount you’re shrinking.
- Click Shrink. You should now see “Unallocated” space on your drive.
4. Disable Fast Startup and Secure Boot (BIOS/UEFI)
These Windows and UEFI features can interfere with Linux installation and booting.
- Disable Fast Startup:
- Open Control Panel -> Hardware and Sound -> Power Options.
- Click “Choose what the power buttons do.”
- Click “Change settings that are currently unavailable.”
- Uncheck “Turn on fast startup (recommended).”
- Click “Save changes.”
- Disable Secure Boot:
- Restart your computer and enter your BIOS/UEFI settings. The key to enter BIOS/UEFI varies by manufacturer (e.g., F2, F10, F12, Del).
- Navigate to the “Boot” or “Security” tab.
- Find “Secure Boot” and disable it. You might also need to disable “Fast Boot” within UEFI if present.
- Save changes and exit.
- Note: Some systems may require you to set a BIOS password to disable Secure Boot.
5. Download Linux ISO and Create Bootable USB
- Download Ubuntu ISO: Go to the official Ubuntu website (https://ubuntu.com/download/desktop) and download the latest Long Term Support (LTS) version.
- Create Bootable USB: You’ll need a USB flash drive (at least 8GB) and a tool to write the ISO image to it. Popular tools include:
- Rufus (Windows only): Simple and effective.
- BalenaEtcher (Windows, macOS, Linux): User-friendly and reliable.
- Download and run your chosen tool, select the Ubuntu ISO, your USB drive, and start the writing process. This will make your USB drive bootable.
Step-by-Step Dual Boot Installation
With preparations complete, you’re ready to install Ubuntu.
1. Boot from USB
- Insert your bootable USB drive into your computer.
- Restart your computer and press the designated key to enter the boot menu (e.g., F12, F10, Esc). This allows you to select which device to boot from.
- Select your USB drive. Your computer should now boot into the Ubuntu live environment.
- You’ll likely see options like “Try Ubuntu” or “Install Ubuntu.” Choose “Try Ubuntu” first to test it out and ensure everything works, or proceed directly with “Install Ubuntu.”
2. Choose “Something Else” for Partitioning
- Follow the on-screen prompts for language, keyboard layout, and network connection.
- When you reach the “Installation type” screen, it’s crucial to select “Something else.” This allows you to manually create partitions in the unallocated space you prepared earlier. Do not choose “Install Ubuntu alongside Windows Boot Manager” as it can sometimes be unpredictable or modify partitions in unexpected ways.
3. Create Partitions
Now you’ll see your hard drive layout. Identify the “free space” you created earlier.
- Select the “free space” and click the
+button. You’ll create several partitions:- Root Partition (
/): This is where the core Linux system files will reside.- Size: A minimum of 20-30 GB. For ample room, allocate 40-60 GB.
- Type: Primary (if it’s one of your first four partitions) or Logical.
- Location: Beginning of this space.
- Use as: Ext4 journaling file system.
- Mount point:
/
- Swap Area: This acts as virtual memory when your RAM is full.
- Size: Generally, match your RAM size, or 2x if you have less than 4GB RAM. For modern systems with 8GB+ RAM, 4-8 GB is usually sufficient.
- Type: Logical.
- Location: Beginning of this space.
- Use as: swap area.
- Home Partition (
/home– Recommended but Optional): This is where your personal files and user settings will be stored. Separating it makes it easier to reinstall the OS without losing your data.- Size: Allocate the remaining free space here.
- Type: Logical.
- Location: Beginning of this space.
- Use as: Ext4 journaling file system.
- Mount point:
/home
- Root Partition (
- After creating these partitions, ensure the “Device for boot loader installation” is set to the main hard drive (usually
/dev/sdaor/dev/nvme0n1), not a specific partition number like/dev/sda1. This is where GRUB (the Linux bootloader) will be installed, allowing you to choose between Windows and Ubuntu at startup.
4. Complete Installation
- Click Install Now. Review the changes before proceeding.
- Follow the remaining prompts for your location, creating a user account (username and password), and computer name.
- The installation process will begin, which might take some time.
5. Restart and Select OS
- Once the installation is complete, you’ll be prompted to restart your computer. Remove the USB drive when instructed.
- Upon reboot, you should see the GRUB boot menu, allowing you to choose between “Ubuntu” and “Windows Boot Manager.” Select “Ubuntu” to boot into your new Linux system or “Windows Boot Manager” to go back to Windows.
Post-Installation: What to Do Next
After successfully dual-booting, there are a few essential steps to ensure your Linux experience is smooth and secure.
1. Update Your System
Open the terminal (Ctrl+Alt+T) and run:
sudo apt update
sudo apt upgrade
This downloads and installs the latest software updates and security patches for your Ubuntu system. This is a critical digital security practice, ensuring your system is protected against known vulnerabilities.
2. Install Drivers (If Needed)
If you have proprietary hardware (e.g., NVIDIA graphics card, Wi-Fi adapter), you might need to install specific drivers. Ubuntu usually prompts you for “Additional Drivers” or you can find them in “Software & Updates.”
3. Personalize Your Environment
Explore the various settings, themes, and applications available. Install your preferred browser, office suite, development tools, and any other software you need from the Ubuntu Software Center. This is where the power of customization truly shines, allowing you to create an environment tailored to your productivity needs.
Navigating Your Hybrid Environment and Beyond
Integrating Linux with Windows 10, whether through WSL or dual booting, opens up a world of possibilities. Managing this hybrid environment effectively is key to maximizing your productivity and security.
Tips for Managing Both Operating Systems
- File Sharing:
- WSL: Your Windows drives are accessible from within WSL under
/mnt/c,/mnt/d, etc. You can also access WSL files from Windows Explorer by typing\wsl$in the address bar. - Dual Boot: Linux can generally read and write to Windows (NTFS) partitions, but it’s best to keep your personal files on a dedicated
/homepartition in Linux or a separate NTFS data partition accessible by both, to avoid potential corruption if Windows is improperly shut down.
- WSL: Your Windows drives are accessible from within WSL under
- Sync Tools: Use cloud storage services like Google Drive, Dropbox, or OneDrive (accessible via browser or third-party clients in Linux) to seamlessly sync files across both operating systems, ensuring your work is always available regardless of which OS you’re using.
- Time Synchronization (Dual Boot): Linux and Windows can sometimes disagree on system time (Windows uses local time, Linux typically uses UTC). If you notice time discrepancies after switching OS, you can configure Linux to use local time to match Windows.
Security Best Practices in a Dual-Boot/WSL Setup
While Linux generally boasts a strong security posture, integrating it with Windows requires a holistic approach to digital security.
- Keep Both OS Updated: Regularly update both Windows 10 and your Linux distribution. Patches often include critical security fixes.
- Strong Passwords: Use strong, unique passwords for both operating systems and for your Linux user account.
- Antivirus/Antimalware: Maintain a robust antivirus solution on your Windows 10 installation. While Linux is less susceptible to Windows-specific malware, it’s not immune, especially if you’re frequently downloading files or working with sensitive data. Consider Linux-compatible scanners for critical systems, though for personal use, standard Linux security practices are often sufficient.
- Firewalls: Ensure both Windows Firewall and your Linux firewall (e.g.,
ufwon Ubuntu) are properly configured to restrict unauthorized access. - Be Mindful of Downloads: Exercise caution when downloading and executing files from unknown sources on either operating system.
- Data Encryption: Consider encrypting your entire disk (both Windows and Linux partitions) during installation for maximum security, especially on laptops.
Continuous Learning and Community Support
The world of Linux is vast and ever-evolving. The journey doesn’t end with installation; it’s a continuous process of learning and exploration.
- Online Communities: Leverage the extensive online communities. Forums like Ask Ubuntu, Reddit (r/linux, r/wsl), and various distribution-specific forums are invaluable resources for troubleshooting, learning new tricks, and staying updated.
- Documentation: Most Linux distributions have excellent official documentation.
- Experimentation: Don’t be afraid to experiment with different desktop environments, command-line tools, and applications. That’s part of the beauty of open source.
By thoughtfully integrating Linux into your Windows 10 setup, you empower yourself with a versatile, secure, and highly customizable computing environment. Whether it’s for advanced development, exploring open-source software, or simply enhancing your daily productivity, the synergy between these two powerful operating systems offers an unparalleled digital experience. Embrace the flexibility, dive into the possibilities, and unlock the full potential of your machine.
aViewFromTheCave is a participant in the Amazon Services LLC Associates Program, an affiliate advertising program designed to provide a means for sites to earn advertising fees by advertising and linking to Amazon.com. Amazon, the Amazon logo, AmazonSupply, and the AmazonSupply logo are trademarks of Amazon.com, Inc. or its affiliates. As an Amazon Associate we earn affiliate commissions from qualifying purchases.