In the vast and ever-evolving landscape of operating systems, Linux stands as a beacon of open-source innovation, flexibility, and security. Among its myriad distributions, Ubuntu has consistently risen to prominence as one of the most user-friendly, robust, and widely adopted choices. Whether you’re a seasoned developer, a curious tech enthusiast, or someone seeking a secure and free alternative to proprietary systems, installing Ubuntu can unlock a world of possibilities. This comprehensive guide will walk you through every step of the process, ensuring a smooth and successful transition to this powerful Linux distribution.
Ubuntu, maintained by Canonical, has earned its reputation for a reason. It strikes a remarkable balance between cutting-edge features and accessibility, making it an ideal entry point for newcomers to Linux while offering the depth and power that advanced users demand. Its vibrant community, extensive documentation, and vast repository of software packages mean that help and resources are always at your fingertips. From web browsing and office productivity to software development, graphic design, and even server management, Ubuntu provides a stable and secure foundation for almost any computing task.
For individuals and businesses navigating the modern digital realm, understanding and utilizing tools like Ubuntu aligns perfectly with the current technology trends emphasized on this website. It offers a stable platform for exploring AI tools, developing new apps, enhancing digital security, and boosting productivity without the licensing costs associated with other operating systems. Furthermore, embracing open-source solutions like Ubuntu can contribute to a more resilient and adaptable tech ecosystem, aligning with the ethos of innovation and self-reliance that underpins much of the technology discussion today.
Before we dive into the nitty-gritty of installation, it’s essential to understand the “why.” Why Ubuntu? Its key advantages include:
- Security: Linux-based systems are inherently more secure than many proprietary counterparts, with a robust permission system and a smaller attack surface. Ubuntu benefits from frequent security updates.
- Stability: Known for its reliability, Ubuntu provides a stable environment for continuous operation, crucial for both personal and professional use.
- Performance: Often lighter on resources than other OSes, Ubuntu can breathe new life into older hardware and run efficiently on modern machines.
- Cost-Effective: As an open-source operating system, Ubuntu is completely free to download, use, and distribute. This can lead to significant cost savings for individuals and businesses, freeing up resources for other investments, a direct benefit for the “Money” aspect of our discussions.
- Customization: From desktop environments to system tweaks, Ubuntu offers unparalleled customization options to tailor your computing experience precisely to your needs.
- Community and Support: A massive global community, extensive online forums, and official documentation provide ample support for any issues you might encounter.
- Software Availability: Access to thousands of free and open-source applications through its software center and vast repositories, covering virtually every category.
By choosing Ubuntu, you’re not just installing an operating system; you’re joining a global movement towards open-source excellence and digital empowerment. Now, let’s prepare for the journey.
Preparing for Your Ubuntu Installation
A successful installation begins with meticulous preparation. This phase involves making crucial decisions about how you want to install Ubuntu, ensuring your system meets the necessary requirements, acquiring the installation media, and most importantly, safeguarding your existing data. Skipping any of these steps could lead to frustration or, in worst-case scenarios, data loss.
Choosing Your Installation Method: Bare Metal, Dual Boot, or Virtual Machine?
Before anything else, you need to decide how you want Ubuntu to run on your system. Each method has its own advantages and disadvantages:
- Bare Metal Installation (Primary OS): This involves installing Ubuntu directly onto your computer’s hard drive, making it the sole operating system. This method offers the best performance and full access to your hardware’s capabilities. It’s ideal if you’re dedicating a machine to Linux or if you’re comfortable completely replacing your current OS.
- Dual Boot (Alongside another OS): This is a popular choice, allowing you to install Ubuntu alongside an existing operating system, such as Windows or macOS. When you start your computer, you’ll be presented with a boot menu, letting you choose which OS to load. Dual-booting provides the full performance benefits of a bare-metal installation while retaining access to your previous environment. However, it requires careful partitioning of your disk and carries a slightly higher risk if not performed correctly.
- Virtual Machine (VM): For those who want to experiment with Ubuntu without altering their primary system, installing it within a virtual machine (using software like VirtualBox or VMware Workstation/Fusion) is an excellent option. The VM runs Ubuntu as a guest operating system on top of your existing host OS. This is the safest method for testing but comes with a slight performance overhead as resources are shared and virtualized. It’s perfect for learning, development, or running specific Linux applications without committing to a full installation.
Consider your technical comfort level, hardware resources, and intended use case when making this decision. For this guide, we’ll primarily focus on a bare metal or dual-boot installation, as these are the most common scenarios for users seeking a full Ubuntu experience, while the VM setup process for Ubuntu itself is largely identical once the virtual machine is configured.
Meeting the Minimum System Requirements
While Ubuntu is relatively lightweight, especially its lighter desktop variants like Lubuntu or Xubuntu, the standard Ubuntu Desktop requires certain minimum specifications to run smoothly. Ensuring your system meets these will prevent performance bottlenecks and ensure a pleasant user experience.
- Processor: 2 GHz dual-core processor (or better).
- RAM: 4 GB system memory.
- Hard Drive Space: 25 GB of free hard drive space (more is recommended for applications and personal files).
- Graphics: VGA capable of 1024×768 screen resolution.
- Connectivity: Internet access is helpful for downloading updates and additional software during and after installation.
- Installation Media: A USB port for the bootable USB drive, or a DVD drive if you choose to use a DVD.
For virtual machine installations, remember that these resources will be allocated from your host system. For optimal performance, ensure your host has sufficient surplus RAM and CPU cores to dedicate to the VM.
Downloading the Ubuntu ISO Image
The first tangible step is to obtain the Ubuntu installation file, known as an ISO image. Always download the ISO from the official Ubuntu website (ubuntu.com) to ensure authenticity and prevent malicious tampering.
- Navigate to the Download Page: Go to ubuntu.com/download/desktop.
- Choose Your Version: You’ll typically find two main versions:
- LTS (Long Term Support) Release: These versions are supported for five years and are recommended for most users due to their stability and extended support period. They receive regular updates but fewer major feature changes.
- Short-Term Release: These are released every six months and supported for nine months. They offer the latest features and software but require more frequent upgrades.
For beginners and most general users, an LTS release is the preferred choice.
- Start the Download: Click the download button for your chosen version. The ISO file will be several gigabytes in size, so ensure you have a stable internet connection.
Creating Bootable Installation Media
Once you have the ISO image, you need to “burn” it to a USB drive to create a bootable installer. This USB drive will be used to boot your computer into the Ubuntu installation environment.
- For Windows Users:
- Rufus: This is a popular and reliable tool. Download Rufus from its official website.
- Etcher (Balena Etcher): Another excellent cross-platform tool known for its simplicity. Download Etcher from balena.io/etcher.
- Process (using Etcher as an example):
- Insert a USB drive (at least 8 GB, preferably empty as it will be completely erased).
- Open Etcher.
- Click “Flash from file” and select the downloaded Ubuntu ISO.
- Click “Select target” and choose your USB drive. Double-check that you’re selecting the correct drive to avoid erasing the wrong one!
- Click “Flash!” and wait for the process to complete.
- For macOS Users:
- Etcher: Similar to Windows, Etcher is the simplest and safest option.
- For Linux Users:
- Etcher: Again, a great graphical tool.
ddcommand-line utility: For advanced users,sudo dd if=/path/to/ubuntu.iso of=/dev/sdX bs=4M status=progress(replace/path/to/ubuntu.isoand/dev/sdXwith your actual ISO path and USB drive identifier). Be extremely cautious withddas an incorrect target (of=) can wipe your hard drive.
Backing Up Your Data (Crucial Step!)
This cannot be overstated: always back up your critical data before performing an operating system installation, especially if you’re doing a bare metal or dual-boot setup. Even if you plan to install on a separate drive or partition, accidents can happen. Store your backups on an external hard drive, cloud storage, or another secure location. This step is a cornerstone of digital security and data management, aligning with the “Tech” and “Money” aspects of responsible computing, as data loss can be incredibly costly in terms of time, effort, and even financial implications.
The Step-by-Step Ubuntu Installation Process
With your preparations complete, it’s time to embark on the actual installation. This section will guide you through the interactive installer, from booting up to your first successful login.
Booting from Your Installation Media
The first challenge is to instruct your computer to start from the USB drive rather than its internal hard drive.
- Insert the Bootable USB: Plug your prepared USB drive into an available USB port.
- Restart Your Computer: As your computer starts up, you’ll need to press a specific key to enter the BIOS/UEFI firmware settings or a boot menu. Common keys include
F2,F10,F12,Del, orEsc. The key varies by manufacturer (e.g., Dell, HP, Lenovo, Asus, Acer). Look for an on-screen prompt during startup. - Change Boot Order:
- BIOS/UEFI Settings: Navigate to the “Boot” or “Startup” tab. Find your USB drive (it might be listed by brand, model, or as “USB HDD”) and move it to the top of the boot order. Save changes and exit.
- Boot Menu: If you found a direct boot menu key, simply select your USB drive from the list.
Your computer should now boot from the USB, presenting you with the Ubuntu installer’s initial screen.
Initial Setup: Language, Keyboard, and Connectivity
The Ubuntu installer is graphically intuitive and user-friendly.
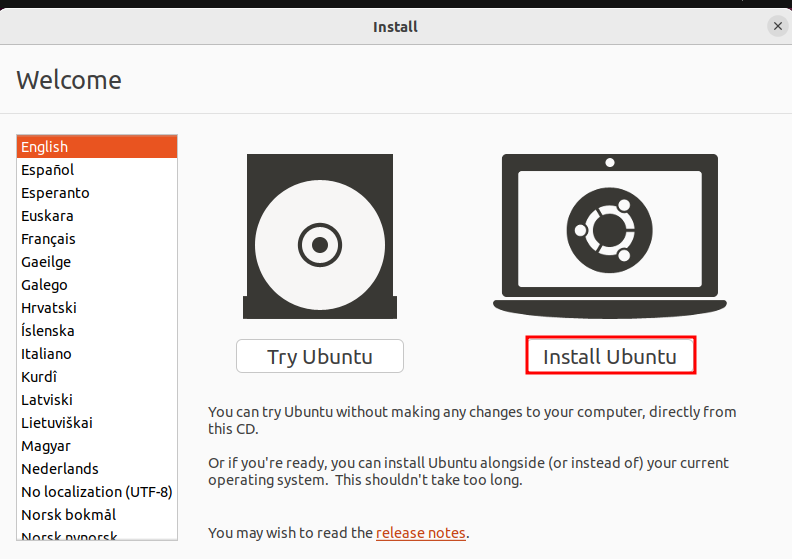
- Language Selection: On the first screen, select your preferred language from the list on the left.
- Try Ubuntu or Install Ubuntu:
- “Try Ubuntu”: This option loads a full live version of Ubuntu from your USB drive. You can test hardware compatibility, browse the web, and get a feel for the OS without making any changes to your hard drive. This is highly recommended to ensure everything works (Wi-Fi, sound, display) before committing to an installation.
- “Install Ubuntu”: This bypasses the live environment and goes directly to the installer.
For the purposes of this guide, we’ll assume you select “Install Ubuntu” or choose it after trying the live session.
- Keyboard Layout: The installer will attempt to detect your keyboard layout. Confirm or select the correct layout for your region. You can test it in the provided text box.
- Wireless Connectivity (Optional but Recommended): If you have a wireless adapter, you’ll be prompted to connect to a Wi-Fi network. Connecting now allows the installer to download updates and third-party software during the process, potentially saving time later.
Preparing the Installation Type
This screen offers important choices regarding the software installed.
- Updates and Other Software:
- Normal Installation: This installs a full desktop environment, web browser, office suite (LibreOffice), media players, and basic utilities. Recommended for most users.
- Minimal Installation: Installs only a basic desktop environment and web browser. Useful for users who want a leaner system and prefer to install only specific applications themselves.
- Download updates while installing Ubuntu: (Recommended) Saves time post-installation.
- Install third-party software for graphics and Wi-Fi hardware and additional media formats: (Highly Recommended) This installs proprietary drivers and codecs that might be necessary for your graphics card, Wi-Fi adapter, and to play certain media files (like MP3s). Enable this unless you have specific reasons not to.
Partitioning Your Disk: The Crucial Decision

This is arguably the most critical step, especially for dual-boot or custom installations. Proceed with extreme caution and ensure you understand the implications of your choices.
-
Installation Type Options:
- Erase disk and install Ubuntu: This option will wipe your entire hard drive and install Ubuntu as the sole operating system. DO NOT choose this if you intend to dual-boot or keep any existing data on the drive. This is typically chosen for dedicated Ubuntu machines or when installing on a new, empty drive.
- Install Ubuntu alongside [Your Existing OS]: If the installer detects another operating system (like Windows), it will offer this option for dual-booting. It will automatically shrink your existing OS partition and create space for Ubuntu. This is the easiest dual-boot method, but you might want more control over partition sizes.
- Something else: This is the advanced option, giving you full control over partitioning. You’ll need to manually create, resize, and assign partitions. This is necessary for complex dual-boot setups, multi-disk systems, or if you want a custom
/homepartition.
-
Guidance for “Something else” (Advanced Users):
-
If you chose “Something else,” you’ll see a partition table. You’ll need to create several partitions:
- Root Partition (
/): This is where the operating system files will reside. A minimum of 20-30 GB is recommended, but 40-60 GB is safer. Choose “Ext4 journaling file system” and set the mount point to/. - Swap Area: This acts as virtual memory when your RAM is full. A common recommendation is to set it equal to your RAM (if RAM is 4GB or less) or 2GB (if RAM is 8GB or more). Select “swap area.”
- Home Partition (
/home): (Optional but recommended for data separation) This partition stores all your personal files, documents, downloads, and user configurations. Creating a separate/homepartition makes it easier to reinstall Ubuntu in the future without losing your personal data. Allocate the remaining space here. Choose “Ext4 journaling file system” and set the mount point to/home. - EFI System Partition (ESP): (Only if booting in UEFI mode) If you’re installing on a UEFI-based system and an ESP doesn’t already exist (e.g., from a Windows installation), you’ll need to create one. It should be 100-500 MB, formatted as FAT32, with the mount point
/boot/efi.
- Root Partition (
-
Device for boot loader installation: Ensure this points to the correct drive (usually
/dev/sdaor the drive containing your EFI partition for UEFI systems).
Crucially, double-check all your partition choices before clicking “Install Now.” Errors here can lead to data loss or an unbootable system.
-
Setting Your Location and User Account
Almost there! These steps personalize your installation.
- Who are you? (User Setup): Enter your name, desired computer name (how it appears on a network), a username for logging in, and a strong password. It’s recommended to choose “Require my password to log in” for security. You can also opt for “Log in automatically” for convenience, but it’s less secure.
- Where are you? (Time Zone): The installer will attempt to detect your location based on your IP address. Confirm or click on the map to set your correct time zone.
Completing the Installation and First Boot
After you’ve made all your selections, the installation process will begin.
- Installation Progress: A slideshow will display various features of Ubuntu while the system copies files, installs software, and configures settings. This can take anywhere from 15 minutes to an hour, depending on your system’s speed and internet connection.
- Installation Complete: Once finished, you’ll see a message prompting you to restart your computer. Click “Restart Now.”
- Remove Installation Media: When prompted, remove your USB drive (or DVD) and press Enter. This ensures your computer boots from the newly installed Ubuntu OS on your hard drive.
- First Boot: Your computer should now boot into Ubuntu. You’ll see the Grub bootloader (if dual-booting or on a legacy BIOS system), followed by the Ubuntu splash screen, and then the login screen (if you chose to require a password). Enter your password, and welcome to your new Ubuntu desktop!
Post-Installation Essentials and Customization
Your journey with Ubuntu doesn’t end with the first boot. A few crucial steps will optimize your system, ensure it’s up-to-date, and personalize it to your liking, enhancing your productivity and digital security.
Updating Your System
This is the very first thing you should do after a fresh installation. Updates bring the latest security patches, bug fixes, and software enhancements.
- Open Terminal: Press
Ctrl+Alt+Tto open a terminal. - Update Package Lists: Type
sudo apt updateand press Enter. You’ll be prompted for your password. This command fetches the latest information about available packages from the Ubuntu repositories. - Upgrade Installed Packages: Type
sudo apt upgradeand press Enter. This command will install newer versions of all installed packages. Confirm withYwhen prompted. - Reboot (if necessary): If the kernel or core system components were updated, it’s good practice to reboot your system for the changes to take full effect:
sudo reboot.
Installing Essential Drivers and Software
While Ubuntu often works well out-of-the-box, some hardware might benefit from proprietary drivers, and you’ll likely want to install additional software.
- Graphics Drivers: If you have an NVIDIA or AMD graphics card, installing proprietary drivers can significantly improve performance for gaming, video editing, and certain professional applications.
- Go to “Software & Updates” (search in the Activities overview).
- Navigate to the “Additional Drivers” tab.
- Ubuntu will scan for available proprietary drivers. Select the recommended driver and click “Apply Changes.”
- Web Browser: While Firefox is pre-installed, you might prefer Chrome or Edge.
- For Chrome: Download the
.debfile from the official Google Chrome website and install it using the Software Center orsudo dpkg -i google-chrome-stable_current_amd64.deb.
- For Chrome: Download the
- Media Codecs: If you didn’t select “Install third-party software” during installation, you might need to install media codecs to play various audio and video formats.
sudo apt install ubuntu-restricted-extras
- Productivity Suites and Tools:
- LibreOffice: Pre-installed and a powerful alternative to Microsoft Office.
- GIMP (GNU Image Manipulation Program): A free and open-source alternative to Photoshop. Install via
sudo apt install gimp. - VLC Media Player: A versatile media player. Install via
sudo apt install vlc. - Flatpak/Snap: Ubuntu relies heavily on Snaps, which offer isolated, universal packages. You might also want to enable Flatpak support for even more software options.
sudo apt install flatpaksudo apt install gnome-software-plugin-flatpakflatpak remote-add --if-not-exists flathub https://flathub.org/repo/flathub.flatpakrepo- Reboot after installing Flatpak for full integration.
These installations enhance your Ubuntu machine’s capabilities, making it a powerful platform for all your tech-related tasks, from software development to creative work.
Personalizing Your Ubuntu Desktop
One of Ubuntu’s strengths is its flexibility. You can significantly alter its look and feel.
- Themes and Icons: Explore the “Appearance” settings in the System Settings to change wallpapers, themes, and icon sets. For more extensive customization, consider installing GNOME Tweaks (
sudo apt install gnome-tweaks) and exploring GNOME Shell Extensions. - Dock and Panel Settings: Customize the position, size, and auto-hide behavior of the dock (the bar on the left).
- Fonts: Install new fonts to personalize your documents and interface.
Enhancing Productivity and Security
Beyond basic setup, consider these steps for an optimized and secure environment:
- Firewall (UFW): Ubuntu comes with an Uncomplicated Firewall (UFW) that is disabled by default.
sudo ufw enablesudo ufw status- Learn how to allow/deny specific ports if you run services.
- Backup Solution: Set up a regular backup schedule using tools like
Deja Dup(Backups) which is usually pre-installed, or a more robust solution likeRsync. Consistent backups are paramount for digital security and data integrity. - Learn Keyboard Shortcuts: Ubuntu (with GNOME) offers many keyboard shortcuts that can significantly boost your productivity.
- Explore the Software Center: Ubuntu Software is a user-friendly graphical interface to browse and install thousands of applications, from productivity tools to games.
Troubleshooting Common Installation Issues
Even with careful preparation, unforeseen issues can arise. Here are solutions to some common problems:
Boot Issues and GRUB Recovery
- “No bootable device found”: Check your BIOS/UEFI settings again to ensure the correct drive is selected as the primary boot device. If dual-booting, Windows might have overwritten the GRUB bootloader.
- GRUB Rescue: If you see a
grub rescue>prompt, it means GRUB cannot find its configuration files. This often happens after resizing partitions or issues during dual-boot installation. You can often fix this using a live Ubuntu USB:- Boot from the live Ubuntu USB.
- Open a terminal.
- Install
boot-repair:sudo add-apt-repository ppa:yannubuntu/boot-repair && sudo apt update && sudo apt install -y boot-repair - Run
boot-repairand select “Recommended repair.”
Wi-Fi and Graphics Driver Problems
- No Wi-Fi after installation: This is often due to missing proprietary drivers. Ensure you checked the “Install third-party software” option during installation. If not, go to “Software & Updates” -> “Additional Drivers” and install the recommended Wi-Fi driver.
- Low Resolution / Screen Tearing: Similar to Wi-Fi, this usually indicates an issue with graphics drivers. Install proprietary drivers from “Additional Drivers” or directly from your GPU manufacturer’s website if needed.
Disk Partitioning Errors
- Installer hangs/crashes during partitioning: This can sometimes indicate a failing hard drive or a bug. Try a different USB port, re-create the bootable USB, or test your hard drive’s health.
- Incorrect disk size/space: If your disk space doesn’t appear correctly, ensure you’ve refreshed the partition table in the “Something else” menu. Incorrect partitioning during a dual-boot setup can also lead to inaccessible space for one OS. Review your partitions carefully.

Conclusion
Installing Ubuntu is a rewarding experience that opens doors to a world of open-source software, enhanced security, and unparalleled customization. By following this comprehensive guide, you’ve not only set up a powerful operating system but also taken a significant step towards greater control over your computing environment. Whether you’re exploring the latest technology trends, securing your digital footprint, boosting your productivity with efficient tools, or simply seeking a cost-effective computing solution, Ubuntu provides a robust foundation.
From the careful preparation of choosing your installation method and backing up data to navigating the installer’s intricate options and performing essential post-installation tweaks, each step contributes to a stable and personalized system. Remember, the vibrant Ubuntu community is always there to assist with any challenges you might encounter. Embrace the freedom and power that Ubuntu offers, and enjoy your journey into the exciting world of Linux. Your new digital workspace awaits!
aViewFromTheCave is a participant in the Amazon Services LLC Associates Program, an affiliate advertising program designed to provide a means for sites to earn advertising fees by advertising and linking to Amazon.com. Amazon, the Amazon logo, AmazonSupply, and the AmazonSupply logo are trademarks of Amazon.com, Inc. or its affiliates. As an Amazon Associate we earn affiliate commissions from qualifying purchases.