In our increasingly mobile and connected world, a laptop is more than just a piece of technology; it’s a vital tool for productivity, creativity, and communication. For many, an HP laptop represents a reliable companion for work, study, and entertainment. However, like all portable electronics, the Achilles’ heel of any laptop is its battery. Over time, even the best batteries degrade, leading to reduced uptime, frustrating power struggles, and ultimately, a tethered experience that defeats the purpose of a portable device.
Replacing a laptop battery might seem like a daunting task, especially for those accustomed to the days of easily removable external batteries. Modern HP laptops, like many others, often feature internal batteries that require a bit more effort to access. Yet, with the right guidance, tools, and a healthy dose of patience, performing this upgrade yourself is not only achievable but also incredibly rewarding. This comprehensive guide will walk you through the process of installing a new battery in your HP laptop, transforming it from a wall-outlet prisoner back into a truly mobile powerhouse. Beyond just the “how-to,” we’ll delve into the “why” and “what next,” providing a holistic approach that aligns with understanding your tech, making smart financial decisions, and even appreciating the brand engineering behind your device. This DIY approach can save you significant repair costs, extend the lifespan of your valuable asset, and reduce electronic waste, embodying smart personal finance and responsible tech ownership.
Understanding Your HP Laptop Battery: When & Why to Replace
Before diving into the intricate steps of replacement, it’s crucial to understand when and why a battery needs to be replaced, and what type of battery you’re dealing with. Recognizing the signs of a failing battery can save you from unexpected shutdowns and lost work, while understanding your battery type dictates the complexity of the task ahead.
Signs Your Battery Needs Replacement
Your laptop’s battery life naturally diminishes with age and charge cycles. However, several clear indicators signal that it’s time for a replacement, moving beyond mere inconvenience to potential performance and safety issues.
Firstly, a significantly reduced battery life is the most common and obvious symptom. If your HP laptop once lasted 6-8 hours on a charge but now barely manages 2-3, its capacity has likely degraded beyond acceptable levels. This directly impacts your productivity and mobility – key tenets of modern tech usage. Secondly, unexpected shutdowns despite indicating remaining charge are a strong warning sign. The battery’s ability to deliver consistent power can fluctuate, causing the system to abruptly cut off, risking data loss. Thirdly, swelling or bulging of the laptop casing is an emergency. This is a critical safety hazard caused by gases produced within the failing lithium-ion cells. If you observe any physical deformation, stop using the laptop immediately and proceed with careful battery replacement or professional servicing, as a swollen battery poses a fire risk.
Other indicators include the “plugged in, not charging” message, even when connected to a working adapter, or the laptop only operating when plugged in. Modern operating systems, including Windows, also provide battery health reports that can indicate remaining capacity, often flagging a “Service Battery” or similar message. Addressing these signs promptly not only restores your laptop’s performance but also safeguards your investment and personal safety.
Internal vs. External Batteries: Identifying Your Type
HP, like most laptop manufacturers, has largely transitioned from external, user-removable batteries to internal designs. This shift is often driven by design aesthetics (slimmer profiles), improved security (less chance of theft), and a desire to integrate the battery more seamlessly into the laptop’s thermal management.
External batteries are characterized by a latch or release mechanism on the underside or back of the laptop, allowing them to be simply slid out and replaced without tools. If your HP laptop is an older model (typically pre-2015 for many lines) or a business-oriented series designed for easy field maintenance, it might still feature an external battery. Replacing these is a simple click-and-go process, requiring no internal disassembly.
Internal batteries, conversely, are housed within the laptop’s chassis and require opening the bottom cover, removing screws, and often disconnecting cables to access. The vast majority of current HP consumer and business laptops, from the Pavilion to the Spectre and EliteBook series, utilize internal batteries. Identifying your laptop’s specific model number (usually found on a sticker on the underside or in the system information within Windows) is crucial for determining which type of battery it uses and, subsequently, the correct replacement part. The complexity of installing an internal battery makes this guide particularly valuable, offering a detailed pathway through what might otherwise seem a daunting task.
The Importance of Genuine or Quality Replacement Batteries
When it comes to sourcing a new battery, quality cannot be overstated. The market is flooded with third-party options, some excellent, some dangerously subpar. For your HP laptop, prioritizing a genuine HP replacement battery is ideal. These batteries are specifically designed and tested for your model, ensuring perfect compatibility, optimal performance, and adherence to stringent safety standards. Investing in a genuine part might be slightly more expensive upfront, but it offers peace of mind, maximum lifespan, and often comes with a warranty, directly connecting to the “Money” aspect of smart purchasing.
If a genuine HP battery is unavailable or cost-prohibitive, choose a high-quality, reputable third-party brand. Look for certifications (like CE, FCC, RoHS) and positive reviews, particularly those that mention long-term reliability and safety. Avoid excessively cheap, no-name batteries. These often use inferior cells, may lack proper safety circuits, and can lead to poor performance, short lifespans, and, in worst-case scenarios, overheating, swelling, or even fire. Such incidents not only damage your laptop but also pose a significant personal risk, making the initial “saving” a costly mistake. Always cross-reference the battery’s model number, voltage, and capacity (mAh or Wh) with your original battery to ensure a perfect match. This careful consideration aligns with protecting your investment and ensuring the continued reliability of your tech.
Essential Preparations Before You Begin
Preparation is key to a successful and safe battery replacement. Rushing into the process without the right tools or understanding the necessary precautions can lead to frustration, damage to your laptop, or even personal injury. This section covers everything you need to do before unscrewing the first panel.
Gathering Your Tools
While the complexity might vary, replacing an internal laptop battery typically requires a few specialized tools. Having these readily available will streamline the process and prevent unnecessary interruptions.
- Small Phillips-head screwdriver set: Laptops often use tiny screws, so a set with various small sizes (PH00, PH000) is essential. A magnetic tip is a bonus for preventing lost screws.
- Plastic spudger or guitar pick: These non-conductive tools are invaluable for prying open plastic latches and separating laptop casing components without scratching or damaging them. Metal tools should be avoided for this purpose.
- Anti-static wrist strap: This is a crucial safety item. Static electricity can irreparably damage sensitive internal components of your laptop. An anti-static strap grounds you, preventing static discharge. If you don’t have one, frequently touch a grounded metal object (like a radiator) to discharge static, but a strap is strongly recommended.
- New replacement battery: As discussed, ensure it’s the correct model for your HP laptop.
- A clean, well-lit workspace: A tidy area prevents losing small screws and ensures good visibility. Avoid working on carpeted surfaces, which can generate static electricity.
- Container for screws: A small magnetic mat, an ice cube tray, or even just different sections of a paper towel can help you organize screws, as they often differ in size and length and must go back in their original spots.
These tools are a modest investment that empowers you to perform a variety of tech repairs, aligning with a mindset of self-reliance and intelligent money management by avoiding professional repair costs for common issues.
Sourcing the Right Battery
The single most critical step in preparation is acquiring the correct replacement battery. A mismatch can lead to fitment issues, incompatibility, or even dangerous electrical problems.
Start by identifying your exact HP laptop model number. This is usually printed on a sticker on the bottom of the laptop, or you can find it by typing “system information” into the Windows search bar. Once you have the model number, you’ll need to identify the original battery’s part number. This is typically printed directly on the battery itself (you might need to open your laptop to see it). Sometimes, the laptop model alone isn’t enough, as HP might use different battery models within the same laptop series.
With both your laptop model and original battery part number, search reputable online retailers (e.g., HP’s official store, authorized parts distributors, or trusted electronics retailers like iFixit, Amazon with careful vendor selection). Be wary of extremely low prices, as these often indicate counterfeit or low-quality batteries. Look for sellers who offer warranties and have strong customer reviews. Confirm the voltage (V) and capacity (Wh or mAh) of the new battery match or are very close to the original specifications. While a higher mAh/Wh rating might offer slightly longer battery life, it must be compatible. This diligent sourcing process ensures you’re making a smart financial decision and getting a product that upholds your HP laptop’s brand integrity and performance.
Critical Safety Precautions
Working inside any electronic device carries risks, primarily from electricity and static discharge. Adhering to safety protocols is paramount.
- Disconnect All Power: Absolutely crucial. Unplug the AC adapter from the wall outlet and from your laptop. Never work on an open laptop that is still connected to power.
- Power Down Completely: Ensure the laptop is fully shut down, not just asleep or hibernating. A full shutdown prevents any residual power from flowing through components.
- Discharge Residual Power: After shutting down and disconnecting power, press and hold the power button for 15-20 seconds. This helps drain any residual charge from capacitors within the system, further reducing the risk of shock or component damage.
- Anti-Static Measures: Wear your anti-static wrist strap throughout the entire process. If you don’t have one, frequently touch a grounded metal object to dissipate any static buildup on your body. Handle internal components by their edges, avoiding touching circuit boards or delicate connectors directly.
- Careful Handling of the Old Battery: Lithium-ion batteries can be volatile if punctured, crushed, or exposed to extreme heat. Handle the old battery with care, avoiding any bending or force. If the old battery is swollen, extreme caution is advised; do not attempt to puncture or deform it.
- Proper Disposal of Old Battery: Never throw old laptop batteries into regular household trash. They contain hazardous materials and should be recycled at designated electronics recycling centers. Check with your local waste management services or electronics retailers for proper disposal options.
By diligently following these safety measures, you protect yourself, your laptop, and the environment, reinforcing responsible tech ownership and financial foresight by preventing costly damage.

Step-by-Step Guide to HP Laptop Battery Installation
With all preparations complete, it’s time to perform the actual battery replacement. This section will guide you through the process for internal batteries, which are the most common type requiring a detailed procedure.
For Internal Batteries: The Detailed Process
The steps outlined below are general guidelines. Minor variations may exist depending on your specific HP laptop model. It’s highly recommended to search for a specific service manual or a video tutorial for your exact model if available, but these steps cover the core process.
Step 1: Power Down and Disconnect All Cables
Ensure your HP laptop is fully shut down (not just in sleep or hibernation mode). Disconnect the AC adapter, and remove any peripherals such as USB drives, external monitors, or mice. You want the laptop to be completely isolated.
Step 2: Accessing the Laptop’s Interior
This is usually the most involved part of the process.
- Flip the laptop over: Place it on your clean, static-free workspace with the bottom facing up.
- Remove the bottom cover screws: Carefully locate all screws securing the bottom cover. HP laptops often have screws of different lengths or types (e.g., Phillips, Torx). Pay close attention to their locations and use your screw organizer to keep track. Some screws might be hidden under rubber feet or stickers.
- Gently pry open the casing: Once all screws are removed, use your plastic spudger or guitar pick to carefully pry open the bottom cover. Start at a seam, working your way around the edges. Take your time, as plastic clips can be fragile. Avoid forcing it; if it doesn’t open easily, double-check for any missed screws. Once the cover is loose, lift it off and set it aside.
Step 3: Disconnecting the Old Battery
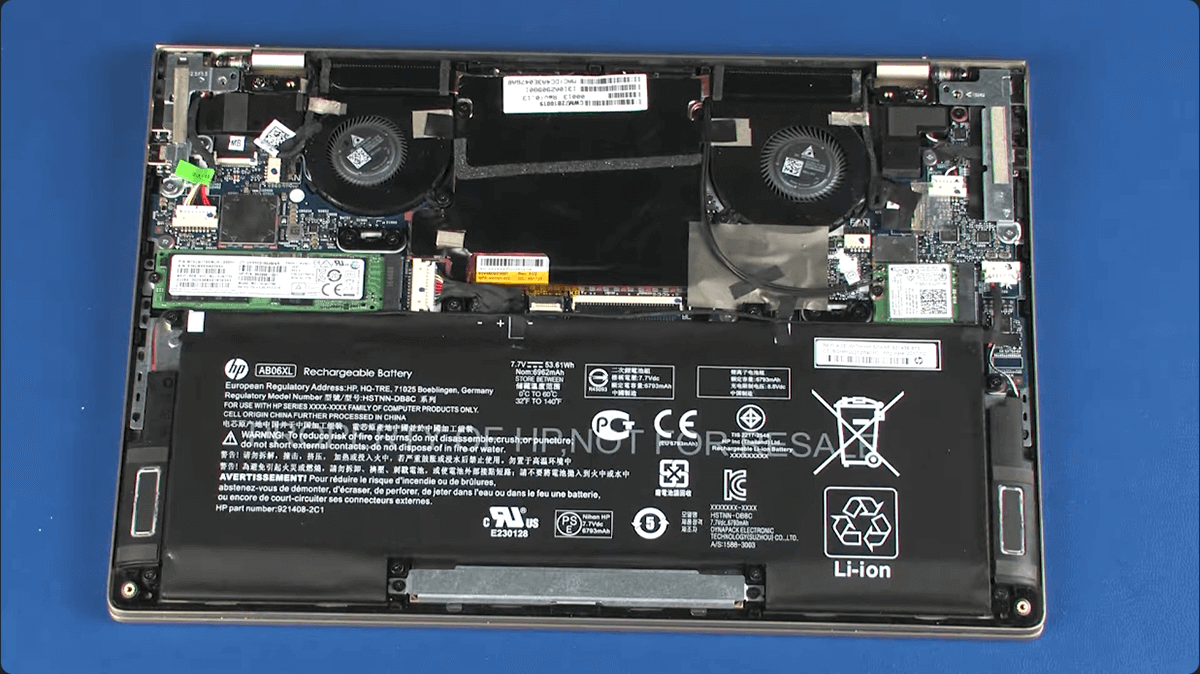
Once the interior of your laptop is exposed, you’ll see various components. The battery is usually a large, rectangular component, often occupying a significant portion of the internal space.
- Locate the battery connector: The battery will be connected to the motherboard via a small cable and connector. This connector might be a simple plug, or it might have a small retaining latch that needs to be gently flipped up before the cable can be pulled out.
- Gently disconnect the battery: With extreme care, unlatch (if present) and pull the connector straight out from its socket on the motherboard. Avoid pulling on the wires themselves; grasp the connector housing. This step is critical for safety and preventing damage to the motherboard’s delicate pins.
Step 4: Removing the Old Battery
The battery is typically secured by a few screws and/or some adhesive.
- Remove battery securing screws: Identify and remove any screws holding the battery in place. Again, use your screw organizer.
- Carefully lift out the old battery: If there’s adhesive, you might need to gently pry it up with your plastic spudger, being careful not to bend or puncture the battery. Lift the old battery out of its compartment. Handle it gently, especially if it was swollen. Set it aside for proper recycling.
Step 5: Installing the New Battery
Now, it’s time for the new, healthy power source.
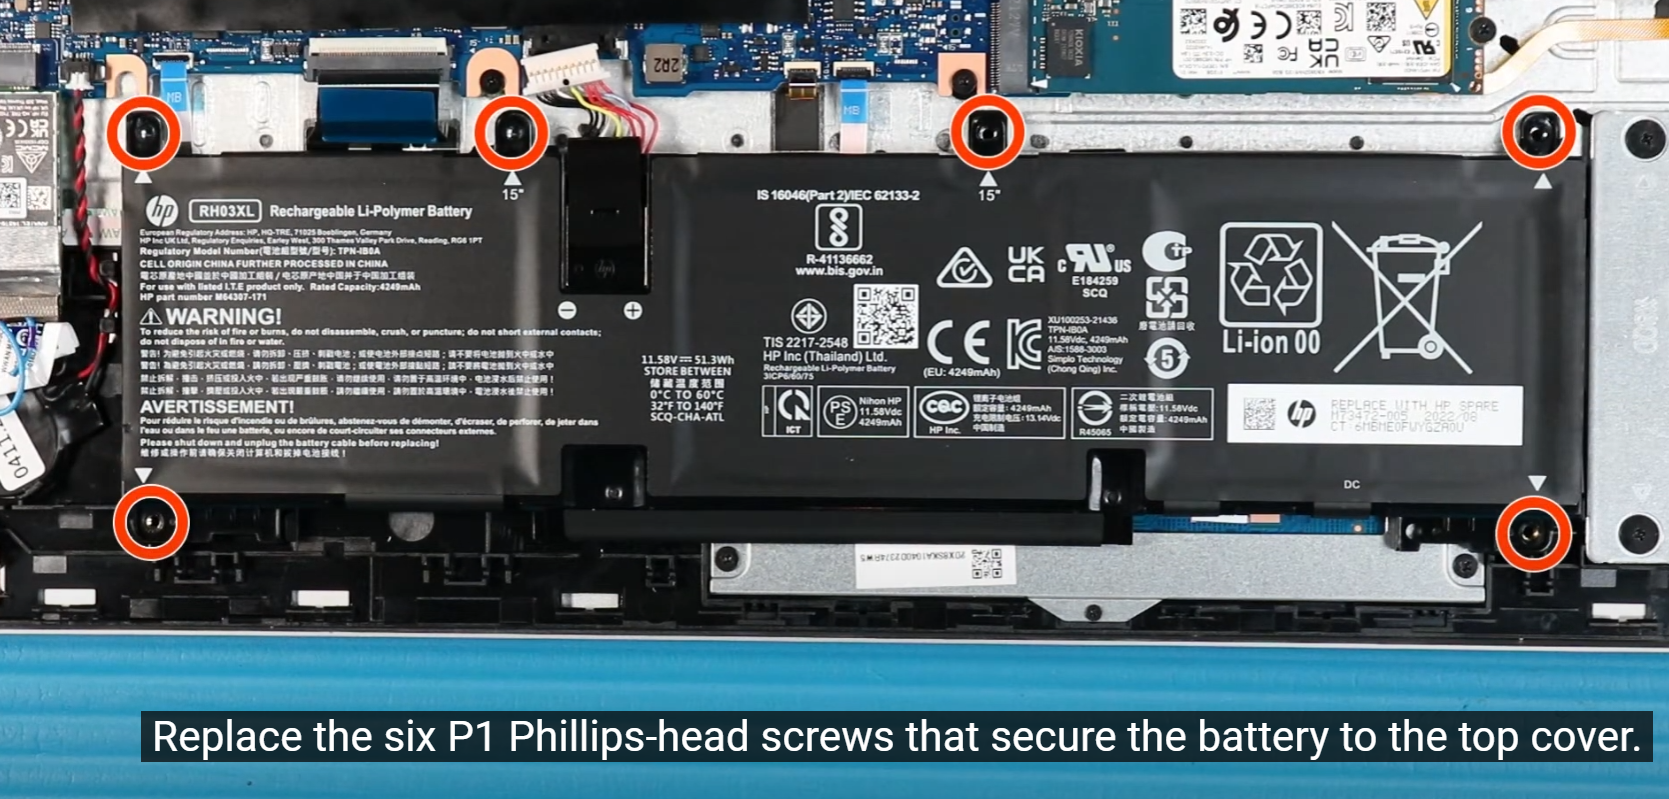
- Place the new battery: Carefully position the new battery into the empty compartment, ensuring it aligns correctly with the screw holes and the connector.
- Secure the new battery: Replace any screws that held the old battery in place, making sure they are snug but not overtightened. If there was adhesive, the new battery might come with fresh adhesive strips, or it might rely solely on the screws.
- Connect the new battery: Carefully align the battery’s connector with the socket on the motherboard. Gently push the connector straight in until it’s fully seated. If there was a latch, flip it back down to secure the connection. Double-check that the connection is firm and secure.
Step 6: Reassembling Your Laptop
The final stage is putting everything back together.
- Replace the bottom cover: Carefully align the bottom cover with the laptop chassis. Ensure all clips (if present) snap back into place. Start by gently pressing around the edges.
- Replace all screws: Systematically replace all the screws you removed in Step 2, ensuring each screw goes back into its original hole. Do not overtighten, as this can strip threads or crack plastic. If you organized your screws, this step should be straightforward.
- Double-check: Give your laptop a quick visual inspection to ensure the cover is flush, and no screws are missing or rattling inside.
With these steps, your HP laptop now boasts a brand-new battery, ready for calibration and a renewed life of untethered performance.
Post-Installation & Battery Health Optimization
Installing a new battery is a significant upgrade, but the journey doesn’t end there. Proper initial setup and ongoing maintenance are crucial to ensure your new battery performs optimally and provides the maximum possible lifespan, protecting your investment and maintaining peak productivity.
Initial Power-Up and Calibration
After successfully installing the new battery and reassembling your HP laptop, there are a few important steps to take to initialize and calibrate it.
- Initial Charge: Connect your AC adapter and power on your laptop. Allow the battery to charge fully to 100% without interruption. This first full charge is important for the battery management system to recognize the new battery’s full capacity.
- Calibration Cycle (Optional but Recommended): While modern lithium-ion batteries don’t strictly require “memory effect” calibration like older battery types, performing a full discharge-recharge cycle can help the laptop’s battery gauge provide more accurate readings. Once fully charged, use the laptop on battery power until it automatically shuts down due to low battery (usually around 5%). Then, plug it back in and charge it uninterrupted to 100% again. This process helps the battery controller learn the new battery’s full range.
- Check Battery Health Software: Access your HP Support Assistant or Windows’ built-in battery report (search for
powercfg /batteryreportin Command Prompt) to confirm the new battery is recognized and displaying its correct capacity. This is a vital tech check to ensure the installation was successful and the new component is functioning as expected.
Software Checks and Updates
Ensuring your operating system and drivers are optimized for battery management can significantly impact performance and longevity.
- HP Support Assistant: If installed, run the HP Support Assistant. This tool can identify potential battery-related issues, suggest driver updates, and provide diagnostics. Ensure your BIOS/UEFI firmware is up to date, as manufacturers often release updates that improve power management efficiency.
- Windows Power Settings: Review your Windows Power & Sleep settings. Adjust the screen brightness, sleep timers, and power modes (e.g., “Best performance” vs. “Better battery”) to suit your usage. For optimal battery life, the “Balanced” or “Better battery” modes are usually recommended.
- Battery Driver Updates: In Device Manager, expand “Batteries.” Right-click on “Microsoft ACPI-Compliant Control Method Battery” and select “Update driver.” While Windows usually handles this automatically, a manual check after a new battery installation can ensure everything is current. These software considerations highlight the interconnectedness of hardware and software in modern tech.
Tips for Extending New Battery Lifespan
A new battery is a fresh start. By adopting good habits, you can significantly extend its useful life, further maximizing your financial investment and maintaining your laptop’s mobility.
- Avoid Extreme Temperatures: Heat is the enemy of lithium-ion batteries. Avoid leaving your laptop in direct sunlight, hot cars, or on soft surfaces that block vents. Similarly, extreme cold can also degrade performance.
- Optimal Charge Range: While a full charge (100%) and a full discharge (0%) are sometimes recommended for calibration, for daily use, try to keep your battery primarily between 20% and 80% charge. Constantly topping it up to 100% or letting it frequently drop to zero can stress the cells. Many modern HP laptops and Windows versions offer “Smart Charging” or “Battery Health Manager” features that can automatically manage this, often learning your usage patterns.
- Reduce Screen Brightness: The display is often the biggest power consumer. Reducing screen brightness significantly extends battery life.
- Close Unused Applications: Background apps consume CPU cycles and power. Regularly close programs you’re not actively using.
- Use Power Saver Mode: For critical periods when you need maximum battery life, enable Windows’ Battery Saver mode.
- Consider “Plugged In” Use: If you’re primarily using your laptop at a desk, consider unplugging it once it reaches 80-90% and using it on battery for a while, then plugging it back in when it drops to 20-30%. This prevents the battery from sitting at 100% charge for extended periods, which can accelerate degradation.
- Keep it Cool: Ensure your laptop’s cooling system is clean and clear of dust. Overheating components can indirectly stress the battery.
By following these best practices, you’re not just maintaining your tech; you’re making a financially savvy decision that delays the next battery replacement and keeps your HP laptop a reliable partner for years to come.
Replacing your HP laptop battery might seem like a complex endeavor, but it’s an incredibly empowering DIY project. From identifying the signs of a failing battery and sourcing a quality replacement to carefully executing the installation and optimizing post-replacement battery health, each step contributes to restoring your laptop’s autonomy and extending its productive life. This process not only saves you money on professional repairs but also deepens your understanding of your technology, aligning perfectly with the principles of informed tech ownership, astute personal finance, and even a greater appreciation for your chosen brand, HP. Embrace the challenge, follow this guide diligently, and soon your HP laptop will be ready to tackle any task, untethered and revitalized.
aViewFromTheCave is a participant in the Amazon Services LLC Associates Program, an affiliate advertising program designed to provide a means for sites to earn advertising fees by advertising and linking to Amazon.com. Amazon, the Amazon logo, AmazonSupply, and the AmazonSupply logo are trademarks of Amazon.com, Inc. or its affiliates. As an Amazon Associate we earn affiliate commissions from qualifying purchases.