
Venmo, a popular peer-to-peer payment app, has revolutionized how friends and family exchange money. Its user-friendly interface and social features have made it a go-to for splitting bills, sending gifts, and managing small debts. However, as with any digital service, there may come a time when users decide to deactivate or permanently delete their Venmo account. This decision could stem from various reasons, including privacy concerns, switching to a different payment platform, or simply no longer needing the service. Understanding the process of account deletion is crucial for a secure and clean digital footprint.
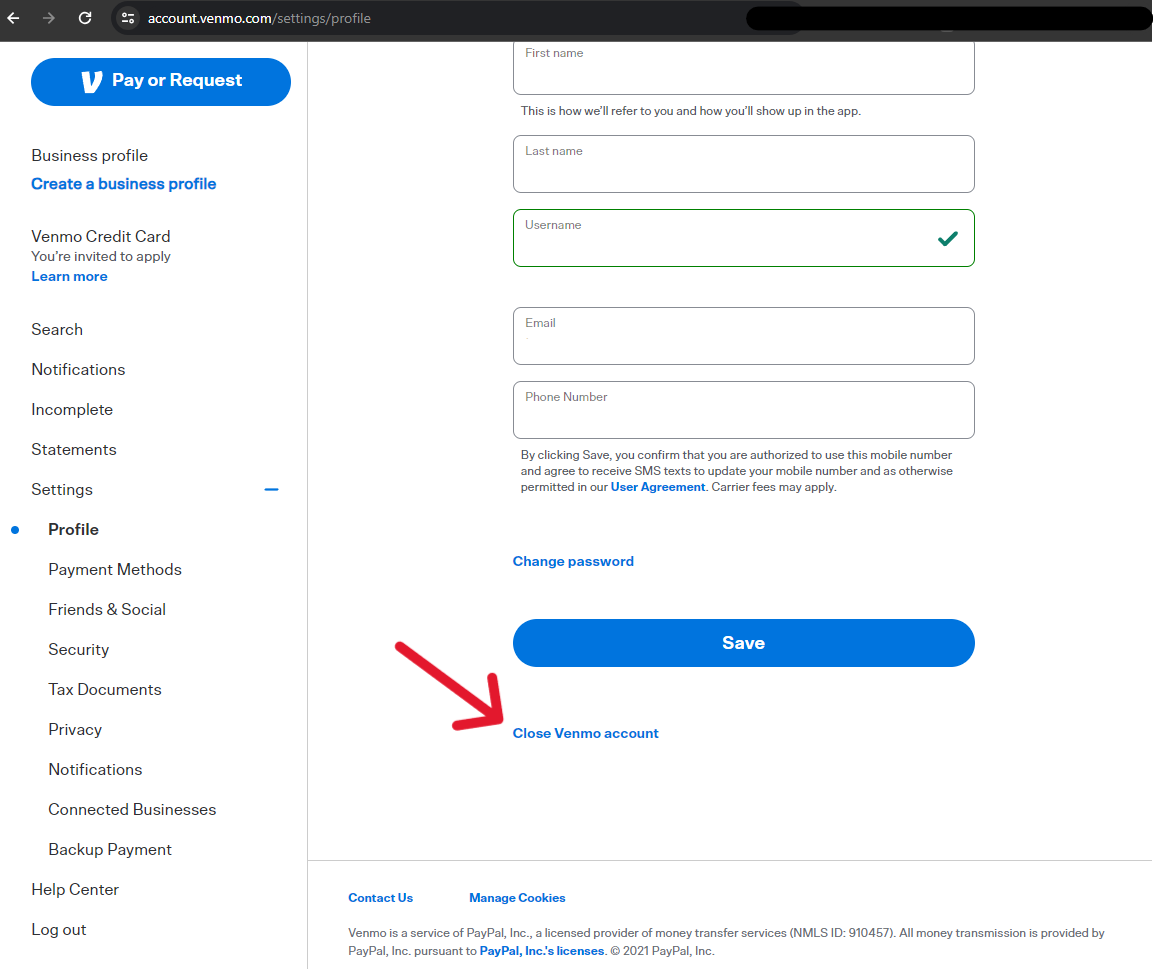
While Venmo offers a straightforward way to deactivate an account, the path to complete and permanent deletion is less immediately apparent and requires specific steps. This article will guide you through the entire process, ensuring you can effectively manage your Venmo account closure, whether you’re looking for a temporary pause or a permanent exit. We will delve into the preparatory steps, the deactivation process, and what to expect after you’ve taken action.
Understanding Venmo Account Deactivation vs. Deletion
It’s important to distinguish between deactivating a Venmo account and permanently deleting it. Venmo’s official process primarily focuses on deactivation, which effectively locks down your account and makes it inactive without wiping your data. Permanent deletion is a more involved process that often requires direct communication with Venmo support. Understanding this distinction is key to achieving your desired outcome.
The Nuances of Deactivation
When you deactivate your Venmo account, you are essentially putting it on hold. Your profile will no longer be searchable on the platform, your past transactions will remain accessible to you (and potentially others if they were public), and your linked bank accounts or cards will be detached from the service. However, your personal information and transaction history are typically retained by Venmo. This is often sufficient for users who simply want to stop using the app for a period or prevent accidental transactions.
Deactivation is generally a self-service process that can be initiated through the Venmo app or website. It’s a reversible action, meaning you can reactivate your account later if you choose to. This provides a safety net for those who might miss Venmo’s functionalities down the line. The immediate effect is that you can no longer send or receive money, view new transactions, or interact with other users on the platform.
The Path to Permanent Deletion
Permanent deletion, on the other hand, aims to remove your account and associated data from Venmo’s systems. This is a more comprehensive step that ensures your personal information is no longer stored by the company. Unlike deactivation, permanent deletion is usually not a one-click process. It often requires you to contact Venmo’s customer support directly and make a formal request. This is because Venmo may have legal or regulatory obligations to retain certain transaction data for a specified period.
The decision to permanently delete an account is often driven by privacy concerns, a desire to simplify one’s digital life, or compliance with data protection regulations. It’s crucial to understand that once an account is permanently deleted, it cannot be recovered, and any associated data, including transaction history, will be irretrievably lost. Therefore, it’s advisable to download any important transaction records before proceeding with permanent deletion.
Preparing to Deactivate or Delete Your Venmo Account
Before you embark on the process of closing your Venmo account, whether for deactivation or permanent deletion, it’s essential to take a few preparatory steps. These actions ensure that you don’t lose any valuable information and that the transition is as smooth as possible. Neglecting these steps could lead to regrettable data loss or unfinished business on the platform.
Securing Your Transaction History
Your Venmo account contains a record of all your financial transactions. For many users, this history serves as a personal ledger or a way to track shared expenses. If you anticipate needing this information in the future, it’s wise to download or record it before you proceed with closing your account. Venmo allows you to view your transaction history within the app, but there isn’t a direct export function for a comprehensive report.
Therefore, you might need to manually go through your transaction history and screenshot or note down important details. For business accounts or those with a high volume of transactions, this could be a time-consuming endeavor. Consider what information is truly essential for your records. This might include payment dates, amounts, sender/receiver names, and any notes associated with the transactions. This step is particularly important if you’re opting for permanent deletion, as the data will become inaccessible.
Unlinking Bank Accounts and Cards
A crucial step before closing your Venmo account is to unlink any associated bank accounts, debit cards, or credit cards. This prevents any automatic payments or recurring transactions from attempting to process through Venmo after your account is inactive or deleted. It also helps to further disconnect your financial information from the platform.
To do this, navigate to the settings or payment methods section of your Venmo app. You will find an option to manage your linked payment sources. From there, you can remove each bank account or card that you have connected to your Venmo profile. Ensure you do this for all linked financial instruments to avoid any unexpected issues. This is a standard security practice when closing accounts with financial implications.
Settling Outstanding Transactions
Before deactivating or deleting your account, it’s imperative to settle any outstanding transactions. This includes paying anyone you owe money to and requesting payments from anyone who owes you. Leaving open transactions can complicate the closure process and may even lead to unexpected charges or delays.
If you owe money, make sure to send the payments through Venmo before you take any steps to deactivate. If you are owed money, send reminders to the senders or consider if pursuing those smaller amounts is worth the effort before you can no longer access the platform. Venmo’s functionality relies on active accounts for these exchanges, so having a clean slate is best.

The Deactivation Process: A Step-by-Step Guide
Venmo provides a relatively straightforward method for deactivating your account through its mobile application. This process effectively locks your account, making it unusable for sending or receiving funds, and removes your profile from public view. While it doesn’t permanently erase your data, it serves as a primary step for users who wish to temporarily or semi-permanently step away from the service.
Step 1: Accessing Account Settings
Begin by opening the Venmo app on your smartphone. Once logged in, navigate to your profile page. Typically, you can access your profile by tapping on your profile picture or the designated profile icon, usually located in the bottom navigation bar. On your profile page, look for a settings or gear icon, which usually signifies access to account management options. Tap on this icon to enter the settings menu.
Within the settings menu, you’ll find various options related to your account, including privacy, notifications, and security. Scroll through these options until you find a section that pertains to account management or closure. The wording might vary, but look for terms like “Account,” “Privacy,” or “Help & Support.”
Step 2: Initiating the Deactivation Request
Once you have located the relevant section for account management, you should see an option to deactivate or close your account. Venmo’s process often guides you through a series of confirmations and questions designed to ensure you understand the implications of deactivation. This might involve acknowledging that you will no longer be able to use the app for transactions and that your profile will be hidden.
Tap on the “Deactivate Account” or a similar option. Venmo may present a brief survey asking why you are choosing to leave the platform. This feedback is valuable for Venmo, but it’s optional. Follow the on-screen prompts carefully. You will likely be required to confirm your decision multiple times to prevent accidental deactivation. This could involve entering your password or a verification code.
Step 3: Confirmation and What Happens Next
After you confirm your deactivation request, Venmo will process it. You should receive an email confirmation that your account has been successfully deactivated. From this point forward, your Venmo account will be inactive. You will not be able to log in to send or receive money, view new transactions, or interact with other users. Your profile will no longer appear in search results on Venmo.
It’s important to remember that deactivation is not the same as permanent deletion. Your account information and transaction history are still retained by Venmo. If you wish to reactivate your account in the future, you can typically do so by logging back into the app with your credentials. This makes deactivation a reversible option for those who may wish to return to Venmo at a later date.
The Permanent Deletion Process: Contacting Support
Permanently deleting your Venmo account is a more involved process and typically requires direct communication with Venmo’s customer support team. Unlike deactivation, which can be done through the app, permanent deletion is a request that Venmo needs to action on your behalf, often after verifying your identity and understanding your intent. This is because Venmo, like many financial service providers, has data retention policies to consider.
Step 1: Finding the Correct Support Channel
The first step in initiating a permanent deletion request is to find the appropriate channel to contact Venmo support. You can usually find this information within the Venmo app itself, under the “Help” or “Support” section. Alternatively, you can visit the Venmo website and look for their customer service contact options, which might include a help center, FAQs, or a direct contact form or email.
Venmo’s support system is designed to handle a variety of user inquiries, so you’ll need to navigate to the option that specifically addresses account management or closure. Be prepared to spend some time searching for the most effective way to get your request to the right department. Sometimes, reaching out through their official website’s support portal or a dedicated support email is the most direct route.
Step 2: Crafting Your Deletion Request
When you contact Venmo support, clearly state your intention to permanently delete your account. Your request should be polite but firm and include all necessary information for them to locate and process your account. This typically includes your full name, the email address associated with your Venmo account, and your Venmo username.
In your request, explain briefly why you wish to delete your account. While not always mandatory, it can help them understand your needs and provide appropriate assistance. Reiterate that you are seeking permanent deletion and understand that this action is irreversible. You may also want to mention that you have already unlinked your bank accounts and cards and settled all transactions, as outlined in the preparation steps.

Step 3: Verification and Waiting Period
After submitting your deletion request, Venmo support will likely need to verify your identity to ensure you are the legitimate owner of the account. This might involve answering security questions or providing additional information. Once your identity is confirmed and your request is processed, your account will be marked for deletion.
There is often a waiting period involved in permanent deletion. Venmo, like many companies, may have a grace period during which you can change your mind, or they may need to fulfill certain data archival requirements. You might receive a confirmation email once the deletion process is complete. It’s advisable to keep a record of your communication with Venmo support for your own reference. Be patient, as these processes can sometimes take several days or even weeks to fully execute.
aViewFromTheCave is a participant in the Amazon Services LLC Associates Program, an affiliate advertising program designed to provide a means for sites to earn advertising fees by advertising and linking to Amazon.com. Amazon, the Amazon logo, AmazonSupply, and the AmazonSupply logo are trademarks of Amazon.com, Inc. or its affiliates. As an Amazon Associate we earn affiliate commissions from qualifying purchases.