
In the vast and ever-evolving landscape of digital infrastructure, robust database management systems (DBMS) form the bedrock of almost every application, website, and enterprise system. Among these, MySQL stands out as a preeminent open-source relational database management system, renowned for its reliability, performance, and flexibility. From powering small personal blogs to managing critical data for some of the world’s largest organizations, MySQL’s ubiquity is a testament to its enduring value. For developers, data scientists, and system administrators alike, mastering its installation is a foundational step in harnessing its power. This comprehensive guide will walk you through the process of installing MySQL software, ensuring a smooth setup across various operating systems and preparing you to embark on your data management journey.
Understanding MySQL and Its Ecosystem
Before diving into the mechanics of installation, it’s crucial to grasp what MySQL is and how it fits into the broader technological ecosystem. This understanding provides context for the various components you’ll encounter during the setup process.
What is MySQL?
MySQL is an open-source relational database management system (RDBMS) developed and supported by Oracle Corporation. At its core, MySQL organizes data into tables, which are structured with rows and columns, allowing for efficient storage, retrieval, and manipulation of information. It adheres to the Structured Query Language (SQL) standard, making it accessible and interoperable with a wide array of applications and programming languages. Its open-source nature means it’s freely available and benefits from a vast community that contributes to its development, documentation, and support.
Key Components of a MySQL Installation
A typical MySQL installation isn’t just a single piece of software; it’s an ecosystem of interconnected tools designed to facilitate database operations. Understanding these components will help you make informed choices during installation:
-
MySQL Server: This is the core component, the database engine itself, responsible for storing and managing data. It processes SQL queries, handles data integrity, and manages user access.
-
Client Utilities: These are command-line tools like
mysql(for interacting with the server) andmysqldump(for backing up databases). They are essential for administrative tasks and direct interaction with the database. -
MySQL Workbench: A powerful, visual database design tool that integrates SQL development, administration, database design, creation, and maintenance into a single, comprehensive graphical user interface (GUI). It’s highly recommended for users who prefer visual management over command-line interfaces.
-
Connectors: Libraries that allow various programming languages (e.g., Python, Java, PHP, Node.js) to connect and interact with MySQL databases. While not always installed with the main package, they are vital for application development.
-
Documentation: Extensive documentation is provided, covering everything from installation to advanced administration, an invaluable resource for troubleshooting and learning.
Why Install MySQL?
The reasons for installing MySQL are manifold and span across various domains:
-
Web Development: MySQL is a cornerstone of the LAMP stack (Linux, Apache, MySQL, PHP/Python/Perl), powering countless websites and web applications, including popular content management systems like WordPress, Joomla, and Drupal.
-
Data Management: It provides a robust solution for storing and managing structured data for businesses, researchers, and individuals, enabling efficient data retrieval and analysis.
-
Backend for Applications: Many desktop and mobile applications rely on MySQL as their backend database, storing user data, application settings, and other critical information.
-
Learning and Development: Its open-source nature and widespread adoption make it an excellent choice for students and aspiring developers to learn database concepts and SQL.
Preparing for MySQL Installation
A successful installation begins with thorough preparation. Taking the time to assess your system and understand your requirements will prevent common pitfalls and ensure a smooth setup experience.
System Requirements
Before you download anything, verify that your system meets the minimum requirements for MySQL. While MySQL is generally lightweight, specific versions might have nuanced demands. Key considerations include:
-
Operating System: MySQL supports a wide range of operating systems, including Windows, various Linux distributions (Ubuntu, CentOS, Debian, Fedora), and macOS. Ensure your OS version is compatible with the MySQL version you plan to install.
-
RAM and Disk Space: While a few gigabytes of RAM and several gigabytes of disk space are usually sufficient for basic installations, production environments with large datasets will require significantly more resources. Always err on the side of caution for disk space, as databases grow over time.
-
Processor: Modern CPUs are generally more than adequate. Performance-intensive workloads may benefit from multi-core processors.
Choosing the Right MySQL Edition
MySQL offers different editions, each catering to specific needs and use cases:
-
MySQL Community Edition: This is the freely available, open-source version, perfect for most individual users, developers, and small to medium-sized businesses. It includes the core server, client utilities, and Workbench. Most tutorials and projects typically utilize this edition.
-
MySQL Enterprise Edition: This is a commercial offering from Oracle, providing advanced features, tools, and 24/7 support tailored for mission-critical applications and large enterprises. It includes additional security features, monitoring tools, and high-availability options.
-
Other Distributions: There are also various community-driven forks and specialized distributions like Percona Server for MySQL and MariaDB, which offer enhanced features or different licensing models. For a first-time installation, the official Community Edition is generally the recommended starting point.
Download Sources
Always download MySQL software from the official source to ensure authenticity, security, and the latest stable version:
-
Official MySQL Website: Navigate to
dev.mysql.com/downloads/to find the various editions and installers for your specific operating system. This is the most reliable place to obtain the software. -
Package Managers (Linux/macOS): For Linux distributions, you can often install MySQL directly from your system’s package manager (e.g.,
aptfor Debian/Ubuntu,yum/dnffor RHEL/CentOS,brewfor macOS). While convenient, these versions might sometimes lag behind the latest official releases.
Pre-Installation Checks
A few quick checks can prevent headaches down the line:
-
Existing Installations: If you have an older version of MySQL or a conflicting database server (like PostgreSQL), decide whether you need to uninstall it or run them concurrently (ensuring they use different ports).
-
Port Availability: MySQL typically uses port 3306. Ensure this port is not already in use by another application. If it is, you’ll need to configure MySQL to use a different port during installation.
-
Administrator Privileges: You will need administrator or root privileges to install software on your system.
Step-by-Step Installation Guides
The installation process varies slightly depending on your operating system. Below, we’ll cover the most common methods for Windows, Linux, and macOS.
Installing MySQL on Windows
The easiest way to install MySQL on Windows is by using the official MySQL Installer.
Using the MySQL Installer (Recommended)
-
Download: Go to
dev.mysql.com/downloads/installer/and download the appropriate MySQL Installer MSI file (usually the larger “web-community” or “full” installer). -
Run Installer: Execute the downloaded
.msifile. -
Choose Setup Type:
-
Developer Default: Installs MySQL Server, MySQL Workbench, MySQL Shell, MySQL Router, connectors, and documentation. This is a good general choice.
-
Server Only: Installs only the MySQL server.
-
Client Only: Installs only client tools (Workbench, Shell, etc.).
-
Full: Installs all available MySQL products.
-
Custom: Allows you to select specific components. For most users, “Developer Default” or “Custom” (to select only what you need, like Server and Workbench) is sufficient.
-
-
Check Requirements: The installer will check for prerequisites (like Visual C++ Redistributable). Install any missing components.
-
Configuration:
-
Server Configuration Type: Select “Development Computer” for local development. For production, choose “Server Computer” or “Dedicated Computer.”
-
Connectivity: Keep the default port (3306) unless you have a conflict.
-
Authentication Method: “Use Strong Password Encryption for Authentication (RECOMMENDED)” is the default and preferred option.
-
Root Account Password: Set a strong password for the ‘root’ user. Remember this password! It’s crucial for administration.
-
MySQL Windows Service: Configure MySQL as a Windows Service, often set to “Start MySQL Server at System Startup.”
-
-
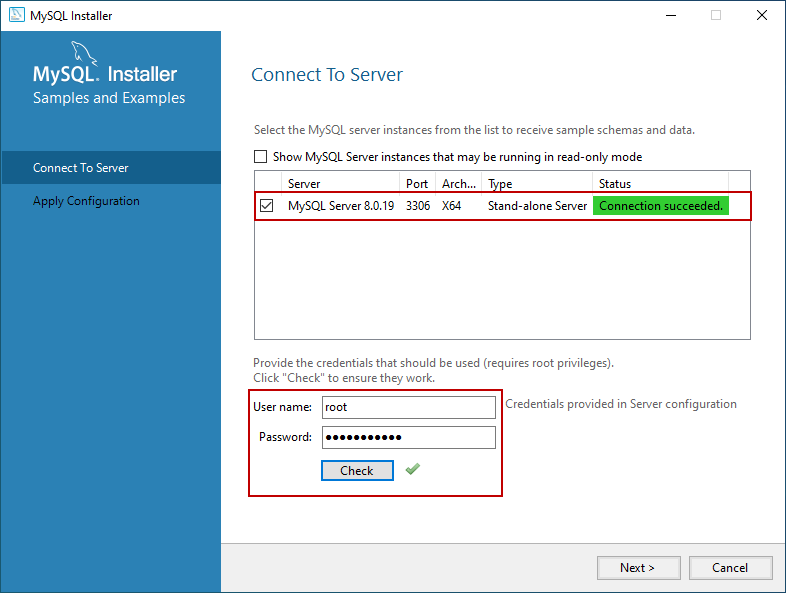
Apply Configuration: Click “Execute” to apply the configurations.
-
Complete Installation: Finish the wizard. You might be prompted to configure additional products like MySQL Router or Sample Databases.
Verification
Open MySQL Workbench, attempt to connect to the local MySQL server using the root password you set. Alternatively, open a Command Prompt and type mysql -u root -p. Enter your root password, and if you get a mysql> prompt, your installation is successful.
Installing MySQL on Linux (Ubuntu/Debian Example)
On Debian-based systems like Ubuntu, the simplest method is to use the apt package manager.
-
Update Package List:
sudo apt update -
Install MySQL Server:
sudo apt install mysql-serverDuring installation, you’ll be prompted to set a root password for the MySQL server.
-
Run Security Script (Crucial):
sudo mysql_secure_installationThis script will guide you through important security measures:
-
Validate Password Component (optional but recommended).
-
Change the root password (if you haven’t already or want to).
-
Remove anonymous users.
-
Disallow root login remotely.
-
Remove test database and access to it.
-
Reload privilege tables. Answer ‘Y’ to all security prompts.
-
-
Check Service Status:
sudo systemctl status mysqlYou should see “active (running)”.

Verification
Connect to the MySQL server using the command-line client:
mysql -u root -p
Enter the root password you set. You should see the mysql> prompt. Type exit to leave.
Installing MySQL on macOS
macOS users have a few options, with Homebrew being a popular and convenient choice.
Using Homebrew (Recommended)
-
Install Homebrew (if not already installed):
Open Terminal and run:
/bin/bash -c "$(curl -fsSL https://raw.githubusercontent.com/Homebrew/install/HEAD/install.sh)" -
Install MySQL:
brew install mysqlHomebrew will download and install MySQL.
-
Start MySQL Service:
brew services start mysqlTo make it start automatically on login:
brew services enable mysql. -
Run Security Script (Crucial):
mysql_secure_installationFollow the prompts as described in the Linux section to secure your installation. Set a strong root password.
Verification
Connect to MySQL:
mysql -u root -p
Enter your root password. A mysql> prompt confirms success.
Post-Installation Configuration and Security
Installing MySQL is only half the battle. Properly configuring and securing your database is paramount, especially in production environments.
Securing Your MySQL Installation
The mysql_secure_installation script is vital, but here’s a recap of critical security practices:
-
Strong Root Password: Always use a complex, unique password for the ‘root’ user.
-
Remove Anonymous Users: Anonymous users pose a security risk as they can access the database without credentials.
-
Disallow Remote Root Login: The ‘root’ user should generally only be able to connect from the local machine (
localhost). This prevents attackers from guessing the root password over the network. -
Remove Test Database: The default ‘test’ database and its associated privileges are often created for demonstration purposes but should be removed from production systems.
-
Firewall Configuration: Configure your operating system’s firewall to allow incoming connections to MySQL’s port (3306) only from trusted IP addresses or networks.
Basic MySQL Commands
Knowing these fundamental commands will help you manage your MySQL server:
-
Start MySQL Server:
-
Windows:
net start MySQL(replace ‘MySQL’ with your service name if different) -
Linux:
sudo systemctl start mysql -
macOS (Homebrew):
brew services start mysql
-
-
Stop MySQL Server:
-
Windows:
net stop MySQL -
Linux:
sudo systemctl stop mysql -
macOS (Homebrew):
brew services stop mysql
-
-
Restart MySQL Server:
-
Linux:
sudo systemctl restart mysql -
macOS (Homebrew):
brew services restart mysql
-
-
Check Status:
-
Linux:
sudo systemctl status mysql -
macOS (Homebrew):
brew services info mysql
-
Setting Up User Accounts and Permissions
It’s a best practice to create specific user accounts for your applications or individual users, granting them only the necessary privileges. Never use the ‘root’ user for everyday application connections.
CREATE USER 'your_username'@'localhost' IDENTIFIED BY 'your_password';

GRANT ALL PRIVILEGES ON your_database_name.* TO 'your_username'@'localhost';

FLUSH PRIVILEGES;
Replace 'your_username', 'your_password', and 'your_database_name' with your desired values. For remote access, replace 'localhost' with the client’s IP address or % for any host (use with caution).
Remote Access Configuration
By default, MySQL often restricts connections to localhost for security. To allow remote connections:
-
Edit
my.cnf(Linux/macOS) ormy.ini(Windows): Locate thebind-addressline, which is usually set to127.0.0.1. -
Change
bind-address:-
To allow connections from any IP, change it to
0.0.0.0. (Less secure, use with caution and a firewall). -
To allow connections from specific IPs, specify those IPs.
-
Comment it out (
# bind-address = 127.0.0.1) to listen on all interfaces.
-
-
Restart MySQL Server.
-
Grant Remote User Privileges: Ensure you’ve created a user account with privileges granted from the remote host (e.g.,
CREATE USER 'remote_user'@'%' IDENTIFIED BY 'password';).
Integrating with MySQL Workbench
MySQL Workbench provides a user-friendly GUI for managing your databases. After installation, you can connect to your local MySQL server:
-
Open MySQL Workbench.
-
Click the
+icon next to “MySQL Connections.” -
Enter a “Connection Name” (e.g., “Local MySQL”).
-
Leave “Hostname” as
127.0.0.1and “Port” as3306. -
Set “Username” to
root(or your specific user). -
Click “Store in Keychain…” to save your password, or enter it manually each time.
-
Test the connection. If successful, you can now manage your databases visually.
Troubleshooting Common Installation Issues
Even with careful preparation, issues can arise. Here are some common problems and their solutions.
Service Fails to Start
-
Check Logs: The MySQL error log (location varies by OS, often
data_dir/hostname.error/var/log/mysql/error.log) is your first stop. It will contain specific error messages indicating why the server failed to start. -
Port Conflict: Another service might be using port 3306. Use
netstat -an | find "3306"(Windows) orsudo lsof -i :3306(Linux/macOS) to identify the conflicting process. If found, stop the conflicting service or configure MySQL to use a different port. -
Configuration Errors: Check your
my.cnformy.inifile for syntax errors or incorrect paths. -
Permissions: Ensure the MySQL user (or system user running the MySQL service) has appropriate read/write permissions to the data directory.
Access Denied Errors
-
Incorrect Password: Double-check the password for the user you’re trying to connect with.
-
Incorrect Host: Ensure the user account has privileges granted from the host you’re connecting from (e.g.,
'your_username'@'localhost'vs.'your_username'@'%'). -
Firewall: Your operating system’s firewall might be blocking the connection.
-
mysql.userTable Issues: In rare cases, themysql.usertable (which stores user credentials and privileges) can become corrupted or misconfigured. This often requires starting MySQL in safe mode to repair.
Port Conflicts
As mentioned, if another application is using port 3306, MySQL won’t be able to start on that port. You can either:
-
Stop the conflicting application.
-
Change MySQL’s default port in its configuration file (
my.cnformy.ini) by modifying theportdirective and then restarting the server. Remember to specify the new port when connecting with clients.
Firewall Issues
If you’re trying to connect to MySQL from a remote machine and experience timeouts or connection refused errors, your server’s firewall (e.g., ufw on Ubuntu, firewalld on CentOS, Windows Firewall) might be blocking port 3306.
-
Allow Port 3306: Add a rule to your firewall to allow TCP traffic on port 3306.
-
Ubuntu (
ufw):sudo ufw allow 3306/tcp -
CentOS (
firewalld):sudo firewall-cmd --add-port=3306/tcp --permanent && sudo firewall-cmd --reload
-

Conclusion
Installing MySQL software is a fundamental skill for anyone working with data-driven applications. By understanding its components, preparing your system, and following the specific steps for your operating system, you can establish a robust and secure database environment. The initial setup might seem daunting, but with each successful installation and configuration, your proficiency grows.
With MySQL now installed, the real journey begins: learning SQL, designing databases, integrating it with your applications, and exploring the vast capabilities it offers. Whether you’re building a dynamic website, analyzing complex datasets, or simply experimenting with database technologies, MySQL provides a powerful and reliable platform for all your data management needs. Embrace the power of open-source and unlock the potential of your data with MySQL.
aViewFromTheCave is a participant in the Amazon Services LLC Associates Program, an affiliate advertising program designed to provide a means for sites to earn advertising fees by advertising and linking to Amazon.com. Amazon, the Amazon logo, AmazonSupply, and the AmazonSupply logo are trademarks of Amazon.com, Inc. or its affiliates. As an Amazon Associate we earn affiliate commissions from qualifying purchases.