Minecraft, at its core, is a game of boundless creativity and exploration. Yet, even the most dedicated builders and adventurers sometimes encounter limitations, be it frustratingly low frame rates on less powerful machines or the inability to fully leverage stunning visual enhancements like shaders. This is where OptiFine enters the scene, a transformative modification that has become an indispensable tool for millions of Minecraft players worldwide. More than just a simple performance booster, OptiFine is a comprehensive optimization suite that unlocks a new dimension of graphical fidelity and gameplay fluidity.

In the vast landscape of software and technology, understanding where to acquire and how to correctly implement tools like OptiFine is paramount. This guide isn’t just about clicking a download button; it’s about navigating the digital world safely, ensuring software compatibility, and harnessing the full “Tech” potential of your gaming setup. We’ll delve into the precise steps for installation, touch upon the “Brand” reputation of official versus unofficial sources, and even subtly explore how smart software choices can add “Money” value by extending the lifespan of your hardware. By the end of this article, you’ll be equipped with the knowledge to seamlessly integrate OptiFine into your Minecraft experience, turning a good game into a truly spectacular one.
The Essentials Before You Begin: Paving the Way for Optimal Performance
Before embarking on the installation journey, it’s crucial to lay a solid foundation. Like any advanced piece of software, OptiFine interacts deeply with your system and the game itself, making certain preliminary steps vital for a smooth and secure setup. This section covers the fundamental understanding of what OptiFine offers and the essential prerequisites to ensure a successful installation, emphasizing both the technical aspects and the critical importance of digital security.
Understanding OptiFine and Its Value Proposition (Tech & Money)
At its heart, OptiFine is a highly optimized version of Minecraft’s renderer, designed to deliver a significant boost in frame rates (FPS) for players, especially those with mid-to-low-end systems. However, its capabilities extend far beyond mere performance. It introduces a plethora of advanced video settings that grant players unparalleled control over their game’s visuals. These include dynamic lights, variable render distance, fog control, enhanced animations, and vastly improved texture processing.
The most celebrated feature of OptiFine, arguably, is its robust support for shaders. Shaders fundamentally transform Minecraft’s aesthetics, adding realistic lighting, shadows, water reflections, dynamic weather effects, and breathtaking volumetric clouds. Without OptiFine, running most shader packs is simply not possible. It also allows for custom sky textures, resource pack extensions, and numerous other visual tweaks that elevate the game’s overall graphical fidelity.
From a “Tech” perspective, OptiFine is a brilliant example of software optimization. It intelligently manages how Minecraft utilizes your CPU and GPU, reducing bottlenecks and enhancing efficiency. This optimization isn’t just about making the game look better; it’s about making it run smoother, which directly impacts gameplay enjoyment and responsiveness.
Considering the “Money” aspect, OptiFine offers incredible value. For many players, especially those on older laptops or budget desktops, OptiFine can revitalize their Minecraft experience, making it playable and enjoyable without the need for an expensive hardware upgrade. Instead of investing in a new graphics card or processor, OptiFine provides a free, software-based solution that significantly enhances performance, effectively extending the useful life of existing hardware. This “free upgrade” can save hundreds, if not thousands, in potential hardware costs, making it an economically smart choice for budget-conscious gamers.
Prerequisites: Java, Minecraft, and Digital Security Mindset (Tech)
For OptiFine to function correctly, your system needs the right environment. The primary prerequisite is a correctly installed and updated version of Java. Minecraft itself runs on Java, and the OptiFine installer is a Java Archive (JAR) file. Therefore, having the appropriate Java Runtime Environment (JRE) installed is non-negotiable.
- Java Installation: For most modern versions of Minecraft (1.17 and newer), you’ll typically need Java 16 or newer. For older versions (1.16.5 and below), Java 8 is usually sufficient. If you’re unsure, ensure you have the latest stable Java version installed, which you can usually download from the official Oracle website or adoptium.net (formerly AdoptOpenJDK). Without Java, the OptiFine installer simply won’t open.
- Minecraft Installation: Naturally, you need a working copy of Minecraft installed via the official Minecraft Launcher. It’s generally recommended to run the target Minecraft version at least once before installing OptiFine, as this ensures all necessary game files are downloaded and configured.
- Digital Security Mindset: This is perhaps the most crucial “Tech” and “Brand” consideration. The internet is replete with unofficial websites claiming to offer OptiFine downloads. Many of these are malicious, containing viruses, adware, or outdated versions that could compromise your system. Cultivating a strong digital security mindset means always prioritizing official sources for software downloads. This protects your computer from threats and ensures you receive the genuine, unadulterated product. Trusting only the official source safeguards your privacy and system integrity, aligning with best practices in digital security.
The Official Source: Your Gateway to a Secure OptiFine Download (Tech & Brand)
In the realm of software, the source of your download is as important as the software itself. For a critical modification like OptiFine, which deeply integrates with your game and system, relying solely on the official source is not just a recommendation but a necessity. This section will guide you directly to the authentic portal, emphasizing why its “Brand” reputation is critical for your digital safety and optimal “Tech” performance.
Why OptiFine.net is Your ONLY Trusted Destination (Brand Reputation & Security)
Let’s be unequivocally clear: the one and only official website to download OptiFine is optifine.net. There are no legitimate alternative primary download sources. Any other website claiming to host OptiFine files, whether it’s a mod repository, a forum link, or a download portal, is either redistributing the file from optifine.net (often without permission and potentially with modifications) or is entirely fraudulent.
The “Brand” of OptiFine has been meticulously built over years of consistent updates, robust performance, and a commitment to player experience. This brand reputation is intrinsically linked to the optifine.net domain. Downloading from unofficial sources carries significant risks:
- Malware and Viruses: Rogue websites frequently bundle legitimate software with malicious payloads like spyware, ransomware, or adware. These can steal your data, compromise your system, or inundate you with intrusive advertisements.
- Outdated or Broken Versions: Unofficial sites might host old, incompatible, or corrupted versions of OptiFine, leading to crashes, bugs, or no performance improvement at all.
- Lack of Support: If you encounter issues with a version downloaded from an unofficial site, you’ll have no legitimate avenue for support from the OptiFine developers.
The official optifine.net website is straightforward and secure. It offers:
- Stable Releases: For the latest official Minecraft versions, you’ll find the most recent stable OptiFine releases.
- Preview Versions: For new Minecraft updates, developers often release preview versions. These are generally stable enough for testing but might have minor bugs.
- Archived Versions: Need an older version of OptiFine for an older Minecraft client? The archives are there.
Step-by-step Download Process from OptiFine.net:
- Navigate to OptiFine.net: Open your web browser and type
optifine.netinto the address bar. Double-check the URL for any misspellings or extra characters. - Go to the “Downloads” Section: On the homepage, click on the “Downloads” link in the navigation menu.
- Locate Your Minecraft Version: Find the OptiFine version that matches your desired Minecraft version. If you don’t see your specific version, click “Show all versions” to expand the list.
- Download the Installer:
- For stable versions, click the “Download” button next to the desired version.
- For preview versions, you might see a “Preview versions” link. Click it, then click “Download” for the latest preview.
- Crucial Step: When you click “Download,” you’ll typically be redirected to an ad page (often AdF.ly or similar). DO NOT click any ads or anything that looks like a download button on this intermediate page. Wait for a few seconds, and a “SKIP” or “Skip Ad” button will appear, usually in the top right corner. Click this button. This is the only legitimate way to proceed.
- Confirm Download: You’ll then be taken to a direct download page, usually hosted on a platform like MediaFire. Click the final “Download” button there. Your browser might warn you that the .jar file type can be harmful; this is a standard security warning for executable files. As long as you downloaded from
optifine.netand followed the skip ad step, it is safe to keep.
By strictly adhering to these steps and using optifine.net, you uphold digital security best practices and ensure you’re installing the genuine OptiFine, protecting your system and guaranteeing the best “Tech” experience.
Installing OptiFine: Step-by-Step for Every Minecraft Setup (Tech Tutorial)
Once you’ve safely downloaded the OptiFine .jar file from optifine.net, the next crucial step is installation. The method you choose depends on your specific Minecraft setup: whether you play vanilla Minecraft, use Forge for extensive modding, or prefer Fabric for a more lightweight modding experience. This section provides detailed “Tech Tutorial” instructions for each scenario, ensuring a seamless integration of OptiFine into your preferred environment.
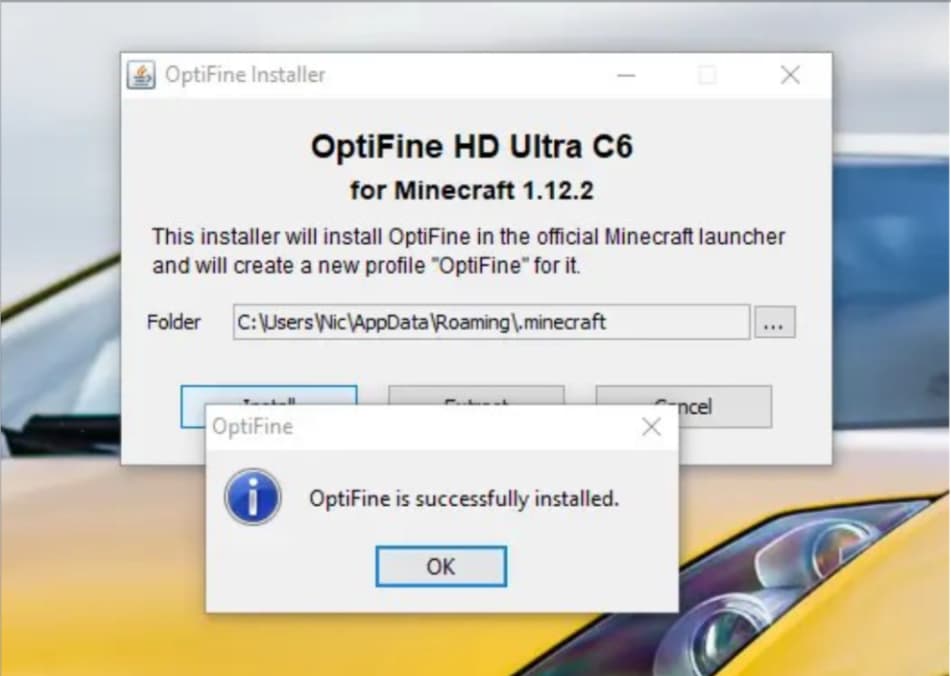
Method 1: Standalone Installation (The Easiest Route)
This method is ideal for players who only want to install OptiFine and don’t use other major mods requiring Forge or Fabric. It’s the simplest and most direct approach.
- Locate the Downloaded OptiFine .jar File: It will typically be in your browser’s default downloads folder.
- Run the Installer:
- Double-click the
.jarfile. - If it doesn’t open, ensure Java is correctly installed (refer to the prerequisites section). You might need to right-click the file, select “Open with,” and choose “Java Platform SE binary.”
- Double-click the
- OptiFine Installer Window: A small window titled “OptiFine Installer” will appear. It should automatically detect your
.minecraftfolder. - Click “Install”: Verify the installation path is correct, then click the “Install” button.
- Confirmation: A message will pop up saying “OptiFine is successfully installed.” Click “OK.”
- Launch Minecraft: Open your Minecraft Launcher.
- Select the OptiFine Profile: In the bottom-left corner of the launcher, click the small arrow next to the “Play” button. A dropdown menu will appear. Select the “OptiFine” profile (e.g., “OptiFine 1.20.4”).
- Play: Click the “Play” button. Minecraft will launch with OptiFine enabled. You can verify this by going to “Options” -> “Video Settings” in the game, where you’ll see many new configuration options.
Method 2: Integrating with Minecraft Forge (For Modded Setups)
If you use Minecraft Forge to run other mods, OptiFine can often be installed alongside it as a regular mod. This requires a specific approach to ensure compatibility.
- Prerequisite: Forge Installed: Ensure you have the correct version of Forge already installed for your Minecraft version. Run Minecraft with Forge at least once to generate the necessary folders.
- Locate the Mods Folder:
- Open your Minecraft Launcher.
- Go to “Installations.”
- Hover over your Forge profile and click the small folder icon to open the game directory.
- Inside the game directory, you should find a folder named
mods. If not, create one.
- Place OptiFine .jar into Mods Folder: Drag and drop the downloaded OptiFine
.jarfile directly into themodsfolder. Do NOT run the OptiFine installer in this scenario. - Launch Minecraft with Forge Profile: Open your Minecraft Launcher, select your Forge profile (e.g., “forge-1.20.4”), and click “Play.”
- Verify: Once in-game, go to “Options” -> “Video Settings” to confirm OptiFine’s presence.
- Compatibility Note: Always ensure the OptiFine version you download is compatible with your specific Forge version and Minecraft version. Occasionally, conflicts can arise between OptiFine and other Forge mods. If you experience crashes, temporarily remove other mods to isolate the issue.
Method 3: Integrating with Fabric (Modern Modding)
Fabric is another popular mod loader known for its lightweight nature and speed. Installing OptiFine with Fabric is slightly different than with Forge, as OptiFine doesn’t natively support Fabric. You’ll need a “bridge” mod.
- Prerequisites:
- Fabric Loader Installed: Ensure you have the Fabric Loader installed for your Minecraft version.
- Fabric API Installed: Download the Fabric API
.jarfile (from CurseForge or Modrinth) and place it in yourmodsfolder. - OptiFabric (or equivalent bridge mod) Installed: This is the crucial bridge mod that allows OptiFine to run on Fabric. Download the appropriate OptiFabric
.jarfile for your Minecraft version from CurseForge or Modrinth.
- Locate the Mods Folder: Similar to Forge, open your Minecraft game directory (via the launcher’s “Installations” tab) and find (or create) the
modsfolder. - Place Files into Mods Folder:
- Drag and drop the downloaded OptiFine
.jarfile into themodsfolder. - Drag and drop the downloaded Fabric API
.jarfile into themodsfolder. - Drag and drop the downloaded OptiFabric
.jarfile into themodsfolder. - Do NOT run the OptiFine installer in this scenario.
- Drag and drop the downloaded OptiFine
- Launch Minecraft with Fabric Profile: Open your Minecraft Launcher, select your Fabric profile (e.g., “fabric-loader-1.20.4”), and click “Play.”
- Verify: In-game, check “Options” -> “Video Settings” for OptiFine options.
- Compatibility Note: Version compatibility is paramount here. Ensure your OptiFine, Fabric Loader, Fabric API, and OptiFabric versions are all compatible with your target Minecraft version. Incompatibility is a common source of crashes when using Fabric with OptiFine.
Following these precise “Tech Tutorial” steps will ensure OptiFine is correctly installed, regardless of your chosen Minecraft setup, paving the way for a more optimized and visually stunning gaming experience.
Post-Installation & Troubleshooting: Ensuring a Smooth Minecraft Experience (Tech & Productivity)
Installing OptiFine is the first step; ensuring it works flawlessly and continuously optimizing your experience is the ongoing journey. This section focuses on verifying the installation, making initial configurations, and—crucially—addressing common issues that may arise. Mastering these steps not only guarantees a smooth Minecraft experience but also enhances your “Tech” troubleshooting skills, contributing to overall “Productivity” in managing your digital tools.
Verifying Installation and Initial Configuration
After following one of the installation methods, the first thing to do is confirm that OptiFine is indeed active.
- In-Game Verification:
- Launch Minecraft with the OptiFine or mod loader profile you installed it with.
- From the main menu, click on “Options…”
- Then click on “Video Settings…”
- If OptiFine is correctly installed, you will see a significantly expanded menu of video settings, often with the OptiFine version number displayed in the bottom-left corner. This is your primary confirmation.
- Initial Performance Check:
- Load into a world.
- Press
F3to bring up the debug screen. In the top-left corner, look for your FPS (frames per second). Compare it to your pre-OptiFine performance. You should ideally see an improvement. - Experiment with basic settings: Try adjusting “Render Distance,” “Fast Render,” “Fast Math,” and “Smooth FPS” in the “Performance” settings tab. Even enabling “Fast Graphics” can offer an immediate boost.
- Shader Test (Optional): If you plan to use shaders, this is a good time for a quick test.
- In “Video Settings,” go to “Shaders.”
- If you have a shader pack
.zipfile, click “Shaders Folder” to open the directory, then drag and drop your shader pack into it. - Select the shader pack from the in-game list. Minecraft will reload. If it loads without crashing and the visuals are transformed, your OptiFine (and shader setup) is working.
Common Issues and Solutions
Even with careful installation, technical glitches can occur. Being prepared with solutions for common problems is key to maintaining “Productivity” and minimizing downtime.
- “Java not found” or Installer Not Opening:
- Problem: Double-clicking the OptiFine
.jarfile does nothing, or Windows asks what program to use. - Solution: This usually means Java isn’t installed, or the file association is incorrect.
- Install Java: Download and install the latest Java JRE from
adoptium.net. - Fix File Association: Right-click the OptiFine
.jarfile -> “Open with” -> “Choose another app” -> Scroll down and select “More apps” -> “Look for another app on this PC.” Navigate to your Java installation directory (e.g.,C:Program FilesJavajre-1.8binjavaw.exeorC:Program FilesJavajdk-17binjavaw.exe) and selectjavaw.exe. Remember to check “Always use this app to open .jar files.”
- Install Java: Download and install the latest Java JRE from
- Problem: Double-clicking the OptiFine
- Minecraft Crashing on Launch (or In-Game):
- Problem: The game crashes immediately upon trying to launch with the OptiFine profile, or after entering a world.
- Solution: This is often a compatibility issue or a mod conflict.
- Version Mismatch: Ensure your OptiFine version perfectly matches your Minecraft version. For modded setups (Forge/Fabric), ensure OptiFine, Forge/Fabric Loader, Fabric API, and OptiFabric (if used) are all compatible with each other and the Minecraft version.
- Mod Conflicts (Forge/Fabric): If you’re using other mods, one of them might be conflicting with OptiFine.
- Diagnostic Steps: Remove all other mods from your
modsfolder except OptiFine (and Fabric API/OptiFabric if applicable). Launch the game. If it works, gradually reintroduce your other mods one by one, launching the game after each addition, until you find the conflicting mod. Check the mod’s documentation or forums for known OptiFine compatibility issues or alternative versions.
- Diagnostic Steps: Remove all other mods from your
- Corrupted Installation: Sometimes, the OptiFine
.jaritself might be corrupted during download or installation. Redownload OptiFine fromoptifine.netand try reinstalling. - Outdated Graphics Drivers: Ensure your graphics card drivers are up to date. Outdated drivers can cause a myriad of stability issues, especially with advanced rendering modifications.
- Performance Not Improving / Shaders Not Working:
- Problem: OptiFine is installed, but you see little to no FPS improvement, or shaders don’t render correctly.
- Solution: Incorrect in-game settings are usually the culprit.
- Review Video Settings: Dive deep into OptiFine’s “Video Settings.”
- Performance Tab: Enable “Fast Render,” “Fast Math,” “Smooth FPS,” and “Dynamic Updates.”
- Details Tab: Set “Clouds,” “Trees,” “Water,” “Sky,” etc., to “Fast” or “Off” if you’re prioritizing FPS.
- Animations Tab: Turn off unnecessary animations.
- Quality Tab: Disable “Custom Skies,” “Custom Entity Models,” and other features that might be resource-intensive if you’re struggling with performance.
- Shaders: Ensure your “Shaders” settings are configured correctly. Some shader packs have their own internal settings that need adjustment. Try a different, less demanding shader pack to rule out issues with a specific pack.
- Allocate More RAM: While OptiFine optimizes, Minecraft itself can be memory-hungry. Ensure your Minecraft Launcher is allocated sufficient RAM (e.g., 4-8GB for modded instances). Go to “Installations,” click the three dots next to your profile -> “Edit” -> “More Options” -> change the JVM Arguments
-Xmxvalue. - Check GPU Usage: Use a tool like MSI Afterburner or your operating system’s Task Manager (Performance tab) to monitor your GPU and CPU usage while playing. If your GPU isn’t being fully utilized, there might be a bottleneck elsewhere (e.g., CPU, or a setting limiting FPS).
- Review Video Settings: Dive deep into OptiFine’s “Video Settings.”
By systematically approaching these issues, you can efficiently troubleshoot and resolve problems, transforming a potential frustration into a valuable learning experience in “Tech” self-sufficiency. This “Productivity” approach ensures your time is spent enjoying Minecraft, not battling technical difficulties.
Beyond Installation: Unlocking OptiFine’s Full Potential (Tech & Brand Value)
Successfully installing OptiFine is merely the gateway. Its true power lies in the extensive customization options it provides, allowing players to meticulously fine-tune their Minecraft experience. This section explores how to leverage OptiFine for breathtaking visual enhancements and personalized performance tuning, ultimately bolstering the “Tech” capabilities of your system and appreciating the immense “Brand Value” OptiFine brings to the global Minecraft community.
Diving into Shaders and Resource Packs (Visual Enhancement)
OptiFine’s support for shaders is arguably its most celebrated feature, elevating Minecraft’s graphics from blocky charm to photorealistic grandeur or stylized artistry. Without OptiFine, running most popular shader packs is simply not possible.
- Shaders Explained: Shaders are mini-programs that run on your graphics card, completely overhauling how light, shadows, water, clouds, and atmosphere are rendered. They can introduce dynamic shadows that move with the sun, realistic reflections on water surfaces, volumetric fog, god rays, and even advanced visual effects like depth of field or motion blur.
- How to Use Shaders with OptiFine:
- Ensure OptiFine is installed (as per previous sections).
- Download your desired shader pack (usually a
.zipfile) from reputable sources like CurseForge, Modrinth, or specific shader websites (e.g., Sildur’s Shaders, BSL Shaders, Complementary Shaders). Always prioritize safe downloads to maintain digital security. - In Minecraft, go to “Options” -> “Video Settings” -> “Shaders.”
- Click the “Shaders Folder” button. This will open the directory where shader packs are stored.
- Drag and drop your downloaded shader pack
.zipfile into this folder. Do not unzip it. - Go back to the game, and your shader pack should appear in the list. Select it to activate.
- Resource Packs (Texture Packs): OptiFine also enhances support for resource packs, allowing for higher resolution textures, custom block models, connected textures, and emissive textures (glowing effects). Many popular resource packs require or highly recommend OptiFine for their full visual features to function correctly. This combination of shaders and high-quality resource packs, enabled by OptiFine, can transform the game into an entirely different visual experience.
The ability to seamlessly integrate these sophisticated visual enhancements underscores OptiFine’s critical role in the “Tech” ecosystem of Minecraft modding, pushing the boundaries of what the game can look like.
Customization and Fine-Tuning for Your System (Personalized Performance)
Beyond supporting shaders, OptiFine’s true “Tech” prowess lies in its granular control over nearly every visual and performance setting in Minecraft. This allows players to tailor the game’s behavior not just for high-end systems, but critically, to extract maximum performance from less powerful hardware.
- Exploring the Extensive Video Settings:
- Details: Control visibility of clouds, trees, water, sky, stars, sun & moon, fog, rain & snow, etc. Setting these to “Fast” or “Off” can yield significant FPS boosts.
- Animations: Disable specific block or item animations that might be taxing your CPU.
- Quality: Adjust mipmap levels, enable/disable connected textures, custom skies, custom entity models, natural textures, and more. These settings can greatly impact visual fidelity versus performance.
- Performance: This tab is crucial for FPS optimization. Options like “Fast Render,” “Fast Math,” “Smooth FPS,” and “Dynamic Updates” directly target rendering efficiency. “Render Regions” can significantly improve performance by optimizing how chunks are loaded.
- Other: Advanced options like
Lagometerfor detailed performance profiling andFullscreen Modefor specific resolutions.
- Tailoring Performance vs. Visuals: The beauty of OptiFine is that there’s no single “best” setting. It empowers you to decide the balance between buttery-smooth frame rates and stunning visual fidelity based on your specific PC hardware and personal preferences.
- For Low-End PCs: Prioritize performance settings, lower render distance, disable non-essential visual details and animations. You can often make the game perfectly playable where it was once a slideshow.
- For High-End PCs: Crank up the render distance, enable fancy graphics, and experiment with high-end shaders to push your hardware to its limits and enjoy the most immersive visuals possible.
The immense “Brand Value” of OptiFine isn’t just about its features; it’s about the freedom and control it gives players. It stands as a testament to what dedicated software development can achieve in enhancing user experience, transforming Minecraft from a simple game into a highly customizable platform. This level of technical control not only benefits individual players by offering a personalized experience but also strengthens the overall “Brand” of the Minecraft modding community as a hub of innovation and player empowerment.

Conclusion
OptiFine stands as a monumental achievement in the world of Minecraft modifications, a testament to the power of dedicated “Tech” innovation in enhancing user experience. This guide has navigated you through every crucial step, from understanding its profound “Tech” value proposition and the “Money” savings it indirectly offers, to securing your download from the official optifine.net “Brand,” and meticulously installing it for any Minecraft setup. We’ve also equipped you with the troubleshooting skills necessary to maintain a smooth gameplay experience and explored the vast potential for visual customization and performance tuning.
Remember, the journey to an optimized Minecraft experience begins and ends with responsible digital practices. Always prioritize the official optifine.net for your downloads to safeguard your system against digital threats and ensure you receive the genuine, high-quality software. Embrace the extensive settings OptiFine offers to tailor your game to your specific hardware, whether you’re chasing every last frame or immersing yourself in breathtaking shader-driven landscapes.
By following these guidelines, you’re not just installing a mod; you’re upgrading your entire Minecraft interaction. Dive into your enhanced worlds with newfound clarity, fluidity, and visual splendor. Enjoy the game, optimized and personalized, exactly the way you want it.
aViewFromTheCave is a participant in the Amazon Services LLC Associates Program, an affiliate advertising program designed to provide a means for sites to earn advertising fees by advertising and linking to Amazon.com. Amazon, the Amazon logo, AmazonSupply, and the AmazonSupply logo are trademarks of Amazon.com, Inc. or its affiliates. As an Amazon Associate we earn affiliate commissions from qualifying purchases.