Precision is paramount in the realm of technology, whether you’re fabricating custom enclosures for sensitive electronics, prototyping a new robotics component, or repairing a critical piece of machinery. The ability to create a strong, reliable threaded connection is a fundamental skill, and choosing the correct drill bit for tapping is the cornerstone of this process. Among the myriad of thread sizes, the 10-24 Unified National Fine (UNF) thread is a common fixture in many tech applications, known for its robust engagement in relatively thin materials. Understanding the precise drill bit required for a 10-24 tap isn’t just about memorizing a number; it’s about grasping the underlying principles that ensure optimal thread engagement, prevent tap breakage, and ultimately deliver a durable connection integral to your tech projects.
Understanding the 10-24 Thread Standard
Before delving into drill bit sizes, it’s crucial to understand what “10-24” signifies. This designation is part of the Unified Thread Standard (UTS), widely adopted in the United States and Canada. The “10” refers to the nominal diameter of the screw, which for a #10 screw is approximately 0.190 inches (4.826 mm). This isn’t a direct measurement like a fractional or metric size; rather, it’s a gauge number in the UTS system. The “24” indicates the thread pitch, specifically 24 threads per inch (TPI). Combined, “10-24” describes a screw with a 0.190-inch major diameter and 24 threads in every inch of its length, characterized as a fine thread, which typically offers greater strength in harder materials and better resistance to loosening from vibration compared to coarse threads (UNC).
The Significance of UNF Threads in Tech
Unified National Fine (UNF) threads like the 10-24 are frequently encountered in technology and electronics for several compelling reasons. Their finer pitch results in more threads per unit of length, which translates to a larger shear area and increased resistance to stripping, particularly beneficial in materials like aluminum, brass, or plastics commonly used in tech chassis, enclosures, and lightweight structural components. The greater number of threads also provides a finer adjustment capability, which can be critical in mechanisms requiring precise alignment or calibration. Furthermore, UNF threads are less prone to loosening under vibration due to their reduced helix angle, making them ideal for securing components in devices subject to movement, such as drones, robotic arms, or industrial machinery. The compact nature of UNF threads also allows for thinner wall sections around the tapped hole, an advantage in designs where space and material mass are at a premium.
Anatomy of a Tap
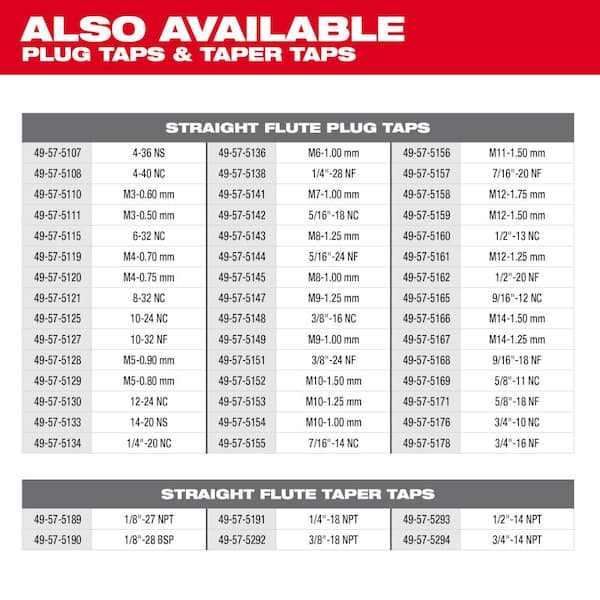
A tap is a specialized cutting tool used to create internal threads. It essentially cuts material from the inside of a pre-drilled hole, forming the helicoidal groove that a screw will engage. Taps come in various forms, but for general purpose hand tapping, you’ll typically encounter three types: taper, plug, and bottoming. The taper tap has a significant chamfer at the tip, making it easier to start a thread; the plug tap (the most common type) has a less aggressive chamfer, suitable for through-holes; and the bottoming tap has virtually no chamfer, designed to cut threads all the way to the bottom of a blind hole. Regardless of the type, the tap’s cutting edges are designed to remove material incrementally, ensuring a precise and robust thread profile, provided the initial hole is correctly sized.
The Core Principle of Tapping Drill Sizes
The primary goal when selecting a drill bit for tapping is to create a hole that is just large enough to allow the tap to cut the thread crests and flanks, but small enough to leave sufficient material for the tap to form the full thread depth. This critical dimension is known as the minor diameter of the thread. If the drill bit is too large, the tap won’t cut full threads, leading to weak engagement and potential stripping. If the drill bit is too small, the tap will have to remove excessive material, increasing the risk of tap breakage, especially in hard materials, and potentially creating an oversized major diameter due to material displacement.
Minor Diameter vs. Tap Drill Size
The minor diameter of a screw thread is the diameter of the smallest cylinder that could be inscribed within the roots of an external thread or the crests of an internal thread. For an internal thread (which is what you create when tapping), the ideal scenario is for the pre-drilled hole to match this minor diameter as closely as possible. However, due to practical considerations and to achieve a specific thread engagement percentage, tap drill sizes are often slightly larger than the theoretical minor diameter.
Thread Engagement Percentage
Thread engagement percentage refers to the proportion of the mating threads that are in contact. A 100% thread engagement means the tapped hole’s internal thread profile perfectly matches the external screw thread, with no clearance at the crests or roots. While 100% engagement sounds ideal, it’s rarely achieved or even desired in practice. A 75% thread engagement is widely considered the optimal balance, providing sufficient strength for most applications while reducing the torque required for tapping and minimizing the risk of tap breakage. Higher engagement percentages, beyond 75-80%, yield diminishing returns in strength and significantly increase the risk of tap breakage due to the increased material removal requirement. Conversely, too low an engagement (e.g., below 50%) results in a weak connection prone to stripping.
Factors Influencing Drill Size Choice
While standard tap drill charts provide excellent guidance, several factors can influence the “best” drill bit choice:
- Material Hardness: Softer materials (e.g., aluminum, plastics) allow for slightly higher thread engagement without excessive tap stress, sometimes permitting a slightly smaller drill bit. Harder materials (e.g., steel, stainless steel) necessitate a drill bit closer to the theoretical minor diameter to reduce cutting forces and prevent tap breakage, often targeting closer to 70-75% engagement.
- Thread Type: Fine threads (UNF) generally benefit from slightly more precise drill sizing than coarse threads (UNC) due to their smaller material volume per thread.
- Hole Type: Through-holes (where the tap goes all the way through) are less critical than blind holes (where the tap bottoms out), which require careful consideration of chip evacuation and tap type.
- Lubrication: Proper lubrication significantly reduces friction and cutting forces, allowing the tap to perform more efficiently and reduce the risk of material tearing or tap welding.
- Tooling: The sharpness of your drill bit and tap, and the rigidity of your setup (hand tapping vs. machine tapping), all play a role. A dull drill bit can create an undersized or out-of-round hole.
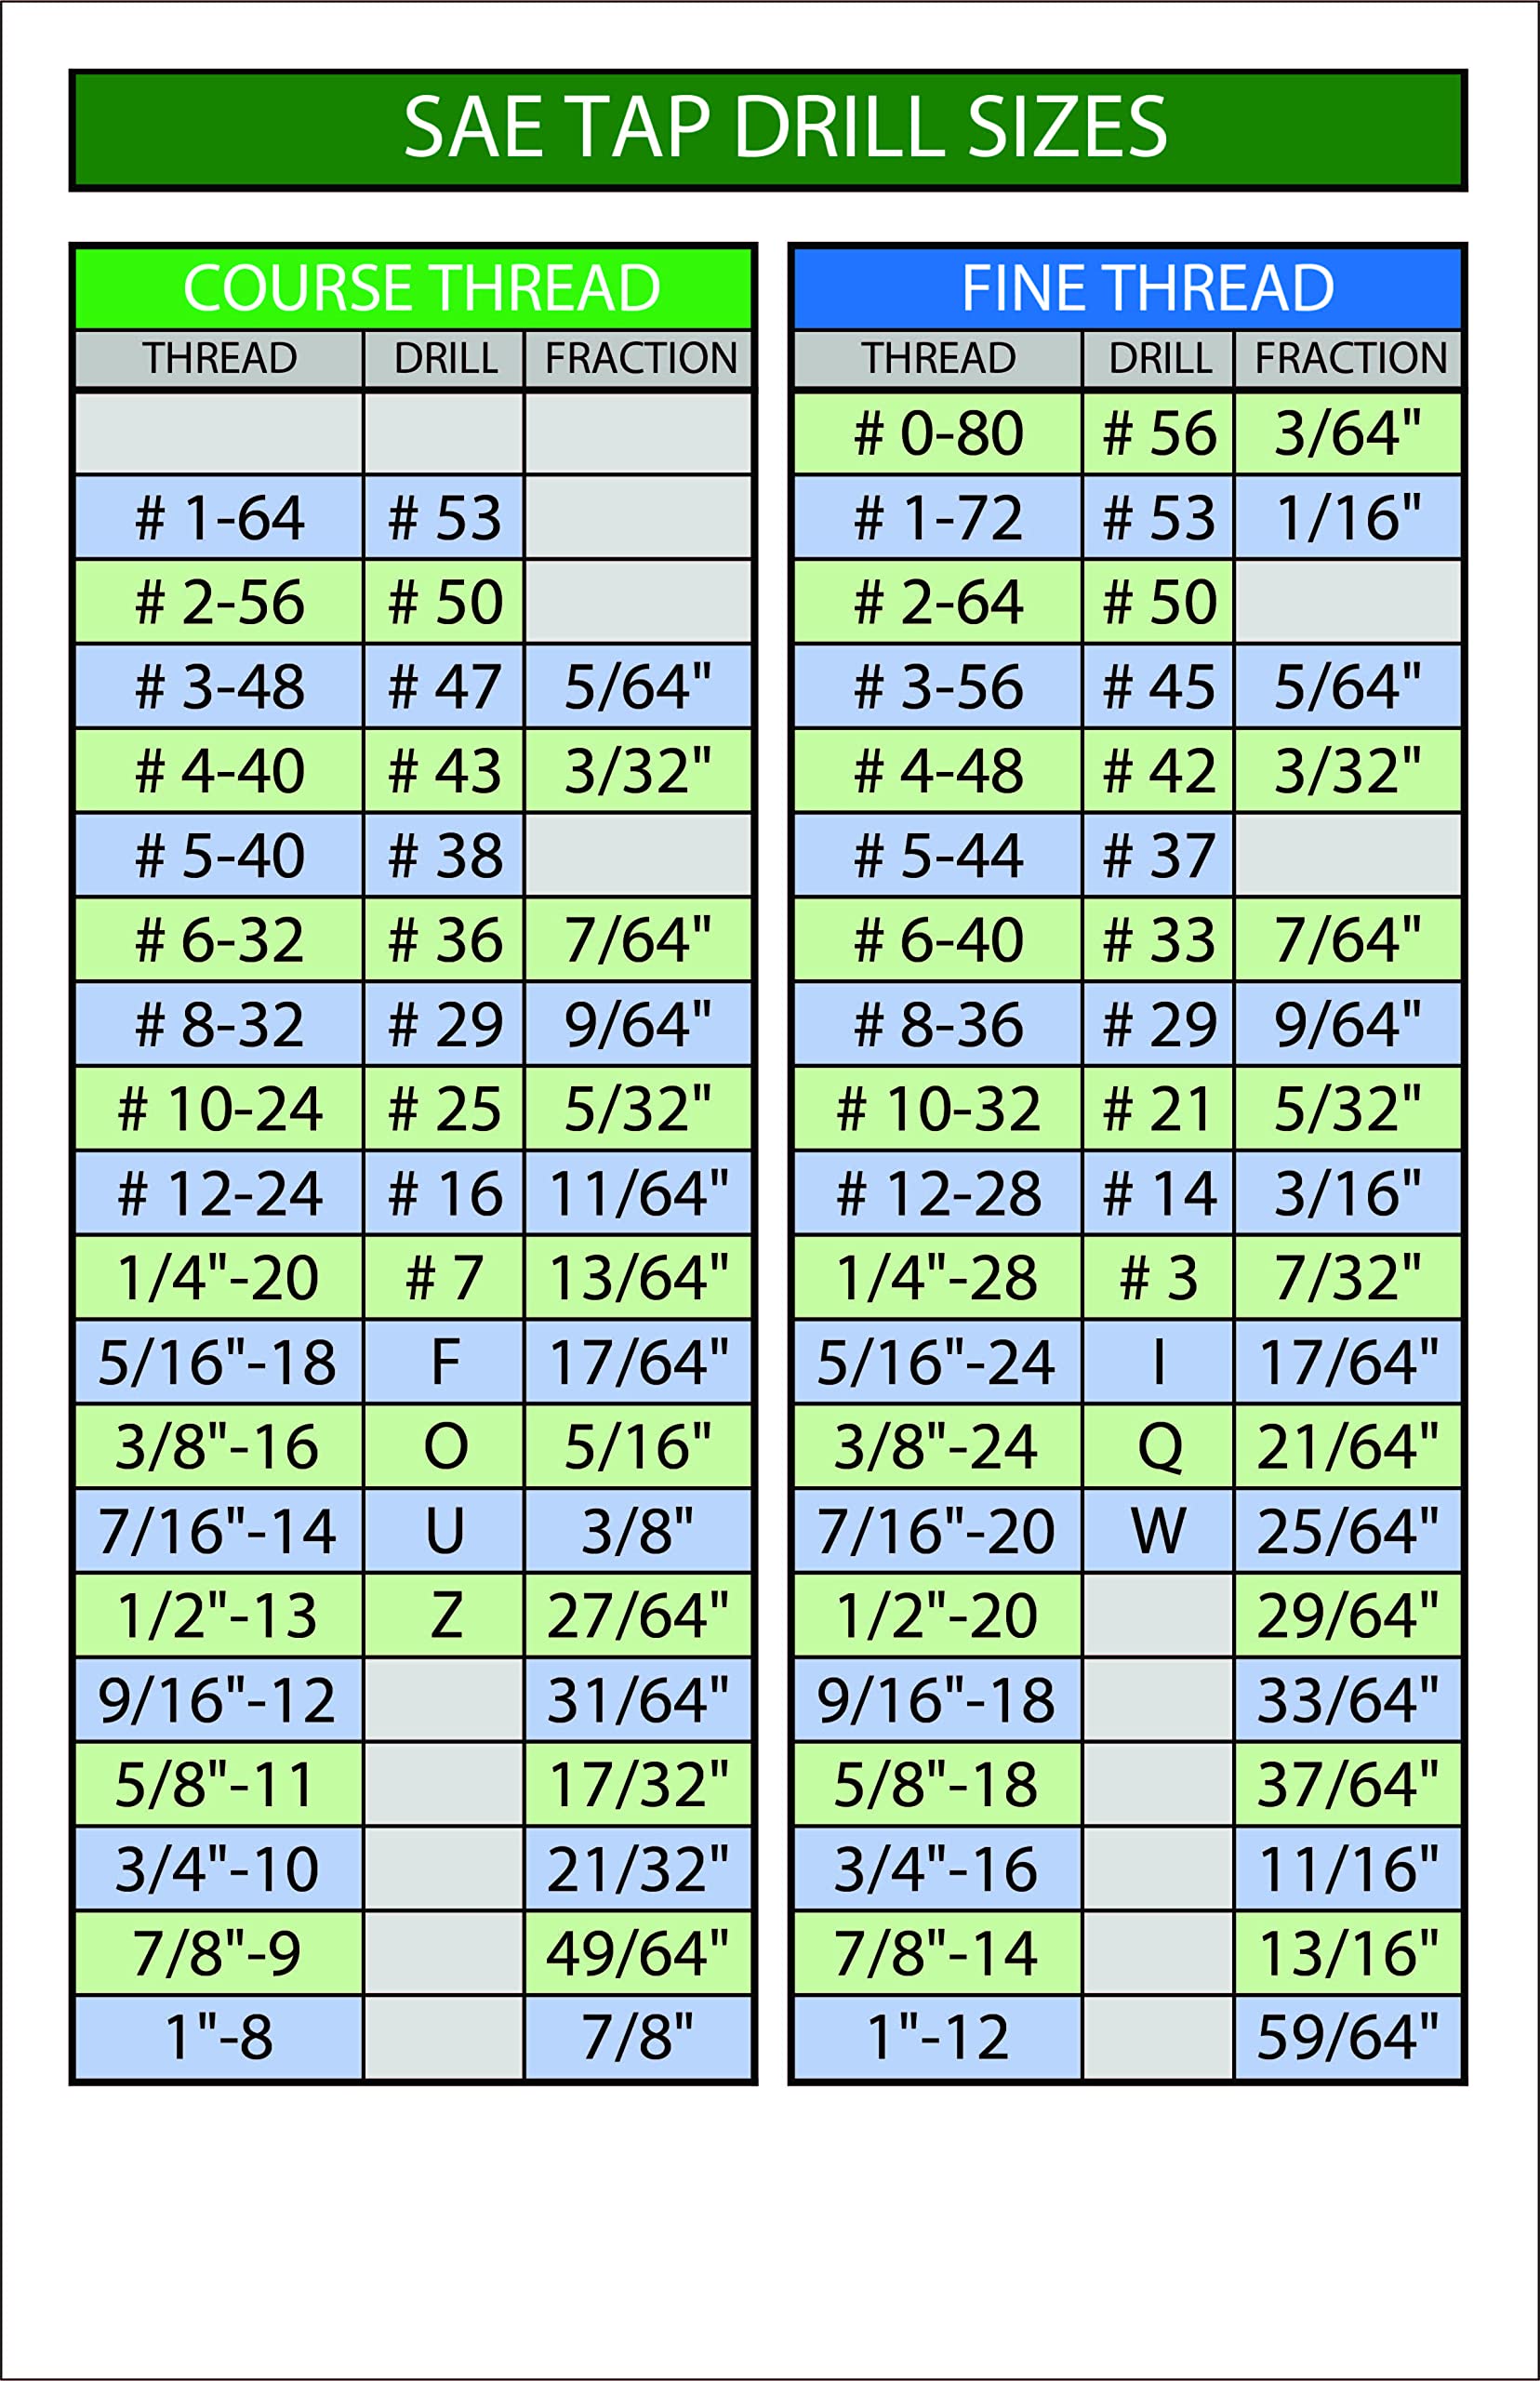
The Definitive 10-24 Tap Drill Size
For the 10-24 Unified National Fine thread, the standard and most widely recommended drill bit size for optimal thread engagement (typically targeting 75%) is a #25 drill bit.
The Standard Recommendation: #25 Drill Bit
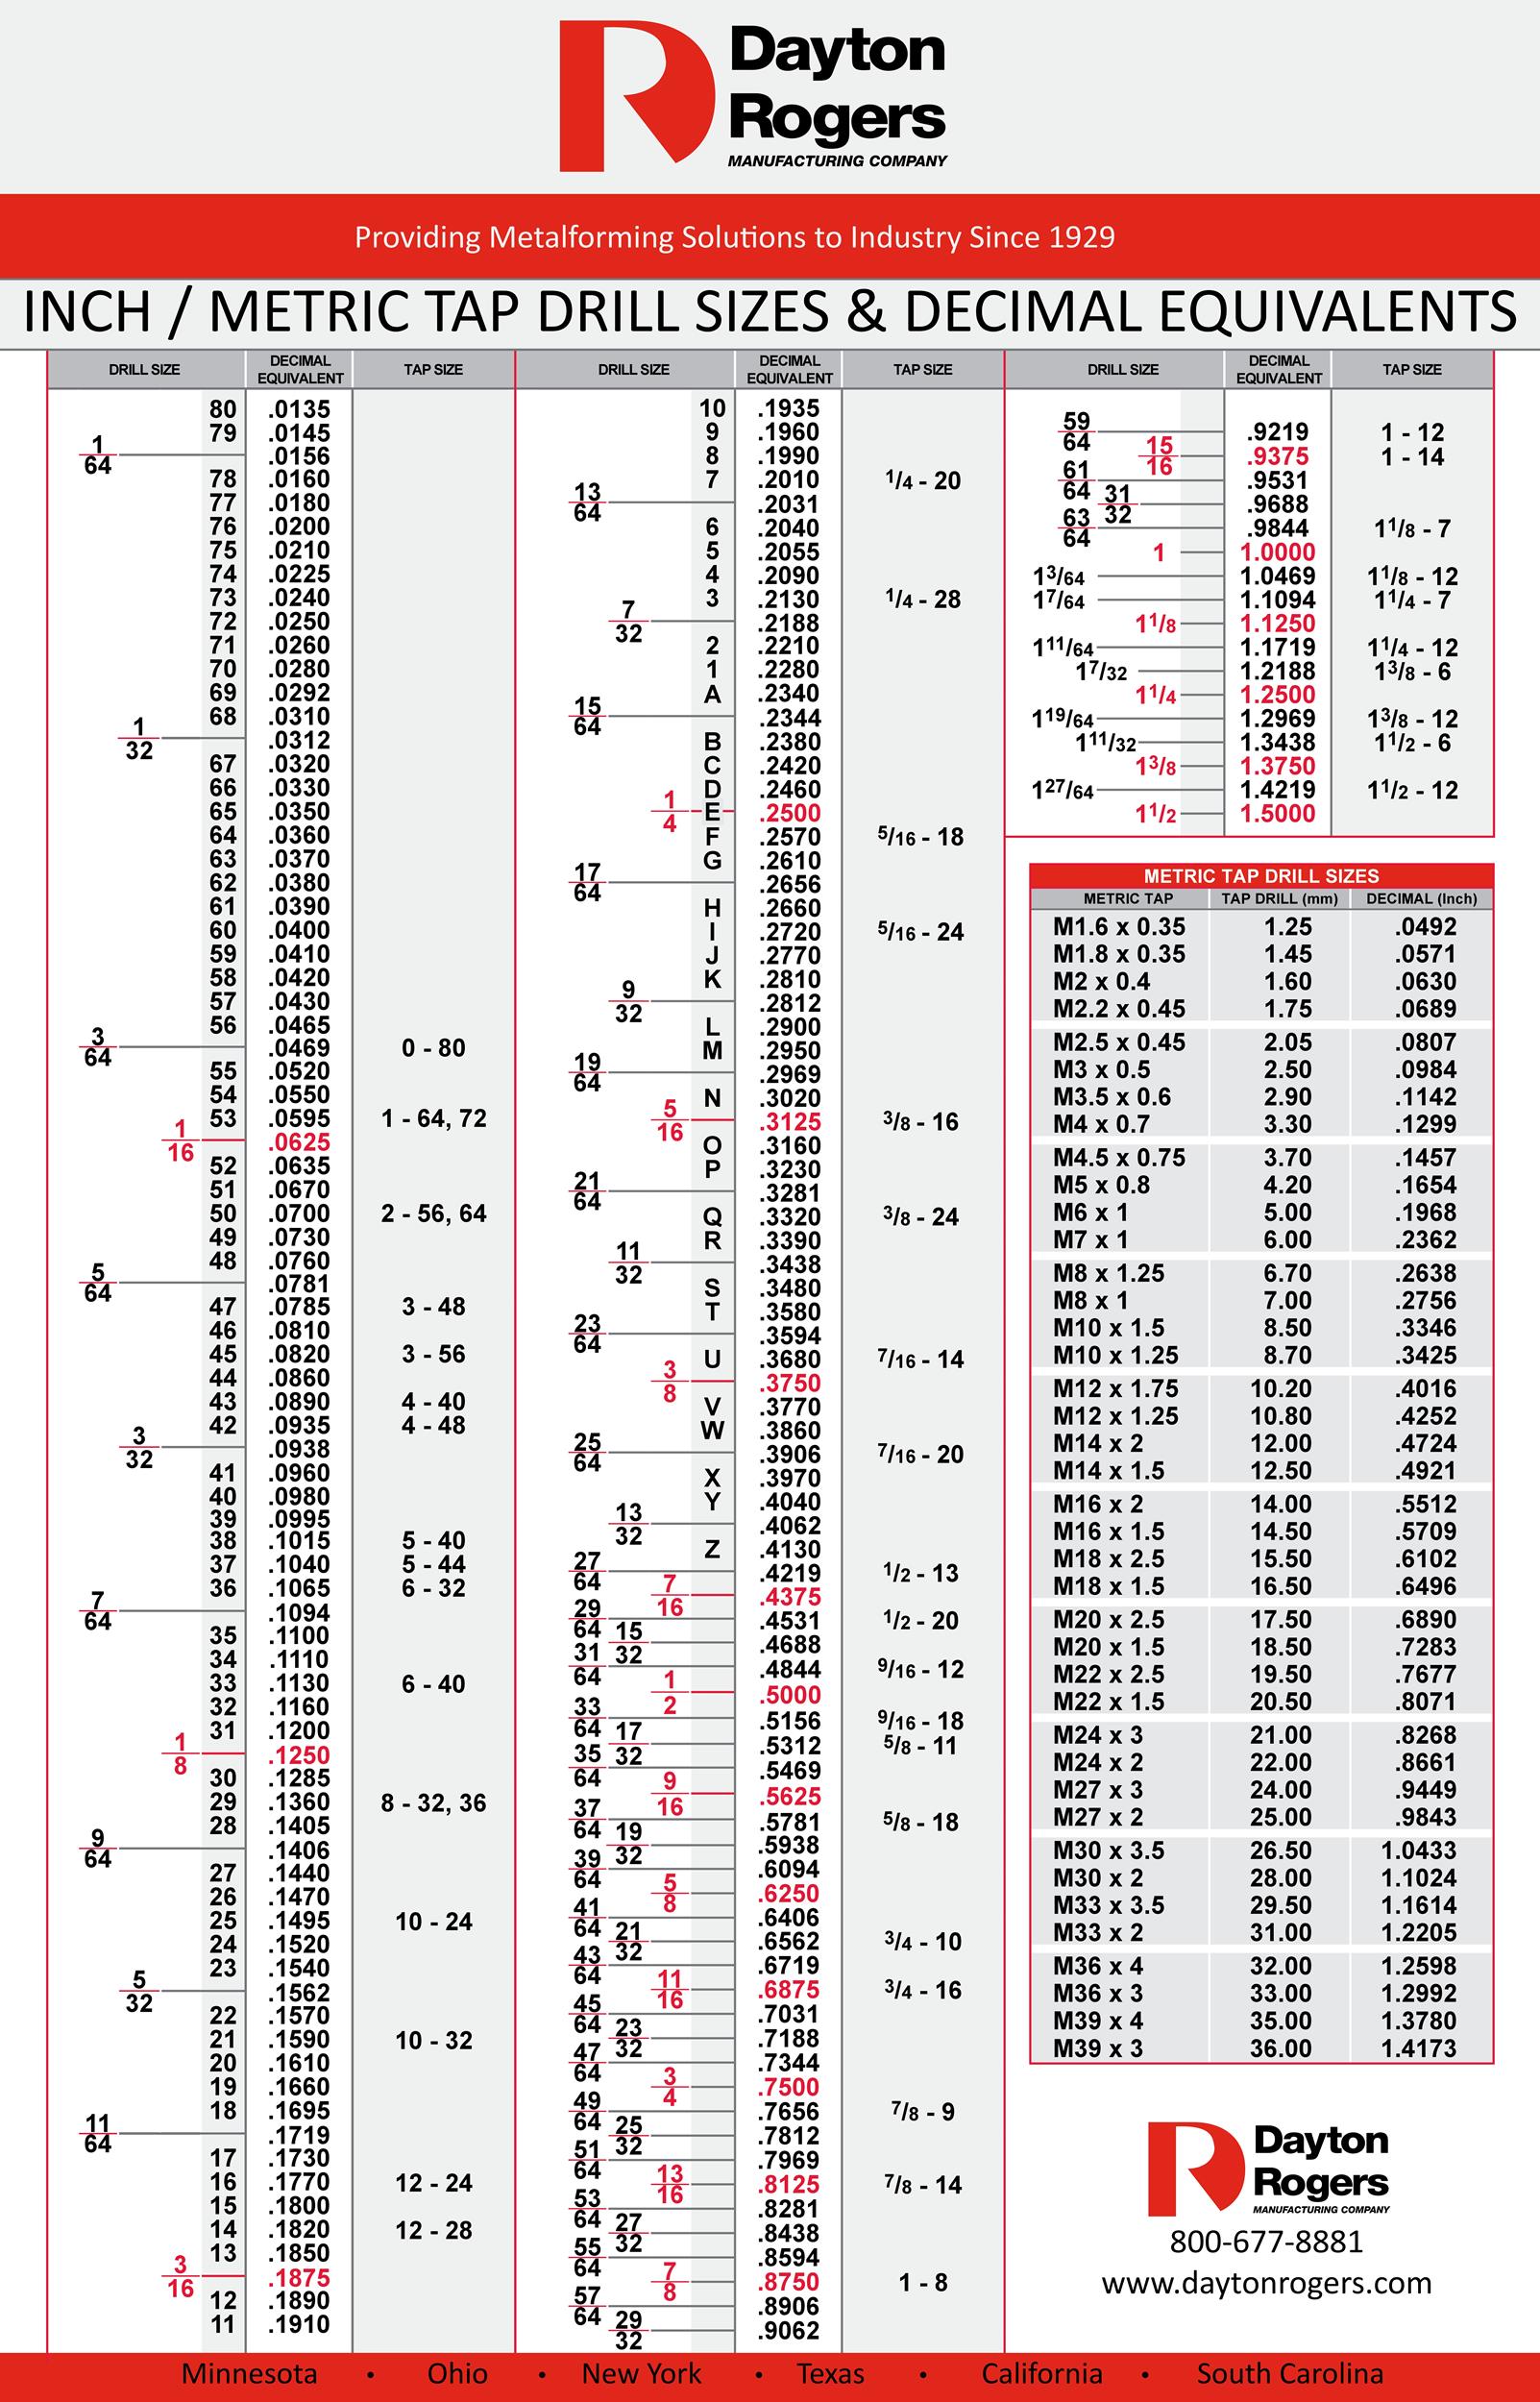
A #25 drill bit has a diameter of 0.1495 inches (3.80 mm). This size is specifically chosen to leave the ideal amount of material for a 10-24 tap to cut, ensuring robust thread engagement without overburdening the tap. Using a standard fractional or metric drill bit that is merely “close” can lead to substandard results. For instance, using a 1/8 inch (0.125″) drill would be too small, leading to extremely high tap stress and likely breakage. Conversely, a 5/32 inch (0.156″) drill would be too large, resulting in weak threads.
Metric Equivalent (if necessary)
While the #25 drill bit is the standard, in a metric-dominant workshop, finding a precise equivalent can be challenging. A 3.80 mm drill bit is the direct metric equivalent to a #25 drill bit. However, 3.80 mm drill bits are not always readily available in standard sets. If you absolutely cannot source a #25 or 3.80 mm drill, a 3.75 mm drill bit (if available) would be the next closest option, offering slightly more material for the tap to cut, which might be acceptable in softer materials but could increase tap stress in harder ones. A 3.90 mm would be slightly too large. For precision tech work, investing in a numbered drill bit set is highly recommended to ensure you always have the exact size required.
Why #25 is Optimal for 10-24
The selection of the #25 drill bit for a 10-24 tap is based on industry standards and engineering calculations designed to achieve approximately 75% thread engagement. This percentage offers the best balance of strength and manufacturability. At 75% engagement, the threads are strong enough to withstand significant tensile loads and resist stripping, yet the tapping process is less strenuous on the tool and the material, reducing the risk of tap breakage and ensuring a clean cut. This precise balance is especially vital in tech, where components often need to be secure but also allow for assembly, disassembly, and potential re-tapping without degrading the integrity of the base material.
Best Practices for Successful Tapping
Achieving professional-grade tapped holes goes beyond selecting the correct drill bit. It requires adherence to best practices that minimize errors and maximize the longevity of your tools and the quality of your work. These practices are especially critical in tech applications where component reliability is paramount.
Material Considerations
The material being tapped significantly influences the tapping process.
- Soft Metals (Aluminum, Brass): These materials are easier to tap, but can sometimes “gum up” or produce stringy chips. Use a good cutting fluid specific for these materials to prevent galling and ensure clean thread formation. You might be able to get away with a slightly smaller drill (e.g., 78% engagement) for extra strength if the material is soft and the tap is sharp.
- Steel: Steels require more force and generate more heat. A high-quality tap, proper cutting fluid, and a slower, more deliberate tapping process are essential. Stick strictly to the #25 drill bit for steel.
- Stainless Steel: Notoriously difficult to tap due to its work-hardening properties. Use a high-quality cobalt or HSS-E tap, aggressive cutting fluid, and a very slow, constant cutting motion. Avoid dwelling, as it can cause work-hardening.
- Plastics: Tapping plastics can be tricky. Some plastics (e.g., Delrin) tap cleanly, while others (e.g., acrylics) can chip or crack. Use a plastic-specific tap or a slightly modified metal tap (e.g., with fewer flutes, different rake angles). A slightly larger drill bit might be appropriate to prevent cracking due to material displacement rather than cutting, aiming for 60-70% engagement.
Lubrication is Key
Never tap dry, especially in metals. Cutting fluid (also known as tapping fluid or cutting oil) plays several crucial roles:
- Reduces Friction: Minimizes heat buildup and the force required to cut the thread.
- Extends Tool Life: Lubrication prevents premature wear and breakage of the tap.
- Improves Finish: Helps produce cleaner, smoother threads by preventing material tearing and galling.
- Aids Chip Evacuation: Some fluids help flush chips from the flutes, especially critical in blind holes.
Choose a cutting fluid appropriate for the material you are tapping. For aluminum, a lighter oil is often sufficient, while for steel and stainless steel, a heavier sulfurized or chlorinated oil is usually recommended.
The Tapping Process Step-by-Step
- Drill the Pilot Hole: Using a sharp #25 drill bit, create a hole perpendicular to the material surface. Use a drill press for accuracy if possible. For handheld drilling, use a center punch to prevent drill wandering.
- Chamfer the Hole (Optional but Recommended): A slight chamfer (deburring) around the entrance of the hole helps guide the tap squarely and prevents the first thread from being damaged during entry.
- Apply Cutting Fluid: Generously apply appropriate cutting fluid to the tap and the hole.
- Start the Tap Squarely: Using a tap wrench, insert the taper tap (or plug tap for through-holes) into the hole. Ensure the tap is perfectly perpendicular to the workpiece. Use a tap guide or a machinist’s square to verify alignment.
- Cut the Thread: Turn the tap wrench clockwise (for right-hand threads) about a half to three-quarters of a turn. This creates the cutting action.
- Break the Chip: After cutting, turn the tap wrench counter-clockwise (reverse) about a quarter to half a turn. This breaks the chip and prevents it from binding in the tap flutes, allowing the cutting fluid to reach the cutting edges more effectively. Repeat this process – cut, reverse, cut, reverse – until the desired thread depth is achieved.
- Clean Up: Once tapping is complete, thoroughly clean the hole to remove all chips and cutting fluid residue. Compressed air or a brush can be effective.
Preventing Tap Breakage
Tap breakage is a common frustration, particularly in critical tech projects where a broken tap can ruin an expensive component.
- Use the Correct Drill Bit: As discussed, an undersized hole is a primary cause of tap breakage.
- Maintain Perpendicularity: Taps are brittle. If forced in at an angle, they will snap. Use a tap guide or drill press when possible.
- Use Sharp Taps: Dull taps require excessive force and are more prone to breaking.
- Don’t Force It: If you feel excessive resistance, stop. Back out the tap, clean the chips, reapply lubricant, and reassess.
- Break Chips Regularly: Failing to break chips allows them to pack into the flutes, causing the tap to bind and snap.
- Choose the Right Tap Type: Use a spiral flute tap for blind holes in softer materials (chips evacuate upwards) and a spiral point tap (gun tap) for through-holes (chips push forward).
- Select Appropriate Material Taps: For tough materials like stainless steel, use high-quality cobalt taps.
Tools and Techniques for Professional Results
Achieving truly professional results in tapping, especially in the demanding context of tech hardware, requires more than just the right drill bit and tap. It demands the right tools and refined techniques that ensure consistency, precision, and efficiency.
Essential Tapping Equipment
- Numbered Drill Bit Set: Critical for having the exact #25 drill bit (and other specific sizes) for tapping. High-speed steel (HSS) or cobalt bits are preferred for durability.
- High-Quality Taps: Invest in good quality HSS, HSS-E, or cobalt taps from reputable manufacturers. Cheap taps are a false economy.
- Tap Wrench: Choose a tap wrench that provides good leverage and allows for a firm grip. T-handle wrenches are great for small taps, while larger bar-type wrenches suit bigger taps.
- Tap Guide: A tap guide (manual or drill press-mounted) is invaluable for ensuring the tap starts and stays perfectly perpendicular to the workpiece, drastically reducing the risk of tap breakage and ensuring straight threads.
- Cutting Fluid: As mentioned, the right cutting fluid for your material is non-negotiable.
- Deburring Tool/Chamfer Tool: Essential for preparing the hole entrance and ensuring clean thread starts.
- Calipers/Micrometers: For verifying hole diameters (if required) and thread dimensions.
Hand Tapping vs. Machine Tapping
- Hand Tapping: Most common for one-off tasks, repairs, or when portability is required. Requires skill and feel to maintain perpendicularity and prevent breakage. Best suited for smaller holes and softer materials.
- Machine Tapping (Drill Press, Milling Machine): Offers superior accuracy and consistency. The machine ensures perfect perpendicularity and can apply precise, constant pressure. Power tapping attachments can automate the cutting and reversing cycles, significantly increasing efficiency and reducing operator fatigue for repetitive tasks. This method is preferred for production runs or critical applications where absolute precision is paramount, such as machining parts for aerospace tech or high-precision robotics.
Quality Control and Inspection
After tapping, a thorough inspection is crucial to verify the quality of the internal threads.
- Visual Inspection: Examine the threads for cleanliness, consistency, and any signs of tearing, galling, or incomplete formation. Ensure chips are fully evacuated.
- Go/No-Go Gauges: For critical applications, use thread plug gauges (Go/No-Go gauges) to verify that the tapped hole falls within specified tolerances. The “Go” gauge should enter freely, and the “No-Go” gauge should not enter more than 1.5 turns.
- Test Fit with a Screw: Always test fit a corresponding screw into the newly tapped hole. It should thread in smoothly without excessive force or binding, indicating a properly formed thread and correct drill bit selection.
Mastering the art of tapping, starting with the fundamental choice of the correct drill bit for a 10-24 thread, is an invaluable asset for anyone involved in building, modifying, or maintaining technology. By combining the precise #25 drill bit with meticulous technique and appropriate tools, you ensure robust and reliable connections, which are the backbone of any well-engineered tech solution.
aViewFromTheCave is a participant in the Amazon Services LLC Associates Program, an affiliate advertising program designed to provide a means for sites to earn advertising fees by advertising and linking to Amazon.com. Amazon, the Amazon logo, AmazonSupply, and the AmazonSupply logo are trademarks of Amazon.com, Inc. or its affiliates. As an Amazon Associate we earn affiliate commissions from qualifying purchases.