
The successful anchoring of a concrete screw, universally known as a Tapcon, hinges on one foundational principle: precise drilling. While seemingly a simple task, selecting the correct drill bit size for a 1/4-inch Tapcon is a critical technical detail that determines the integrity, load-bearing capacity, and longevity of the fastener connection. This isn’t merely a matter of convenience; it’s an engineering requirement for optimal mechanical performance in brittle substrates like concrete, brick, or block.
The Engineering Principle Behind Tapcon Fasteners
Tapcon fasteners are self-tapping screws designed specifically for masonry applications. Unlike traditional expansion anchors that exert outward pressure to create friction, Tapcons work by cutting their own threads into the base material. This innovative design allows for a strong, vibration-resistant connection without the need for an additional anchor or epoxy. Understanding this mechanism is key to appreciating the strict requirements for pilot hole sizing.

How Tapcons Create a Secure Connection
The magic of a Tapcon lies in its hardened, alternating thread design. As the screw is driven into a pre-drilled pilot hole, its threads literally cut into the surrounding concrete or masonry. This creates a secure, form-fitting connection where the screw threads are deeply embedded within the substrate. The tightness of this fit is paramount; too large a hole, and the threads won’t engage effectively, leading to a loose or stripped connection. Too small, and the screw may bind, break, or overstress the material, causing spalling or cracking.
The Tapered Thread Design
Tapcons feature a unique thread profile. While the thread diameter is consistent, the threads themselves are engineered with a specific pitch and a high-low thread design. This allows for efficient material removal during installation while maximizing the contact area once fully seated. The hardened steel construction enables the screw to withstand the immense forces required to tap into dense masonry. The precise diameter of the pilot hole is crucial because it dictates the amount of material the Tapcon needs to displace. An ideal pilot hole allows the screw to tap effectively without over-compressing or fracturing the surrounding material.
Precision Drilling: The Core of a Reliable Tapcon Installation
Achieving a robust connection with a 1/4-inch Tapcon is intrinsically linked to the precision of the pilot hole. This isn’t a task where “close enough” is acceptable; the tolerances are tight to ensure the self-tapping threads can perform their function optimally.
The Universal Rule: Undersizing for Mechanical Grip
For any self-tapping fastener, the universal rule is to create a pilot hole that is undersized relative to the fastener’s major thread diameter. This undersizing is what allows the threads to cut into and grip the material. For Tapcons, this principle is even more critical due to the brittle nature of masonry. The pilot hole needs to be large enough to accommodate the screw’s core diameter but small enough that the aggressive threads can bite deeply into the concrete, generating maximum pull-out and shear strength.
Why Carbide-Tipped Bits Are Non-Negotiable
Drilling into concrete or masonry requires specialized tooling. Standard high-speed steel (HSS) drill bits will dull almost instantly and are ineffective. Carbide-tipped masonry drill bits are essential. The carbide tip, an extremely hard and heat-resistant material, can withstand the abrasive forces and high temperatures generated during drilling. Furthermore, these bits are designed with specific fluting to efficiently remove the concrete dust (spoil) from the hole, preventing binding and ensuring a clean, accurate diameter. Using a worn-out or incorrect type of bit will not only make the job harder but will also compromise the precision of the hole, leading to a potentially failed Tapcon installation.
The Definitive Answer: Drill Bit Size for 1/4″ Tapcon
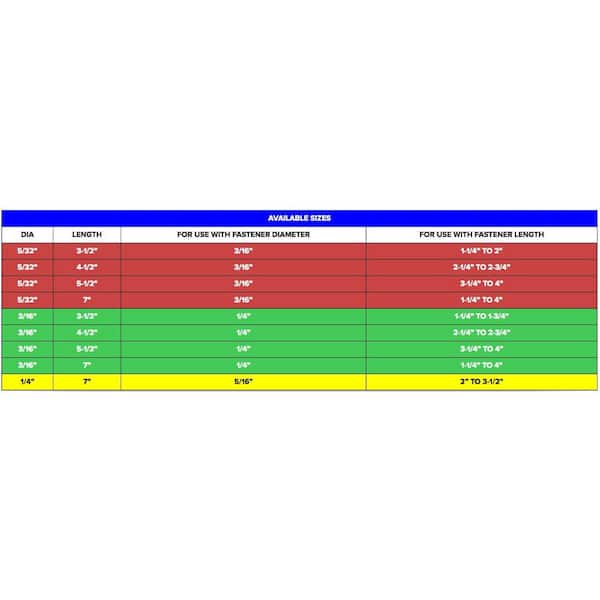
For a standard 1/4-inch diameter Tapcon concrete screw, the universally recommended drill bit size is 3/16 inch.
This seemingly counter-intuitive choice of an undersized bit is deliberate and critical. The 3/16-inch pilot hole provides precisely the right amount of material for the 1/4-inch Tapcon’s threads to engage and cut into, creating a strong mechanical interlock. Deviating from this specific size can lead to significant problems:
- Using a 1/4-inch drill bit: This will create a hole that is too large. The Tapcon’s threads will not have enough material to bite into effectively, resulting in a loose, easily stripped, or failed connection. The screw may spin freely without tightening, or it may pull out under minimal load.
- Using a drill bit smaller than 3/16-inch: This will create a hole that is too small. The Tapcon will encounter excessive resistance, making it difficult to drive. This can lead to the screw binding, snapping off, or causing the concrete around the hole to spall or crack due to over-stressing. It also puts undue strain on the drill and the installer.
Metric vs. Imperial Considerations
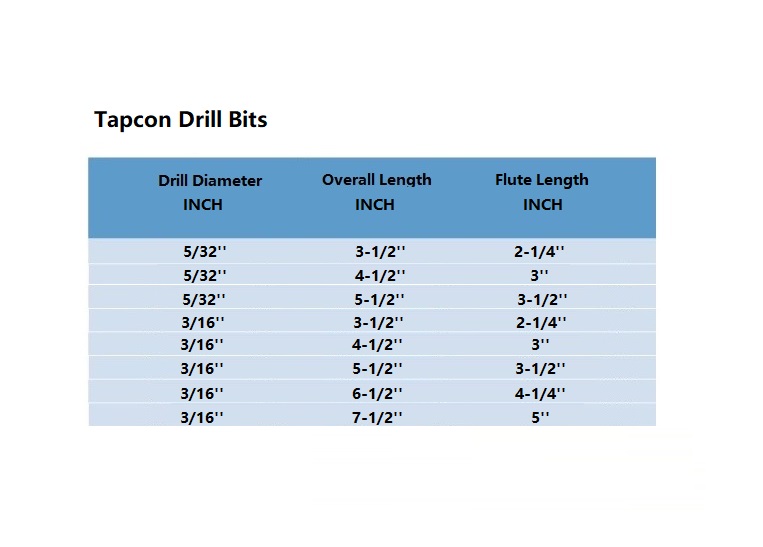
While Tapcons are predominantly specified in imperial measurements (1/4-inch, 3/16-inch), it’s worth noting the metric equivalents for international applications or when working with metric tooling. A 1/4-inch Tapcon is approximately 6.35 mm in diameter. The corresponding 3/16-inch drill bit is approximately 4.76 mm. When purchasing drill bits, always verify the stated application or use the imperial size for simplicity with Tapcon fasteners.
The Impact of Material Hardness
While 3/16-inch is the standard, slight adjustments might be considered in extremely rare, specific circumstances based on material hardness, though it’s generally not recommended for the average user. For instance, in very soft block or mortar, some might theoretically consider a slightly smaller bit (e.g., 5/32 inch for softer materials), but this dramatically increases the risk of stripping or binding. Conversely, in incredibly dense, high-strength concrete, a precisely honed 3/16-inch bit is still preferred, perhaps with a more powerful rotary hammer drill, rather than attempting to enlarge the hole, which would compromise the screw’s grip. For practical purposes, stick to the 3/16-inch for all typical masonry.
Beyond the Bit: Advanced Techniques for Flawless Installation
Selecting the correct drill bit is foundational, but the installation process itself demands technical proficiency to ensure a reliable anchor. The tools and techniques employed play a significant role in the overall success of a Tapcon installation.
Using a Rotary Hammer Drill
For drilling into concrete, especially with carbide-tipped bits, a rotary hammer drill is the superior tool. Unlike standard hammer drills, which primarily rely on percussion, rotary hammer drills use an electro-pneumatic mechanism to deliver a more powerful, piston-driven hammering action combined with rotation. This allows for faster drilling, reduces user fatigue, and creates cleaner, more accurate holes with less effort, which is critical for consistent hole diameter. While a standard hammer drill can suffice for lighter duty or fewer holes, a rotary hammer is a professional-grade tool for serious masonry work.
Depth Control and Hole Cleaning
The depth of the pilot hole is as important as its diameter. The hole must be drilled at least 1/4 inch to 1/2 inch deeper than the Tapcon will penetrate. This extra depth provides space for the concrete dust (spoil) generated during the tapping process, preventing hydraulic lock or binding. Most rotary hammer drills come with a depth gauge for precise control.
After drilling, thorough cleaning of the hole is absolutely crucial. Concrete dust left in the hole can:
- Act as a cushion, preventing the Tapcon from fully seating.
- Increase friction, making it harder to drive the screw.
- Compromise the thread engagement and overall holding power.
Use a wire brush specifically designed for anchor holes, followed by a blow-out bulb or compressed air, to remove all dust and debris. Repeat this process until the hole is completely clean.
Best Practices for Driving the Tapcon
Once the pilot hole is drilled and cleaned, the Tapcon is ready to be driven.
- Select the correct driver bit: Tapcons typically use a hex head or Phillips/Square drive. Ensure your impact driver or drill has the corresponding bit size and type.
- Use an impact driver: While a standard drill can sometimes work, an impact driver is highly recommended. Its rotational impact force is far more effective at driving the Tapcon and cutting threads without stripping the screw head or over-stressing the user.
- Start slowly: Begin driving the Tapcon at a slow speed to ensure it starts straight and catches the threads properly.
- Increase speed: Once the screw has begun to tap, increase the speed. Maintain firm, steady pressure.
- Stop when snug: Drive the Tapcon until it is firmly seated and snug. Do not overtighten. Overtightening can strip the threads in the concrete, damage the screw head, or crack the surrounding material. There is a distinct feel when the Tapcon reaches full engagement and compression.
Troubleshooting and Optimizing Performance
Even with the correct bit size and technique, issues can arise. Understanding how to diagnose and rectify these problems can save time and ensure the structural integrity of your fastening.
When a Tapcon Spins or Strips
If a Tapcon spins freely in the hole and doesn’t tighten, it almost invariably means the pilot hole is too large, or the material around the hole has been compromised (e.g., spalled, or drilled through a void).
- Immediate solution: Remove the spinning Tapcon. If possible, drill a new hole a few inches away. If the location is critical and relocation isn’t an option, you may be able to use a chemical anchoring epoxy to secure the screw, but this is a repair, not an ideal installation.
- Prevention: Always verify your drill bit size, ensure your drill bit is not worn down, and avoid excessive hammering with a non-rotary hammer drill, which can widen the hole.
Ensuring Long-Term Durability
The longevity of a Tapcon installation is a function of the initial precision and the environmental conditions.
- Material compatibility: Ensure the Tapcon material is appropriate for the environment. Standard Tapcons are typically carbon steel with a corrosive-resistant coating. For outdoor, highly corrosive, or damp environments, consider stainless steel Tapcons or specialized coatings, if available for the specific application, to prevent rust and degradation over time.
- Load considerations: Always adhere to the manufacturer’s recommended load ratings for Tapcons. Overloading the fastener can lead to creep, failure, or catastrophic collapse of the attached structure. The 3/16-inch pilot hole, when correctly utilized, ensures the fastener achieves its rated strength.
- Regular inspection: For critical applications, periodic inspection of Tapcon anchors can help identify any signs of movement, corrosion, or material fatigue, allowing for preventative maintenance.
In summary, the choice of a 3/16-inch drill bit for a 1/4-inch Tapcon is a fundamental technical specification. Adherence to this, combined with proper tooling and installation techniques, is the blueprint for a reliable, high-performance masonry anchor, critical for the safety and stability of countless structural and non-structural applications.
aViewFromTheCave is a participant in the Amazon Services LLC Associates Program, an affiliate advertising program designed to provide a means for sites to earn advertising fees by advertising and linking to Amazon.com. Amazon, the Amazon logo, AmazonSupply, and the AmazonSupply logo are trademarks of Amazon.com, Inc. or its affiliates. As an Amazon Associate we earn affiliate commissions from qualifying purchases.