
In the world of spreadsheet software, Microsoft Excel stands as the undisputed industry standard. However, for a beginner, the sheer volume of buttons, icons, and menus can be overwhelming. At the heart of this complex ecosystem is a feature known as the “Ribbon.” Introduced in the 2007 version of Microsoft Office to replace the traditional drop-down menus and toolbars, the Ribbon is a graphical user interface (GUI) designed to help users find the commands they need to complete tasks quickly and efficiently.
Understanding the Ribbon is not just about knowing where buttons are; it is about mastering the logic of Excel’s workflow. By organizing hundreds of commands into a logical hierarchy of tabs and groups, the Ribbon streamlines data entry, complex calculations, and professional data visualization.

The Anatomy of the Excel Ribbon
To use Excel effectively, you must first understand how the Ribbon is structured. It is not merely a bar of icons; it is a sophisticated, multi-layered navigation system. The Ribbon is divided into three primary components: Tabs, Groups, and Commands.
Tabs: The Top-Level Categories
Tabs are the horizontal labels that sit at the very top of the Ribbon. Each tab represents a specific category of tasks. For example, the “Home” tab contains the most frequently used tools for formatting, while the “Formulas” tab is dedicated to mathematical functions and logic. By clicking a tab, the Ribbon changes its display to show the tools relevant to that specific area of work.
Groups: Logic-Based Clusters
Within each tab, the Ribbon is further divided into “Groups.” These are vertical sections separated by thin grey lines, grouping related commands together. On the “Home” tab, you will find groups such as “Font,” “Alignment,” and “Number.” This grouping ensures that if you are looking to change how text looks, you don’t have to scan the entire Ribbon; you simply look at the “Font” group.
Commands: Taking Action
Commands are the individual buttons, boxes, or menus within a group. A command might be a simple button (like “Bold”), a drop-down menu (like “Font Face”), or a gallery (like “Cell Styles”). Some commands carry out an immediate action, while others open a sub-menu for more specific choices.
Dialog Box Launchers
In the bottom-right corner of many groups, you will see a tiny square with an arrow pointing diagonally downward. This is the Dialog Box Launcher. Because the Ribbon cannot fit every single feature of Excel without becoming cluttered, these launchers open a separate window containing more advanced or niche settings for that specific group, such as the full “Format Cells” dialog box.
Navigating the Standard Ribbon Tabs
Excel comes with a set of core tabs that form the foundation of most users’ daily activities. Each tab is a specialized environment designed for a specific stage of data management.
The Home Tab: Your Daily Toolkit
The Home tab is the default view when you open Excel. It houses the commands used for basic data manipulation and formatting. Key groups here include the Clipboard (cut, copy, paste), Font (styling text), and Alignment (positioning text within cells). Perhaps the most powerful group here is “Number,” which allows you to define data types—such as Currency, Date, or Percentage—ensuring that Excel treats your information correctly during calculations.
The Insert and Page Layout Tabs
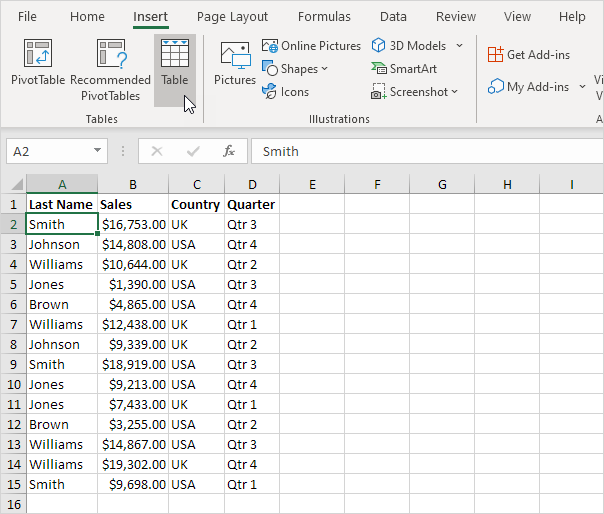
The “Insert” tab is where you go to add elements to your spreadsheet. This includes PivotTables, illustrations (like shapes and icons), and the extensive Charts library. If you need to visualize data, this is your primary destination.
The “Page Layout” tab, conversely, focuses on how the spreadsheet appears on paper or in a PDF. It allows you to adjust margins, orientation, and themes. The “Print Area” tool is particularly important here, allowing users to define exactly which cells should be included in a physical printout.
The Formulas and Data Tabs
These two tabs represent the “engine room” of Excel. The “Formulas” tab contains the Function Library, which categorizes Excel’s 400+ functions into logical groups like Financial, Logical, and Text. It also houses tools for “Formula Auditing,” which help users trace errors in complex calculations.
The “Data” tab is essential for power users. It contains the “Get & Transform Data” tools (Power Query), sorting and filtering options, and data validation tools. This tab is designed for cleaning, organizing, and analyzing large datasets from external sources.
Review and View Tabs
The “Review” tab is for quality control. It includes spell check, accessibility checkers, and the ability to add comments or notes. It is also the location for workbook protection settings, allowing you to lock cells or password-protect your files.
The “View” tab allows you to change how you see your workspace. You can toggle gridlines, the formula bar, and headings on or off. The “Freeze Panes” tool, located here, is vital for keeping headers visible while scrolling through thousands of rows of data.
Contextual Tabs and the Power of Dynamic Interfaces
One of the most intelligent features of the Excel Ribbon is its “Contextual Tabs.” To avoid cluttering the screen with tools you don’t need, Excel only shows certain tabs when you are working with specific objects.
Chart Design and Format Tabs
When you click on a chart, two new tabs suddenly appear: “Chart Design” and “Format.” These tabs provide specialized tools for changing chart types, adding chart elements (like axis titles), and fine-tuning the colors and borders of your data visualizations. As soon as you click back into a regular cell, these tabs disappear.
Table Design and PivotTable Analyze
If you convert a range of data into an official Excel Table (Ctrl+T), the “Table Design” tab appears. This offers quick options for “Total Rows,” “Banded Rows,” and “Slicers.” Similarly, clicking inside a PivotTable triggers the “PivotTable Analyze” and “Design” tabs, which contain the advanced tools necessary for high-level data summarization.
Drawing and Picture Tools
When you insert an image or a shape, the “Picture Format” or “Shape Format” tabs emerge. These allow for advanced image editing within Excel, such as background removal, cropping, and 3D effects. This dynamic nature of the Ribbon ensures that the interface evolves based on the task at hand, keeping the workspace focused.
Customizing the Ribbon for Maximum Productivity
While the default Ribbon is well-organized, every professional has different needs. Excel allows for significant customization to ensure your most-used tools are always within reach.
Modifying the Quick Access Toolbar (QAT)
Located either above or below the Ribbon, the Quick Access Toolbar is a small, customizable row of buttons that stays visible regardless of which tab you have selected. By default, it contains “Save,” “Undo,” and “Redo.” However, you can right-click any command on the Ribbon and select “Add to Quick Access Toolbar.” This is a game-changer for tools you use dozens of times an hour, such as “Paste Values” or “Freeze Panes.”
Creating Custom Tabs and Groups
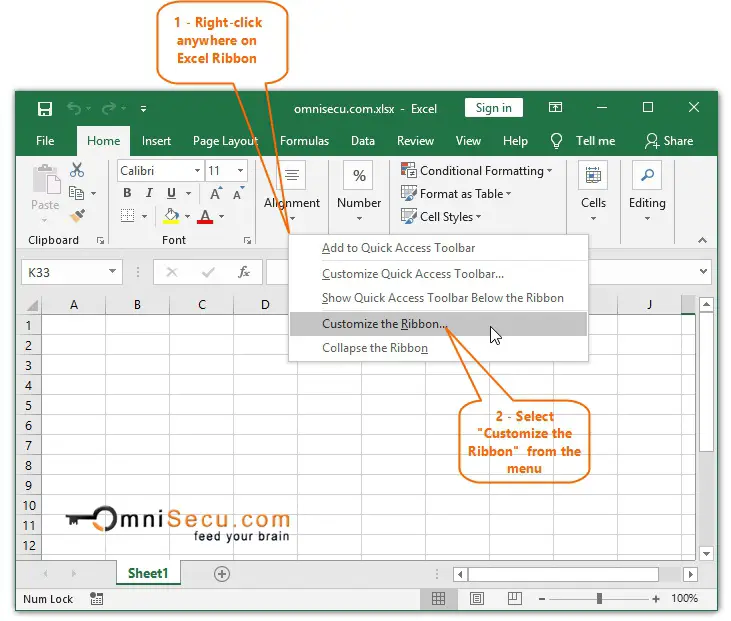
If you find yourself constantly jumping between the “Home” and “Data” tabs, you can create your own custom tab. By right-clicking the Ribbon and selecting “Customize the Ribbon,” you can create a new tab named “My Tools” (or anything you like) and drag your favorite commands into it. This allows you to build a personalized interface tailored to your specific workflow, whether you are an accountant, a data scientist, or a project manager.
Collapsing and Pinning the Ribbon
On smaller screens, such as laptops, the Ribbon can take up valuable vertical space. You can collapse the Ribbon by double-clicking any tab or pressing Ctrl+F1. This hides the groups and commands, showing only the tab names. When you need a tool, you click the tab, the Ribbon drops down, and it automatically retracts once you return to your sheet. To lock it back into place, you simply click the “pin” icon in the bottom-right corner of the Ribbon.
Advanced Ribbon Features and Keyboard Shortcuts
For those looking to transition from a casual user to a “power user,” the Ribbon offers several advanced navigation features that go beyond clicking buttons.
Key Tips: Navigating without a Mouse
If you press the “Alt” key on your keyboard, tiny letters and numbers appear over every tab and command on the Ribbon. These are called “Key Tips.” By typing the sequence of letters shown, you can navigate the entire Ribbon without ever touching your mouse. For example, pressing Alt, then H, then A, then C will center-align the text in your selected cells. Mastering these sequences is the hallmark of Excel experts, as it significantly increases speed.
The Search Bar (Tell Me What You Want To Do)
At the top of the Excel window, there is a search bar (often labeled “Search” or “Tell me what you want to do”). This is an extension of the Ribbon’s functionality. If you cannot remember which tab a specific command is on, you can simply type the name of the feature (e.g., “Remove Duplicates”). Excel will not only show you where the command is but allow you to execute it directly from the search results.
Future Trends in UI: AI and Fluid Design
The Excel Ribbon is not static; it continues to evolve. Recent updates have seen the integration of “Search” and “Analyze Data” (powered by AI) directly into the interface. As Microsoft moves toward a more “Fluid Design” language, the Ribbon is becoming more streamlined, with simplified icons and better support for touch-screen devices. Understanding the current structure of the Ribbon ensures that you are prepared for these future iterations of the software.
By mastering the Ribbon, you transform Excel from a daunting grid of cells into a responsive and powerful tool. Whether you are formatting a simple budget or building a complex financial model, the Ribbon is your primary map and compass in the world of data.
aViewFromTheCave is a participant in the Amazon Services LLC Associates Program, an affiliate advertising program designed to provide a means for sites to earn advertising fees by advertising and linking to Amazon.com. Amazon, the Amazon logo, AmazonSupply, and the AmazonSupply logo are trademarks of Amazon.com, Inc. or its affiliates. As an Amazon Associate we earn affiliate commissions from qualifying purchases.