
In the ever-evolving landscape of technology, where our digital lives are increasingly intertwined with our daily routines, the stability and security of our operating systems are paramount. Windows 10, a ubiquitous platform powering millions of computers worldwide, is generally a robust and reliable operating system. However, like any complex piece of software, it can occasionally encounter issues. When these problems arise, from software conflicts and driver incompatibilities to malware infections and system instability, users often find themselves searching for solutions. This is where Safe Mode on Windows 10 emerges as an indispensable troubleshooting tool.
Safe Mode is a diagnostic startup mode designed to help you resolve problems with Windows. It starts Windows with a minimal set of drivers and services, effectively stripping away non-essential programs and features that might be causing your computer to malfunction. Think of it as a highly controlled environment where you can diagnose and fix issues without the interference of potentially problematic software.
Understanding the Core Purpose of Safe Mode
The fundamental principle behind Safe Mode is isolation. By loading only the bare necessities for Windows to function, it allows you to pinpoint the source of a problem. If your computer boots successfully into Safe Mode, it strongly suggests that the issue lies with a third-party application, a driver, or a specific Windows setting that is not loaded in this minimal environment. Conversely, if the problem persists even in Safe Mode, it might indicate a more serious hardware issue or a deeply embedded system corruption.
When Should You Consider Using Safe Mode?
The decision to enter Safe Mode is typically prompted by noticeable disruptions to your computer’s normal operation. Here are some common scenarios where Safe Mode can be your first line of defense:
- Unexplained Crashes and Freezes: If your computer frequently crashes, freezes, or exhibits the dreaded “Blue Screen of Death” (BSOD), Safe Mode can help determine if a recently installed program or driver is the culprit.
- Performance Issues: A sudden and drastic slowdown in your computer’s performance, even after closing unnecessary applications, can be a sign of underlying problems that Safe Mode can help diagnose.
- Software Installation or Uninstallation Problems: Sometimes, software installations or uninstallations can go awry, leaving your system in an unstable state. Safe Mode provides a cleaner environment to address these issues.
- Malware and Virus Infections: While dedicated antivirus software is your primary defense, if you suspect a malware infection and your system is too unstable to run your security tools effectively, Safe Mode can be a crucial step in removing stubborn infections.
- Driver Issues: Faulty or incompatible hardware drivers are a frequent cause of system instability. Safe Mode loads only basic drivers, allowing you to uninstall or update problematic drivers without interference.
- System File Corruption: In rare cases, essential Windows system files can become corrupted. Safe Mode can provide an environment to run diagnostic tools that can repair these files.
How to Access Safe Mode in Windows 10
Accessing Safe Mode in Windows 10 is a straightforward process, though it has evolved slightly from earlier Windows versions. There are several methods, and the best one often depends on whether your computer can boot into the standard Windows environment.
Method 1: Accessing Safe Mode from Settings (When Windows Boots Normally)
This is the most user-friendly method if your Windows 10 system is still booting up, albeit with issues.
- Open Settings: Click the Start button and select the gear icon to open the Settings app.
- Navigate to Update & Security: In the Settings window, click on “Update & Security.”
- Select Recovery: On the left-hand sidebar, click on “Recovery.”
- Advanced startup: Under the “Advanced startup” section, click the “Restart now” button.
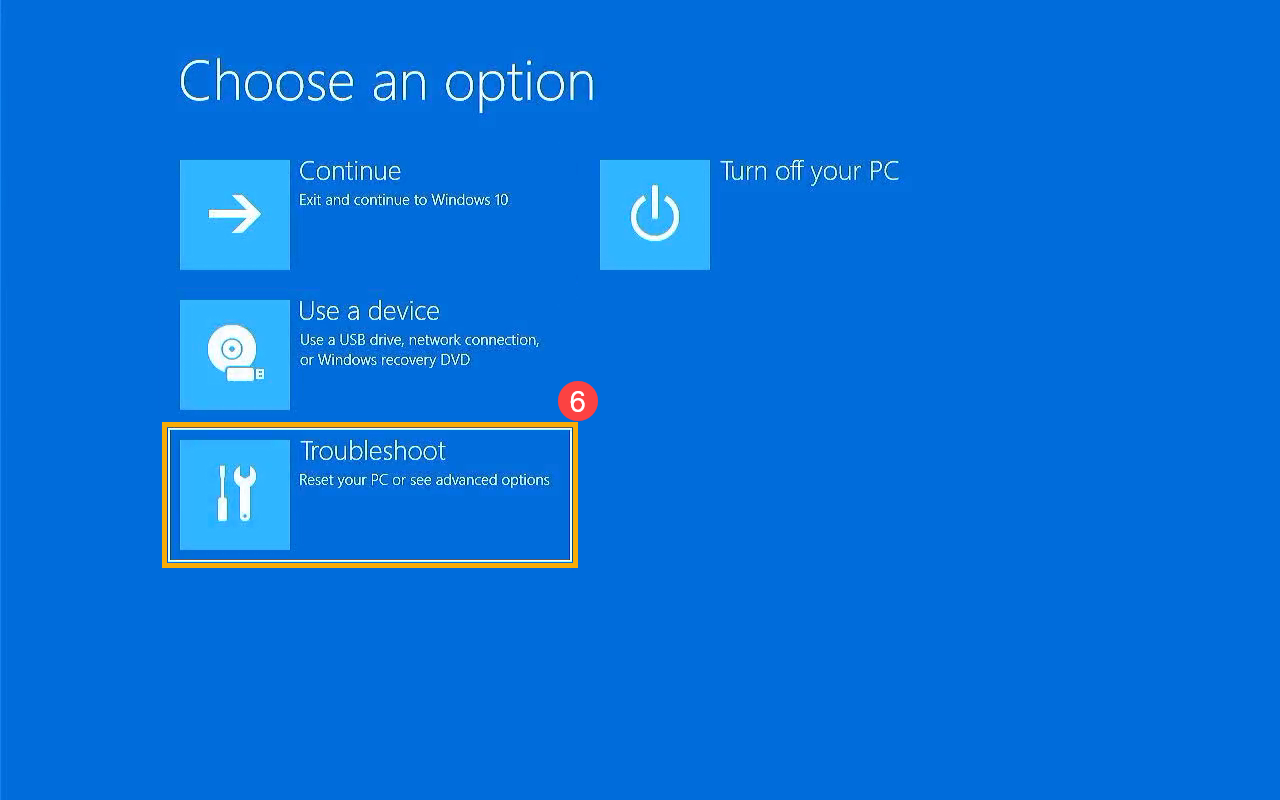
- Troubleshoot: Your computer will restart and present you with a blue screen with several options. Select “Troubleshoot.”
- Advanced options: From the Troubleshoot menu, choose “Advanced options.”
- Startup Settings: Within Advanced options, select “Startup Settings.”
- Restart: You’ll see a list of options that will affect the next startup. Click the “Restart” button.
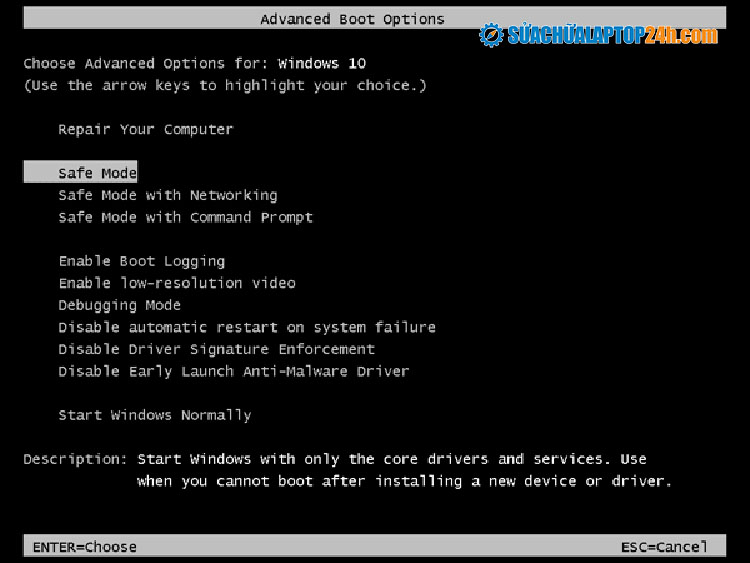
- Choose Safe Mode: After restarting, you’ll be presented with a list of startup options. You can press the number key or the function key corresponding to your desired Safe Mode.
- 4 or F4: Enable Safe Mode (the most common choice).
- 5 or F5: Enable Safe Mode with Networking (useful if you need internet access to download drivers or tools).
- 6 or F6: Enable Safe Mode with Command Prompt (for advanced users who prefer a command-line interface).
Method 2: Accessing Safe Mode from the Sign-in Screen (When Windows Boots but You Can’t Log In)
If Windows boots but you’re stuck at the sign-in screen, or if you can’t log in due to a problem, this method is effective.
- Restart your PC: On the Windows sign-in screen, click the Power button icon in the bottom-right corner.
- Hold Shift and Click Restart: While holding down the Shift key on your keyboard, click “Restart.”
- Follow steps 5-9 from Method 1: Your computer will reboot into the blue Advanced startup options screen. From there, follow steps 5 through 9 of Method 1 (Troubleshoot > Advanced options > Startup Settings > Restart > Choose Safe Mode).
Method 3: Accessing Safe Mode When Windows Fails to Boot (Automatic Repair)
If Windows fails to boot correctly multiple times, it will automatically trigger the Automatic Repair environment.
- Force Shutdown Three Times: The quickest way to trigger Automatic Repair is to interrupt the boot process three consecutive times. To do this, power on your PC and, as soon as you see the Windows logo, press and hold the power button until the PC shuts down completely. Repeat this process three times.
- Automatic Repair Screen: On the fourth boot attempt, Windows should automatically enter the Automatic Repair screen.
- Follow steps 5-9 from Method 1: From the Automatic Repair screen, select “Advanced options,” then “Troubleshoot,” “Advanced options,” “Startup Settings,” “Restart,” and finally choose your desired Safe Mode option.
Method 4: Accessing Safe Mode via System Configuration (msconfig)
This method is useful if you want to set Windows to boot into Safe Mode on the next startup and then revert it back later.
- Open Run: Press the Windows key + R to open the Run dialog box.
- Type
msconfig: In the Run dialog box, typemsconfigand press Enter or click OK. This will open the System Configuration utility. - Boot Tab: Navigate to the “Boot” tab.
- Safe Boot: Under “Boot options,” check the box that says “Safe boot.”
- Select Minimal: Ensure that “Minimal” is selected (this is the standard Safe Mode). You can choose “Network” if you need internet access.
- Apply and Restart: Click “Apply” and then “OK.” You will be prompted to restart your computer. Click “Restart.” Your computer will now boot into Safe Mode.
- To Disable Safe Mode: Once you have resolved your issues and your computer is running normally, repeat steps 1-3. Uncheck the “Safe boot” box, click “Apply,” “OK,” and restart your computer.

Navigating and Troubleshooting in Safe Mode
Once you’ve successfully booted into Safe Mode, you’ll notice a few key differences from your normal Windows environment:
- Black Background: The desktop wallpaper is typically black, and you’ll see the words “Safe Mode” displayed in each corner of the screen.
- Limited Display Resolution: The screen resolution might be lower than usual, as Safe Mode uses generic display drivers.
- Fewer Icons and Programs: You’ll only see the essential Windows icons on the desktop and in the taskbar. Many third-party applications will not be available.
- Limited Functionality: Devices like printers, scanners, and certain audio devices might not function correctly because their specific drivers are not loaded.
With these limitations in mind, here’s how you can use Safe Mode to troubleshoot:
Identifying and Removing Problematic Software
This is the most common use of Safe Mode.
- Check Recently Installed Programs: Go to Settings > Apps > Apps & features. Sort the list by “Install date” to easily identify recently installed software. If you suspect a particular program is causing issues, uninstall it from here.
- Use System Restore: If you know when the problem started, you can use System Restore to revert your PC to an earlier state when it was working correctly. Search for “Create a restore point” in the Windows search bar and open the System Properties window. Click “System Restore” and follow the prompts.
- Clean Boot: A clean boot starts Windows with a minimal set of startup programs and services. You can perform a clean boot by disabling non-Microsoft services and startup items in msconfig (System Configuration). This helps isolate whether a startup program is causing the conflict.
Managing Drivers
Driver conflicts are a frequent cause of instability.
- Open Device Manager: Search for “Device Manager” in the Windows search bar and open it.
- Look for Yellow Exclamation Marks: Devices with yellow exclamation marks indicate a problem.
- Update or Uninstall Drivers: Right-click on the problematic device and choose “Update driver” or “Uninstall device.” If you choose to uninstall, Windows will attempt to reinstall a generic driver upon reboot. If you know which driver is causing issues, you might need to download the latest version from the manufacturer’s website (if you’re in Safe Mode with Networking or have the driver installer downloaded beforehand).
Scanning for Malware
If you suspect a virus or malware infection, Safe Mode can be more effective for removal.
- Boot into Safe Mode with Networking: This allows you to connect to the internet.
- Download and Run Antivirus/Antimalware Software: If you don’t have up-to-date antivirus software, download a reputable tool like Malwarebytes or a bootable rescue disk from a trusted antivirus vendor.
- Perform a Full System Scan: Run a comprehensive scan of your entire system. Malware is often less active in Safe Mode, making it easier for security software to detect and remove it.
Command Prompt in Safe Mode
For advanced users, the Safe Mode with Command Prompt option can be powerful.
sfc /scannow: This command checks for and repairs corrupted Windows system files.DISMcommands: Deployment Image Servicing and Management tools can be used to repair Windows images.
When Safe Mode Isn’t Enough
While Safe Mode is a powerful diagnostic tool, it’s not a universal solution. If you’ve tried troubleshooting in Safe Mode and the problems persist, or if you’re unable to boot into Safe Mode at all, it might indicate a more serious issue such as:
- Hardware Failure: Problems with your RAM, hard drive, graphics card, or motherboard can cause severe instability.
- Critical System File Corruption: If essential boot files are irrevocably damaged, you might need to perform a Windows reset or a clean installation.
- Deep-Seated Malware: Some advanced malware can resist removal even in Safe Mode.
In these situations, you may need to consider more drastic measures like performing a Windows reset or a clean installation, or seeking professional help from a computer technician.
Conclusion
Safe Mode on Windows 10 is an essential and often overlooked tool in any user’s troubleshooting arsenal. By providing a controlled, minimalist environment, it empowers you to isolate and resolve a wide range of software-related issues that can plague your computer. Whether you’re dealing with frustrating crashes, sluggish performance, or suspected malware, understanding how to access and effectively utilize Safe Mode can save you time, money, and a great deal of frustration, ultimately contributing to a more stable and productive digital experience.
aViewFromTheCave is a participant in the Amazon Services LLC Associates Program, an affiliate advertising program designed to provide a means for sites to earn advertising fees by advertising and linking to Amazon.com. Amazon, the Amazon logo, AmazonSupply, and the AmazonSupply logo are trademarks of Amazon.com, Inc. or its affiliates. As an Amazon Associate we earn affiliate commissions from qualifying purchases.