
In the modern ecosystem of home offices and interconnected workplaces, the printer has evolved from a simple peripheral into a sophisticated network node. Whether you are attempting to configure a high-end laser printer for a small business or simply trying to connect your inkjet to a new laptop, knowing the device’s IP (Internet Protocol) address is often the key to unlocking its full functionality. An IP address acts as a digital home address, allowing other devices on your local area network (LAN) to identify and communicate with the printer.

When a printer “disappears” from your list of available devices or fails to respond to print jobs, the issue usually stems from a breakdown in network communication. By locating the IP address, you gain the ability to troubleshoot connectivity, access the printer’s internal settings via a web browser, and manually install drivers when automatic discovery fails. This guide provides a deep dive into the various methods for locating your printer’s IP address across different platforms and hardware configurations.
Direct Methods: Finding the IP Address on the Printer Itself
The most reliable way to find a printer’s IP address is to go directly to the source. Most modern printers with built-in displays or wireless capabilities have the network information stored within their internal firmware.
Navigating the On-Screen Menu
For printers equipped with an LCD or touchscreen interface, the IP address is typically nested within the network settings. While every manufacturer—such as HP, Canon, Epson, or Brother—uses a slightly different menu structure, the logic remains consistent. You will generally navigate to “Settings,” “Setup,” or a “Wireless” icon. From there, look for a sub-menu labeled “Network Status,” “TCP/IP Settings,” or “View Network Details.”
In these menus, the IP address will appear as a string of four numbers separated by periods (e.g., 192.168.1.15). If you see a string of characters and colons, you are looking at the IPv6 address; however, for most local network configurations and manual driver installations, the standard IPv4 address is what you require.
Printing a Network Configuration Page
If your printer lacks a sophisticated screen or if the menu system is difficult to navigate, you can force the device to print its own internal diagnostics. This is often referred to as a “Network Configuration Page” or a “Printer Status Report.”
On many inkjet printers, holding down the “Wi-Fi” or “Information” (i) button for several seconds will trigger a printout of the network settings. For laser printers, you may need to navigate to the “Reports” section of the system menu and select “Network Summary.” This physical document is an invaluable resource, as it lists not only the IP address but also the MAC address, the signal strength, and the gateway address, providing a comprehensive snapshot of how the printer is interacting with your router.
Using Your Operating System to Identify Network Printers
If you are already connected to the printer from a computer but need the IP address for advanced configuration (such as setting up a mobile printing app or a Web Image Monitor), your operating system can pull this data from the current driver connection.
Finding the IP in Windows 10 and 11
Windows maintains detailed records of all installed peripherals. To find the IP address of a currently installed printer, follow these steps:
- Open the Control Panel (you can search for it in the Start menu).
- Navigate to Hardware and Sound > Devices and Printers.
- Right-click on the printer in question and select Printer Properties (Note: ensure you select “Printer Properties” and not “Properties” at the bottom of the list).
- Click on the Ports tab.
- Look for the port that has a checkmark next to it. If the printer is networked, the port name will often be the IP address itself. If the name is a generic label like “WSD Port,” click on Configure Port. The IP address will be listed in the “Printer Name or IP Address” field.
Alternatively, in Windows 11, you can go to Settings > Bluetooth & devices > Printers & scanners, select your printer, and click on Printer properties to find the same information under the “Ports” or “General” tab.
Locating the IP on macOS
Apple’s macOS makes it relatively straightforward to find network details through the System Settings.
- Click the Apple Menu and select System Settings (or System Preferences on older versions).
- Navigate to Printers & Scanners.
- Select your printer from the list on the left.
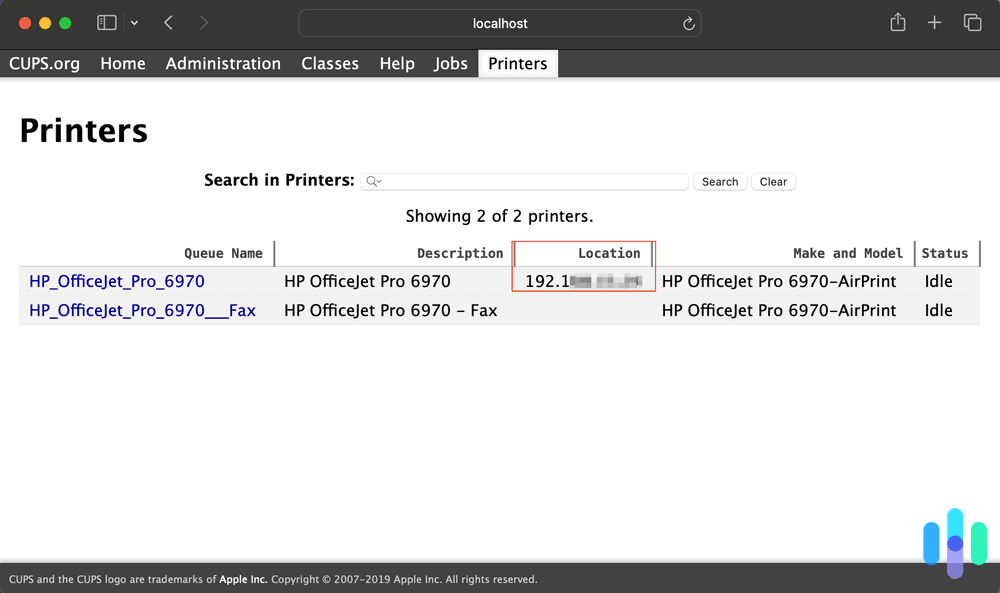
- Look for the “Location” or “Kind” field. In many cases, the IP address is listed directly under the printer’s name.
- If it is not immediately visible, click on Options & Supplies. The IP address is frequently listed under the “General” tab in this sub-menu as a 12-digit number or a standard IP string.
Network-Level Identification: Routers and Command Lines
In scenarios where the printer is unresponsive or not yet installed on a computer, you can look at the network from a “top-down” perspective. This involves checking the devices connected to your router or using command-line tools to ping the local network.
Accessing the Router’s Connected Devices List
The router acts as the traffic controller for your network. It assigns IP addresses to every device via a protocol called DHCP (Dynamic Host Configuration Protocol). By logging into your router’s administrative interface, you can see a complete list of every device currently drawing a signal.
- Open a web browser and type your router’s IP address (usually 192.168.0.1 or 192.168.1.1).
- Log in with your administrative credentials.
- Look for a section labeled Connected Devices, DHCP Client List, or Device Map.
- Identify your printer by its hostname (e.g., “HP-OfficeJet-8020”) or its MAC address. The associated IP address will be displayed next to the device name.
Using the Command Prompt (ARP Method)
For tech-savvy users, the Address Resolution Protocol (ARP) table is a quick way to see all active IP-to-MAC address mappings on your network.
- Open the Command Prompt (Windows) or Terminal (Mac).
- Type
arp -aand hit Enter. - This will display a list of all IP addresses that your computer has recently communicated with. While this list can be long, you can often identify the printer by looking for IP addresses that share the same prefix as your computer (e.g., if your computer is 192.168.1.5, the printer will likely be 192.168.1.x).
Managing and Securing Your Printer’s Network Identity
Finding the IP address is often just the first step in optimizing your printing environment. Once you have the address, you can leverage it to improve reliability and security.
The Power of the Embedded Web Server (EWS)
Once you have your printer’s IP address, type it into the address bar of any web browser on the same network. This will open the printer’s Embedded Web Server (EWS). This is a powerful, browser-based management tool that allows you to:
- Check ink or toner levels with high precision.
- Update the printer’s firmware to patch security vulnerabilities.
- Configure scan-to-email settings.
- Set a password for the printer’s settings to prevent unauthorized changes.
Transitioning from Dynamic to Static IP Addresses
By default, most routers assign IP addresses dynamically. This means that if the router reboots or the printer is turned off for an extended period, the router might assign the printer a new IP address. This is the most common cause of “Printer Offline” errors; the computer is looking for the printer at its old address, but the printer has moved to a new one.
To solve this, you can use the EWS to assign a Static IP address or a Manual IP. By reserving a specific address for the printer, you ensure that the communication path remains permanent. When setting a static IP, it is best practice to choose an address outside the normal DHCP range (for example, if your router assigns addresses between .2 and .100, set your printer to .200) to avoid IP conflicts with other devices like smartphones or laptops.

Security Implications of a Networked Printer
In the age of IoT (Internet of Things) security threats, a networked printer is a potential entry point for malicious actors if left unsecured. Once you have located your IP address and accessed the EWS, ensure that you have disabled any legacy protocols you don’t use, such as Telnet or FTP. Furthermore, if your printer supports it, enable HTTPS for the web interface to encrypt the data sent between your computer and the printer.
Understanding your printer’s IP address is more than just a troubleshooting step; it is a fundamental part of maintaining a robust digital workflow. From initial setup to long-term network management, the IP address serves as the bridge between your hardware and the digital world, ensuring that your documents reach the tray without interruption.
aViewFromTheCave is a participant in the Amazon Services LLC Associates Program, an affiliate advertising program designed to provide a means for sites to earn advertising fees by advertising and linking to Amazon.com. Amazon, the Amazon logo, AmazonSupply, and the AmazonSupply logo are trademarks of Amazon.com, Inc. or its affiliates. As an Amazon Associate we earn affiliate commissions from qualifying purchases.