
Understanding MOA: The Basics of Angular Measurement
In the world of precision shooting and optics, understanding Minute of Angle (MOA) is fundamental for anyone looking to achieve consistent accuracy with a rifle scope. MOA is a unit of angular measurement that allows shooters to quantify adjustments needed to compensate for bullet drop, windage, and target size, irrespective of the shooting distance. It provides a consistent, scalable reference point for adjustments that are critical for hitting targets accurately, especially at longer ranges.
At its core, MOA derives from the division of a circle. A full circle contains 360 degrees, and each degree is further divided into 60 minutes. Therefore, one Minute of Angle (1 MOA) is precisely 1/60th of a degree. This small angular unit translates into a physical dimension that expands with distance. Crucially, 1 MOA subtends approximately 1.047 inches at 100 yards. For practical purposes, many shooters simplify this to “1 inch at 100 yards,” which is a close enough approximation for many applications, though the exact value is important for extreme precision.

This relationship means that if you need to move your point of impact 1 MOA, it will translate to approximately 1 inch at 100 yards, 2 inches at 200 yards, 3 inches at 300 yards, and so on. The beauty of MOA is its scalability; the angular correction remains the same no matter the distance, simplifying the calculation of necessary scope adjustments. Without a solid grasp of MOA, precision shooting becomes largely a matter of guesswork, as external ballistic factors like gravity and wind constantly pull a bullet off its intended path. MOA provides the language to correct these deviations systematically.
Degrees, Minutes, and MOA Defined
To reiterate, the system is hierarchical: a circle contains 360 degrees (360°). Each degree is divided into 60 minutes (60′), and each minute can be further divided into 60 seconds (60″). When we talk about MOA, we are referencing these “minutes” of a degree. Therefore, 1 MOA is a very fine angular slice, allowing for precise adjustments. The reason this angular unit is so important is that bullet trajectory is an arc, and corrections must be made in terms of angles, not just linear distances at a single point.
Why MOA is Crucial for Shooters
For a shooter, MOA serves several vital purposes. It allows for:
- Elevation Adjustments: Compensating for bullet drop over distance.
- Windage Adjustments: Counteracting the effect of crosswinds on the bullet’s path.
- Ranging: Estimating the distance to a target if its size is known, using the reticle’s MOA subtensions.
- Holdovers/Holdunders: Using the reticle to aim above or below a target without physically adjusting the scope’s turrets.
- Grouping Measurement: Quantifying the precision of a shot group on a target (e.g., a “1 MOA group” means all shots landed within approximately 1 inch at 100 yards).
Mastering MOA empowers a shooter to not only understand where their bullet went but also why and how to make the necessary corrections for future shots.
MOA vs. MIL: Two Systems of Adjustment
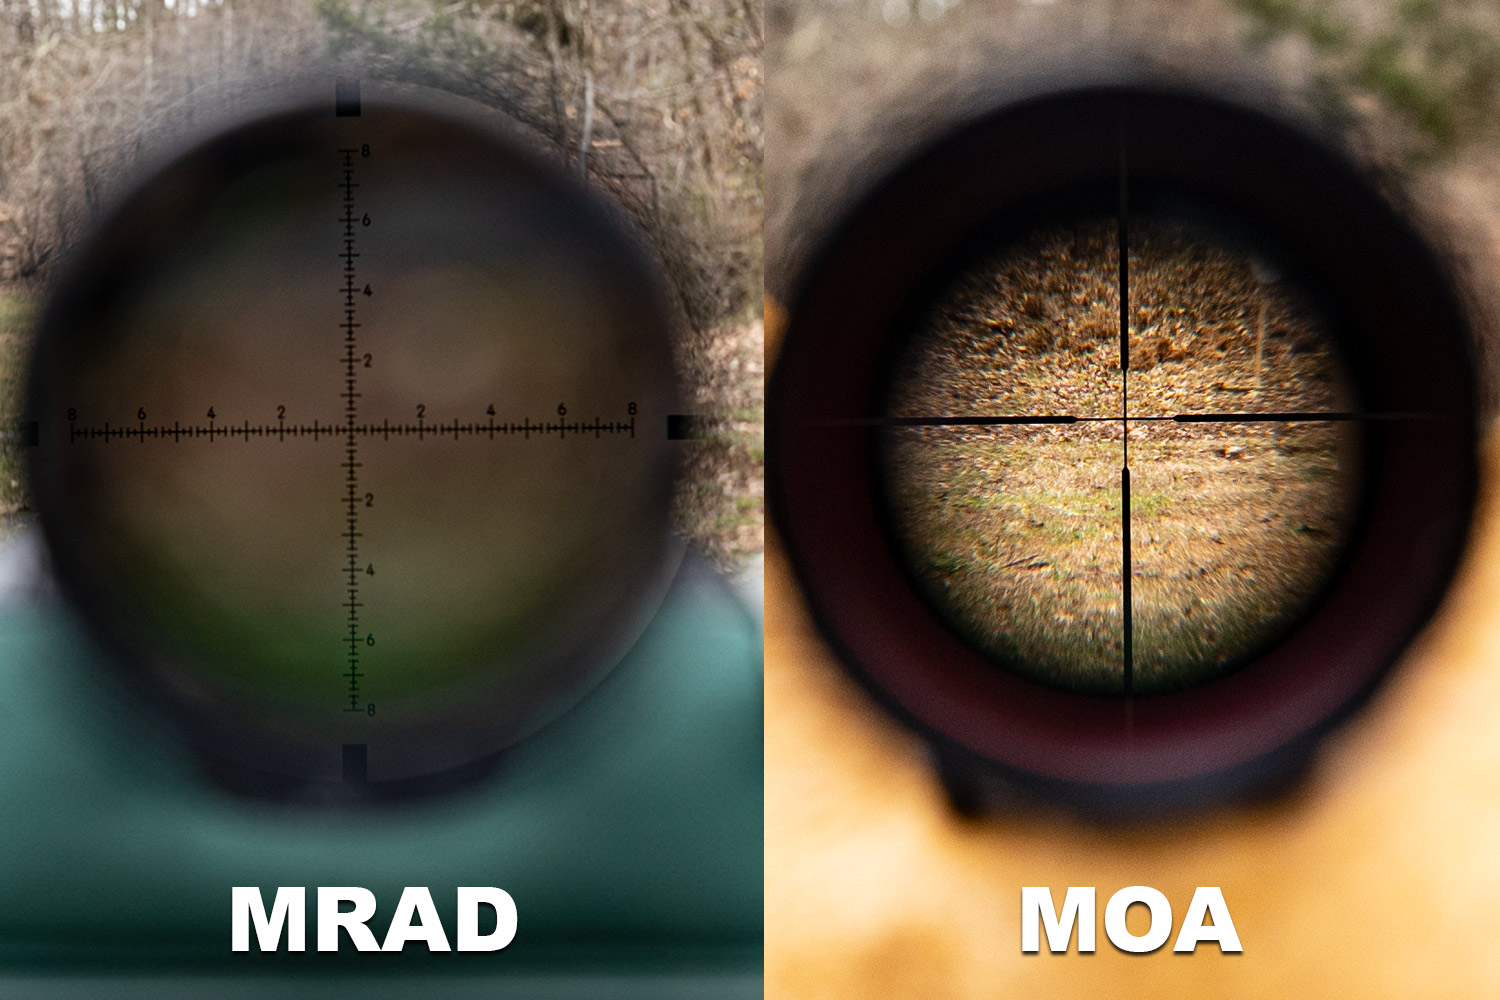
While MOA is widely popular, especially in North America and among shooters accustomed to imperial measurements (yards, inches), it’s not the only system used for scope adjustments. The other prevalent system is MIL, short for Milliradian. Both MOA and MIL are angular measurements designed to achieve the same goal: providing a precise, scalable method for making ballistic corrections. However, they differ in their base units and the physical distances they represent.
A Milliradian (MIL) is defined as 1/1000th of a radian. A radian is the angle subtended at the center of a circle by an arc equal in length to the radius. For practical shooting purposes, 1 MIL subtends exactly 10 centimeters at 100 meters, or approximately 3.6 inches at 100 yards. MIL is favored in many parts of the world using the metric system (meters, centimeters) and is also common in military and tactical applications.
The key difference for a shooter lies in the “clicks” on their scope turrets and the spacing of their reticle hash marks.
- MOA Scopes: Typically feature turrets with 1/4 MOA or 1/8 MOA clicks. A 1/4 MOA click moves the point of impact approximately 1/4 inch at 100 yards. MOA reticles feature hash marks or dots spaced at 1 MOA or fractional MOA intervals.
- MIL Scopes: Usually have turrets with 0.1 MIL (or 1/10th MIL) clicks. A 0.1 MIL click moves the point of impact approximately 1 cm at 100 meters, or 0.36 inches at 100 yards. MIL reticles have hash marks at 0.5 MIL or 1 MIL intervals.
The crucial takeaway is that a shooter should ideally use a scope where the reticle and the turrets are in the same unit of measurement (i.e., MOA/MOA or MIL/MIL). Attempting to use an MOA reticle with MIL turrets (or vice-versa) requires constant, complex conversions that can easily lead to errors, especially under pressure. While conversions are possible, sticking to a consistent system simplifies the shooting process and minimizes mistakes. Both systems are equally effective for precision shooting; the choice often comes down to personal preference, familiarity, or the prevailing standard in a particular shooting discipline or region.
MOA in Practice: How to Use It with Your Scope
Putting MOA knowledge into action involves understanding your scope’s reticle and turrets, and how to calculate adjustments based on your shot placement. This practical application is where theory translates into tangible accuracy improvements.
The MOA Reticle
An MOA reticle features a series of hash marks, dots, or a more complex “Christmas tree” pattern, all spaced at specific MOA increments. These increments allow for several tactical uses:
- Holdovers/Holdunders: Instead of dialing the turrets, you can use the MOA hash marks to “hold” above or below your target to compensate for bullet drop or wind. For example, if your ballistic data suggests a 5 MOA drop at 500 yards, you can simply aim with the 5 MOA mark on your reticle.
- Ranging: If you know the size of a target (e.g., a deer’s shoulder height is 18 inches) and it spans, say, 3 MOA in your reticle, you can estimate the distance using a formula or chart.
- Wind Holds: Similarly, the horizontal hash marks can be used to hold into the wind without adjusting the windage turret.
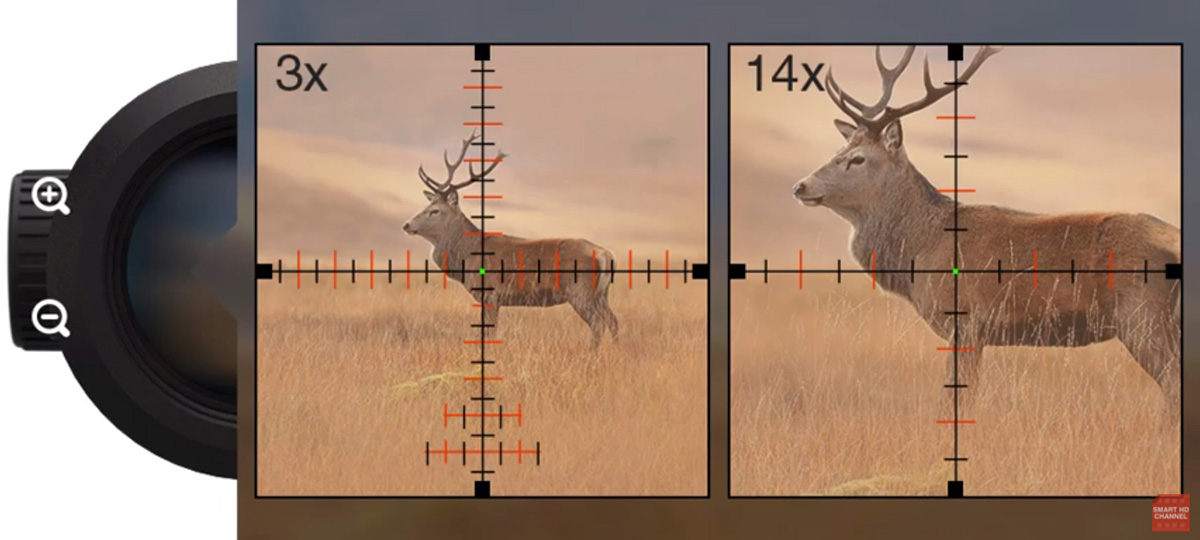
It’s essential to understand the difference between First Focal Plane (FFP) and Second Focal Plane (SFP) MOA reticles.
- First Focal Plane (FFP): The reticle’s apparent size changes with magnification. This means the MOA values of the reticle hash marks remain true at all magnification settings. FFP scopes are highly favored for long-range and tactical shooting where ranging and holdovers are performed at varying magnifications.
- Second Focal Plane (SFP): The reticle appears to stay the same size regardless of magnification. Consequently, the MOA values of the hash marks are only accurate at a specific magnification setting, usually the highest power or a clearly marked intermediate setting. SFP scopes are often simpler and more affordable, popular in hunting where shots are usually taken at known distances or at the designated magnification.
MOA Turrets and Clicks
Scope turrets are the primary mechanism for adjusting your point of impact. MOA turrets are marked to indicate adjustments in MOA. Most common are 1/4 MOA per click, meaning four clicks equal 1 MOA. Other common values include 1/8 MOA for finer adjustments or 1/2 MOA for faster, larger adjustments.
When you turn an elevation turret “UP,” it moves the reticle down relative to the scope’s internal mechanism, causing the bullet to impact higher on the target. Conversely, turning the windage turret “RIGHT” moves the reticle left, causing impacts further right.
To make an adjustment:
- Fire a shot and observe the point of impact.
- Measure the deviation from your aiming point (e.g., 4 inches low and 2 inches left at 100 yards).
- Calculate the MOA correction needed.
Calculating MOA Adjustments
The basic formula for calculating MOA adjustments is:
MOA Adjustment = (Inches of Correction Needed / (Distance in Yards / 100))
Let’s use an example: You are shooting at 200 yards, and your bullet impacts 6 inches low.
- Inches of Correction Needed = 6
- Distance in Yards / 100 = 200 / 100 = 2
- MOA Adjustment = 6 / 2 = 3 MOA UP
If your scope has 1/4 MOA clicks, you would need to dial 3 MOA / (1/4 MOA per click) = 12 clicks UP on your elevation turret.
For windage, if your shot was 4 inches left at 200 yards, you would need to adjust 2 MOA RIGHT, which is 8 clicks RIGHT on a 1/4 MOA scope.
While this formula is excellent for initial zeroing and basic corrections, for long-range shooting, a ballistic calculator is highly recommended. These tools account for bullet type, muzzle velocity, atmospheric conditions (temperature, humidity, barometric pressure), and spin drift, providing highly accurate MOA corrections.
Choosing the Right MOA Scope: Factors to Consider
Selecting an MOA scope requires careful consideration of various features to match your specific shooting needs, whether it’s hunting, competitive shooting, or tactical applications. The right scope can significantly enhance your accuracy and overall shooting experience.
FFP vs. SFP Revisited
The choice between First Focal Plane (FFP) and Second Focal Plane (SFP) is paramount for MOA users.
- FFP MOA scopes are ideal for dynamic shooting scenarios where you need to range targets or use holdovers at various magnifications without having to recalculate or remember a specific power setting. The reticle’s MOA subtensions are always true. This makes FFP scopes a favorite among long-range precision shooters and tactical users.
- SFP MOA scopes are often preferred for hunting or target shooting at fixed distances where adjustments are primarily made by dialing the turrets, or holdovers are used at a single, known magnification. They can also offer a finer, less cluttered reticle at lower magnifications compared to FFP designs. Understand your primary use case before deciding.
Turret Click Values and Total Adjustment Range
The precision of your scope’s turrets directly impacts your ability to make fine adjustments.
- Click Values: Common MOA click values are 1/4 MOA and 1/8 MOA. A 1/4 MOA click offers a good balance of precision and speed for most shooting disciplines. For extremely fine adjustments, 1/8 MOA clicks provide greater granularity but require more clicks to achieve the same total adjustment. Some scopes also offer 1/2 MOA clicks for rapid, larger adjustments, often seen in scopes designed for big game hunting.
- Total Adjustment Range: This refers to the maximum amount of elevation and windage adjustment available in the scope’s turrets, typically expressed in total MOA. For long-range shooting, a scope with a large total elevation adjustment (e.g., 60-100+ MOA) is crucial to compensate for significant bullet drop. Ensure the scope has sufficient internal adjustment range for your intended maximum shooting distance.
Reticle Design
MOA reticles come in a multitude of designs, from simple duplex crosshairs with MOA hashes to complex “Christmas tree” patterns filled with multiple MOA reference points.
- Clarity and Simplicity: For quick target acquisition and minimal distraction, a simpler MOA reticle with clean hash marks might be preferred.
- Detailed Information: For advanced long-range shooting, a more complex reticle offering numerous holdover and windage reference points can be invaluable for fast engagements without dialing.
- Illumination: An illuminated reticle can be a significant advantage in low-light conditions, allowing for clearer visibility of the MOA markings against a dark background.
Scope Quality and MOA Precision
The optical and mechanical quality of an MOA scope directly affects its performance and reliability.
- Optical Clarity: High-quality glass and coatings ensure a clear, bright image, which is essential for precise aiming and identifying MOA marks, especially at long distances.
- Tracking and Repeatability: A premium scope will have turrets that “track” accurately, meaning a given number of clicks will consistently result in the expected MOA shift. More importantly, the turrets should be “repeatable,” allowing you to dial up and back to zero without any shift in point of impact.
- Zero Stop: A zero stop feature allows you to quickly and confidently return your elevation turret to your established zero without looking, preventing you from dialing below zero in rapid adjustments. This is a highly valued feature for MOA scopes used in dynamic shooting.
Investing in a quality MOA scope ensures that the precision inherent in the MOA system is fully realized, providing confidence and consistency in your shooting.
Mastering MOA for Improved Accuracy
While understanding the mechanics of MOA is crucial, true mastery comes through consistent practice, meticulous data collection, and an intimate understanding of your entire shooting system. MOA is a powerful tool, but like any tool, its effectiveness depends on the skill of the user.
Practice and Data Collection
The range is your laboratory. Engage in regular live-fire practice at varying distances to truly ingrain the MOA system.
- Develop a “Dope Card”: Maintain a detailed log of your MOA adjustments for different ammunition types, temperatures, altitudes, and wind conditions. This “dope” (Data On Previous Engagements) becomes an invaluable quick-reference guide. For example, knowing that your specific rifle and ammunition require 7.5 MOA of elevation at 700 yards in a 60°F environment allows for rapid, confident adjustments.
- Verify Ballistic Calculators: Use online or app-based ballistic calculators to predict MOA corrections for various scenarios. Critically, take these predictions to the range and verify them with actual shots. This process helps calibrate your understanding and refine your data.
- Practice Both Dialing and Holdovers: Become proficient in both methods of MOA application. Sometimes, rapidly dialing turrets is impractical, making reticle holdovers the faster, more efficient solution. Conversely, for precise long-range shots, dialing in the exact MOA is often preferred.
Understanding Your Ammunition and Rifle
The ballistic performance of your ammunition is a primary driver of the MOA corrections you’ll need.
- Ballistic Coefficient (BC) and Muzzle Velocity (MV): Different bullet weights and designs have different BCs, affecting how well they resist air drag. MV, the speed at which the bullet leaves the barrel, also significantly impacts trajectory. Understanding these factors for your specific ammunition allows for more accurate MOA predictions.
- Rifle Accuracy: Know the inherent mechanical accuracy of your rifle. A “1 MOA rifle” means it can consistently group shots within 1 MOA (approximately 1 inch at 100 yards). If your rifle consistently shoots 2 MOA groups, expecting 0.5 MOA precision from your adjustments is unrealistic. MOA helps measure and improve your shooting, but it won’t compensate for an inaccurate firearm.
Windage and Other Environmental Factors
MOA adjustments aren’t limited to elevation. Your windage turret also uses MOA to compensate for lateral bullet drift caused by wind.
- Wind Estimation: Learning to accurately estimate wind speed and direction is one of the most challenging aspects of long-range shooting. MOA windage corrections will vary significantly based on these factors.
- Atmospheric Conditions: Temperature, humidity, and barometric pressure affect air density, which in turn influences bullet drag. Ballistic calculators can account for these variables, providing more precise MOA corrections.
Mastering MOA is an ongoing journey that combines technical understanding with hands-on experience. It bridges the gap between the theoretical world of ballistics and the practical execution of precision shooting, allowing you to consistently hit your target with confidence.
aViewFromTheCave is a participant in the Amazon Services LLC Associates Program, an affiliate advertising program designed to provide a means for sites to earn advertising fees by advertising and linking to Amazon.com. Amazon, the Amazon logo, AmazonSupply, and the AmazonSupply logo are trademarks of Amazon.com, Inc. or its affiliates. As an Amazon Associate we earn affiliate commissions from qualifying purchases.