
Knitting, at its heart, is a language of loops and stitches. While mastering intricate lace patterns or seamless sweaters can be a long and rewarding journey, every knitter, regardless of their experience level, relies on a foundational set of techniques. Among these, the “Kfb” stitch stands out as a deceptively simple yet incredibly versatile tool. But what exactly is Kfb in knitting, and why is it so important?
In the realm of crafting, especially with the digital tools and AI advancements we see proliferating across tech and brand domains, understanding the core mechanics of a craft is akin to grasping the foundational algorithms of a software program or the bedrock principles of brand identity. For knitting, Kfb represents one of those fundamental building blocks. It’s a technique that allows knitters to increase the number of stitches on their needles, a crucial step in shaping garments and creating dimension.
This article will delve into the world of Kfb, exploring its purpose, how to execute it, and its various applications within knitting projects. We’ll also touch upon how understanding such fundamental techniques in a craft can echo the importance of foundational knowledge in technology and business, offering a unique perspective for those interested in diverse fields.
Understanding the “Kfb” Stitch: An Introduction to Knitting Increases
Before we dive into the mechanics of Kfb, let’s briefly contextualize its role. Knitting patterns are essentially a series of instructions that guide you in creating fabric. These instructions often involve increasing stitches, decreasing stitches, or maintaining the current stitch count. Increases are vital for shaping knitted items. Imagine knitting a simple rectangle; to turn it into a triangle or a sleeve, you need to add stitches strategically. This is where increases like Kfb come into play.
The Purpose of Kfb: Shaping and Expanding Your Knitted Fabric
The primary function of the Kfb stitch is to increase your stitch count by one. This might sound straightforward, but the way Kfb achieves this increase is what makes it so popular. Unlike some other increase methods that can leave small holes or look awkward, Kfb is designed to be relatively neat and integrated into the fabric.
Think of it like scaling a digital asset. In design, you might need to enlarge an image or a logo. Kfb is the knitting equivalent of a controlled and intentional expansion. It’s not just about adding more material; it’s about adding it in a way that contributes to the overall structure and aesthetic of the finished piece.
In essence, Kfb is your go-to for:
- Creating Gradual Shaping: When you need to widen a piece of fabric gradually, such as for the body of a sweater that flares out, or the beginnings of a sleeve, Kfb is an excellent choice.
- Adding Dimension: It allows you to build up fabric and create rounded shapes, like the bust of a knitted garment or the crown of a hat.
- Correcting Minor Errors (with caution): While not its primary purpose, in some instances, a Kfb can be used to add a stitch if you’ve accidentally dropped one, though this should be approached with care to avoid making the fabric uneven.
The efficiency and neatness of Kfb make it a staple in countless knitting patterns, from beginner projects to advanced designs. Understanding it is akin to a programmer understanding how to declare a variable or a marketer understanding how to conduct basic market research – it’s a fundamental skill that opens up a world of possibilities.
How to Execute the Kfb Stitch: A Step-by-Step Tutorial
The beauty of Kfb lies in its simplicity. It’s a two-step process that builds upon the basic knit stitch. Many knitting tutorials and resources use abbreviations, and Kfb is one of the most common. Let’s break down how to do it.
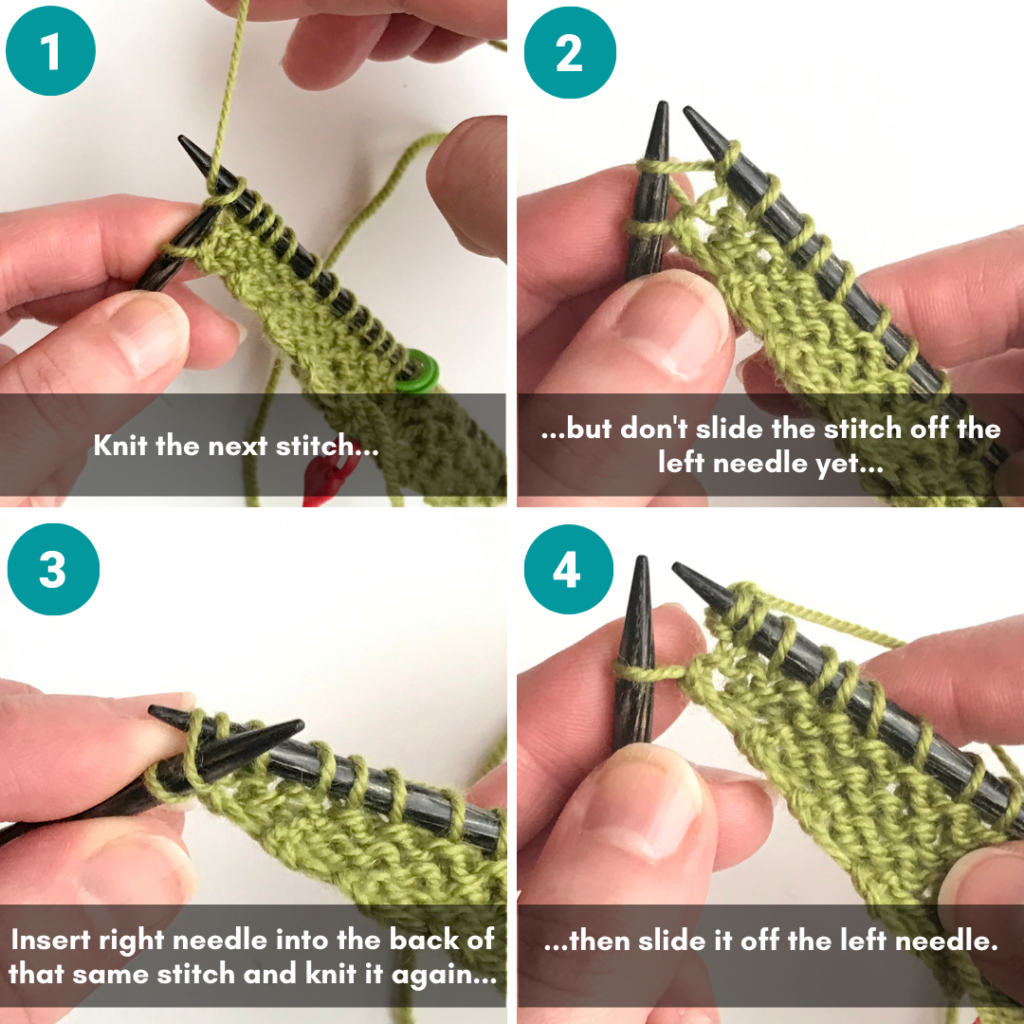
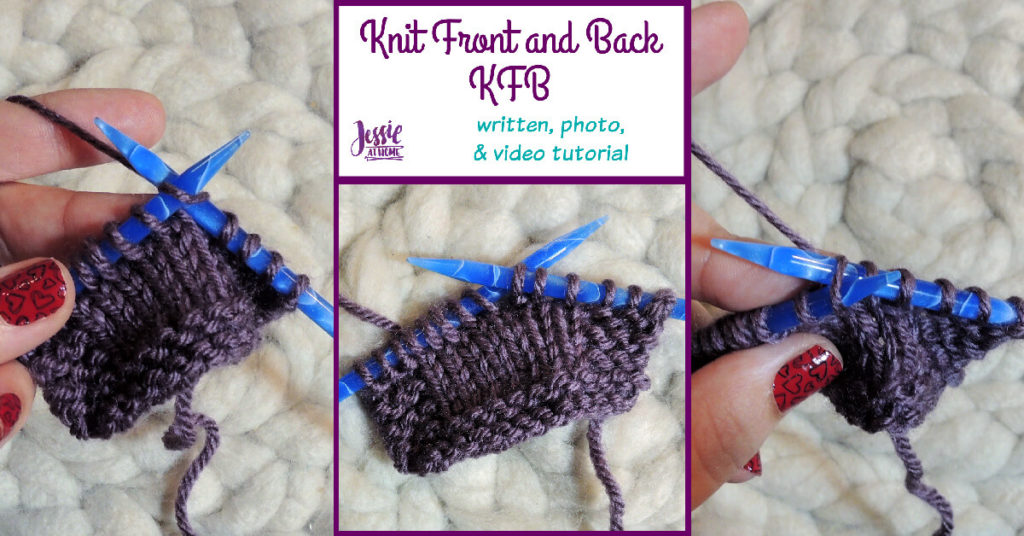
Kfb stands for Knit Front and Back. This means you will work into the front of a stitch, and then, without dropping that stitch from your left needle, you will work into the back of the same stitch. This action creates two stitches from a single original stitch.
Here’s a detailed breakdown:
Prerequisites:
- You should be comfortable with the basic knit stitch (knitting into the front of a stitch).
- You should have stitches on your left-hand needle, ready to be worked.
The Steps:
-
Insert the Right Needle: Just as you would for a regular knit stitch, insert the tip of your right-hand needle into the front of the first stitch on your left-hand needle, from front to back.
-
Knit the Front: Wrap the yarn around the tip of your right-hand needle as if you were making a normal knit stitch. Then, pull the yarn through the loop to create a new stitch. Crucially, do not drop the original stitch off the left-hand needle yet. You now have a new stitch on your right-hand needle, and the original stitch is still on your left-hand needle.
-
Knit the Back: Now, without moving the original stitch, insert the tip of your right-hand needle into the back loop of the same original stitch that is still on your left-hand needle. You’ll be entering from back to front this time.
-
Knit the Back Loop: Wrap the yarn around the tip of your right-hand needle again. Pull the yarn through this back loop to create a second new stitch on your right-hand needle.
-
Drop the Original Stitch: You have now successfully created two stitches from one. You can now slide the original stitch off your left-hand needle.
Visualizing the Process:
Imagine the original stitch on your left needle as a single thread.
- First, you knit through the front of that thread, creating a loop.
- Then, you knit through the back of that same thread, creating another loop.
- This effectively splits the single thread into two, increasing your stitch count.
This process is remarkably similar to how new features are integrated into software or how a marketing campaign expands its reach. You’re taking an existing element (a stitch, a piece of code, an existing customer base) and using it as a foundation to build something new and add value.
Variations and Considerations for Kfb
While the core Kfb technique is straightforward, there are a few nuances and related stitches that knitters encounter. Understanding these can help you adapt to different patterns and achieve specific aesthetic goals.
The “K1, YO” Alternative: A Similar Outcome with a Different Look
Sometimes, a pattern might call for “K1, YO” (Knit 1, Yarn Over). This is another common way to increase by one stitch. The “Yarn Over” (YO) involves bringing the yarn forward between the needles and then knitting the next stitch. This creates a new loop and leaves a small decorative hole (a “lace eyelet”) in the fabric.
While both Kfb and K1, YO increase your stitch count by one, they produce different results:
- Kfb: Creates a relatively solid and inconspicuous increase, ideal for body shaping.
- K1, YO: Creates a visible hole, often used for decorative purposes in lace patterns or when you want to create a deliberate small gap.
The choice between Kfb and K1, YO depends entirely on the desired look and structure of your knitted item. It’s a design decision, much like choosing between a sleek, minimalist app interface and a more visually engaging, dynamic one.
Placement and Density: How Kfb Affects Your Fabric
The placement of your Kfb stitches significantly impacts the final shape of your knitting.
- Close Together: If you work Kfb stitches in consecutive rows or even within the same row, you will see a more rapid increase in width. This can lead to a more pronounced shaping effect.
- Spread Apart: Spacing Kfb stitches over several rows or across a wider section of your work will create a gentler, more gradual increase.
Consider how brand messaging is deployed. Consistent, frequent messaging can create a strong, immediate impression, while more spaced-out communication might build brand awareness over a longer period. The strategic application of Kfb is key to achieving the intended design.
Furthermore, the density of your knitting – how tightly or loosely you work your stitches – can also influence how noticeable the Kfb increase appears. If your overall knitting is very tight, the Kfb might blend in more seamlessly. If your knitting is looser, the Kfb might be slightly more visible.
Kfb in Action: Practical Applications in Knitting Projects
The versatility of Kfb makes it a cornerstone of many knitting projects. Here are some common scenarios where you’ll find yourself using this fundamental increase:
Shaping Garments: Sleeves, Bodices, and Yokes
This is arguably the most common application of Kfb.
- Sleeves: Knitting a sleeve often begins with a narrow cuff and then gradually widens to accommodate the arm. Kfb is perfect for creating this gradual flare. You’ll typically see instructions like “Kfb in next stitch, repeat across row” to increase evenly along the length of the sleeve.
- Bodices and Sweaters: When knitting the body of a sweater, you often need to shape it to fit the torso. If a pattern calls for the garment to widen, Kfb is a frequent choice for creating that subtle shaping without distorting the fabric.
- Yokes: The upper part of a sweater that sits over the shoulders and bust, known as the yoke, often requires shaping. Kfb can be used here to create rounded or angled increases that contribute to a well-fitting garment.
Creating Accessories: Hats, Mittens, and Bags
Kfb isn’t limited to apparel. It’s also essential for shaping smaller accessories.
- Hats: The crown of a knitted hat is typically formed by decreasing stitches. However, the initial part of the hat, where it begins to round out from the brim, often involves increases. Kfb can be used to start shaping the hat upwards.
- Mittens and Gloves: Similar to sleeves, the thumb and fingers of mittens and gloves often require increases to be formed. Kfb can be employed to create the base of these extensions.
- Bags and Baskets: If you’re knitting a bag or a basket that needs to widen out from a flat base, Kfb is a reliable method to achieve that expansion.
When to Choose Kfb Over Other Increases
As mentioned earlier, the choice of increase depends on the pattern and the desired outcome. However, Kfb is generally favored when:
- Neatness is paramount: You want an increase that is subtle and doesn’t draw attention to itself.
- No holes are desired: You’re not looking for decorative eyelets and want a solid fabric.
- Gradual shaping is needed: You require a steady, controlled increase in stitch count over a series of rows.
In the world of technology, this mirrors the choice of an API. Sometimes you need a robust, well-documented API that integrates seamlessly without drawing attention. Other times, you might opt for a more public-facing, feature-rich interface. Kfb is the workhorse of knitting increases, much like a dependable, foundational API is to many software projects.

Conclusion: Embracing the Power of the Kfb Stitch
The “Knit Front and Back” stitch, or Kfb, is a fundamental technique in knitting that allows you to increase your stitch count by one. Its simplicity, neatness, and versatility make it an indispensable tool for knitters of all levels. Whether you’re shaping a cozy sweater, a snug hat, or a practical bag, Kfb is likely to be your trusted companion.
Understanding Kfb is more than just learning a stitch; it’s about understanding how to manipulate and shape knitted fabric. It’s a building block that unlocks a vast array of design possibilities. In a world increasingly driven by innovation in tech, branding, and finance, appreciating these fundamental crafting techniques offers a unique perspective. Just as a solid understanding of coding languages, brand strategy, or financial principles forms the bedrock for success in their respective fields, mastering the Kfb stitch provides a solid foundation for any knitting endeavor. So, the next time you encounter “Kfb” in a pattern, you’ll know exactly what to do, and you’ll be one step closer to creating beautiful, well-shaped knitted pieces.
aViewFromTheCave is a participant in the Amazon Services LLC Associates Program, an affiliate advertising program designed to provide a means for sites to earn advertising fees by advertising and linking to Amazon.com. Amazon, the Amazon logo, AmazonSupply, and the AmazonSupply logo are trademarks of Amazon.com, Inc. or its affiliates. As an Amazon Associate we earn affiliate commissions from qualifying purchases.