The Adobe Photoshop Frame Tool might seem like a minor addition to an already robust feature set, but its introduction marked a significant shift in how designers approach layout and content placement, particularly within the realm of digital design and prototyping. It’s a tool designed to streamline workflows, enhance non-destructive editing, and facilitate a more intuitive design process. Understanding its capabilities is crucial for anyone looking to work efficiently within Photoshop, especially when dealing with web design, UI/UX mockups, or even complex print layouts that require precise content orchestration.
Essentially, the Frame Tool allows you to create placeholder shapes – rectangles, ellipses, or custom polygons – that act as containers for other content. Unlike traditional shape layers or selections, frames are specifically designed to hold images, videos, or even other layer groups. This fundamental distinction unlocks a range of powerful functionalities that can dramatically speed up your design process and make your work more flexible and manageable.

The Core Functionality: Content-Aware Containers
At its heart, the Frame Tool’s primary function is to act as a dedicated content container. This might sound simple, but the implications are far-reaching. When you draw a frame, you’re not just creating a visible shape; you’re establishing a designated area where content will reside. This content can then be easily placed, resized, and repositioned within the frame without affecting the frame’s boundaries.
Creating and Manipulating Frames
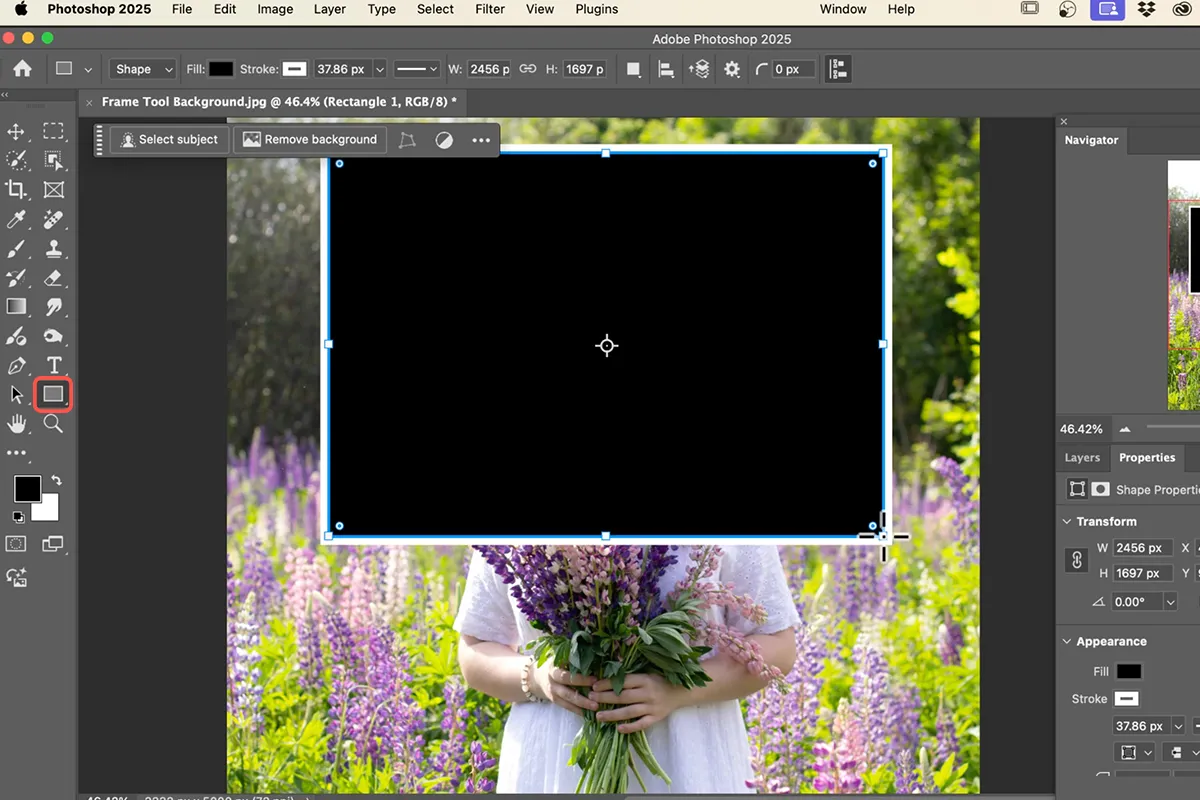
The process of creating a frame is straightforward. You select the Frame Tool from the Photoshop toolbar (it often shares a spot with the Shape Tools, distinguished by an icon that resembles a picture frame). Once selected, you can click and drag on your canvas to draw a rectangular or elliptical frame, much like you would draw a standard shape. You can also hold down the Shift key to constrain the proportions, creating perfect squares or circles. For custom shapes, Photoshop offers the Pen Tool, which can be used to create vector paths that can then be converted into frames.
Once a frame is created, it behaves like a special kind of layer. You can resize it by dragging its handles, similar to transforming any other layer. However, the key difference lies in how content interacts with it. When you drag an image or a video file directly into a document containing frames, Photoshop intelligently prompts you to place that content within the active frame. Alternatively, you can select a frame and then use File > Place Embedded or File > Place Linked to import content specifically into that frame.
The Power of Placeholder Design
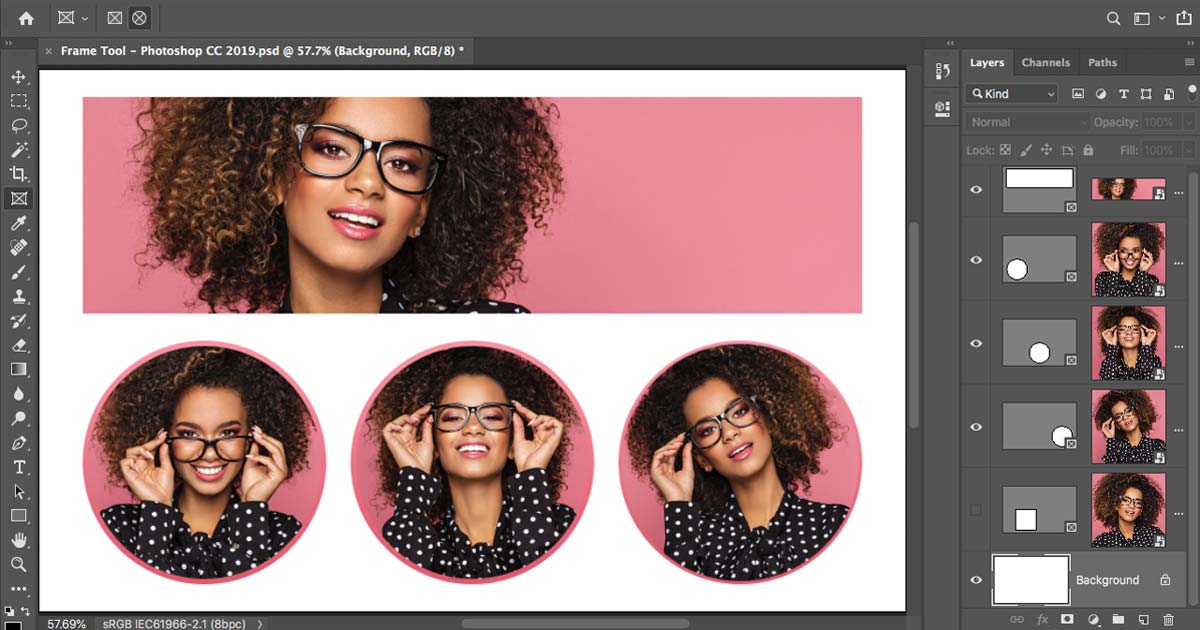
A significant advantage of using the Frame Tool is its inherent placeholder functionality. Before you even have final assets, you can use frames to sketch out the layout of your design. This is invaluable for wireframing and early-stage mockups. You can quickly block out areas for images, logos, or text sections, allowing you to focus on the overall composition and user flow. These placeholders are easily identifiable and can be visually distinct if desired, perhaps by giving them a subtle color overlay or a temporary texture.
This placeholder approach makes iterating on designs incredibly efficient. If a client decides to change the size or orientation of an image, you simply resize the frame, and the content within it automatically adapts. This non-destructive workflow prevents the need for constant manual adjustments and resizes of the actual image content, saving considerable time and effort.
Non-Destructive Content Placement and Manipulation
One of the most significant benefits of the Frame Tool is its commitment to non-destructive editing. This means that the original content you place within a frame remains untouched. The frame acts as a mask and a bounding box, dictating what portion of the content is visible and how it’s scaled.
Scaling and Cropping with Frames
When you place an image or video into a frame, it’s automatically scaled to fit the frame’s dimensions. Photoshop offers intelligent scaling options, often defaulting to “Fill” or “Fit.” “Fill” will scale the content to fill the entire frame, potentially cropping parts of it if the aspect ratios don’t match. “Fit” will scale the content to fit within the frame, potentially leaving empty space if the aspect ratios differ.
The real power emerges when you want to adjust how the content sits within the frame. You can double-click on the content within a frame to enter a “transform mode” for that content. Here, you can freely scale, rotate, and move the actual image or video independently of the frame. The frame itself remains the unmoving boundary. This allows for precise control over composition. For instance, if you have a portrait image that’s cropped by the frame, you can move the image within the frame to highlight the subject’s face, all without altering the frame’s dimensions or directly manipulating the original image layer in a destructive manner.
Content as a Smart Object
When content is placed within a frame, it’s typically converted into a Smart Object. Smart Objects are a cornerstone of non-destructive editing in Photoshop. They preserve the original image data, allowing you to scale, transform, and even apply filters to the content multiple times without losing quality. This means that if you scale an image down within a frame, you can later scale it back up to its original resolution without pixelation. This is a fundamental advantage over traditional raster-based transformations.
Streamlining Workflows for Digital Design and Prototyping
The Frame Tool is particularly revolutionary for designers working in the digital space, especially those involved in UI/UX design and web development. Its integration with other Photoshop features and its inherent flexibility make it an indispensable tool for creating mockups, prototypes, and even final assets.
UI/UX Design and Web Mockups
In UI/UX design, projects often involve numerous screens, components, and variations. The Frame Tool allows designers to quickly create the layout for these screens, defining areas for images, icons, and other visual elements. For example, when designing a mobile app screen, you can draw a frame for the header image, another for a user profile picture, and several for content cards.
This structured approach makes it incredibly easy to swap out placeholder images with final assets later. If a client provides a new set of product photos, you can drag and drop them directly into the relevant frames, and they’ll automatically be placed and scaled appropriately. Furthermore, frames can be grouped and organized, making complex projects more manageable. You can rename frames to clearly indicate their purpose (e.g., “Hero Image Frame,” “Avatar Frame”), contributing to better project organization.
Responsive Design Considerations
While Photoshop isn’t a dedicated responsive design tool like Adobe XD or Figma, the Frame Tool can assist in visualizing how designs might adapt to different screen sizes. By creating frames of varying dimensions, you can simulate how your content would look on a desktop, tablet, or mobile device. You can then copy and paste frames between artboards or documents, facilitating a more efficient process of adapting designs for different breakpoints.
Integration with Other Tools and Features
The Frame Tool works seamlessly with other powerful Photoshop features. It interacts well with Layer Comps for managing design variations, and with Smart Objects for non-destructive editing. When exporting assets, you can easily select individual frames or groups of frames to export specific pieces of your design, ensuring that you only get the content you need without any extraneous background elements. This is particularly useful for web developers who need to extract individual assets for implementation.
Advanced Techniques and Best Practices
While the Frame Tool is intuitive, mastering it can unlock even greater efficiency and creative control. Understanding its nuances and adopting best practices can elevate your Photoshop workflow.
Custom Shapes as Frames
As mentioned earlier, you’re not limited to rectangles and ellipses. You can leverage Photoshop’s Pen Tool to create any vector shape you desire and then convert that path into a frame. This opens up possibilities for unique, non-standard content containers. Imagine creating a star-shaped frame for a featured product or a subtly curved frame for a flowing image. To do this, you would first draw your custom vector path using the Pen Tool. Then, with the Path Selection Tool active, you would select your path, and from the Options bar, choose “Make Frame” or right-click on the path and select the equivalent option. This allows for highly customized layouts.
Using Frames for Vector Artwork and Text
While the Frame Tool is predominantly associated with raster images and videos, it can also be used to contain vector artwork and text. When you place a vector graphic or a text layer inside a frame, it behaves similarly to an image. The frame acts as a bounding box, and you can scale and reposition the vector or text within it. This can be useful for maintaining specific aspect ratios or for quickly assembling complex layouts where elements need to be contained within predefined areas. However, it’s important to remember that for text, directly editing the text within its own text layer often provides more granular control than editing it through a frame.
Managing Large Projects with Frames
In large, complex projects with many images and assets, the Layer Panel can quickly become cluttered. The Frame Tool helps mitigate this by treating each frame and its contained content as a single unit. This means that instead of having multiple individual image layers that need to be managed, you have a single frame layer. This significantly tidies up the Layers Panel, making it easier to navigate, select, and organize your design elements. Renaming frames descriptively is a crucial best practice for maintaining clarity in complex documents. Furthermore, utilizing layer groups in conjunction with frames can further enhance organization, allowing you to group related frames and their content logically.
In conclusion, the Frame Tool in Photoshop is far more than just a simple placeholder. It represents a thoughtful evolution in the software’s approach to content management and layout. By embracing its content-aware, non-destructive capabilities, designers can unlock significant time savings, improve the flexibility of their work, and tackle complex digital design projects with unprecedented efficiency and control. Whether you’re a web designer, UI/UX professional, or a graphic designer working on intricate layouts, understanding and integrating the Frame Tool into your workflow will undoubtedly lead to a more streamlined and productive creative process.
aViewFromTheCave is a participant in the Amazon Services LLC Associates Program, an affiliate advertising program designed to provide a means for sites to earn advertising fees by advertising and linking to Amazon.com. Amazon, the Amazon logo, AmazonSupply, and the AmazonSupply logo are trademarks of Amazon.com, Inc. or its affiliates. As an Amazon Associate we earn affiliate commissions from qualifying purchases.