
The presence of oil in a vehicle’s coolant system is a significant indicator of a potential mechanical issue. This unwelcome contamination can manifest in various visual cues, each pointing to specific internal engine problems. Understanding what oil in coolant looks like, why it occurs, and the implications for your vehicle’s health is crucial for proactive maintenance and preventing more severe, costly damage. This article delves into the visual diagnostics of oil contamination in the coolant, exploring the underlying causes and offering insights for vehicle owners and aspiring mechanics alike.

Visual Indicators: Recognizing the Signs of Oil Contamination
The most immediate and apparent way to identify oil in coolant is through its visual presentation. The coolant reservoir, often a translucent plastic tank connected to the radiator, is typically the primary inspection point. When everything is functioning as it should, coolant should be a vibrant, consistent color, usually green, orange, pink, or blue, depending on the manufacturer’s specified type. However, the introduction of oil disrupts this clarity and consistency.
The Emulsified Sludge: A Muddy Appearance
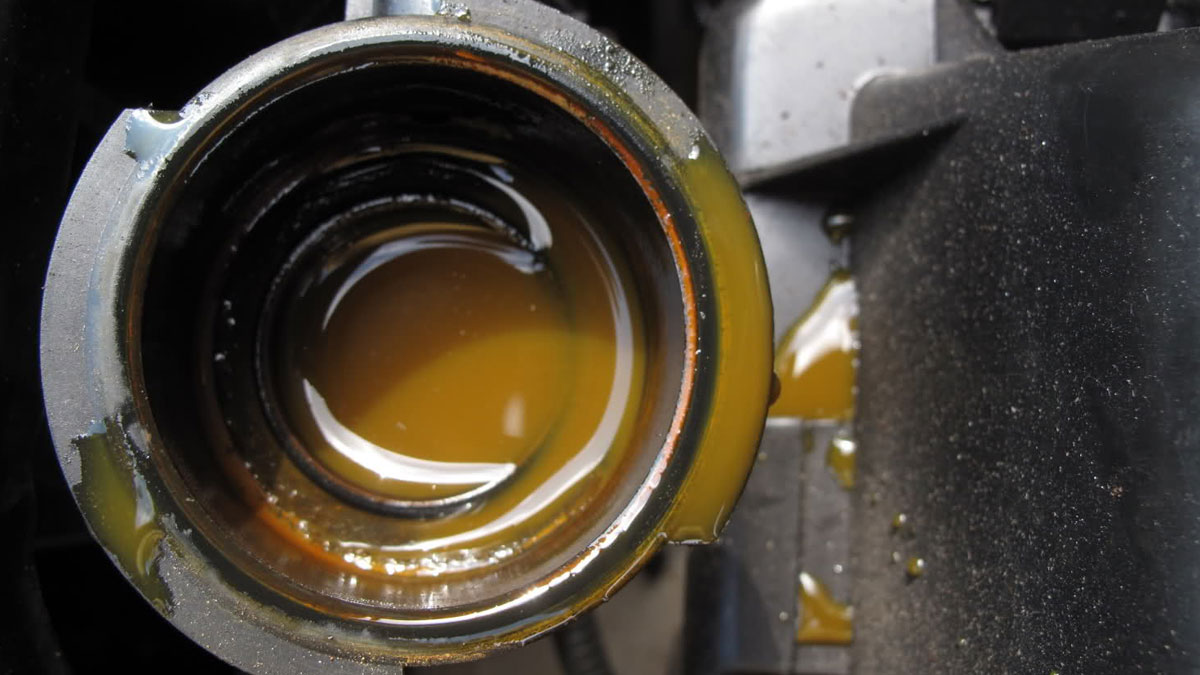
One of the most common visual signs of oil in the coolant is the formation of an emulsified sludge. This occurs when oil and coolant mix, creating a thick, frothy, and often muddy-looking substance. The color of this sludge can vary. If the coolant is a dark color, the sludge might appear dark brown or even black. If the coolant is a lighter shade, the sludge might be a lighter brown or tan. This emulsion is a result of the oil breaking down the chemical structure of the coolant, preventing it from performing its intended function of heat dissipation and lubrication within the cooling system. The frothy nature comes from trapped air, which is also a symptom of the compromised system.
Where to Spot the Sludge
The sludge is most easily observed in the coolant reservoir. If you remove the radiator cap (only when the engine is completely cool!), you might also see a layer of this emulsified material adhering to the inside walls of the radiator or even floating on the surface of the coolant. The consistency can range from a thin film to a thick, gooey substance, depending on the extent of the contamination. It’s important to note that a small amount of harmless sediment at the bottom of the reservoir can sometimes occur due to normal wear and tear, but a widespread, frothy, muddy layer is a clear red flag.
Oily Film and Sheen: A Visible Layer
Another tell-tale sign is the appearance of an oily film or sheen on the surface of the coolant. Even if the coolant doesn’t appear fully emulsified, a distinct, iridescent layer can be seen floating on top. This is essentially oil that has not yet fully mixed with the coolant, or it could be a less severe stage of contamination. The sheen might be more apparent when the engine is running and the coolant is circulating, but it can also be visible when the engine is off and the coolant has settled. This oily layer hinders the coolant’s ability to transfer heat effectively, as it creates an insulating barrier.
Observing the Radiator Cap
The underside of the radiator cap is another excellent place to check for this oily film. When the engine is hot, pressure builds up, and this can push some oil to the surface. When the engine cools down, this oil can leave a residue on the cap. This residue might look like a dark, greasy stain or a slick, oily film. It’s a relatively easy check that can provide early warning signs without needing to drain the entire system.
Discolored Coolant: A Shift in Hue
Beyond the formation of sludge or an oily film, the very color of the coolant itself can be altered by the presence of oil. While the original color of the coolant is designed to be vibrant and easily identifiable, oil contamination can lead to a dulling or darkening of this hue. For instance, a bright green coolant might turn a murky, brownish-green, or even a reddish-brown if the coolant is red. This discoloration isn’t always as dramatic as sludge formation but is nonetheless a significant indicator that something is amiss.
Understanding Coolant Types
It’s worth noting that different coolant types have different colors and chemical compositions. For example, Organic Acid Technology (OAT) coolants are often orange or pink, while Inorganic Acid Technology (IAT) coolants are typically green. Hybrid OAT (HOAT) coolants can be orange, yellow, or even blue. Regardless of the original color, the introduction of oil will disrupt its clarity and introduce a brownish or darker tint. This emphasizes the importance of using the correct coolant type specified by the vehicle manufacturer, as mixing incompatible types can lead to their own set of problems.
Underlying Causes: Where is the Oil Coming From?
The presence of oil in the coolant system is not a random occurrence. It invariably points to a failure or compromise in a component that is designed to keep oil and coolant separate. These components typically involve seals or gaskets that have degraded or failed. Identifying the source of the oil leak is critical to addressing the problem effectively.
Head Gasket Failure: The Most Common Culprit
The most frequent and often most serious cause of oil in coolant is a blown or leaking head gasket. The head gasket is a critical seal between the engine block and the cylinder head. It’s responsible for maintaining the separation of combustion gases, engine oil, and coolant. When the head gasket fails, it can create a pathway for oil from the engine’s lubrication passages to seep into the coolant passages, or for coolant to leak into the oil. This is why you often see both oil in the coolant and coolant in the oil (which might manifest as a milky or foamy substance on the oil dipstick).
Symptoms of Head Gasket Failure
Besides oil in the coolant, a blown head gasket can exhibit several other symptoms. These include white smoke from the exhaust (due to coolant burning in the combustion chamber), overheating, loss of engine power, rough idling, and a persistent sweet smell from the exhaust. The pressure from the combustion process can also force coolant into the oil, creating the aforementioned milky appearance. Conversely, oil can be forced into the cooling system, leading to the visual cues described earlier.

Cracked Cylinder Head or Engine Block: Severe Mechanical Issues
In more severe cases, a cracked cylinder head or engine block can also lead to oil contamination of the coolant. Cracks can develop due to extreme temperature fluctuations, overheating, or manufacturing defects. These cracks create direct breaches between the oil galleries and the coolant passages. Repairing a cracked cylinder head or engine block is a significantly more complex and expensive undertaking than replacing a head gasket.
Identifying Cracks
Diagnosing cracks in the cylinder head or engine block typically requires more advanced diagnostic procedures. This might include performing a “block test” where a chemical solution is used to detect the presence of exhaust gases in the coolant, which can indicate a breach in the combustion chamber seal. Pressure testing the cooling system can also reveal leaks. In some instances, visual inspection of the components themselves, often after disassembly, is necessary to confirm the presence of cracks.
Oil Cooler Malfunction: A Less Common but Possible Scenario
Some vehicles are equipped with an engine oil cooler, which is a heat exchanger that uses the engine’s coolant to help regulate oil temperature. If the seals within the oil cooler fail or if the cooler itself develops a crack, it can allow oil to mix directly with the coolant. While less common than head gasket issues, an oil cooler malfunction is a distinct possibility, especially in vehicles with higher mileage or those that have experienced significant overheating.
The Role of the Oil Cooler
The oil cooler is typically located near the radiator or integrated into the radiator itself. It consists of a series of tubes or channels through which oil flows, surrounded by coolant. The heat is then transferred from the oil to the coolant. A failure in the internal seals or the housing can create a cross-contamination path. Symptoms of an oil cooler failure can be similar to those of a head gasket issue, including oil in the coolant and potential overheating. However, checking for oil contamination in the coolant is often the first step in diagnosing a faulty oil cooler.
Diagnostic Procedures and Next Steps: Addressing the Contamination
Once you’ve identified oil in your coolant, it’s imperative to take swift action. Ignoring the problem can lead to severe damage to your engine and cooling system. A thorough diagnostic process is necessary to pinpoint the cause and a proper flushing procedure is required to remove the contaminants.
Comprehensive Cooling System Inspection
The first step after noticing oil in the coolant is a comprehensive inspection of the entire cooling system. This includes checking the coolant reservoir, radiator, hoses, water pump, and thermostat. Look for any signs of leaks, corrosion, or damage to these components. A mechanic will typically perform a pressure test on the cooling system to identify any leaks. They will also check the oil for signs of coolant contamination.
The Importance of Professional Diagnosis
While you can perform initial visual checks yourself, a professional mechanic has the tools and expertise to perform a more in-depth diagnosis. This may involve using specialized equipment to test for combustion gases in the coolant or to precisely locate leaks. Attempting to fix a complex engine issue without proper knowledge can exacerbate the problem, leading to more expensive repairs.
Flushing the Cooling System: Removing the Contaminants
Once the source of the oil leak has been identified and repaired, the cooling system must be thoroughly flushed. This process removes all traces of oil, sludge, and degraded coolant. Simply draining and refilling the system will not be sufficient, as oil and sludge can adhere to the internal surfaces of the cooling system components.
The Flushing Process Explained
A professional cooling system flush involves circulating a specialized cleaning solution through the system. This solution is designed to break down and emulsify the oil and sludge. After the cleaning solution has circulated, it is drained, and the system is then flushed with plain water. Finally, fresh, manufacturer-specified coolant is added to the system. Multiple flushes may be necessary to completely remove all contaminants, especially in cases of severe contamination.
Repair and Replacement: Restoring System Integrity
The repair aspect will depend entirely on the diagnosed cause. As mentioned, this could range from replacing a faulty head gasket to repairing or replacing a cracked engine block or a defective oil cooler. Following the repair, it is crucial to ensure that all components are properly sealed and that the cooling system is refilled with the correct type and mixture of coolant.
Long-Term Coolant Health
After a flush and repair, it’s important to monitor the coolant regularly for any signs of recurring contamination. This includes checking the coolant level and appearance periodically. Adhering to the manufacturer’s recommended coolant change intervals will also help maintain the overall health of the cooling system and prevent future issues. Proactive maintenance and prompt attention to warning signs like oil in the coolant are the cornerstones of preserving your vehicle’s longevity and performance.
aViewFromTheCave is a participant in the Amazon Services LLC Associates Program, an affiliate advertising program designed to provide a means for sites to earn advertising fees by advertising and linking to Amazon.com. Amazon, the Amazon logo, AmazonSupply, and the AmazonSupply logo are trademarks of Amazon.com, Inc. or its affiliates. As an Amazon Associate we earn affiliate commissions from qualifying purchases.