
For millions of remote workers, students, and professionals, the Zoom interface has become as familiar as a physical office or classroom. Yet, even seasoned users occasionally encounter the prompt that halts a meeting before it truly begins: “Join Audio.” It is a foundational feature of the platform, yet its function, implications, and the technical mechanisms behind it remain a mystery to many. Understanding what “Join Audio” means is the difference between a successful, collaborative video call and a frustrating experience characterized by silence and connectivity errors.
The Functional Role of Joining Audio
At its core, the “Join Audio” prompt is the digital handshake between your local hardware—your microphone and speakers—and the Zoom server infrastructure. When you launch a Zoom meeting, the application occupies your camera and screen, but it does not automatically assume control of your audio input and output devices. This is a deliberate design choice rooted in privacy, hardware conservation, and user agency.
Bridging Hardware and Software
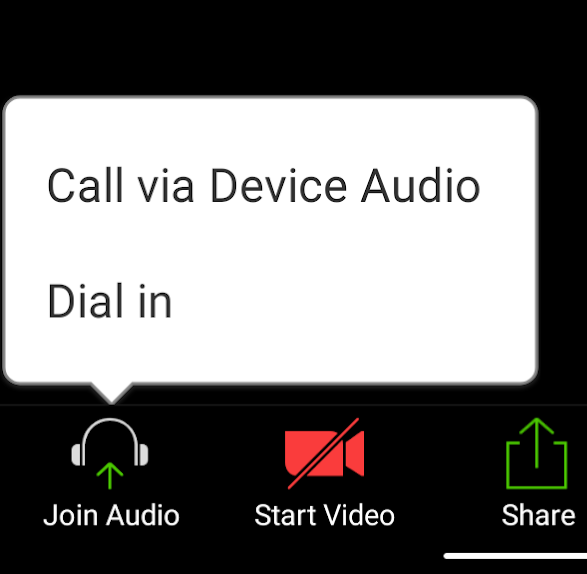
When you see the “Join Audio” button, your computer or mobile device is waiting for explicit permission to route audio data through the Zoom software. By clicking this button, you are initiating a handshake protocol that tells your operating system to allow Zoom to utilize your microphone for transmission and your speakers or headphones for reception. If you ignore this button, the application remains in a “silent” state. You might be able to see participants, but you cannot hear them, and they certainly cannot hear you.
Why It Is Not Automatic
Many users wonder why the platform does not simply join audio by default upon entry. This functionality serves as a safeguard against “ghost” audio. If Zoom automatically activated your microphone the second you joined a link, it could lead to accidental broadcasts of private conversations or ambient background noise before the user is ready. By requiring a manual action, the platform places the user in control of their own acoustic presence within the digital meeting space.
Technical Components of Audio Connectivity
The process of joining audio is not a singular action; it is a complex negotiation between your device’s sound card, the Zoom application, and your network environment. When you click “Join Audio,” several underlying processes occur in milliseconds.
The Role of VoIP and PSTN
Zoom provides two primary avenues for joining audio: Voice over Internet Protocol (VoIP) and the Public Switched Telephone Network (PSTN). When you select “Join with Computer Audio,” you are opting into the VoIP stream. This digitizes your voice into data packets that travel over the internet to the Zoom cloud, where they are processed and distributed to other participants.
Conversely, if the internet connection is unstable, or if you prefer the reliability of traditional phone lines, the “Join Audio” menu provides dial-in numbers. This allows users to connect via a cellular or landline connection, bypassing the data stream entirely. Understanding this distinction is vital for troubleshooting; if your VoIP audio is choppy, it is a sign of packet loss on your Wi-Fi or local area network (LAN), whereas dial-in audio relies on the strength of your cellular signal or telephone provider.
Hardware Negotiation and Input Mapping
Once the connection is established, the “Join Audio” prompt triggers a query to your hardware. If you have multiple devices connected—such as a webcam microphone, a dedicated USB headset, and an internal laptop mic—Zoom must select the active path. The “Join Audio” settings menu allows you to specify which hardware handles the input (microphone) and output (speaker). This “Audio Mapping” is why some users find themselves in a meeting where their audio is “on” but not “functioning.” They have successfully clicked Join Audio, but the application is looking for sound from a muted or disconnected piece of hardware.
Troubleshooting Common Audio Failures

Even after clicking “Join Audio,” users frequently encounter scenarios where sound is absent. Recognizing the symptoms of these failures can help you resolve them without delaying the meeting.
The “Test Speaker and Microphone” Feature
Within the Join Audio sub-menu, Zoom provides a critical diagnostic tool: “Test Speaker and Microphone.” This feature allows you to play a sample tone and record your voice to verify connectivity before you begin speaking to others. If you cannot hear the sample tone, the issue is with your output settings. If you cannot see the progress bar move while you speak, the issue lies with the input gain or the microphone selection.
Resolving Echo and Feedback Loops
A common issue that arises after joining audio is the dreaded echo. This typically happens when two participants are in the same physical room, both have joined audio, and their microphones are picking up the sound output from each other’s devices. Because Zoom’s audio processing is highly sensitive, it attempts to cancel out these sounds. However, if the proximity is too close, the digital signal creates a feedback loop.
When joining an audio-sensitive environment, it is best practice to mute all devices except one or to ensure all participants are wearing headphones. Headphones are the most effective solution for high-quality audio, as they physically separate the output sound from the input microphone, preventing the software from needing to rely solely on internal cancellation algorithms.
Network Latency and Jitter
In technical terms, joining audio involves managing latency—the time it takes for a sound wave to be converted into a data packet, travel to the server, and emerge at the receiver’s end. High latency creates that uncomfortable “talk-over” phenomenon where two people constantly interrupt each other. When joining audio on a public or congested network, these packets may be delayed or arrive out of order (a phenomenon known as jitter).
If you find that joining audio results in robotic or fragmented sound, the issue is usually related to bandwidth. Closing background applications—especially those that synchronize cloud storage or high-bandwidth video streams—can clear the necessary “pipe” for Zoom to maintain a steady audio handshake.
Best Practices for a Professional Audio Experience
Professionalism in a virtual environment is 80% audio. Poor video quality is often forgiven, but poor audio—background noise, low volume, or constant cutting in and out—renders a meeting ineffective. Mastering the “Join Audio” process is the first step toward professional virtual communication.
The Headset Advantage
While built-in microphones have improved significantly in modern laptops, they are rarely sufficient for professional-grade audio. Internal microphones are omnidirectional by design, meaning they capture the keyboard clicking, the hum of an air conditioner, and the ambient room noise. By using a headset with a unidirectional microphone, you isolate your voice and significantly increase the quality of the signal sent to the Zoom server. When you join audio with a headset, the software’s noise-suppression algorithms have a much cleaner “source” to work with, resulting in a clearer, more crisp experience for your colleagues.
Managing Mute During Entry
One of the most important behaviors associated with joining audio is the immediate use of the “Mute” toggle. Even if you are in a quiet environment, it is best practice to join audio in a muted state. This prevents the “clutter” noise of joining a meeting—the sound of your movement, your breath, or the application interface noise—from being broadcast to others who are already mid-sentence. It establishes a level of etiquette that respects the flow of the existing meeting.

Continuous Monitoring
Finally, treat “Join Audio” not as a set-and-forget task, but as a dynamic status. Throughout a call, your audio status might change if your internet blips or if your device enters a power-saving mode. By keeping the audio settings accessible, you can quickly re-initialize the handshake if you notice your own microphone icon flashing or the sound indicators on others’ windows disappearing.
In conclusion, “Join Audio” is far more than a simple button prompt. It is the gateway to the virtual meeting experience, representing a sophisticated blend of networking, hardware integration, and user interaction. By understanding the underlying mechanics of how Zoom connects your voice to the world, you move from being a passive participant to a prepared, professional communicator, capable of navigating the technical complexities of the modern digital landscape.
aViewFromTheCave is a participant in the Amazon Services LLC Associates Program, an affiliate advertising program designed to provide a means for sites to earn advertising fees by advertising and linking to Amazon.com. Amazon, the Amazon logo, AmazonSupply, and the AmazonSupply logo are trademarks of Amazon.com, Inc. or its affiliates. As an Amazon Associate we earn affiliate commissions from qualifying purchases.