When embarking on a fresh Windows installation, one of the most pivotal yet often misunderstood steps occurs at the partition management screen: the format. To the casual user, “formatting” is frequently synonymous with “deleting everything,” but in the realm of system architecture and software deployment, it is a far more sophisticated procedure. Formatting is the process of preparing a storage medium—such as a Hard Disk Drive (HDD) or a Solid State Drive (SSD)—for use by an operating system. Without this step, the Windows installer would be attempting to write data onto a digital void without a map, a library without shelves, or a city without a grid.

In this deep dive, we explore the intricate mechanics of what formatting actually does during a Windows installation, the technical differences between various formatting types, and why this process is essential for maintaining the integrity and performance of your digital environment.
The Core Mechanics of Formatting in the Windows Setup Environment
To understand what formatting does, one must first understand the state of a drive before the Windows installer touches it. A raw drive is simply a collection of magnetic or electronic storage cells. Formatting establishes the “File System,” which acts as the organizational framework that allows Windows to store, retrieve, and manage data.
Initializing the File System: The Dominance of NTFS
During a modern Windows installation (Windows 10 or 11), the installer defaults to the NTFS (New Technology File System). When you click “Format” on a partition, the installer writes the necessary structures for NTFS to function. This includes the Master File Table (MFT), which is essentially the “table of contents” for the entire drive. The MFT stores metadata about every file, including its location on the physical disk, its size, and its permissions. Without formatting, Windows would have no way of knowing where the kernel ends and your user data begins.
The Logical Structure: Clusters and Sectors
Formatting also defines the “allocation unit size,” often referred to as clusters. A cluster is the smallest amount of disk space that can be used to hold a file. During the installation format, Windows determines these cluster sizes to balance efficiency and performance. If you have thousands of tiny files, small clusters are efficient; for larger media files, larger clusters are better. By formatting during the installation, Windows ensures that the drive’s logical structure is perfectly aligned with the OS’s requirements, preventing “slack space” and optimizing read/write speeds from day one.
Quick Format vs. Full Format: Deciphering the Windows Installer Options
In the standard Windows Setup GUI, the “Format” button typically triggers what is known as a “Quick Format.” However, understanding the distinction between a Quick Format and a Full Format is crucial for anyone managing hardware or concerned with data security.
How Quick Format Operates
A Quick Format is the default choice because of its speed. It does not scan the drive for bad sectors, nor does it physically overwrite the data. Instead, it wipes the File System’s “index” (the MFT). To the operating system, the drive appears empty because the pointers to the old data have been removed. The actual bits and bytes of your old photos or documents remain on the platters or flash cells until they are eventually overwritten by new Windows system files. This is why a Windows installation can feel so fast—it’s only “cleaning the table of contents” rather than “burning the book.”
When the Installer Performs a Full Format
While the modern Windows “Custom Installation” screen defaults to Quick Format, certain command-line tools (like diskpart) or older installation media allow for a Full Format. A Full Format does everything a Quick Format does, but with one critical addition: it runs a check on every sector of the disk to ensure they are healthy. If it finds a “bad sector,” it marks it as unusable so that Windows won’t attempt to store vital system files there later.
Data Security and Sector Verification
From a technical standpoint, the Full Format introduced in Windows Vista and later actually writes zeros to the entire partition. This is a significant security measure. If you are installing Windows on a drive you intend to sell or give away, a Quick Format is insufficient, as data recovery tools can easily “undelete” the old files. However, for a standard home installation, the Quick Format is preferred as it reduces wear on SSDs and saves significant time.
The Interplay Between Partitioning and Formatting
Formatting does not exist in a vacuum; it is the second half of the “Partition and Format” duo. Before a drive can be formatted during a Windows installation, it must first be partitioned.
Creating the Volume: The Precursor to Formatting
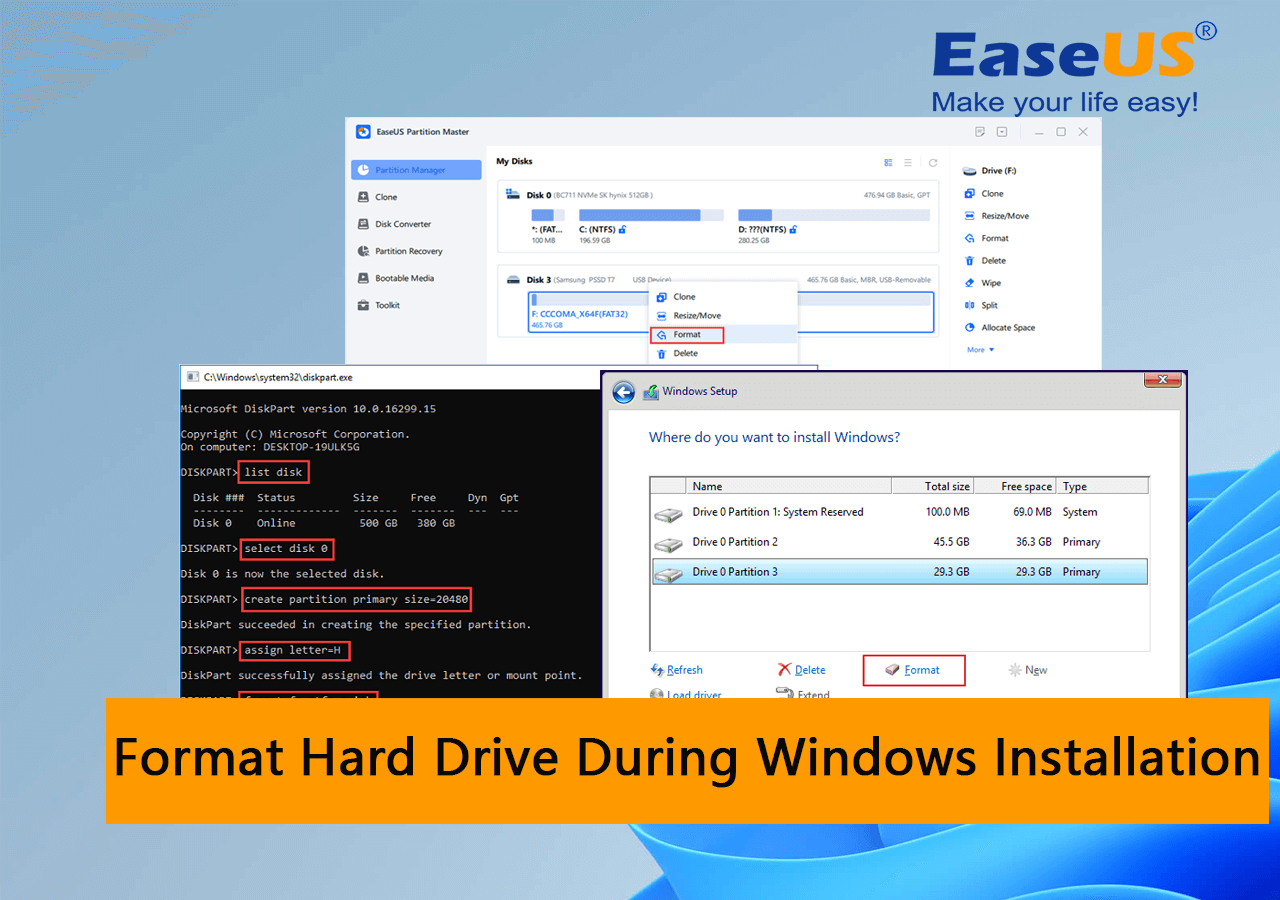
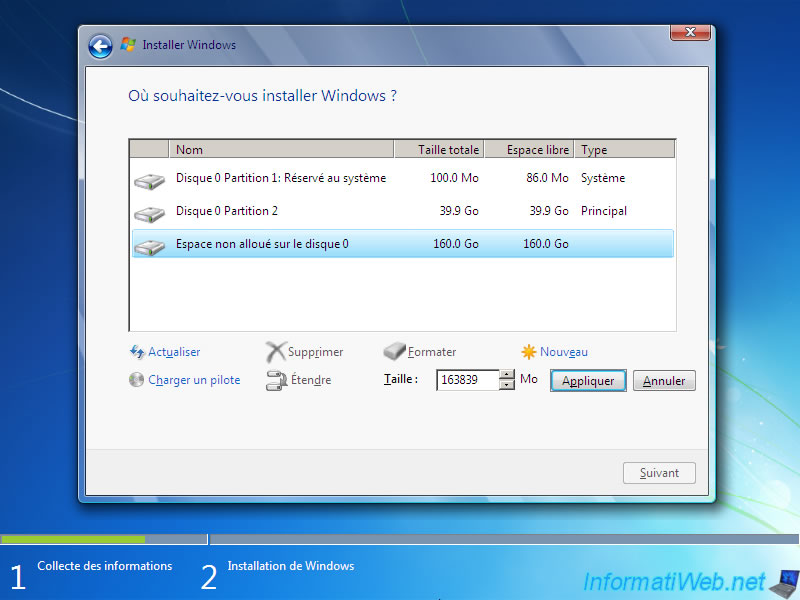
Partitioning is the act of carving out a specific “slice” of the physical drive to act as a logical volume. When you see “Drive 0 Unallocated Space” and click “New,” Windows creates a partition table—usually using the GPT (GUID Partition Table) standard on modern UEFI systems. Once the partition is defined, the format command is what “paints” the file system onto that specific slice. You can have multiple partitions on one drive, each formatted differently, though Windows generally requires its primary partition to be NTFS.
Reserved Partitions and System Files
During the installation process, you may notice that Windows creates several small partitions automatically (such as the EFI System Partition and the Recovery Partition). The installer formats these partitions specifically to hold the bootloader and recovery tools. These are often formatted as FAT32 to ensure compatibility with the motherboard’s firmware (BIOS/UEFI), while the main “C:” drive is formatted as NTFS. This multi-format approach is what allows your computer to bridge the gap between hardware firmware and the high-level operating system.
Why Formatting is Essential for a Clean Installation
Many users ask if they can simply install Windows over an existing installation without formatting. While possible (creating a Windows.old folder), it is rarely recommended. Formatting provides a “clean slate” that is vital for several reasons.
Eliminating Software Conflicts and Malware
Over years of use, an operating system accumulates “digital rot”—broken registry keys, conflicting drivers, and potentially dormant malware. Formatting the drive during installation ensures that every single bit of old data is ignored. It effectively “sanitizes” the environment, ensuring that the new Windows installation isn’t hampered by the ghosts of software past. This is often the only way to guarantee a 100% stable environment for high-performance tasks or professional work.
Optimizing Drive Performance and Alignment
For modern Solid State Drives (SSDs), the format process during a Windows installation includes “partition alignment.” If a partition is not aligned with the physical blocks of the SSD, every write operation requires the drive to modify two blocks instead of one, cutting the drive’s lifespan and speed in half. By allowing the Windows installer to format the drive, you ensure that the file system is perfectly aligned with the hardware’s architecture, maximizing the IOPS (Input/Output Operations Per Second) of your hardware.
Common Misconceptions and Troubleshooting
Despite being a standard part of tech literacy, formatting still carries a few myths that can lead to confusion during the Windows setup process.
Does Formatting Physically Destroy Data?
It is a common misconception that formatting “deletes” data in the sense of physical destruction. As discussed, a Quick Format only removes the index. Even a Full Format (which writes zeros) doesn’t physically damage the drive; it simply resets the magnetic or electronic state. However, from a practical standpoint, once you format a drive and install Windows over it, the chance of recovering your old data drops to near zero because the new OS files will overwrite the physical locations where your old data lived.
Handling Installation Errors During the Format Phase
Sometimes, the Windows installer will throw an error stating, “Windows could not format a partition on disk 0.” This usually points to one of three things: a failing hard drive (hardware level), a write-protection lock, or a conflict between the partition style (MBR vs. GPT) and the motherboard’s boot mode (Legacy vs. UEFI). In these cases, the Tech-savvy approach involves using the “Shift + F10” shortcut during installation to open the Command Prompt, using diskpart to “clean” the drive, and then allowing the installer to format from a truly blank state.
In summary, formatting during a Windows installation is the bridge between raw hardware and a functional workspace. It builds the logical infrastructure, verifies the health of the storage medium, and ensures that the operating system has a stable, high-performance foundation to rest upon. Whether you are a system administrator or a home enthusiast, understanding this process ensures that your digital foundation is built to last.
aViewFromTheCave is a participant in the Amazon Services LLC Associates Program, an affiliate advertising program designed to provide a means for sites to earn advertising fees by advertising and linking to Amazon.com. Amazon, the Amazon logo, AmazonSupply, and the AmazonSupply logo are trademarks of Amazon.com, Inc. or its affiliates. As an Amazon Associate we earn affiliate commissions from qualifying purchases.