
The unassuming drill, a staple in workshops and toolboxes worldwide, is far more than just a spinning bit. Its seemingly simple design is governed by a complex interplay of numbers and symbols, each meticulously calibrated to dictate its performance, application, and safety. For the uninitiated, these markings can appear arcane, a cryptic language understood only by seasoned tradespeople. However, for anyone looking to maximize their efficiency, ensure precision, and select the right tool for the job, understanding these numbers is not just beneficial – it’s essential. This article will demystify the numerical landscape of drills, breaking down the key specifications that define their capabilities and guide users towards informed decisions within the realm of Tech.
Understanding the Core Power Metrics: Voltage and Amperage
At the heart of any electric drill’s capability lies its power. For cordless drills, this power is primarily defined by its battery voltage. For corded drills, while voltage is standardized by the mains supply, the amperage rating offers insight into its continuous power draw and, by extension, its potential torque.
The Significance of Voltage in Cordless Drills
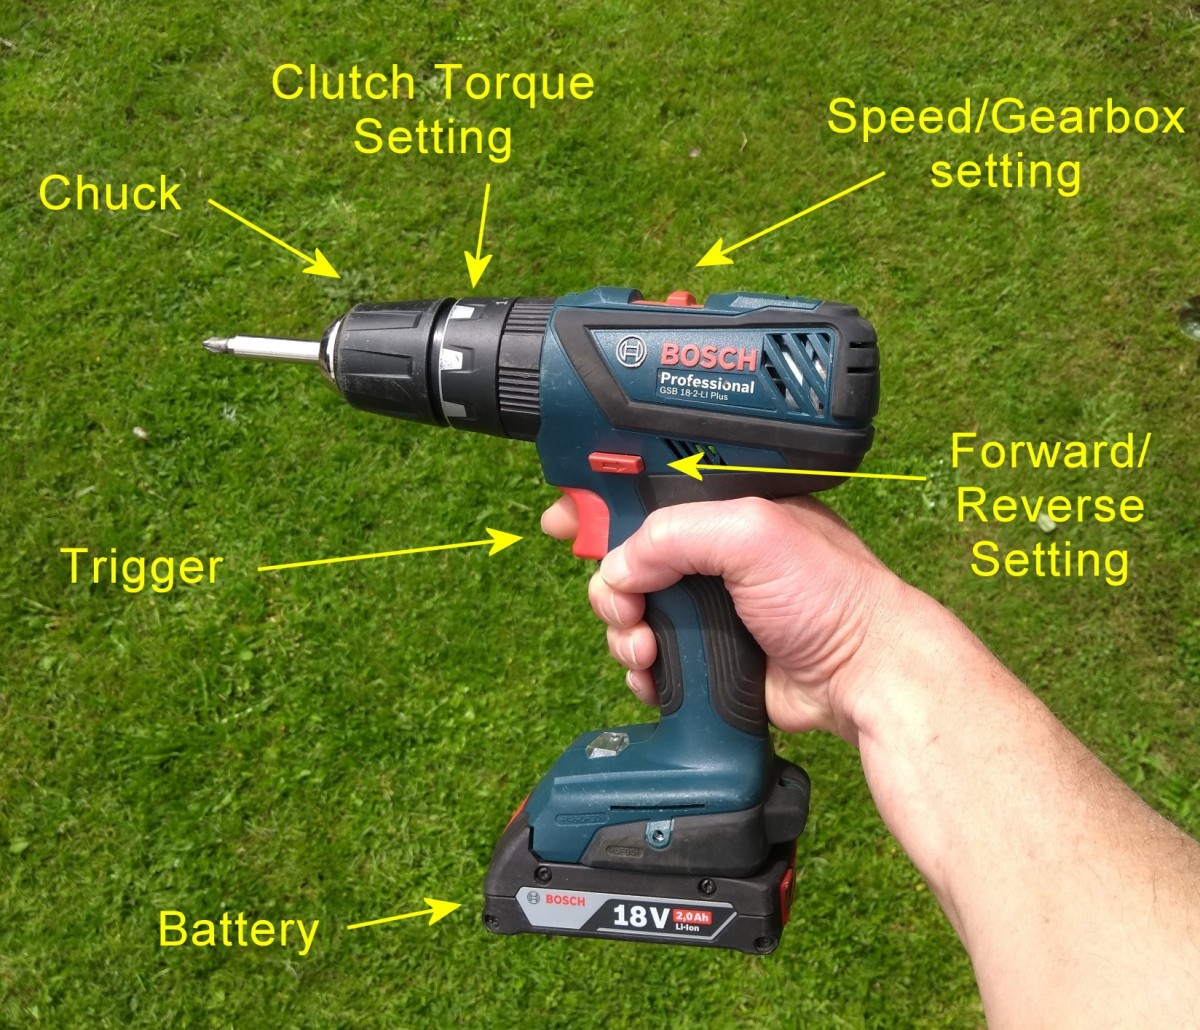
The most prominent numbers found on a cordless drill are related to its battery. The voltage (V) is a critical indicator of the drill’s potential power and its ability to handle demanding tasks. Common voltage ratings include 12V, 18V, 20V (often marketed as 20V MAX, which refers to the peak charge of the battery), and increasingly, higher voltages like 36V or 40V for heavy-duty applications.
- Higher Voltage, Higher Torque and Performance: Generally, a higher voltage battery can deliver more power to the motor. This translates into greater torque, which is the rotational force the drill can exert. For drilling into dense materials like hardwoods or masonry, or for driving large screws, a higher voltage drill will be significantly more effective. It will struggle less, generate less heat, and offer a more consistent performance.
- Runtime and Battery Capacity (Ah): While voltage dictates the power potential, the Ampere-hour (Ah) rating of the battery dictates its runtime. A higher Ah rating means the battery can supply a certain current for a longer period. So, a 2.0Ah battery will drain faster than a 5.0Ah battery when used with the same drill under similar conditions. It’s important to consider both voltage and Ah when evaluating a cordless drill’s overall utility. A high-voltage drill with a low Ah battery might offer power but lack longevity, while a low-voltage drill with a high Ah battery might last a long time but struggle with tough jobs.
- Weight and Ergonomics: Higher voltage batteries tend to be larger and heavier. This impacts the overall weight and balance of the drill, which is a crucial ergonomic consideration, especially for prolonged use. A 12V drill will be lighter and more maneuverable than a 36V model, making it ideal for intricate tasks or working in confined spaces.
Amperage in Corded Drills: A Measure of Power Draw
For corded drills, the amperage (A) rating, often found on the nameplate, indicates the amount of electrical current the drill draws from the power outlet. While the voltage is typically a standard 120V (in North America) or 240V (elsewhere), the amperage provides a comparable measure of power output.
- Higher Amperage, Greater Sustained Power: A higher amperage rating generally signifies a more powerful motor capable of delivering sustained torque and handling continuous heavy-duty use without overheating. A 7A corded drill will likely outperform a 4A drill in terms of drilling speed and ability to power through tough materials.
- Duty Cycle and Application: Amperage can also be an indirect indicator of the drill’s intended duty cycle. Tools designed for continuous professional use will often have higher amperage ratings than those intended for occasional DIY tasks.
Decoding Speed and Control: RPM and Gear Settings
Beyond raw power, the speed at which a drill rotates and the control offered over that speed are paramount for precision and material suitability. These are typically indicated by Revolutions Per Minute (RPM) ratings and the presence of variable speed triggers or multi-gear transmissions.
Revolutions Per Minute (RPM): The Pace of Work
The RPM rating on a drill specifies the maximum number of rotations the chuck can achieve in one minute. This metric is crucial for understanding how quickly the drill can cut through material or drive fasteners.
- Variable Speed Triggers: Most modern drills, both corded and cordless, feature variable speed triggers. This allows the user to control the RPM by the amount of pressure applied to the trigger. This is essential for starting holes accurately, preventing bit slippage, and controlling the depth of screw insertion.
- High-Speed vs. Low-Speed Applications: Different tasks require different RPMs. For drilling small pilot holes in wood or metal, a higher RPM is generally desirable for efficiency. However, for drilling larger holes, especially in dense materials, or for driving large screws, a lower RPM is often preferred to prevent overheating the bit and material, and to maintain better control and reduce the risk of stripping screw heads.
- Dual-Speed Gearboxes: Many drills come equipped with a two-speed gearbox, often indicated by a slider switch on the top of the drill. This switch typically has markings like “1” and “2,” or “I” and “II.”
- Gear 1 (Low Speed, High Torque): This setting provides more rotational force (torque) at a lower speed. It’s ideal for tasks requiring significant power, such as drilling large holes, mixing paint, or driving large fasteners into tough materials.
- Gear 2 (High Speed, Low Torque): This setting prioritizes speed over torque. It’s suitable for general drilling, creating pilot holes quickly, and driving smaller fasteners.
Understanding which gear to use for which application is fundamental to efficient and effective drilling.
Clutch Settings: The Art of Torque Control
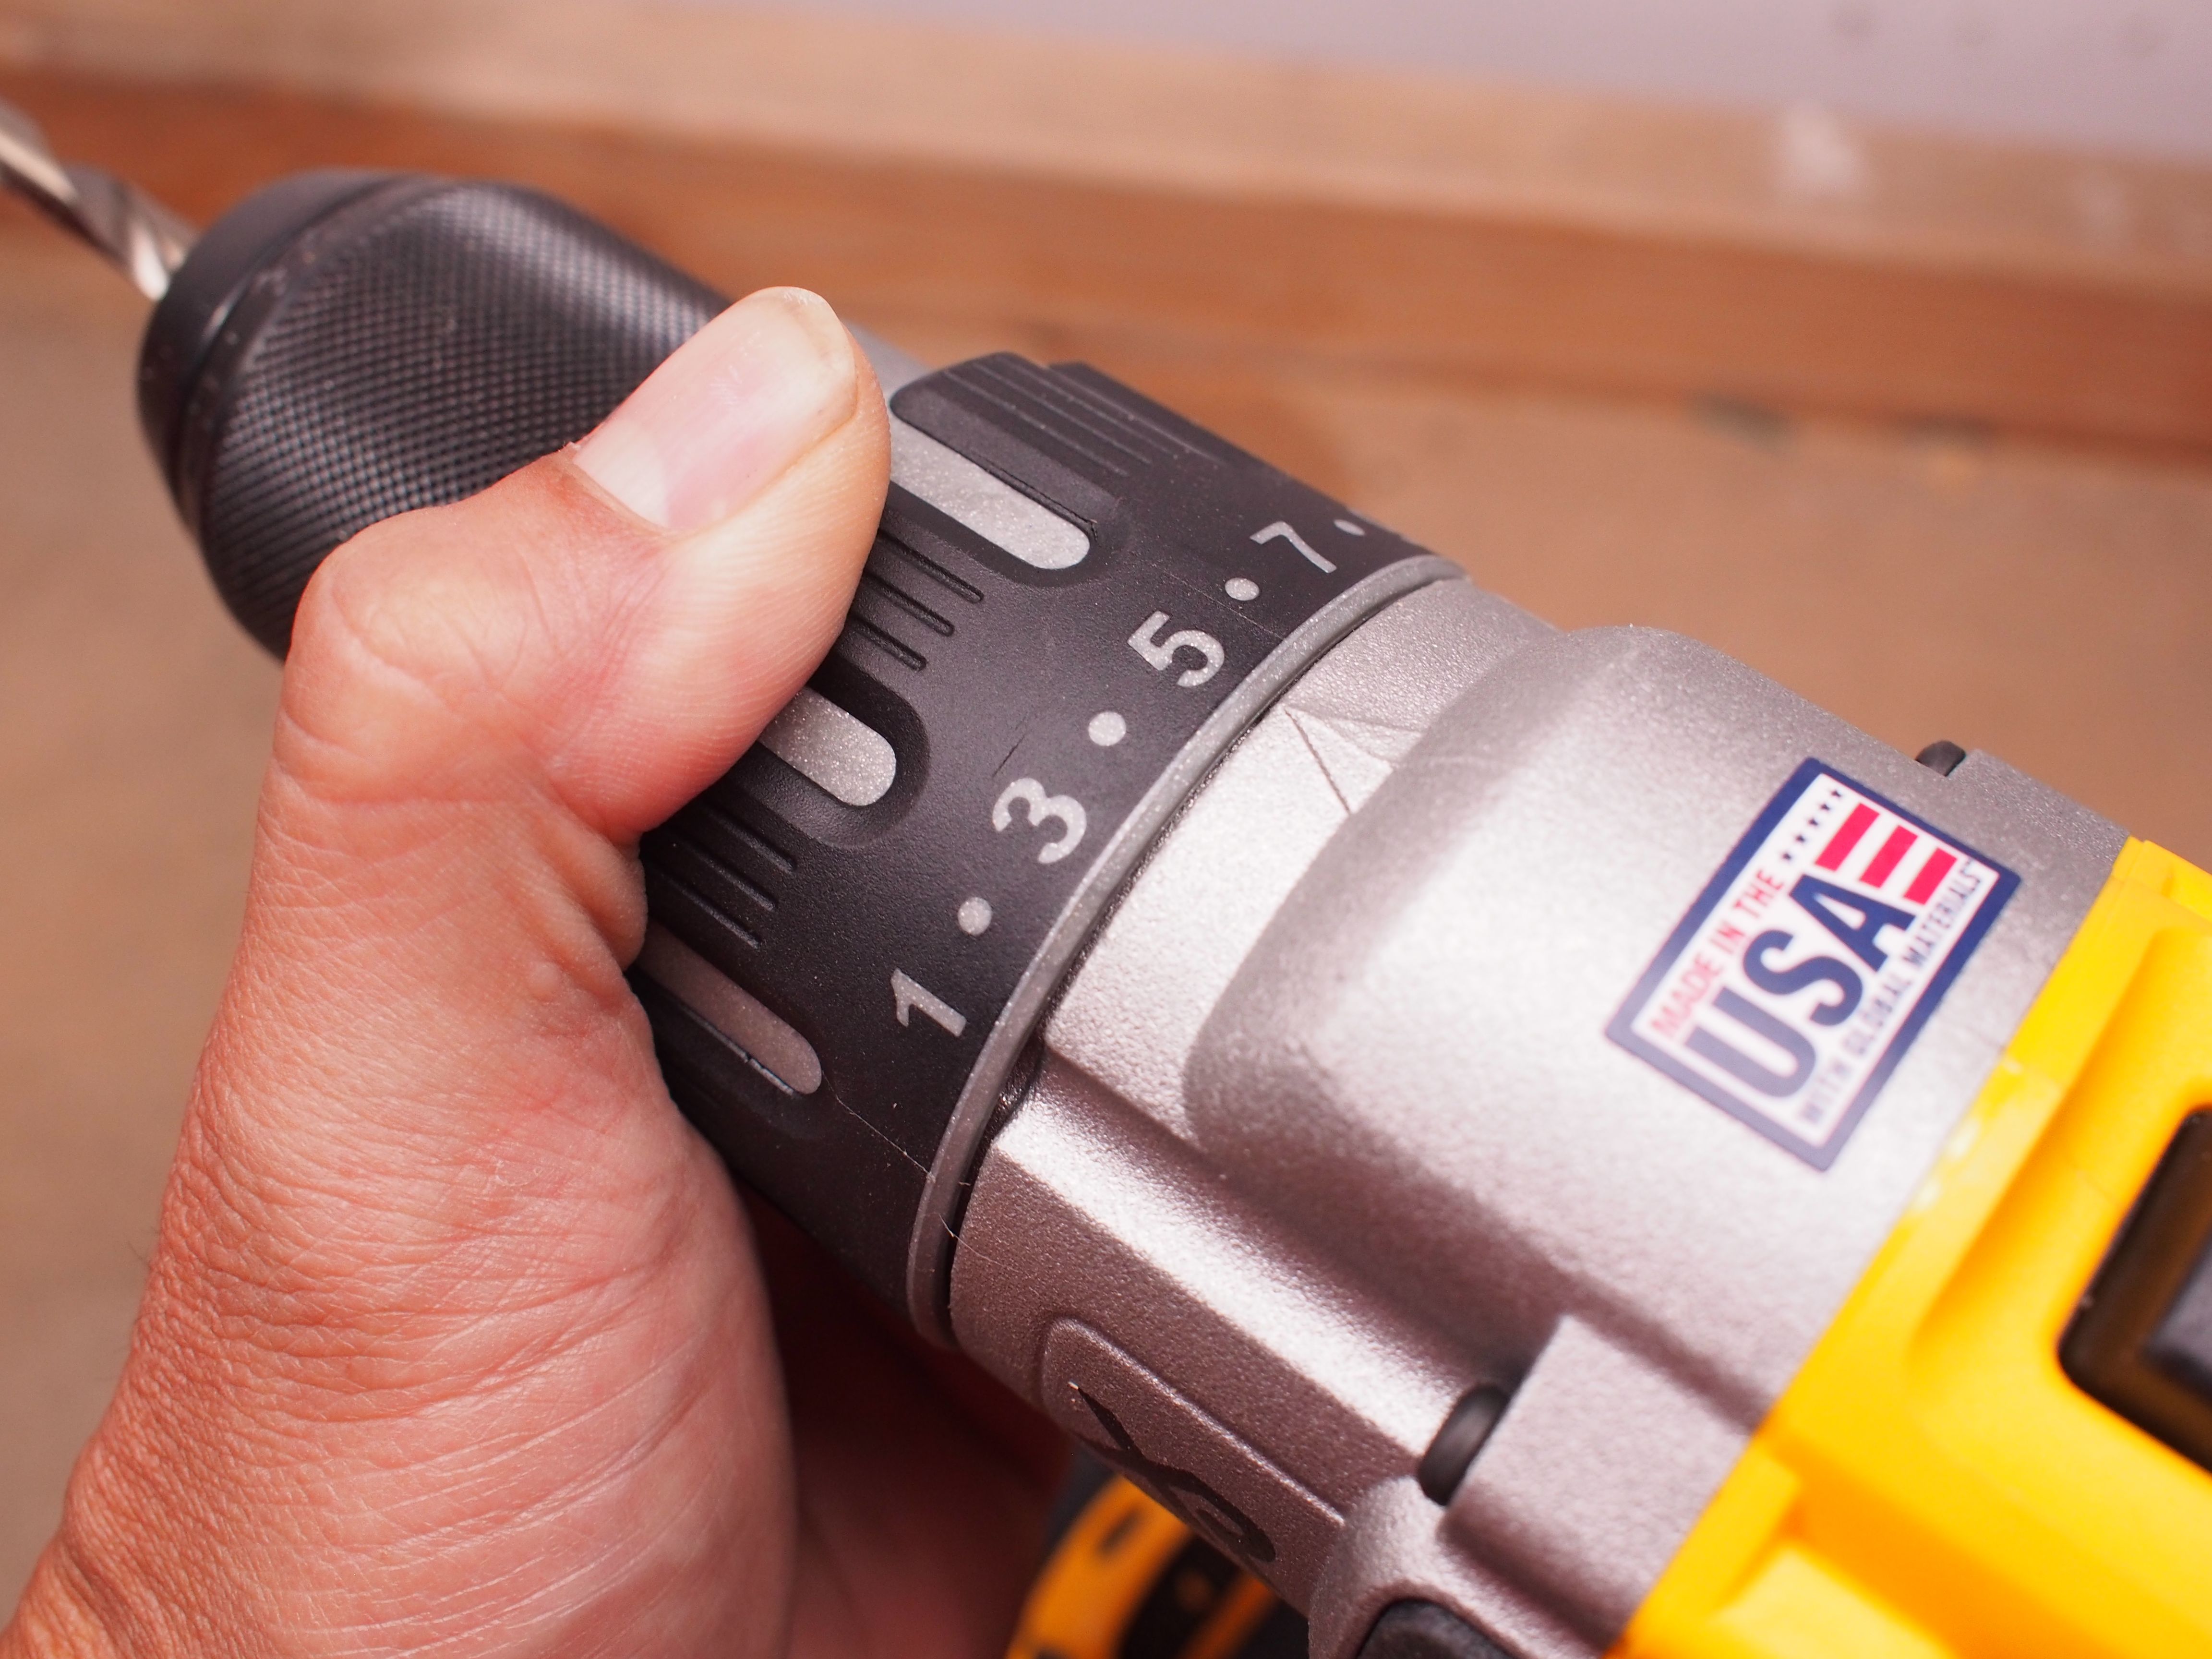
Beyond the primary speed settings, most drills incorporate a clutch mechanism, often indicated by a numbered ring just behind the chuck. This clutch is a critical safety and precision feature, designed to prevent over-tightening of screws and to protect both the fastener, the material, and the drill’s internal gearing.
- The Torque Continuum: The numbers on the clutch ring represent different torque settings, usually from 1 to 10, 15, 20, or even higher, depending on the drill’s capacity. A lower number signifies a lower torque limit, while a higher number indicates a higher torque limit.
- How the Clutch Works: When the drill reaches the pre-set torque limit, the clutch disengages, causing the drill to “click” and spin freely without continuing to apply rotational force. This is often described as the drill “slipping.”
- Choosing the Right Setting:
- Low Numbers (1-5): Ideal for driving small screws into soft materials like drywall or thin wood. This prevents stripping the screw head or damaging the material.
- Medium Numbers (6-12): Suitable for driving medium-sized screws into wood.
- High Numbers (13+): Used for driving larger fasteners into harder materials or when significant clamping force is required.
- Drill Mode: Many drills also have a dedicated “drill mode” (often indicated by a drill bit symbol) that bypasses the clutch entirely, allowing the drill to operate at its maximum torque for drilling holes. This is essential for its primary function.
Mastering the clutch settings is key to achieving consistent screw depth and preventing damage, a fundamental aspect of professional-grade work.
Understanding the Chuck and Bit Interface: Size and Security

The chuck is the part of the drill that holds the drill bit or screwdriver bit. Its size and the method of securing the bit are critical technical specifications that dictate the range of bits you can use and the security of their attachment.
Chuck Size: The Diameter of Capability
The chuck size is typically measured by the maximum diameter of the drill bit shank it can accommodate. Common chuck sizes include 3/8 inch (approximately 10mm) and 1/2 inch (approximately 13mm).
- 3/8-inch Chucks: These are commonly found on smaller, lighter-duty drills, often 12V models. They are suitable for drilling smaller holes and driving standard screws.
- 1/2-inch Chucks: These are found on more powerful drills, including most 18V and higher voltage cordless models, as well as corded drills. They can accommodate larger diameter drill bits, making them essential for drilling through tougher materials or for tasks requiring larger holes.
- Impact-Rated Chucks: For use with impact drivers or hammer drills, look for chucks that are specifically designated as “impact-rated.” These are built to withstand the high torque and percussive forces generated by these tools.
Keyed vs. Keyless Chucks: Convenience and Control
Drill chucks can be either keyed or keyless.
- Keyed Chucks: These require a special wrench (key) to tighten and loosen the chuck jaws. While they offer a very secure grip on the bit, they are less convenient as the key needs to be carried and used.
- Keyless Chucks: These are the dominant type on modern drills. They feature a rotating collar that allows the user to tighten and loosen the jaws by hand. This offers superior convenience and speed. The collar is often textured for better grip, and some high-end models include a ratcheting mechanism for even greater tightening force and a more secure lock.
Beyond the Basics: Specialized Features and Ratings
While voltage, RPM, and chuck size are fundamental, modern drills often boast a range of additional technical specifications that enhance their versatility and performance in specific applications.
Hammer Functionality: Tackling Masonry with Ease
Many drills are equipped with a hammer function, transforming them into hammer drills. This is typically indicated by an additional setting on the gear selector or clutch ring, often represented by a hammer icon.
- How it Works: When engaged, the hammer function adds a percussive action to the rotational motion. This rapidly striking force is ideal for drilling into hard materials like brick, concrete, and stone.
- Impact Rate (BPM): For drills with a hammer function, you may encounter a “blows per minute” (BPM) or “impacts per minute” (IPM) rating. This number indicates how many times the hammer mechanism strikes the material per minute. A higher BPM generally means faster drilling into masonry.
Brushless Motors: Efficiency and Longevity
A significant technological advancement in drills is the adoption of brushless motors. While not always directly indicated by a number on the external casing, this feature is often highlighted in product descriptions and specifications.
- Increased Efficiency: Brushless motors are more efficient than traditional brushed motors. They convert more electrical energy into mechanical work, leading to longer runtimes on a single battery charge and less heat generation.
- Enhanced Durability: Without brushes to wear out, brushless motors are generally more durable and have a longer lifespan. They also typically offer more precise speed and torque control.
- Power-to-Weight Ratio: Brushless drills often achieve a better power-to-weight ratio, meaning they can deliver more power for their size and weight compared to brushed motor equivalents.
IP Ratings and Environmental Protection
In some professional or industrial contexts, drills might carry Ingress Protection (IP) ratings. These standardized ratings indicate the level of protection a device offers against the ingress of solid objects (like dust) and liquids.
- Understanding the Codes: An IP rating consists of two digits. The first digit indicates protection against solids (0-6), and the second indicates protection against liquids (0-9). For example, an IP54 rating means the drill is protected against dust ingress to a degree that could interfere with its operation and is protected against splashing water from any direction.
- Application Relevance: While less common on consumer-grade drills, IP ratings are crucial for tools used in harsh environments, such as construction sites, workshops exposed to dust and moisture, or outdoor applications.
In conclusion, the numbers on a drill are not arbitrary markings; they are the technical specifications that define its power, speed, control, and suitability for a vast array of tasks. By understanding voltage, amperage, RPM, clutch settings, chuck size, and specialized features like hammer functionality and brushless motors, users can move beyond guesswork and make informed decisions. This technical literacy empowers individuals to select the right drill for their needs, optimize their workflow, and achieve professional-grade results, transforming this common tool into a precisely engineered instrument for creation and repair.
aViewFromTheCave is a participant in the Amazon Services LLC Associates Program, an affiliate advertising program designed to provide a means for sites to earn advertising fees by advertising and linking to Amazon.com. Amazon, the Amazon logo, AmazonSupply, and the AmazonSupply logo are trademarks of Amazon.com, Inc. or its affiliates. As an Amazon Associate we earn affiliate commissions from qualifying purchases.