In the dynamic world of technology, keeping your operating system up-to-date is often a necessity for security, performance, and access to the latest features. Whether you’ve just upgraded from Windows 10 to Windows 11, performed a major feature update, or even reinstalled Windows, you might notice a significant chunk of your hard drive mysteriously occupied by what’s often referred to as “previous Windows installations.” This can manifest as a Windows.old folder or various temporary installation files. For users striving for optimal system performance and maximum storage efficiency – key aspects of digital productivity – the question inevitably arises: Is it safe to delete these previous Windows installations?
This isn’t merely a trivial query about freeing up disk space; it delves into the delicate balance between system stability, recovery options, and resource management. In an era where digital security is paramount and computational efficiency directly impacts productivity, understanding the implications of such deletions is crucial. This comprehensive guide will explore what these files are, why they exist, the safety considerations involved in their removal, and how to go about it responsibly, ensuring your system remains robust and responsive.
Understanding “Previous Windows Installations”
Before we can confidently decide whether to delete these files, it’s essential to understand what exactly constitutes a “previous Windows installation” and the role it plays within your system. These are not just random leftover files; they serve specific purposes, primarily related to system recovery and downgrade options.
What Are These Files?
The most prominent and space-consuming component of a “previous Windows installation” is typically the Windows.old folder. This folder is automatically created by the Windows operating system during major upgrades (e.g., from Windows 10 to Windows 11) or significant feature updates (e.g., from Windows 10 version 21H1 to 21H2). It essentially contains a complete backup of your previous Windows installation, including the operating system files, installed programs, user accounts, and settings. Think of it as a snapshot of your entire system from before the upgrade.
Beyond Windows.old, other categories of files contribute to what might be considered “previous installations”:
- Windows installation files: These are temporary files downloaded and used during the upgrade or installation process. While many are cleaned up automatically, some persistent ones can remain.
- Previous Windows Update files: Similar to installation files, these are components of past updates that are no longer needed but might not have been fully purged.
- System Restore Points: While not part of a “previous installation” in the same sense as
Windows.old, these are system snapshots that allow you to revert your system to an earlier state. They consume significant disk space and are often managed alongside other system recovery options. - Temporary files: A broad category that includes logs, cache data, and remnants from software installations or system operations that accumulate over time.
Collectively, these files can occupy tens of gigabytes of storage space, especially the Windows.old folder, making their removal an appealing prospect for users facing disk space constraints or simply seeking a tidier system.
Why Do They Exist?
The primary reason for the existence of the Windows.old folder and related installation files is to provide a safety net. Microsoft designs Windows upgrades to be as seamless as possible, but unforeseen compatibility issues, driver problems, or user preferences can sometimes necessitate a rollback.
- Rollback Capability: The
Windows.oldfolder is crucial for allowing users to revert to their previous version of Windows within a specific timeframe (typically 10 days, though it can be up to 60 days depending on the version and configuration). If you upgrade to Windows 11 and encounter issues, or simply dislike the new interface, havingWindows.oldenables you to go back without needing a complete reinstall from scratch. This significantly reduces downtime and potential data loss, contributing to user productivity and peace of mind. - System Recovery: In some cases, parts of these older installations can contribute to system recovery environments, although dedicated recovery partitions are more common.
- Troubleshooting and Diagnostics: Remnants of installation files can sometimes be useful for diagnosing issues that arose during or after an upgrade.
This built-in recovery mechanism is a testament to Microsoft’s commitment to user experience and system stability, acting as a crucial safety feature. However, once a user is confident in their new Windows installation, these recovery files become redundant and merely consume valuable disk space.
The Core Question: Is it Safe?
Now that we understand what these files are and why they exist, we can directly address the central question: Is it safe to delete previous Windows installations? The straightforward answer is yes, it is generally safe, but with critical caveats and conditions. It’s not a decision to be made lightly, and timing is everything.
When It’s Generally Safe
The ideal time to delete Windows.old and other previous installation files is when you are absolutely certain that your current Windows installation is stable, functional, and meets all your needs.
- After Verifying System Stability: The most crucial condition for safe deletion is confirming the stability of your new Windows version. This means:
- All your essential applications are running without issues.
- All your hardware components (printers, graphics cards, peripherals) are working with their correct drivers.
- You haven’t encountered any critical errors, crashes, or unexpected behavior over a period of consistent use (e.g., 2-4 weeks).
- You are happy with the user experience of the new OS and have no desire to revert to the previous version.
- Beyond the Rollback Period: Windows typically provides a grace period (often 10 days, extendable in some enterprise settings) during which you can easily roll back to the previous version. If this period has passed, Windows will often automatically remove the
Windows.oldfolder itself. If it hasn’t, and you’re well past this period without needing to revert, it’s a strong indicator that deletion is safe. - Having a Backup Strategy: Even when you’re confident in your current system, always having a robust backup strategy in place is a fundamental aspect of digital security. If you routinely back up your important files and have a system image backup, the safety net provided by
Windows.oldbecomes less critical for personal data, shifting its primary role to OS-level rollback.
Deleting these files after confirming stability and having a backup plan aligns perfectly with best practices for maintaining a healthy and efficient tech environment. It’s a proactive step towards optimizing your digital workspace, preventing unnecessary clutter that can impact performance over time.
Potential Risks of Premature Deletion
While generally safe under the right conditions, deleting previous Windows installations prematurely carries significant risks that could severely impact your productivity and necessitate more drastic recovery measures.
- Loss of Rollback Capability: The most immediate and significant risk is losing the ability to easily revert to your previous Windows version. If you delete
Windows.oldand then encounter insurmountable problems with your new OS, your only recourse might be a complete clean installation, which is a far more time-consuming and disruptive process. This means potential data loss (if not backed up) and significant downtime. - System Instability: Although rare, prematurely deleting certain temporary installation files or components that the system still relies on (even indirectly) could theoretically introduce instability. Sticking to Microsoft’s recommended cleanup methods (like Disk Cleanup) mitigates this risk.
- Data Loss (Indirect): While deleting
Windows.oldwon’t directly delete your current user files (unless they were specifically part of the old system’s user profile that you haven’t migrated), it removes a potential recovery path. If your current system becomes unbootable and you haven’t backed up your data, you lose an option to boot back into the old OS to retrieve files. This underscores the importance of a comprehensive digital security approach.
The decision to delete should always prioritize system stability and your ability to recover from potential issues. In a professional context, where uptime and data integrity are paramount, prudence dictates a waiting period and solid backup protocols.
Disk Space Implications
Beyond the safety aspect, the most tangible benefit of deleting previous Windows installations is the significant recovery of disk space. For many users, particularly those with solid-state drives (SSDs) which often have less capacity than traditional HDDs, reclaiming tens of gigabytes can dramatically improve system utility and user experience.
- Enhanced Performance: While merely freeing space doesn’t directly speed up your CPU, a fuller drive can lead to fragmentation (on HDDs), reduced cache sizes, and less room for temporary files, all of which can indirectly impact performance. More importantly, having ample free space ensures the system has room for future updates, applications, and user data, preventing “disk full” errors that halt productivity.
- Productivity Boost: For content creators, developers, or anyone working with large files, every gigabyte counts. Freeing up space means more room for projects, virtual machines, or large datasets, directly contributing to uninterrupted workflow and productivity.
- Cost Savings: Maximizing your current storage capacity can delay the need to purchase larger internal or external drives, representing a tangible “money” saving aspect of this tech decision.
Therefore, deleting these files is not just about tidiness; it’s a practical step towards maintaining an efficient, productive, and cost-effective computing environment.
How to Safely Remove Previous Windows Installations

Given the considerations, the good news is that Windows provides built-in, safe methods for removing previous installations. It’s crucial to use these official tools rather than attempting manual deletion, which can be risky.
Using Disk Cleanup
The most recommended and straightforward method for safely removing previous Windows installations is through the Disk Cleanup utility. This tool is designed by Microsoft to identify and remove various types of unnecessary files without harming your system.
Detailed Steps for Using Disk Cleanup:
- Open Disk Cleanup:
- Press
Windows Key + Rto open the Run dialog. - Type
cleanmgrand press Enter. - Alternatively, search for “Disk Cleanup” in the Windows search bar.
- Press
- Select Drive: If prompted, select the drive where Windows is installed (usually C:).
- Run as Administrator: In the Disk Cleanup window, click on “Clean up system files.” This step is crucial because
Windows.oldand other system-level files require administrator privileges to be listed and deleted. - Reselect Drive (if prompted): You might be asked to select the drive again.
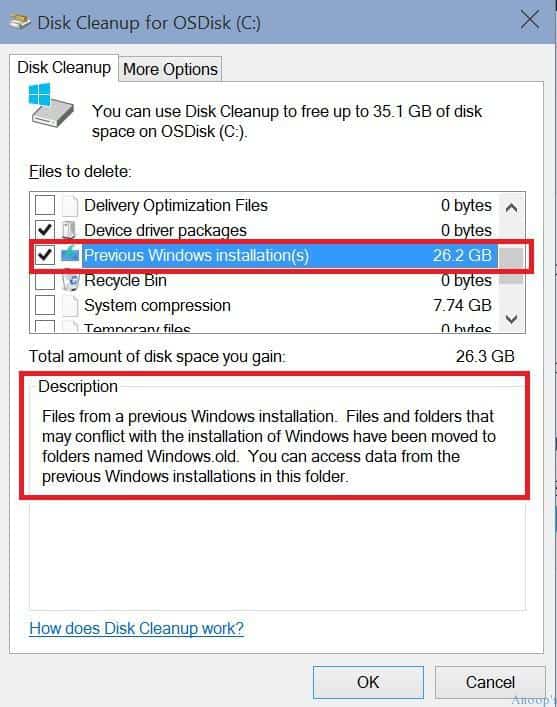
- Identify Files to Delete: Disk Cleanup will scan your system for various file categories. Once the scan is complete, a new window will appear listing different types of files.
- Scroll down the list and look for entries like:
- “Previous Windows installation(s)” (this is your
Windows.oldfolder) - “Windows upgrade log files”
- “Temporary Windows installation files”
- “Windows Update Cleanup”
- “Previous Windows installation(s)” (this is your
- Check the boxes next to these items. You can also review other categories like “Temporary files,” “Recycle Bin,” etc., to free up more space.
- Scroll down the list and look for entries like:
- Confirm Deletion: Click “OK” and then “Delete Files” when prompted to confirm.
- Wait for Completion: Disk Cleanup will proceed to remove the selected files. This process can take some time, depending on the amount of data being deleted.
Once completed, you will have significantly more free space on your drive. This method is safe because Disk Cleanup is specifically programmed to know which files can be removed without compromising system integrity.
Other Methods and Considerations
While Disk Cleanup is the primary tool, other features can also help manage disk space related to old installations:
- Storage Sense (Windows 10/11): This is a more automated approach to disk management.
- Go to Settings > System > Storage.
- Toggle “Storage Sense” to On.
- Click on “Configure Storage Sense or run it now”.
- Here, you can set Storage Sense to automatically clean up temporary files, empty your Recycle Bin, and, importantly, “Delete previous versions of Windows” after a set number of days (the default is usually after the rollback period, like 10 days). This is an excellent “set it and forget it” productivity feature.
- Manual Deletion (with extreme caution): Manually navigating to the
C:Windows.oldfolder and attempting to delete it is generally not recommended. Windows protects these system files, and direct deletion can lead to permission issues or leave behind stubborn remnants. More importantly, attempting to manually delete other system files without knowing their purpose can corrupt your operating system. Stick to Disk Cleanup or Storage Sense for safety. - Third-Party Cleaners (Use with Discretion): There are many third-party disk cleaning utilities available. While some are reputable, others can be overly aggressive or install unwanted software. For system files like
Windows.old, sticking to Microsoft’s built-in tools is always the safest and most reliable approach.
Best Practices Before Deletion
To ensure maximum safety and peace of mind before deleting any previous Windows installations, consider these best practices:
- Verify System Stability: As emphasized, spend ample time (at least 2-4 weeks) using your new Windows installation to ensure all applications, hardware, and settings are working perfectly.
- Back Up Important Data: Always, always, always back up your personal files (documents, photos, videos, critical project files) to an external drive, cloud storage, or network-attached storage (NAS). This is a fundamental aspect of digital security, irrespective of system updates. Tools like Windows File History or third-party backup solutions can automate this.
- Create a System Restore Point: Before running Disk Cleanup, consider manually creating a system restore point. This provides an additional layer of recovery, allowing you to revert system settings to a known good state if something unexpected happens (though it won’t restore
Windows.old). - Confirm No Need to Rollback: Make a conscious decision that you do not wish to revert to your previous Windows version. Once
Windows.oldis gone, that option is effectively closed.
By following these steps, you transform the act of deleting old files from a potential risk into a routine system maintenance task that contributes to a more efficient and secure computing environment.
Beyond Deletion: Maintaining a Healthy Windows System
Deleting previous Windows installations is just one step in maintaining a robust and efficient operating system. For sustained productivity and digital security, a broader approach to system health is essential.
Regular Maintenance Tips
Proactive maintenance prevents issues before they arise, minimizing downtime and extending the lifespan of your hardware.
- Regular Disk Cleanup (General): Beyond just old Windows installations, make it a habit to run Disk Cleanup periodically to remove temporary files, browser caches, and other accumulated junk. This helps keep your drive lean and performance optimal.
- Manage Startup Programs: Too many programs launching at startup can significantly slow down your boot time and consume valuable RAM. Use Task Manager (Ctrl+Shift+Esc) to disable unnecessary startup items, directly impacting system responsiveness and productivity.
- Update Drivers: Outdated drivers are a common cause of system instability and hardware malfunctions. Regularly check for and install the latest drivers for your graphics card, chipset, and other critical components, either through Windows Update, device manager, or manufacturer websites.
- Defragment/Trim Drives: For traditional Hard Disk Drives (HDDs), regular defragmentation is important for performance. For Solid State Drives (SSDs), ensure TRIM is enabled (Windows usually handles this automatically) to maintain write performance and longevity. Avoid defragmenting SSDs, as it’s unnecessary and can reduce their lifespan.
The Role of Backups and Recovery
Emphasizing again, comprehensive backups are the cornerstone of digital security and data recovery. Relying solely on Windows.old for recovery is insufficient.
- Full System Image Backups: For ultimate peace of mind, consider creating full system image backups periodically. Tools like Macrium Reflect Free or built-in Windows Backup and Restore (Windows 7 legacy, still present in 10/11) allow you to create an exact copy of your entire C: drive. If your system ever suffers a catastrophic failure, you can restore it to a previous working state, complete with your OS, applications, and files. This proactive approach safeguards your investment in software and your valuable time.
- Cloud Sync and Version History: For critical documents and creative projects, leverage cloud services like OneDrive, Google Drive, or Dropbox, which often provide automatic syncing and version history. This protects against accidental deletions or file corruption and offers accessibility across devices.
These measures contribute significantly to an organization’s or individual’s “digital security brand,” ensuring data integrity and minimizing reputational risk from data loss.
When to Consider a Clean Install vs. Upgrade
The debate between upgrading an existing Windows installation and performing a clean install is ongoing among tech enthusiasts.
- Upgrades: Generally convenient, preserving existing applications and settings. They rely on the
Windows.oldfolder for rollback. Good for users who prioritize minimal disruption. - Clean Installs: Involve formatting your drive and installing Windows from scratch. This often results in a “fresher,” faster system, free from accumulated bloat, old drivers, or registry inconsistencies. While more time-consuming initially (reinstalling apps, reconfiguring settings), it can lead to long-term performance benefits and fewer issues. A clean install inherently doesn’t create a
Windows.oldfolder (as there’s no “previous” OS to save).
For users experiencing persistent issues or those who desire absolute peak performance from their system, a clean install might be the better long-term productivity choice, even if it requires more initial effort. This decision aligns with optimizing your “tech stack” for maximum efficiency.

Conclusion
The question “Is it safe to delete previous Windows installations?” is met with a qualified yes. These files, particularly the Windows.old folder, serve a vital purpose by offering a grace period for rolling back to a previous operating system version. However, once you are confident in the stability and performance of your new Windows installation, and ideally, have a comprehensive backup strategy in place, these files become redundant space occupiers.
By utilizing Microsoft’s built-in tools like Disk Cleanup and Storage Sense, you can safely and effectively reclaim valuable disk space, contributing to a snappier, more efficient, and productive computing experience. This not only optimizes your system’s performance but also acts as a smart financial decision by extending the useful life of your existing storage. Remember, digital security, system stability, and smart resource management are intertwined. Always prioritize verifying your system’s health and securing your data before making significant changes, ensuring your journey through the ever-evolving tech landscape remains smooth and secure.
aViewFromTheCave is a participant in the Amazon Services LLC Associates Program, an affiliate advertising program designed to provide a means for sites to earn advertising fees by advertising and linking to Amazon.com. Amazon, the Amazon logo, AmazonSupply, and the AmazonSupply logo are trademarks of Amazon.com, Inc. or its affiliates. As an Amazon Associate we earn affiliate commissions from qualifying purchases.