In the rapidly evolving landscape of personal computing, the graphics processing unit (GPU) stands as the most critical component for gamers, creative professionals, and AI enthusiasts alike. Whether you are looking to bridge the gap toward 4K gaming, accelerate your video rendering workflows, or explore the frontiers of local machine learning, a graphics card upgrade is the single most impactful change you can make to your system. However, the process involves much more than simply swapping one piece of silicon for another. It requires a nuanced understanding of hardware synergy, power delivery, and software optimization.

This guide provides a comprehensive technical breakdown of how to upgrade your graphics card, ensuring that your investment translates into peak performance without compromising system stability.
1. Pre-Upgrade Essentials: Compatibility and Power Requirements
Before purchasing a new GPU, you must conduct a thorough audit of your existing hardware. A high-end graphics card is a demanding component that can easily overwhelm an aging or ill-equipped system.
Identifying Your Current Hardware and Bottlenecks
The first step is to assess your current CPU and monitor resolution. A “bottleneck” occurs when one component limits the potential of another. For instance, pairing a flagship NVIDIA RTX 4090 with a decade-old quad-core processor will result in the CPU struggling to feed data to the GPU, leaving a significant portion of the graphics card’s power unused. Tools like HWMonitor or CPU-Z can help you identify your current specifications. If you are gaming at 1080p, your CPU matters more; at 4K, the burden shifts almost entirely to the GPU.
Power Supply Unit (PSU) Limitations
The GPU is typically the most power-hungry component in a PC. You must verify two things: wattage and connectors. Check your PSU’s label for its total wattage; modern mid-range cards usually require 600W to 750W, while flagship cards can demand 850W to 1000W+. Furthermore, ensure your PSU has the necessary PCIe power cables (6-pin, 8-pin, or the newer 12VHPWR 16-pin connector). Using “daisy-chain” cables for high-draw cards is generally discouraged; separate cables from the PSU to the GPU provide cleaner, more stable power delivery.
Physical Clearance and Case Dimensions
Modern graphics cards have grown significantly in size. “Triple-fan” designs can exceed 330mm in length and occupy three or even four expansion slots in width. Measure the distance from the rear expansion slots of your case to any front-mounted fans or radiators. Additionally, check the “height” clearance to ensure the side panel of your case can close once the power cables are plugged in, as some cards are notably tall.
2. Selecting the Right Graphics Card for Your Needs
The market is currently a tri-polar landscape consisting of NVIDIA, AMD, and increasingly, Intel. Each offers specific technological advantages that go beyond raw frame rates.
Assessing Performance Tiers and Use Cases
Identify your primary objective. For 1080p competitive gaming (e.g., Valorant or Counter-Strike), mid-range cards like the RTX 4060 or RX 7600 are more than sufficient. For 1440p “sweet spot” gaming, look toward the RTX 4070 Super or RX 7800 XT. If your goal is 4K ultra-settings or professional 3D rendering in Blender or Octane, the high-end tier (RTX 4080/4090 or RX 7900 XTX) becomes a necessity.
NVIDIA vs. AMD vs. Intel: The Current Landscape
The choice of brand often comes down to specific feature sets.
- NVIDIA: Leads in Ray Tracing performance and features the most mature AI upscaling technology (DLSS 3.5 with Frame Generation). It is also the industry standard for AI development and CUDA-accelerated professional software.
- AMD: Generally offers better “raw” performance-per-dollar and more generous Video RAM (VRAM) allocations at lower price points. Their FSR (FidelityFX Super Resolution) works across all brands, making it a versatile choice.
- Intel: The newcomer with the Arc series, offering excellent AV1 encoding for streamers and competitive performance in the budget-to-mid-range sector.
VRAM and Future-Proofing
Video RAM (VRAM) is the dedicated memory your GPU uses to store textures and geometric data. As modern games utilize higher-resolution textures, 8GB of VRAM is becoming the absolute minimum. For a card intended to last 3–5 years, 12GB or 16GB is highly recommended to avoid stuttering in modern “AAA” titles or memory errors during complex video exports.
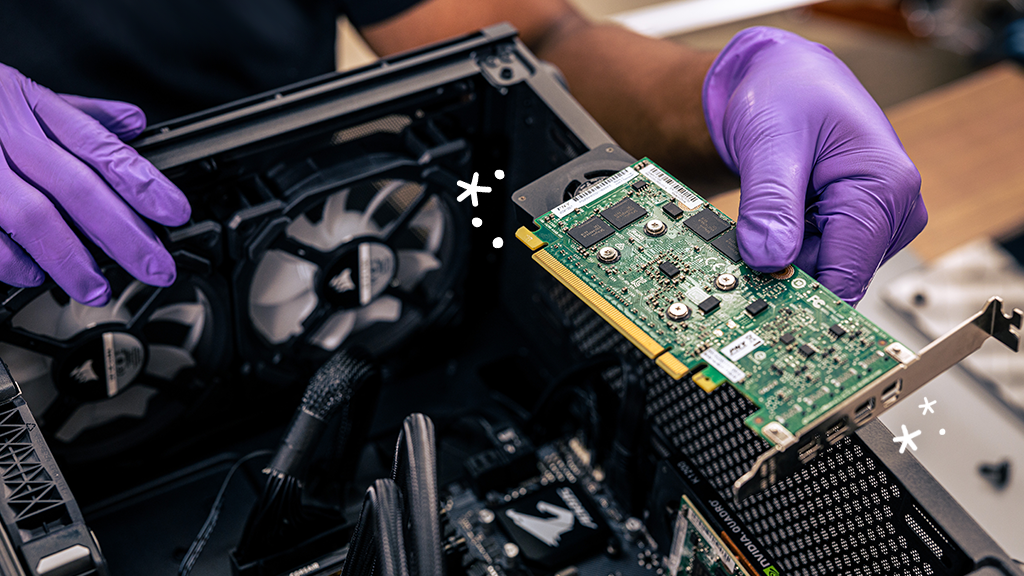
3. The Step-by-Step Installation Process

Once you have selected your card and verified compatibility, the physical installation requires a methodical approach to prevent electrostatic discharge (ESD) or mechanical damage.
Preparing the Software (DDU)
Before touching the hardware, it is a best practice to remove old drivers. Even if you are staying within the same brand (e.g., upgrading from an older NVIDIA card to a newer one), residual files can cause conflicts. Download a tool called Display Driver Uninstaller (DDU). Run it in Windows Safe Mode to completely wipe any traces of previous graphics drivers, then shut down your computer.
Handling Hardware Safely
Unplug your PC from the wall and press the power button for five seconds to discharge any remaining electricity in the capacitors. Open the side panel. To prevent ESD, touch a grounded metal object or wear an anti-static wrist strap. Unscrew the mounting screws holding the current GPU to the case chassis and gently press the plastic release latch on the PCIe slot. Pull the old card straight out.
Seating the Card and Connecting Power
Align your new graphics card with the top PCIe x16 slot (the one closest to the CPU, as it usually has the most bandwidth). Press down firmly until you hear a click from the latch. Re-secure the card to the chassis with screws to prevent “GPU sag,” which can damage the PCIe slot over time. Finally, plug in the PCIe power cables. Ensure they are fully seated; a loose 12VHPWR connector on newer cards can lead to overheating and cable failure.
4. Post-Installation Optimization and Driver Management
With the hardware installed, the final phase involves configuring the software environment to extract the maximum performance from your new component.
Installing Clean Drivers
Boot your system and navigate to the manufacturer’s website (NVIDIA, AMD, or Intel) to download the latest driver package. Avoid using Windows Update for this, as it often installs outdated or generic versions. During installation, select a “Fresh Install” if prompted. This ensures that the card’s firmware and the OS are communicating via the most efficient protocols.
Stress Testing and Temperature Monitoring
It is vital to verify that your card is performing as expected and that your cooling solution is adequate. Use benchmarking software like 3DMark or Superposition to put the card under a heavy load. While the benchmark runs, monitor temperatures using software like MSI Afterburner. Modern GPUs are designed to operate safely up to 80–85°C. If your temperatures exceed this, you may need to adjust your case’s fan curves or improve overall airflow.
Fine-Tuning with Software Tools
Modern GPUs offer significant headroom for optimization.
- Undervolting: Many enthusiasts choose to “undervolt” their cards, reducing the voltage while maintaining the same clock speed. This results in lower temperatures and power consumption with zero loss in performance.
- Resizable BAR: Ensure “Resizable BAR” (or Smart Access Memory for AMD) is enabled in your motherboard’s BIOS. This allows the CPU to access the entire GPU frame buffer at once, providing a 5–10% performance boost in supported titles.
5. Troubleshooting and Maximizing Longevity
Even with careful planning, technical hurdles can arise. Understanding how to diagnose these issues is key to a successful upgrade.
Common Installation Issues
If your PC fails to boot (No POST) after an upgrade, the most common culprits are improperly seated power cables or a GPU that isn’t fully clicked into the PCIe slot. If you see visual artifacts (flickering lines or strange colors), it could indicate a faulty driver or, in rare cases, defective VRAM. Always test with a different DisplayPort or HDMI cable first, as cables are more prone to failure than the cards themselves.
Maintenance and Airflow Management
To ensure your new graphics card lasts for years, maintain a dust-free environment. Use compressed air to clean the GPU heatsink every six months. Furthermore, ensure that your case has a positive pressure airflow configuration (more intake fans than exhaust fans) to minimize dust buildup. If you have purchased a particularly heavy card, consider a “GPU support bracket” to prevent the PCB from warping over time.
Upgrading a graphics card is more than a simple hardware swap; it is an exercise in system balancing. By meticulously verifying compatibility, choosing the right silicon for your specific workload, and following a disciplined installation and optimization routine, you can transform your computing experience. This transition not only enhances your current digital life but also prepares your system for the increasingly demanding technological requirements of the future.
aViewFromTheCave is a participant in the Amazon Services LLC Associates Program, an affiliate advertising program designed to provide a means for sites to earn advertising fees by advertising and linking to Amazon.com. Amazon, the Amazon logo, AmazonSupply, and the AmazonSupply logo are trademarks of Amazon.com, Inc. or its affiliates. As an Amazon Associate we earn affiliate commissions from qualifying purchases.