
In the dynamic world of computing, the performance and stability of your system are often dictated by the unsung heroes of software: drivers. For users leveraging NVIDIA graphics cards, keeping these drivers up-to-date isn’t merely a recommendation; it’s an essential practice for unlocking peak performance, ensuring compatibility with the latest applications, and safeguarding against potential vulnerabilities. Whether you’re a hardcore gamer seeking every frame per second, a professional designer relying on GPU acceleration, or simply a casual user wanting a smooth experience, understanding the process of updating your NVIDIA driver is paramount. This comprehensive guide will walk you through the why, what, and how, empowering you to maintain your system’s graphical prowess with confidence and ease.
The Critical Importance of Keeping Your NVIDIA Drivers Current
Many users overlook driver updates, considering them a chore or an unnecessary technicality. However, for NVIDIA GPU owners, neglecting driver maintenance can lead to a cascade of suboptimal experiences, ranging from minor annoyances to significant performance degradation and even system instability. Understanding the underlying reasons for regular updates transforms this perceived chore into a vital routine.
Why Regular Updates are Non-Negotiable
NVIDIA continuously develops and releases new driver versions. These updates are far from arbitrary; they are meticulously crafted to address a myriad of issues and introduce enhancements. Primarily, new drivers are often optimized for the latest game titles, ensuring that you get the best possible frame rates, visual fidelity, and stability when diving into new releases. This is particularly crucial in the fast-paced gaming industry where game developers and hardware manufacturers work in tandem to deliver cutting-edge experiences. Beyond gaming, these optimizations extend to professional applications like video editing suites, 3D rendering software, and CAD programs, where GPU acceleration is key to workflow efficiency. Without the latest drivers, your powerful NVIDIA hardware might not be fully utilized, leaving significant performance on the table.
Benefits Beyond Performance
While performance gains are a primary motivator, the advantages of current drivers extend much further. Enhanced Stability: Older drivers can sometimes conflict with new operating system updates or software, leading to crashes, freezes, or graphical glitches. New drivers often include bug fixes that iron out these compatibility issues, leading to a more stable and reliable computing experience. Imagine being in the middle of a critical project or an intense gaming session only for your display driver to crash; regular updates significantly reduce this risk. New Features and Technologies: NVIDIA frequently introduces new features and technologies through driver updates. This could include advancements in ray tracing, DLSS (Deep Learning Super Sampling), NVIDIA Reflex for reduced latency, or new filters and tools within GeForce Experience. Without the latest drivers, you might miss out on these innovative features that enhance visual quality, performance, or overall user experience. Improved Digital Security: Like any piece of software, drivers can contain vulnerabilities that malicious actors might exploit. NVIDIA actively identifies and patches these security flaws with new driver releases. Running outdated drivers leaves your system exposed to potential security breaches, making regular updates a crucial aspect of your digital security hygiene. It’s not just about performance; it’s about protecting your system and data.
Potential Risks of Outdated Drivers
Conversely, the risks associated with outdated drivers are substantial. The most immediate is suboptimal performance, where your expensive NVIDIA graphics card underperforms its capabilities. You might experience lower frame rates, stuttering, or visual artifacts in games and applications that should run smoothly. Beyond performance, system instability is a common complaint. This can manifest as frequent application crashes, “blue screen of death” (BSOD) errors related to display drivers, or even complete system freezes. Compatibility issues arise when new software, games, or even Windows updates are released, expecting modern driver support. An outdated driver might fail to render graphics correctly, display errors, or prevent certain applications from launching altogether. Finally, the security vulnerabilities mentioned earlier pose a silent but significant threat, potentially opening backdoors for malware or unauthorized access to your system. In essence, neglecting driver updates is akin to driving a high-performance car with worn-out tires and an overdue oil change – it might work, but not optimally or safely.
Essential Pre-Update Preparations
Before embarking on the driver update process, a few preparatory steps are advisable. These actions ensure a smooth installation, help identify the correct driver for your system, and provide a safety net in case anything goes awry. Skipping these steps might lead to unnecessary complications or the installation of incorrect drivers.
Identifying Your NVIDIA GPU
The first and most critical step is to know exactly which NVIDIA graphics card is installed in your system. NVIDIA produces a vast range of GPUs across different series (e.g., GeForce RTX 40 Series, GTX 16 Series, Quadro, etc.) and specific models (e.g., RTX 4090, GTX 1660 Super). Installing the wrong driver can lead to errors, instability, or the driver simply refusing to install.
There are several ways to identify your GPU:
- Device Manager (Windows): Right-click the Start button, select “Device Manager.” Expand “Display adapters.” Your NVIDIA GPU will be listed there.
- NVIDIA Control Panel: If you already have NVIDIA drivers installed, right-click on your desktop and select “NVIDIA Control Panel.” In the bottom-left corner, click “System Information.” Your GPU details will be listed under the “Display” tab.
- GeForce Experience: If installed, launch GeForce Experience, navigate to the “Drivers” tab, and your GPU model will be displayed.
- Physical Inspection: If your computer is a desktop and you’re comfortable opening it, you can physically inspect the graphics card itself, where the model name is usually printed.
Note down the exact model name, as you’ll need it for manual driver downloads.
Checking Your Current Driver Version
Knowing your current driver version is useful for two reasons:
- It confirms if an update is indeed available and necessary.
- It serves as a baseline if you ever need to revert to a previous version.
You can check your current driver version through:
- NVIDIA Control Panel: As described above, under “System Information,” the “Driver version” will be listed.
- GeForce Experience: In the “Drivers” tab, it will show your current driver version.
- Device Manager: Right-click on your NVIDIA GPU under “Display adapters,” select “Properties,” then go to the “Driver” tab. The “Driver Version” will be listed.
Compare this version with the latest available on NVIDIA’s website to determine if an update is required.
Creating a System Restore Point: Your Safety Net
While NVIDIA driver updates are generally reliable, unforeseen issues can sometimes occur. A new driver might conflict with existing software, or the installation process might encounter an error. A system restore point acts as a snapshot of your operating system’s state before the update. If any problems arise post-installation, you can revert your system to this restore point, effectively undoing the changes and allowing you to troubleshoot or try a different approach without losing personal files.
To create a system restore point in Windows:
- Search for “Create a restore point” in the Windows search bar and open it.
- In the “System Properties” window, ensure “Protection” is “On” for your system drive (usually C:). If not, select the drive, click “Configure,” and turn on system protection.
- Click the “Create…” button.
- Give the restore point a descriptive name (e.g., “Before NVIDIA Driver Update [Date]”).
- Click “Create” and wait for the process to complete.
This simple step provides immense peace of mind and can save you significant time and effort if something goes wrong.
Step-by-Step Guide to Updating Your NVIDIA Driver
With your preparations complete, you’re ready to proceed with the update. NVIDIA offers several methods, catering to different user preferences and technical proficiencies. Each method has its advantages, but they all lead to the same goal: an updated graphics driver.
Method 1: Utilizing NVIDIA GeForce Experience (Recommended for Gamers)
NVIDIA GeForce Experience is a comprehensive companion application designed to optimize your gaming experience, record gameplay, and most importantly, keep your drivers up-to-date. It’s the most straightforward method for many users.
Installing GeForce Experience
If you don’t already have GeForce Experience installed, you can download it directly from NVIDIA’s official website. It’s usually bundled with NVIDIA’s graphics drivers, so if you did an initial driver installation, you likely have it. Follow the on-screen instructions for installation.
Navigating the Driver Tab
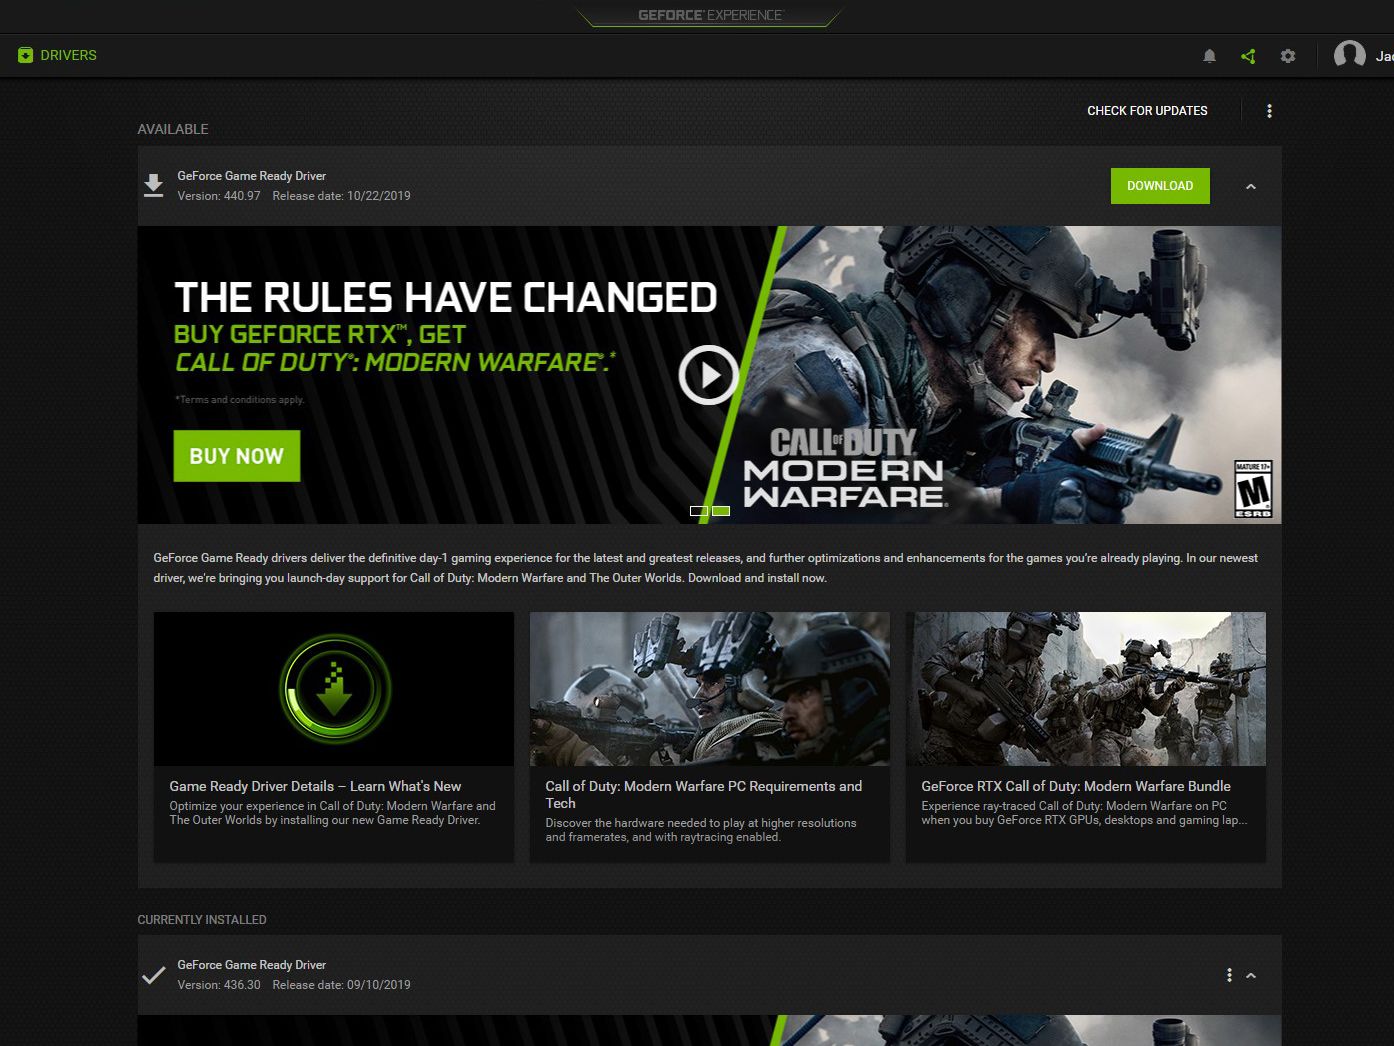
- Launch the GeForce Experience application.
- Click on the “Drivers” tab located in the top-left corner of the interface.
- GeForce Experience will automatically check for available driver updates. If a new driver is found, it will display a notification and show the “Game Ready Driver” or “Studio Driver” available for download.
Express vs. Custom Installation
Once a new driver is detected:
- Click the “Download” button.
- After the download completes, you’ll be presented with two installation options:
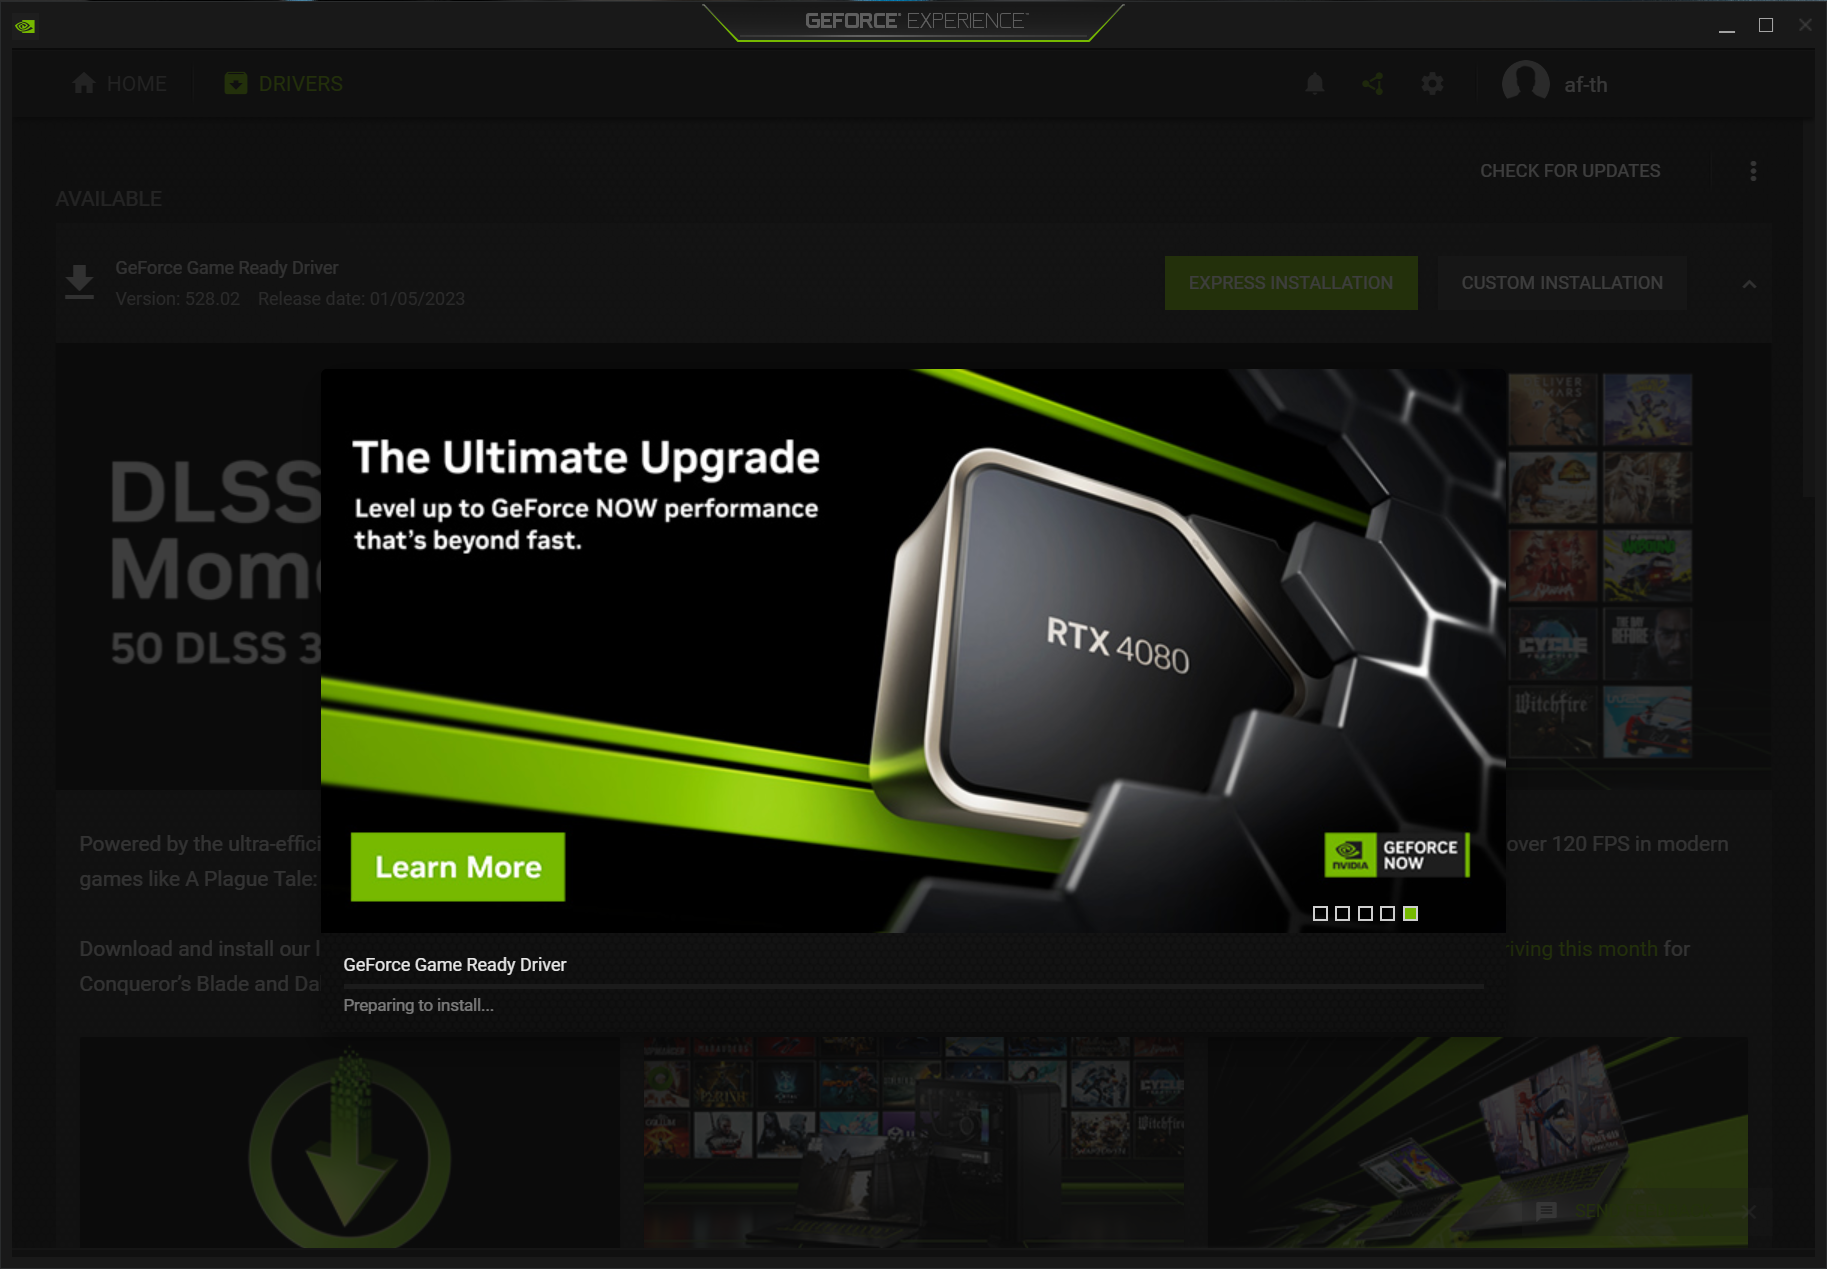
- Express Installation (Recommended): This option automatically installs the new driver and all necessary components without user intervention. It’s quick, simple, and suitable for most users. The screen may flicker or briefly go black during this process, which is normal.
- Custom Installation: This option allows you to select specific components to install (e.g., driver, PhysX, HD Audio Driver, GeForce Experience itself). More importantly, it provides an option to perform a “Clean Installation.” A clean installation removes all previous driver files and settings before installing the new ones, which can resolve lingering issues from older drivers. This is often recommended if you’ve been experiencing problems or after a major system change. For most routine updates, Express is fine, but if you want to be thorough or troubleshoot, Custom with a Clean Installation is superior.
Follow the on-screen prompts to complete the installation. Your system might require a restart afterwards.
Method 2: Updating via Device Manager (Windows Standard)
For users who prefer using built-in Windows tools or don’t want to install GeForce Experience, the Device Manager offers a basic way to check for and install driver updates. This method relies on Windows Update’s driver repository.
Accessing Device Manager
- Right-click on the Start button (or press
Windows Key + X). - Select “Device Manager” from the context menu.
Locating Your Display Adapter
- In the Device Manager window, expand the “Display adapters” section.
- Right-click on your NVIDIA graphics card (e.g., “NVIDIA GeForce RTX 4090”).
Automatic Driver Search
- From the right-click menu, select “Update driver.”
- Choose “Search automatically for updated driver software.”
- Windows will then search your computer and the internet (via Windows Update) for the latest compatible driver. If a newer driver is found, it will be downloaded and installed automatically.
- If Windows reports that “The best drivers for your device are already installed,” it means Windows Update doesn’t have a newer version available than what you currently have or what’s on NVIDIA’s official website. In this case, you might need to use Method 3 for the absolute latest version.
Method 3: Manual Driver Download from NVIDIA’s Website (For Advanced Users/Troubleshooting)
This method involves directly downloading the driver package from NVIDIA’s official website. It’s the most reliable way to get the very latest drivers, especially if you want a specific version or if other methods fail. It also allows for a “Clean Installation” more easily if GeForce Experience isn’t installed.
Visiting NVIDIA’s Official Driver Download Page
- Open your web browser and navigate to NVIDIA’s official driver download page. The URL is typically
www.nvidia.com/drivers.
Selecting Your Product Type and Series
- On the driver download page, you’ll see dropdown menus to filter for your specific GPU.
- Carefully select:
- Product Type: (e.g., GeForce, Quadro, NVS)
- Product Series: (e.g., GeForce RTX 40 Series, GeForce GTX 16 Series)
- Product: (e.g., RTX 4090, GTX 1660 Super) – this is where your identified GPU model comes in.
- Operating System: (e.g., Windows 11 64-bit, Windows 10 64-bit) – ensure it matches your system.
- Download Type: (Game Ready Driver is standard for gaming; Studio Driver for creative professionals needing stability and specific application optimizations).
- Click “Search.”
Downloading and Running the Installer
- NVIDIA will display the latest available driver matching your criteria.
- Review the driver details (version number, release date, supported products) to confirm it’s the correct one.
- Click “Get Download” and then “Download” again to save the executable file to your computer.
- Once the download is complete, locate the downloaded
.exefile and double-click it to start the installation process. - The installer will first extract the files. Then, you’ll be prompted to agree to the NVIDIA Software License Agreement.
- You’ll typically be given “Express” or “Custom” installation options, similar to GeForce Experience. For a thorough update, especially if you were experiencing issues, choose “Custom” and check the “Perform a clean installation” box. This ensures all old driver files are removed before the new ones are put in place, preventing potential conflicts.
- Follow the remaining on-screen instructions to complete the installation. A restart may be required.
Troubleshooting Common Update Issues
Even with careful preparation, occasional issues can arise during or after a driver update. Knowing how to troubleshoot these can save you a lot of frustration.
Performing a Clean Installation
As mentioned, a clean installation is often the solution to many driver-related problems. If you’re experiencing crashes, performance issues, or installation failures, performing a clean install can resolve conflicts left over from previous driver versions.
- Via NVIDIA Installer (Method 3): During a custom installation, tick the “Perform a clean installation” checkbox.
- Via Display Driver Uninstaller (DDU): For persistent issues or if you want to ensure absolutely every trace of old drivers is gone, a third-party tool like Display Driver Uninstaller (DDU) is highly recommended. DDU uninstalls all display driver remnants in safe mode, allowing for a truly fresh start. After running DDU, you can then proceed with a fresh installation using Method 3.
Resolving Installation Failures
If the driver installation fails, consider these steps:
- Disable Antivirus/Firewall: Temporarily disable your antivirus software and firewall during installation, as they can sometimes interfere.
- Run as Administrator: Right-click the installer executable and select “Run as administrator.”
- Check System Requirements: Ensure your system meets the minimum requirements for the new driver.
- Re-download: The download file might be corrupted. Try downloading the driver again.
- Windows Updates: Ensure your Windows operating system is fully up-to-date, as some driver updates depend on specific OS components.
Addressing Post-Update Instability
If your system becomes unstable, crashes, or exhibits strange behavior after an update:
- Reboot: A simple restart can often resolve minor post-installation glitches.
- Revert to Previous Driver:
- System Restore Point: If you created a system restore point, use it to revert your system to its previous state.
- Device Manager Rollback: In Device Manager, right-click your NVIDIA GPU, go to “Properties,” then the “Driver” tab, and click “Roll Back Driver” if the option is available.
- Install Older Driver: Download a slightly older, known-stable driver version from NVIDIA’s archive and install it manually.
- Check Event Viewer: Use Windows Event Viewer (search for “Event Viewer” in Start) to look for critical errors related to your display driver around the time of the issue. This might provide clues.
Verifying Your Driver Update and Maintaining Optimal Performance
Once the update is complete and your system is stable, a final verification step confirms everything is in order. Beyond that, adopting good practices ensures your NVIDIA graphics card continues to deliver its best.
Confirming the New Driver Version
To verify that the new driver has been successfully installed:
- NVIDIA Control Panel: Right-click on your desktop, select “NVIDIA Control Panel,” then go to “System Information” in the bottom left. Check the “Driver version.”
- GeForce Experience: Launch GeForce Experience and go to the “Drivers” tab. It will display the currently installed driver version.
- Device Manager: Right-click on your NVIDIA GPU under “Display adapters,” select “Properties,” and go to the “Driver” tab.
Ensure the version number matches the one you intended to install.
Best Practices for Driver Maintenance
- Regular Checks: Make it a habit to check for new drivers every few weeks, especially before launching a new AAA game or major software application. GeForce Experience can automate this.
- Read Release Notes: Before updating, quickly skim the driver release notes on NVIDIA’s website. They highlight new features, game optimizations, and important bug fixes. This can help you decide if an update is urgent or can wait.
- Consider Studio Drivers: If you primarily use your PC for professional creative work (e.g., video editing, 3D rendering), consider using NVIDIA’s Studio Drivers instead of Game Ready Drivers. Studio Drivers are designed for maximum stability and performance in creative applications, often undergoing more extensive testing with professional software suites.
- Monitor System Performance: After an update, pay attention to your system’s performance. If you notice unexpected drops in frame rate, crashes, or visual artifacts, it might indicate an issue with the new driver, and a rollback might be necessary.
- Keep Drivers on a Secondary Drive (Optional): For crucial or complex setups, some users keep a copy of their currently stable driver and the latest available driver on a separate drive or cloud storage. This ensures you always have access to a working version if internet access is limited or a new driver causes problems.
Updating your NVIDIA driver is a fundamental aspect of PC maintenance for anyone utilizing their graphics card to its potential. By understanding the importance, following the preparatory steps, choosing the appropriate installation method, and knowing how to troubleshoot, you empower yourself to consistently enjoy optimal performance, enhanced stability, and the latest features your NVIDIA GPU has to offer. This simple routine ensures your system remains a well-oiled machine, ready for any digital challenge you throw its way.
aViewFromTheCave is a participant in the Amazon Services LLC Associates Program, an affiliate advertising program designed to provide a means for sites to earn advertising fees by advertising and linking to Amazon.com. Amazon, the Amazon logo, AmazonSupply, and the AmazonSupply logo are trademarks of Amazon.com, Inc. or its affiliates. As an Amazon Associate we earn affiliate commissions from qualifying purchases.