In the rapidly evolving world of personal computing, the graphics card (also known as a GPU or Graphics Processing Unit) stands as one of the most vital components, especially for gamers, content creators, and professionals engaged in visually demanding tasks. Its role extends far beyond just displaying images; it’s a powerhouse responsible for rendering complex graphics, accelerating video processing, and even contributing to general computing tasks. While the hardware itself is a marvel of engineering, its true potential is unlocked and maintained through its accompanying software: the graphics drivers.
Regularly updating these drivers is not merely a recommendation; it’s a critical maintenance practice that can significantly impact your system’s performance, stability, and access to cutting-edge features. Neglecting driver updates can lead to a host of issues, from diminished frame rates in games and software glitches to security vulnerabilities and compatibility problems with new applications. This comprehensive guide will walk you through everything you need to know about keeping your graphics card drivers up to date, ensuring your system operates at its peak efficiency.
Why Keeping Your Graphics Card Drivers Updated Matters
Updating your graphics card drivers might seem like a tedious chore, but it’s a fundamental aspect of maintaining a healthy, high-performing computer. The benefits extend across various aspects of your computing experience, from boosting raw power to enhancing security.
Enhanced Performance and Stability
One of the primary reasons to update your drivers is the tangible performance improvements they often bring. Graphics card manufacturers like NVIDIA, AMD, and Intel constantly optimize their drivers to extract more power from their hardware. These optimizations can translate into higher frame rates in games, faster rendering times in creative applications, and smoother overall system responsiveness. Beyond raw performance, new drivers frequently include bug fixes that address stability issues, preventing crashes, freezes, and graphical artifacts that might have plagued older versions. For instance, a game struggling with stuttering on an older driver might run flawlessly after an update, thanks to specific game-ready optimizations.
Access to New Features and Technologies
The world of graphics technology is always advancing, introducing groundbreaking features designed to enhance visual fidelity and efficiency. Technologies such as NVIDIA’s DLSS (Deep Learning Super Sampling), AMD’s FSR (FidelityFX Super Resolution), and hardware-accelerated Ray Tracing all rely on up-to-date drivers to function correctly and deliver their intended visual impact. Without the latest drivers, your graphics card might physically possess the capabilities, but the software instruction set won’t be there to utilize them. Updating ensures you can experience the newest graphical innovations and get the most out of your hardware investment, making your games look better and run faster.
Improved Gaming Experience
For gamers, driver updates are practically mandatory. Game developers often work closely with GPU manufacturers to ensure their titles perform optimally on current hardware. “Game Ready” drivers are specifically released around the launch of major new titles, providing day-one optimizations that can dramatically improve performance and prevent common issues. These drivers often contain profiles that fine-tune how specific games interact with your GPU, leading to smoother gameplay, reduced latency, and fewer graphical glitches. An outdated driver could mean the difference between an enjoyable, immersive gaming session and a frustrating experience riddled with low frame rates and visual inconsistencies.
Critical Security Patches
While less frequently highlighted, graphics drivers can also contain security vulnerabilities. Like any other piece of software, they are susceptible to flaws that could potentially be exploited by malicious actors. Manufacturers periodically release updates that patch these security holes, protecting your system from potential threats. Keeping your drivers updated is therefore not just about performance, but also an integral part of your overall digital security strategy, safeguarding your data and system integrity.
Identifying Your Graphics Card and Current Driver Version
Before you can update your graphics card drivers, you first need to know which graphics card you have and what driver version is currently installed. This information is crucial for downloading the correct drivers from the manufacturer’s website. Installing the wrong drivers can lead to system instability or even prevent your display from working correctly.
Using Windows Device Manager
The most straightforward way to identify your graphics card and check its driver version on a Windows PC is through the Device Manager.
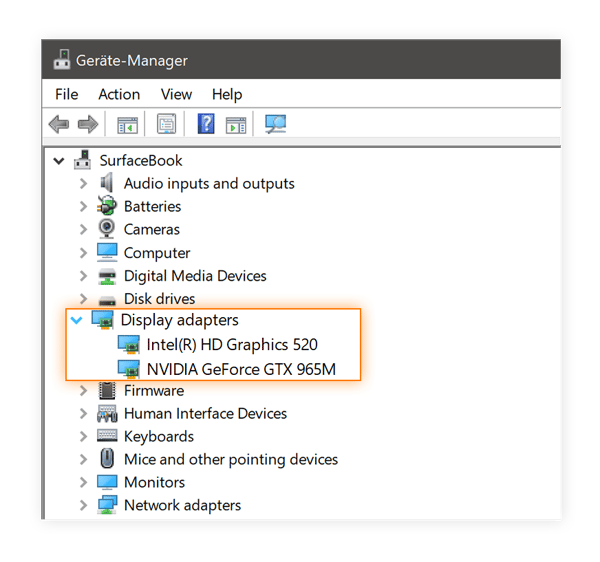
- Open Device Manager: Right-click on the Start button (or press
Win + X) and select “Device Manager” from the menu. - Expand Display Adapters: In the Device Manager window, locate and expand the “Display adapters” section. This will list your integrated graphics (if you have one, e.g., Intel HD Graphics) and your dedicated graphics card (e.g., NVIDIA GeForce RTX 3080 or AMD Radeon RX 6800 XT).
- Check Driver Details: Right-click on your dedicated graphics card and select “Properties.”
- View Driver Version: Go to the “Driver” tab. Here, you’ll see the “Driver Version” and “Driver Date.” Make a note of your graphics card model and the driver version.
Utilizing Manufacturer-Specific Software
If you’ve already installed the official software suites from your GPU manufacturer, these tools provide an even more detailed and user-friendly way to check your hardware and driver status.
- NVIDIA GeForce Experience: Open the application, go to the “Drivers” tab, and it will clearly show your current driver version and notify you if a new one is available.
- AMD Radeon Software: Launch the application, navigate to the “Home” or “System” tab, and it will display your graphics card model and current software version.
- Intel Driver & Support Assistant: This utility is designed specifically to detect Intel hardware and recommend the latest drivers.
Physical Inspection (If Necessary)
In rare cases, especially if your system isn’t booting or you’re building a new PC, you might need to physically inspect the graphics card. The manufacturer and model number are usually printed on a sticker directly on the card or its shroud. You’ll need to open your PC case to do this.
The Step-by-Step Process for Updating Your Graphics Drivers
Once you know your graphics card model, you’re ready to download and install the latest drivers. There are several methods, each with its own advantages.
Method 1: Manufacturer’s Official Website (Recommended)
This is generally the most reliable method, ensuring you get the latest, most stable drivers directly from the source.
- Identify Your GPU Manufacturer: (NVIDIA, AMD, or Intel).
- Navigate to the Driver Download Page:
- NVIDIA: Visit nvidia.com/drivers. Use the dropdown menus to select your Product Type, Product Series, Product, and Operating System.
- AMD: Visit amd.com/en/support. You can either use the auto-detect tool or select your product from the list.
- Intel: Visit intel.com/content/www/us/en/support/detect.html. Use the Intel Driver & Support Assistant or manually search.
- Download the Latest Driver: Once you’ve selected your specifics, the website will present you with the latest driver version. Download the installer file.
- Prepare for Installation:
- Close all open applications, especially games and graphic-intensive software.
- Consider performing a clean install (discussed below).
- Run the Installer: Locate the downloaded file (usually in your Downloads folder) and double-click it to start the installation process.
- Follow On-Screen Prompts: The installer will guide you through the process.
- For NVIDIA, you’ll usually choose between “Express Installation” (recommended for most users) or “Custom Installation” (which allows for a clean install option and selection of components).
- For AMD, the Radeon Software installer will offer similar options.
- Restart Your PC: After the installation is complete, it’s highly recommended to restart your computer to ensure all changes take effect properly.
Method 2: Using Manufacturer’s Software (Easier for Beginners)
If you have GeForce Experience (NVIDIA) or Radeon Software (AMD) installed, these applications streamline the update process.
- NVIDIA GeForce Experience: Open the application, click on the “Drivers” tab. If an update is available, it will show a “Download” button. Click it, then choose “Express Installation” or “Custom Installation.”
- AMD Radeon Software: Open the application. On the “Home” tab, it will usually indicate if a new recommended driver is available. You can also go to the “Settings” icon (gear) in the top right, then “System,” and under “Software & Driver,” click “Check for Updates.”
These tools simplify the process by automatically detecting your GPU and finding the correct driver.
Method 3: Windows Device Manager (Least Recommended for Major Updates)

While Windows Device Manager allows you to update drivers, it often pulls older, generic versions or ones already cached on your system. It’s not ideal for getting the latest, performance-optimized drivers directly from the manufacturer.
- Open Device Manager.
- Expand “Display adapters” and right-click on your graphics card.
- Select “Update driver.”
- Choose “Search automatically for updated driver software.” Windows will try to find and install a driver. If it says “The best drivers for your device are already installed,” it simply means Windows couldn’t find a newer certified driver through its own channels, not necessarily that you have the latest available from the manufacturer.
Clean Installation vs. Standard Installation
When installing new drivers, you’ll often have the option for a “Standard” or “Clean” installation.
- Standard Installation: This simply overwrites the existing drivers with the new ones. It’s usually fine, but sometimes old driver files can conflict with new ones, leading to issues.
- Clean Installation: This uninstalls the old drivers completely before installing the new ones. It’s like starting with a fresh slate, minimizing potential conflicts. Most manufacturer installers (NVIDIA, AMD) offer a “Perform a clean installation” checkbox during custom installation.
For a truly thorough clean install, especially when switching between GPU brands (e.g., from AMD to NVIDIA) or troubleshooting persistent driver issues, consider using a third-party utility called Display Driver Uninstaller (DDU).
- Download DDU: Get it from a reputable source like Guru3D.
- Boot into Safe Mode: This is crucial to prevent Windows from loading any graphics drivers.
- Run DDU: Select your GPU manufacturer and click “Clean and restart.”
- Install New Drivers: After restarting, boot normally and install the new drivers from the manufacturer’s website.
DDU is a powerful tool but should be used carefully and only when necessary. For routine updates, the clean install option within the manufacturer’s driver installer is usually sufficient.
Post-Update Verification and Troubleshooting
After updating your graphics drivers, it’s essential to verify that the update was successful and that your system is functioning correctly. Occasionally, issues can arise, and knowing how to address them is key.
Confirming the Update
- Check Device Manager: Revisit the “Display adapters” section in Device Manager and check the “Driver Version” under the “Driver” tab for your graphics card. It should reflect the newly installed version.
- Manufacturer’s Software: Open NVIDIA GeForce Experience or AMD Radeon Software. These applications usually show the current driver version prominently and confirm the successful installation.
Testing Performance
The best way to confirm the benefits of the update is to test your system with demanding applications.
- Run your favorite games: Pay attention to frame rates, smoothness, and visual quality. Use in-game benchmarks if available.
- Execute professional applications: If you use software for video editing, 3D rendering, or CAD, open them and perform some tasks to ensure stability and observe any performance gains.
- Benchmark tools: Run synthetic benchmarks like 3DMark or Heaven Benchmark to get objective scores you can compare with previous runs.
Common Issues and Solutions
Even with a clean installation, problems can sometimes occur. Here are some common issues and their troubleshooting steps:
-
Driver Installation Failure:
- Check internet connection: Ensure you have a stable connection during download.
- Disable antivirus/firewall temporarily: Sometimes security software can interfere with the installation process.
- Redownload the driver: The downloaded file might be corrupted.
- Run installer as administrator: Right-click the installer and select “Run as administrator.”
- Perform a DDU clean uninstall: If all else fails, a deep clean with DDU often resolves persistent installation problems.
-
Display Issues (Black Screen, Flickering, Wrong Resolution):
- Boot into Safe Mode: If your screen is black or unusable, restart your PC and press F8 (or Shift + Restart in Windows 10/11) to access the Advanced Startup Options. Select “Safe Mode” or “Enable low-resolution video.”
- Roll Back Driver: In Safe Mode, go to Device Manager, right-click your graphics card, select “Properties,” and under the “Driver” tab, click “Roll Back Driver.” This will revert to your previous stable driver.
- Reinstall with DDU: If rolling back doesn’t work, uninstall the problematic drivers using DDU and then attempt a fresh installation of an older, known-stable driver version.
- Check Cables: Ensure your display cables (HDMI, DisplayPort, DVI) are securely connected.
-
Performance Degradation or New Bugs:
- While rare, sometimes a new driver can introduce new bugs or reduce performance in specific scenarios.
- Roll Back Driver: The quickest solution is to roll back to the previous driver version using Device Manager.
- Check online forums: Look for similar reports on forums like Reddit (r/nvidia, r/amd), manufacturer forums, or gaming communities. Others might have found solutions or confirmed the issue.
- Report the bug: Inform the manufacturer about the issue so they can address it in future updates.
Best Practices for Graphics Driver Maintenance
Maintaining your graphics drivers shouldn’t be a one-time event. Establishing good habits can keep your system running smoothly and prevent future headaches.
Regular Checks
How often should you check for updates? There’s no single perfect answer, but a good rule of thumb is:
- Gamers: Check monthly, or whenever a major new game is released. Game Ready drivers are crucial for day-one performance.
- Content Creators/Professionals: Check every 1-3 months, or when using new software that might benefit from driver optimizations.
- General Users: Every 3-6 months is usually sufficient, primarily for stability and security updates.
Utilizing manufacturer software like GeForce Experience or Radeon Software can automate this process by notifying you when updates are available.
Backing Up Your System
Before undertaking any major driver update or system change, it’s always wise to create a system restore point or a full system backup. This provides a safety net, allowing you to easily revert your entire system to a previous stable state if something goes wrong. Windows’ built-in System Restore feature is simple to use for this purpose.
Stable vs. Beta Drivers
Graphics drivers often come in two main categories:
- Stable (Recommended/WHQL Certified) Drivers: These have undergone extensive testing and are recommended for most users due to their reliability and stability.
- Beta Drivers: These are pre-release drivers, often containing experimental features, early game optimizations, or fixes for very specific issues. They are less thoroughly tested and carry a higher risk of introducing new bugs or instability.
- When to use Stable: Always, for maximum reliability.
- When to use Beta: Only if you’re an enthusiast looking for bleeding-edge performance, troubleshooting a very specific issue that a beta claims to fix, or if directed by support. Always proceed with caution and be prepared to roll back.
Keeping Other System Drivers Updated
While graphics drivers are paramount for visual performance, remember that your graphics card doesn’t operate in isolation. Its performance is also influenced by other system components and their drivers.
- Chipset Drivers: Update your motherboard’s chipset drivers from your motherboard manufacturer’s website (or Intel/AMD’s site). These are crucial for overall system stability and communication between components.
- BIOS/UEFI Firmware: Periodically check for BIOS updates. These can improve hardware compatibility, stability, and even offer performance enhancements. Be extremely cautious when updating BIOS, as a failure can brick your motherboard.

Conclusion
Updating your graphics card drivers is a simple yet profoundly impactful maintenance task that contributes significantly to the overall health, performance, and security of your PC. By following the steps outlined in this guide – identifying your hardware, choosing the right method for installation, and performing post-update verification – you can ensure your system is always running optimally, delivering the best possible experience for gaming, creative work, and everyday computing. Make regular driver maintenance a core part of your tech routine, and you’ll reap the benefits of a consistently high-performing machine.
aViewFromTheCave is a participant in the Amazon Services LLC Associates Program, an affiliate advertising program designed to provide a means for sites to earn advertising fees by advertising and linking to Amazon.com. Amazon, the Amazon logo, AmazonSupply, and the AmazonSupply logo are trademarks of Amazon.com, Inc. or its affiliates. As an Amazon Associate we earn affiliate commissions from qualifying purchases.