
YouTube TV has revolutionized the way many households consume live and on-demand television. Its comprehensive package of channels, user-friendly interface, and robust cloud DVR capabilities offer an unparalleled streaming experience. However, with the convenience of automatically recording virtually every show from your favorite channels, users can sometimes find their library growing unwieldy. While YouTube TV boasts unlimited cloud DVR storage, there are valid reasons why you might want to stop recording certain shows, delete past episodes, or simply curate your library more effectively. This guide delves into the specifics of managing your recordings on YouTube TV, ensuring your viewing experience remains streamlined and tailored to your preferences.
Understanding YouTube TV’s DVR System
Before diving into the “how-to,” it’s crucial to grasp the fundamental mechanics of YouTube TV’s Digital Video Recorder (DVR) system. Unlike traditional cable boxes with finite hard drive space, YouTube TV operates entirely in the cloud, offering a unique approach to recording and playback.
The Cloud DVR Advantage
YouTube TV’s DVR is a fully cloud-based service. This means recordings aren’t stored on your local device but on Google’s servers. This architecture brings several significant advantages:
- Accessibility: Your recordings are available from any device where you can access YouTube TV – whether it’s your smart TV, smartphone, tablet, computer, or streaming stick – as long as you’re logged into your account.
- No Storage Limits: Perhaps the most celebrated feature is its “unlimited” storage capacity. You don’t need to worry about deleting old shows to make space for new ones, a common frustration with traditional DVRs.
- Simultaneous Recordings: The cloud infrastructure allows for an unlimited number of simultaneous recordings. You’ll never encounter a conflict where you can’t record two shows airing at the same time.
Unlimited Storage, But Not Forever
While the storage is unlimited, it’s important to understand a key caveat: recordings are kept for a maximum of nine months. After this period, they automatically expire and are removed from your library. This duration is generally sufficient for most users to catch up on their favorite series or rewatch specific events. However, if you intend to archive content indefinitely, YouTube TV’s DVR isn’t designed for that purpose. Additionally, some on-demand versions of shows might become available and replace your DVR recording, especially if the on-demand version has unskippable ads. YouTube TV prioritizes the version of the content that offers the best user experience (e.g., ad-free, or a complete season rather than individual recordings).
How Recordings Are Managed Automatically
When you add a show, movie, or sports team to your YouTube TV library, the system automatically records all airings of that content, including new episodes, reruns, and even different airtimes of the same episode. This “add to library” function is essentially your recording trigger. The system then intelligently presents you with the best available version, allowing you to easily navigate through episodes or airings. This automation is incredibly convenient but can sometimes lead to a cluttered library if you’ve added many items over time.
Stopping Current and Future Recordings
The primary reason users seek to “stop recording” on YouTube TV is often to either remove unwanted shows from their library or prevent future episodes of a no-longer-watched series from being added. The process is straightforward, focusing on managing your “Library.”
Deleting Individual Recordings from Your Library
While you can’t manually “delete” a single recorded episode in the traditional sense due to the cloud DVR’s architecture (it’s not like deleting a file from a hard drive), you can remove your access to it by taking the show out of your library. The actual recording persists in the cloud for its nine-month duration or until its on-demand counterpart becomes the primary viewing option, but it will no longer appear in your library.
To remove an individual episode or movie from your view:
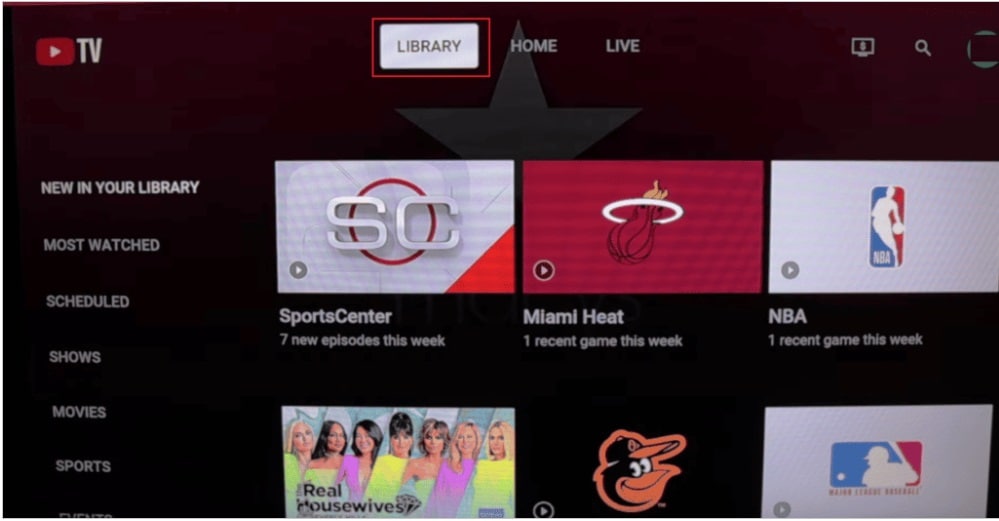
- Navigate to your Library: Access the “Library” tab from the YouTube TV main menu.
- Find the Content: Browse or search for the specific show or movie you wish to remove.
- Select the Item: Click or tap on the show’s tile to open its detail page.
- Remove from Library: On the detail page, you will see a button, usually labeled “Added to Library” or a checkmark icon. Clicking this will change it to an “Add to Library” button (or a plus sign icon). This action effectively removes all current and future recordings of that particular show from your personalized library view.
Important Note: Removing a show from your library affects all episodes and future airings of that particular program. You cannot selectively remove a single episode of a series while keeping others unless you’re dealing with a standalone movie or special that isn’t part of a recurring series.
Managing Series Recordings (Stopping Future Episodes)
If you’ve decided you no longer want to follow a particular series, stopping its future recordings is also accomplished by removing it from your library. This is the most common use case for “stopping recordings.”
To stop a series from recording new episodes:
- Access Your Library: Go to the “Library” section within YouTube TV.
- Locate the Series: Find the TV series you want to stop recording. It will usually be listed under “Shows” or “Scheduled.”
- Open the Series Details: Click on the series title or artwork to open its dedicated page.
- Remove from Library: On the series detail page, look for the “Added to Library” button (or a checkmark icon). Click it. The button will change to “Add to Library” (or a plus sign icon), indicating that the series is no longer in your library.
Once you perform this action, YouTube TV will cease to record any new or re-aired episodes of that series for you. Any episodes that were previously recorded and within the nine-month retention window will also disappear from your library.
The “Remove from Library” vs. “Don’t Record” Distinction
It’s important to clarify that YouTube TV doesn’t have a distinct “Don’t Record” button in the same way traditional DVRs might. The act of “stopping recording” is synonymous with “removing a show from your library.”
- “Add to Library”: This is your primary control. When you “add to library” a show, YouTube TV automatically records all available airings of that show for the next nine months.
- “Remove from Library”: When you “remove from library” a show, you are telling YouTube TV to stop recording new episodes for you and to remove all existing recordings of that show from your personalized library view. The underlying cloud recording for other users or general availability might still exist, but it won’t be accessible to you as part of your DVR library.
This design simplifies management, as there’s only one toggle to worry about for any given show. If it’s in your library, it’s being recorded (and accessible). If it’s not, it isn’t.
Advanced Recording Management and Best Practices
While YouTube TV’s DVR is largely hands-off, understanding some nuances can help you optimize your experience, especially regarding content availability and managing potential frustrations.
Prioritizing Your Recording Space (Though Unlimited)
Even with unlimited storage, a cluttered library can make it difficult to find what you want to watch. Regularly reviewing and curating your library is a good practice.
- Scheduled Recordings: Pay attention to the “Scheduled” section in your library. This shows you upcoming recordings. If you see shows here that you’ve lost interest in, it’s a good reminder to remove them from your library.
- Expired Content: While YouTube TV automatically removes expired content after nine months, you might want to remove shows you’ve finished or abandoned sooner to keep your library cleaner.
Troubleshooting Recording Issues
Occasionally, users might encounter situations where a show they expected to be recorded isn’t in their library, or a recording seems to be missing. Here’s a quick troubleshooting guide:
- Check “Added to Library” Status: First, ensure the show is actually “Added to Library.” Navigate to the show’s detail page and confirm the button says “Added to Library” or displays a checkmark.
- Confirm Airing: Double-check if the show actually aired at the expected time and on the expected channel. Schedule changes or pre-emptions can occur.
- Content Restrictions: Very rarely, certain contractual agreements might prevent a show from being recorded via DVR, or dictate a shorter retention period. These are exceptions but can happen.
- Internet Connection: While recordings are cloud-based, a poor internet connection on your device might hinder the display of your library or playback, but won’t prevent the cloud recording itself.
- YouTube TV Status: Check official YouTube TV social media channels or status pages for any widespread service disruptions.
If you’ve confirmed the show was in your library, aired, and there are no service issues, and the recording is still missing, contacting YouTube TV support is the next step.
Understanding Content Availability and Expiration
The nine-month expiration policy is a critical detail. This means if you want to rewatch a show beyond that window, you’ll need to find an alternative.
- On-Demand Versions: Many shows become available as on-demand content from the network after airing. These might have different ad experiences or expiration dates set by the content provider. YouTube TV often defaults to showing you the on-demand version if it’s available and offers a better experience than your DVR copy (e.g., higher quality, ad-free).
- Purchasing Episodes: For content you wish to keep indefinitely, consider purchasing individual episodes or seasons through platforms like YouTube, Google TV, or other digital storefronts. This is outside the YouTube TV subscription but offers permanent ownership.
- Network Apps: Many networks (e.g., ABC, FOX, AMC) offer their own streaming apps where you can often watch recent episodes on demand, sometimes by linking your YouTube TV subscription.
Beyond Just Stopping: Optimizing Your YouTube TV Experience
Managing recordings is just one facet of maximizing your YouTube TV subscription. A well-curated library contributes significantly to a better overall viewing experience.
Utilizing Live vs. Recorded Content
YouTube TV blurs the line between live and recorded content. When you select a show from your library, YouTube TV prioritizes playing the most appropriate version.
- If a show is currently airing live, you’ll usually be given the option to “Watch Live” or “From Library.”
- If a show just ended, the recorded version will typically be available almost instantly.
- For ongoing series, you can easily jump to the latest episode or browse all recorded episodes.
Understanding this fluidity helps you decide whether to tune in live or rely on your DVR. For major live events like sports or news, live viewing is often preferred. For episodic content, the DVR offers flexibility to watch at your leisure and skip commercials.
Customizing Your Live Guide and Recommendations
While not directly about stopping recordings, customizing your live guide and personalized recommendations indirectly helps reduce the impulse to “record everything.”
- Customizing Live Guide: You can reorder channels in your live guide or hide channels you never watch. This makes navigating live TV more efficient.
- “Thumbs Up/Down” for Recommendations: Use the “thumbs up” and “thumbs down” features on shows and movies to train YouTube TV’s recommendation engine. This helps the service suggest content you’re more likely to enjoy, potentially reducing the need to add every single show you hear about to your library.
Device Compatibility and Accessing Recordings
Your recordings are universally accessible across all devices supported by YouTube TV. This includes smart TVs, streaming devices (Roku, Apple TV, Amazon Fire TV, Chromecast), gaming consoles, web browsers, and mobile devices (iOS and Android).
- Consistent Experience: The process of adding or removing shows from your library is consistent across all these platforms. An action taken on your phone will immediately reflect on your TV and vice versa.
- Offline Viewing: Currently, YouTube TV does not offer an official way to download DVR recordings for offline viewing. An internet connection is always required to stream your library content.
In conclusion, “stopping recording” on YouTube TV is an intuitive process of managing your library. By understanding the cloud DVR’s capabilities, its nine-month retention policy, and how the “Add to Library” function serves as your primary control, you can effortlessly curate your content and ensure your streaming experience remains clean, organized, and perfectly aligned with your viewing habits. Regularly reviewing your library and making conscious choices about what you keep can transform your YouTube TV into a truly personalized entertainment hub.
aViewFromTheCave is a participant in the Amazon Services LLC Associates Program, an affiliate advertising program designed to provide a means for sites to earn advertising fees by advertising and linking to Amazon.com. Amazon, the Amazon logo, AmazonSupply, and the AmazonSupply logo are trademarks of Amazon.com, Inc. or its affiliates. As an Amazon Associate we earn affiliate commissions from qualifying purchases.