
The evolution of the Windows operating system has always been marked by shifts in user interface, security protocols, and installation workflows. When Windows 8 was introduced, it brought a radical departure from the traditional desktop-centric environment, ushering in the “Modern UI” and a more stringent approach to installation licensing. One of the most common hurdles encountered by system administrators, PC enthusiasts, and developers is the mandatory product key prompt that appears at the very beginning of the installation process. Unlike its predecessor, Windows 7, which allowed users to skip this step and enter the key later, Windows 8 (and its successor, 8.1) typically halts the installation until a valid 25-character string is provided.
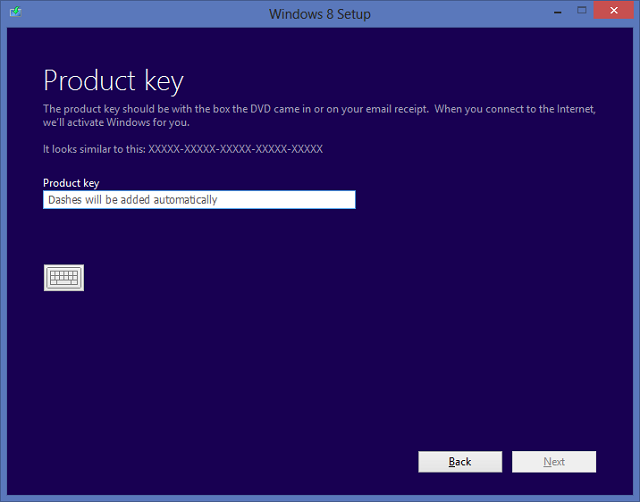
Understanding how to bypass this requirement is not merely a matter of convenience; it is a critical skill for technical troubleshooting, testing software compatibility in a clean environment, or recovering data from a system where the original license sticker has faded or been lost. This guide provides a deep dive into the technical methodology of modifying installation media to bypass the product key prompt, ensuring a seamless deployment process.
1. Understanding the Windows 8 Installation Architecture
To effectively bypass the product key prompt, one must first understand how the Windows Setup engine processes licensing information. Unlike many applications that check for a license post-installation, Windows 8 was designed to integrate the product key into the initial configuration phase. This was part of Microsoft’s effort to reduce software piracy and ensure that users were installing the correct edition (Core, Pro, or Enterprise) intended for their specific license.
Why Microsoft Mandates the Product Key
In previous iterations, the installer would default to a “trial” mode if no key was provided. However, Windows 8 uses the product key to determine which image (WIM file) to extract from the installation media. Because the standard ISO often contains multiple editions of the operating system, the key serves as a filter. Without it, the installer doesn’t “know” which version to install, resulting in the hard stop that users encounter.
The Critical Distinction Between Installation and Activation
It is vital to distinguish between bypassing the installation prompt and activating the software. The method described in this tutorial allows for a “clean” installation, granting access to the desktop and system features. However, it does not bypass the legal requirement for a license. Once the OS is installed, it will operate in a limited state—often disabling personalization settings and displaying a persistent watermark—until a genuine product key is entered. For technicians, this “grace period” is essential for hardware testing and driver verification before committing a retail license to the machine.
2. The Technical Solution: Leveraging the Edition Configuration (ei.cfg) File
The most reliable and “clean” way to circumvent the key prompt is by utilizing a hidden feature within the Windows installation media: the Edition Configuration file, or ei.cfg. This is a specific text-based configuration file that tells the Windows Setup engine exactly how to behave regarding licensing and edition selection.
What is the Edition Configuration (ei.cfg) File?
The ei.cfg file is a small script located within the sources folder of the Windows installation media. By default, this file is often absent from retail ISOs, which triggers the setup to ask the user for a key to determine the edition. By manually creating and inserting this file, we can force the installer to display a menu of available editions or to default to a specific version, effectively skipping the mandatory key entry screen.
Preparing Your Installation Media
Before modifying the file structure, you need a bootable version of the Windows 8 or 8.1 installation media. This can be an ISO file downloaded from the Microsoft website or a physical DVD that has been “ripped” into an image format. You will also need a tool to write these files to a USB flash drive, such as Rufus or the Windows USB/DVD Download Tool. Modification is easiest on a USB drive because it allows for direct file manipulation without needing to re-compile a disk image.
3. Step-by-Step Guide to Bypassing the Prompt
Once you have your installation files ready on a USB drive or an accessible folder on your hard drive, follow these precise technical steps to modify the installation behavior.
Creating the Modification File
The ei.cfg file must be authored with specific syntax to be recognized by the Windows Setup engine.
- Open a plain text editor, such as Notepad (do not use Word or any rich-text editor, as these add hidden formatting).
- Type or paste the following lines into the document:
[EditionID]


<p style="text-align:center;"><img class="center-image" src="https://www.nextofwindows.com/wp-content/uploads/2012/08/Windows-8-Activate-Window1.png" alt=""></p>


[Channel]
Retail
[VL]
0
The [EditionID] field is left blank to ensure the installer allows you to choose which version you want to install during the setup process. The [Channel] can be set to “Retail” or “OEM,” and [VL] (Volume License) is set to 0 (False) for standard versions.
Injecting the File into the Installation Source
After creating the text, saving it correctly is the most crucial step.
- In Notepad, go to File > Save As.
- Navigate to the
sourcesfolder within your Windows 8 installation files. - Set the “Save as type” dropdown to All Files (.). This prevents Notepad from adding a
.txtextension. - Name the file exactly
ei.cfgand click save.
If you are working with an ISO file directly, you will need a utility like UltraISO or AnyISO to “inject” the file into the sources directory of the image before burning it to a disc or writing it to a USB.
Executing the Modified Installation
With the ei.cfg file in place, boot your computer from the modified USB or DVD. When the installation starts, the behavior will be noticeably different:
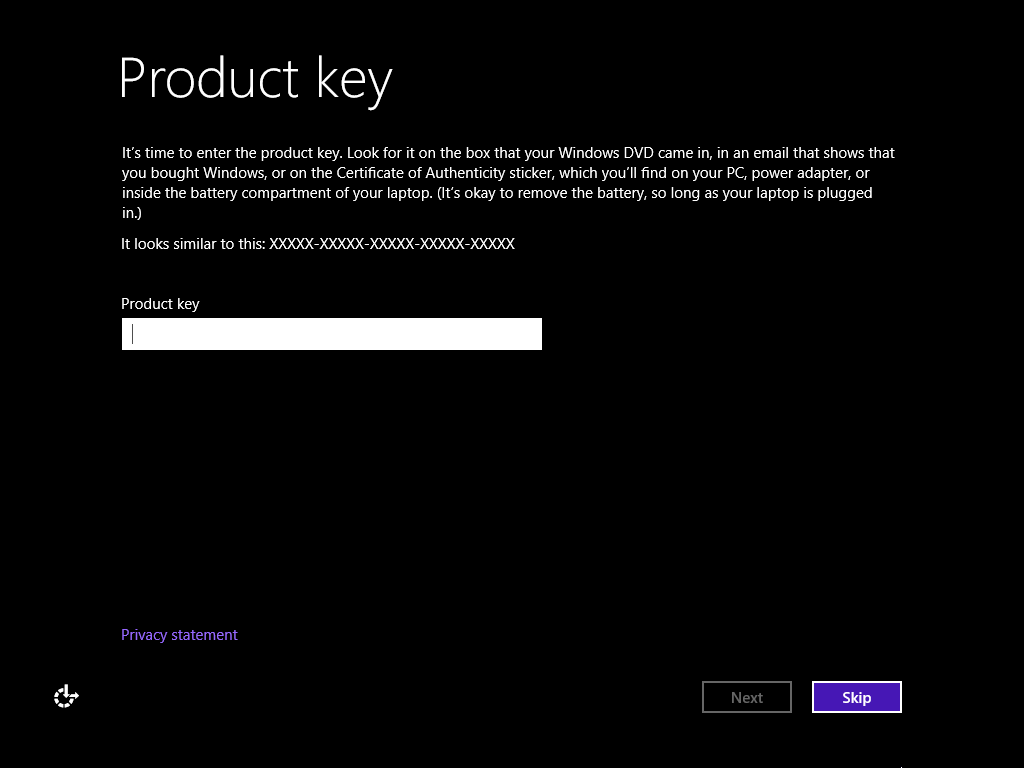
- The “Enter your product key” screen will still appear, but it will now feature a “Skip” or “Next” button that was previously hidden or disabled.
- In some configurations, the installer will skip the key screen entirely and present a list of Windows 8 editions (e.g., Windows 8 Pro, Windows 8 Core).
- Select your desired edition and proceed with the installation as normal.
4. Troubleshooting and Post-Installation Workflow
While the ei.cfg method is the industry standard for technicians, certain variables can affect its success. Understanding the nuances of hardware-embedded keys and post-install activation is key to a professional deployment.
Handling BIOS-Embedded Keys (OA 3.0)
Modern laptops and pre-built desktops (from brands like Dell, HP, or Lenovo) often come with a Windows 8 key embedded directly into the BIOS/UEFI firmware (OEM Activation 3.0). In these cases, the installer may automatically read the embedded key and install the corresponding version without asking you for anything. If you are trying to install a different version than what the BIOS dictates (e.g., installing Pro on a machine that came with Core), the ei.cfg file is mandatory to override the firmware’s instruction.
Common Errors with ei.cfg
If the prompt still appears without a skip option, double-check the following:
- File Extension: Ensure the file is not named
ei.cfg.txt. View hidden file extensions in Windows Explorer to verify. - File Location: The file must be in the
sourcesfolder. Placing it in the root directory will have no effect. - Syntax: Ensure there are no typos in the brackets or headers. The Windows Setup engine is sensitive to formatting.
Activating Windows After the Fact
Once the installation is complete and you have reached the desktop, you must eventually activate the OS. To do this, hover over the bottom-right corner to bring up the Charms bar, click Settings > PC Settings > Activate Windows. Alternatively, you can use the Command Prompt (Admin) and use the slmgr.vbs tool:
slmgr.vbs /ipk YOUR-PRODUCT-KEY-HERE(to install the key)slmgr.vbs /ato(to activate the key online)
5. The Strategic Importance of Custom Installations in Modern Computing
Mastering the ability to bypass installation hurdles is a hallmark of an advanced user. In a professional tech environment, the ability to deploy an OS without immediate licensing provides the flexibility needed for rapid prototyping and system recovery.
Maintaining System Performance and Testing
For software developers and QA testers, the ability to quickly spin up a Windows 8 environment to test legacy app compatibility is invaluable. By skipping the product key, testers can verify that their applications run correctly on a vanilla install before using a precious activation seat. Furthermore, this method is excellent for “clean installs,” which remove the bloatware often included by manufacturers, thereby optimizing system performance.
Security and Digital Integrity
From a digital security perspective, using official ISOs and modifying them yourself with an ei.cfg file is significantly safer than downloading “pre-activated” or “cracked” versions of Windows from third-party sources. Modified ISOs from the internet often contain backdoors or malware. By using the method outlined in this guide, you maintain the integrity of the original Microsoft binaries while gaining the professional flexibility required to manage your software deployment on your own terms.
In conclusion, while Windows 8 introduced more rigid installation requirements, the underlying architecture remains accessible to those with the right technical knowledge. The ei.cfg modification is a powerful, elegant, and standard-compliant way to regain control over the installation process, ensuring that the technology serves the user’s needs rather than acting as a barrier to productivity.