
In an increasingly digital world, the way we manage and transfer money has been fundamentally transformed by innovative financial technologies. Among the most prominent players in this evolution is Venmo, a peer-to-peer (P2P) payment application that has become synonymous with instant, social, and seamless money transfers. Far more than just a simple transaction tool, Venmo represents a significant shift in digital finance, enabling millions to split bills, pay friends, and handle everyday expenses with unprecedented ease. This article delves into the technological architecture and user-centric design that make Venmo a leader in the P2P payment space, offering a comprehensive tutorial on its core functionality, exploring advanced features, and emphasizing the crucial aspects of digital security. Whether you’re a newcomer to the app or seeking to deepen your understanding of its capabilities, this guide will illuminate how to effectively navigate and leverage the power of Venmo for all your digital payment needs.

Understanding Venmo: A Digital Payment Ecosystem
Venmo, a subsidiary of PayPal, emerged as a trailblazer in the peer-to-peer mobile payment sector, rapidly changing how individuals interact with their money and with each other. At its core, Venmo is a mobile application designed for quick and easy money transfers between users, primarily through linked bank accounts, debit cards, or the user’s Venmo balance. It distinguishes itself not only through its speed and simplicity but also by integrating a social feed, allowing users to share and view payment descriptions (though transaction amounts remain private), fostering a community-driven payment experience.
The Rise of P2P Payments and Venmo’s Place
The advent of smartphones and pervasive internet access created fertile ground for the rise of P2P payment solutions. Traditional methods of splitting costs or reimbursing friends often involved cash, checks, or cumbersome bank transfers, which were slow and lacked immediate confirmation. Venmo, launched in 2009, tapped into this need for instant, digital exchanges, particularly appealing to younger demographics accustomed to mobile-first interactions. Its intuitive interface and social components quickly resonated, positioning it as a go-to app for everything from splitting dinner bills to paying rent. Venmo’s success underscored a broader technological trend: the democratization of financial services through accessible and user-friendly applications. It became a prime example of how software could simplify complex financial operations, making them available at the tap of a screen.
Key Features and Accessibility
Venmo’s appeal lies in its straightforward feature set, designed for maximum usability. The primary function is sending and receiving money, which is typically free for standard bank or debit card transfers. Users can maintain a balance within the app, which can then be used for future payments, withdrawn to a linked bank account, or even spent via a Venmo Debit Card. The platform also supports direct deposit, allowing users to receive paychecks or government payments directly into their Venmo account. From a technology standpoint, Venmo is built on a robust, scalable infrastructure capable of handling millions of transactions daily, ensuring reliability and speed. Accessibility is key, with native applications available on both iOS and Android platforms, ensuring broad reach across the mobile user base. Furthermore, Venmo has expanded its utility beyond P2P, allowing users to pay at select merchants online and in-app, further blurring the lines between social payments and commercial transactions.
The Step-by-Step Guide: Sending Money with Venmo
Using Venmo to send money is an incredibly straightforward process, designed for quick and intuitive interactions. This section provides a comprehensive, step-by-step tutorial, guiding you from account setup to successfully executing your first payment.
Setting Up Your Venmo Account
Before you can send or receive money, you’ll need to create a Venmo account. This process is designed to be quick and secure, ensuring your identity is verified.
- Download the App: Begin by downloading the Venmo app from the Apple App Store (for iOS devices) or Google Play Store (for Android devices).
- Sign Up: Open the app and select “Get Started” or “Sign Up.” You’ll have the option to sign up using your Facebook account, which can help find friends already on Venmo, or by using your email address and phone number.
- Provide Personal Information: You’ll be prompted to enter your name, email address, phone number, and create a strong password. Venmo also requires your date of birth and the last four digits of your Social Security Number (SSN) for identity verification, which is a standard Know Your Customer (KYC) procedure for financial apps. This is crucial for security and compliance with financial regulations.
- Verify Your Identity: You may receive a verification code via text message or email to confirm your phone number or email address. Follow the instructions to complete this step.
Linking Payment Methods
Once your account is set up, the next critical step is to link a funding source. This is how you’ll move money into your Venmo account to make payments.
- Access Settings: From the Venmo home screen, tap on the “Me” tab (usually your profile icon) and then the “Settings” gear icon (⚙️) in the top right corner.
- Navigate to Payment Methods: Select “Payment Methods.”
- Add a Bank Account: Tap “Add a bank or card.” For bank accounts, you can typically link instantly using your bank’s online login credentials (powered by services like Plaid for secure connections). Alternatively, you can opt for manual verification by providing your bank’s routing and account numbers; Venmo will then send two small deposits to your account, which you’ll need to verify within the app.
- Add a Debit or Credit Card: You can also link a debit card (usually free for payments) or a credit card (typically incurs a 3% fee for sending money). You’ll need to enter the card number, expiration date, and CVV.
- Recommendation: Linking a debit card or bank account is generally preferred for free transactions. Credit cards are useful in emergencies but the fees can add up.
Initiating a Payment
With your account active and a payment method linked, you’re ready to send money.
- Tap the Pay/Request Icon: On the Venmo home screen, locate the “Pay/Request” icon (often a pen and paper or a dollar sign within a speech bubble) at the bottom or top of the screen.
- Select Recipient: You can search for the recipient by their username, phone number, or email address. If they’re in your phone contacts and also on Venmo, they may appear automatically.
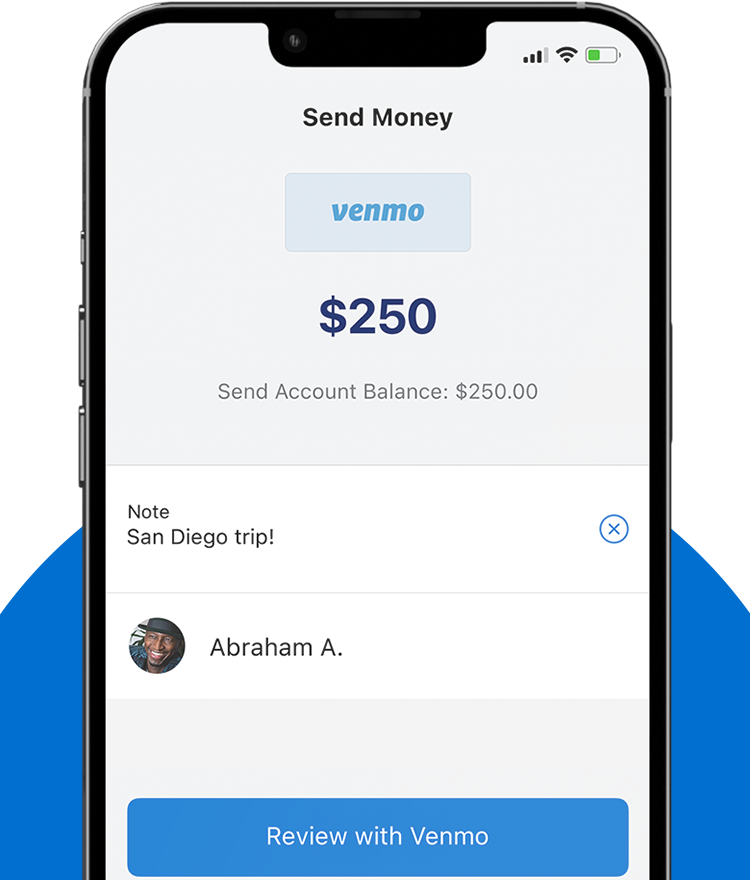
- Enter Amount: Input the exact amount of money you wish to send.
- Add a Note: This is where Venmo’s social element comes in. Add a descriptive note about the payment (e.g., “Dinner last night,” “Rent,” “Movie tickets”). You can use emojis to make it more expressive.
- Choose Privacy Setting: Below the note, you’ll see privacy options: “Public,” “Friends,” or “Private.”
- Public: Anyone on Venmo can see the transaction note.
- Friends: Only your Venmo friends can see the transaction note.
- Private: Only you and the recipient can see the transaction note.
- Pro Tip: For most personal financial transactions, “Private” is the recommended setting.
- Review and Send: Double-check the recipient, amount, and note. Ensure the correct funding source is selected (it usually defaults to your Venmo balance or primary linked bank/debit card). Tap the “Pay” button to complete the transaction. The money is typically sent instantly.
Customizing Payments and Requests
Venmo isn’t just for sending money; it also offers robust features for requesting money and splitting costs, making it a versatile financial tool.
- Requesting Money: Instead of tapping “Pay,” select “Request” after choosing a recipient. Enter the amount and a note, then send the request. The recipient will receive a notification and can easily pay you back.
- Splitting Bills: For group expenses, Venmo’s split feature is incredibly handy. After tapping the “Pay/Request” icon, select multiple recipients. Input the total amount and Venmo can automatically divide it equally among the chosen individuals, or you can manually adjust amounts per person. This streamlines what used to be an awkward and time-consuming task.
Beyond Basic Transactions: Advanced Venmo Features
While its core P2P functionality is what made Venmo popular, the app has evolved to offer a suite of advanced features, transforming it from a simple money-sharing tool into a more comprehensive digital wallet and payment platform. These features extend its utility for personal and even small business use, further solidifying its place in the digital finance ecosystem.
Group Payments and Split Bills
The ability to split bills is a cornerstone of Venmo’s social functionality, simplifying complex group expenses. Beyond the basic “request money” feature, Venmo enhances this by allowing users to select multiple recipients when requesting money, automatically dividing a total amount equally or enabling custom distribution. This is invaluable for shared expenses like utilities with roommates, group travel costs, or collective gift purchases. The technology behind this allows for synchronous requests, where one action can trigger multiple individual requests, streamlining what would otherwise be a tedious manual process for each person involved. This feature significantly reduces the friction associated with shared financial responsibilities, making Venmo an indispensable tool for communal living and group activities.
Business Profiles and QR Codes
Recognizing the need for small businesses and freelancers to accept digital payments easily, Venmo introduced Business Profiles. These profiles allow users to create a dedicated presence for their business within the Venmo app, separate from their personal profile. This enables them to accept payments for goods and services, often with lower transaction fees than traditional credit card processors, and helps them keep personal and business finances distinct.
A key technological innovation supporting Business Profiles is the integration of QR codes. Venmo-generated QR codes provide a contactless and incredibly simple way for customers to pay. A customer can merely scan a business’s unique QR code using their Venmo app, enter the payment amount, and confirm the transaction. This eliminates the need for manual input of usernames or phone numbers, reducing errors and speeding up the payment process, especially in physical retail environments or at events. The underlying technology ensures secure data transfer and instant payment confirmation, crucial for business operations.
Venmo Debit Card and Credit Card Integration
Venmo has expanded its offerings beyond in-app transfers with physical payment instruments. The Venmo Debit Card, issued by MasterCard, allows users to spend their Venmo balance anywhere MasterCard is accepted, online or in physical stores. This effectively bridges the gap between digital funds and traditional retail, offering cashback rewards on certain purchases. From a technical perspective, this card functions like a standard debit card but draws funds directly from the user’s Venmo balance, providing a seamless extension of their digital wallet into the physical world.
Furthermore, Venmo also offers a Venmo Credit Card, issued by Synchrony Bank. This card provides automatic customization of cashback rewards based on spending categories, dynamically adjusting to where the user spends the most. The integration with the Venmo app is deep, allowing users to track spending, manage their card, and view rewards directly within the app’s interface. These cards represent Venmo’s strategic move to become a more comprehensive financial platform, leveraging its user base and brand recognition to enter the broader banking and credit card markets through advanced technological integrations.
Ensuring Digital Security and Privacy on Venmo
Given that Venmo facilitates financial transactions, the security of user accounts and the privacy of their data are paramount. Venmo employs a multi-layered security approach, combining advanced technological safeguards with user best practices to protect funds and personal information.
Account Protections and Encryption
At the core of Venmo’s security infrastructure are robust encryption protocols. All sensitive data, including financial details and transaction information, is encrypted both in transit and at rest. This means that data is scrambled and unreadable to unauthorized parties when it’s being sent between your device and Venmo’s servers, and when it’s stored on their systems. Venmo utilizes bank-level security measures, similar to those employed by major financial institutions, to protect customer information.
Beyond encryption, Venmo implements several account protections:
- Fraud Detection: Sophisticated algorithms and machine learning continuously monitor transactions for suspicious activity. Any unusual patterns or potential fraud attempts are flagged for review and, if necessary, account action.
- PIN/Biometric Security: Users can enable a PIN, fingerprint (Touch ID), or facial recognition (Face ID) to access the app, adding an extra layer of security beyond just a password, ensuring that even if your phone is lost or stolen, your Venmo account remains protected.
- Two-Factor Authentication (2FA): Venmo strongly encourages and supports 2FA, which requires a verification code sent to your registered phone number or email in addition to your password when logging in from a new device. This significantly reduces the risk of unauthorized access.
- Secure Servers: Venmo’s servers are protected by firewalls and other network security measures, designed to prevent unauthorized access and data breaches.
Best Practices for Secure Transactions
While Venmo provides strong inherent security, user vigilance plays a critical role in maintaining account safety. Adhering to these best practices can significantly enhance your digital security:
- Use Strong, Unique Passwords: Never reuse passwords, and ensure your Venmo password is complex, combining letters, numbers, and symbols.
- Enable PIN/Biometric Security: Activate the app’s PIN or biometric lock for an additional layer of protection.
- Enable Two-Factor Authentication (2FA): This is a non-negotiable step for enhanced security.
- Be Wary of Phishing Attempts: Venmo will never ask for your password, SSN, or bank account details via email or text message. Always be skeptical of unsolicited communications asking for personal information. Verify the sender and look for suspicious links.
- Confirm Recipients Carefully: Double-check the recipient’s username, phone number, or email address before sending money. Venmo payments are often irreversible, so sending money to the wrong person can result in a permanent loss of funds.
- Link a Secure Bank Account: Ensure the bank account you link is also well-secured with strong passwords and 2FA.
- Review Transaction History Regularly: Periodically check your Venmo transaction history for any unauthorized activity.
- Keep Your App Updated: Software updates often include security patches. Always keep your Venmo app updated to the latest version.
Understanding Privacy Settings
Beyond financial security, Venmo offers granular control over transaction privacy, allowing users to decide who sees their payment activities.
- Transaction Privacy: As discussed earlier, each transaction can be marked as “Public,” “Friends,” or “Private.” By default, transactions are often set to “Public” or “Friends” depending on regional settings or account age, making it crucial for users to consciously choose “Private” for sensitive transactions.
- Friend Activity: Users can also control who sees their friend list and if others can find them through their social connections.
- Payment Notes: The content of your payment note is subject to your chosen privacy setting. Avoid including highly sensitive or personal information in public or friends-only notes.
By understanding and actively managing these settings, users can balance the social aspects of Venmo with their personal preferences for financial privacy, ensuring their digital footprint is managed according to their comfort level.
Optimizing Your Venmo Experience: Tips and Troubleshooting
Maximizing your Venmo utility extends beyond basic transactions. By understanding its nuances, managing notifications, and knowing how to troubleshoot common issues, you can ensure a smooth and efficient digital payment experience.
Managing Notifications and Alerts
Venmo’s notification system is designed to keep you informed about account activity, but it can also be customized to prevent overwhelm.
- In-App Settings: Navigate to your Venmo settings and look for the “Notifications” section. Here, you can toggle alerts for payments received, payments sent, requests received, comments, likes, and more.
- Email and Push Notifications: You can choose to receive push notifications directly to your phone for instant alerts, or opt for email summaries of your activity. For critical security alerts, it’s advisable to keep both push notifications and email alerts enabled.
- Balance Alerts: Set up alerts to notify you when your Venmo balance falls below a certain threshold or when a direct deposit arrives.
- Optimization Tip: Curate your notifications to strike a balance between staying informed and avoiding notification fatigue. Prioritize alerts for money received and payment requests, and consider turning off notifications for social interactions if they become distracting.
Resolving Common Payment Issues
Despite Venmo’s reliability, users might occasionally encounter issues. Knowing how to address them can save time and frustration.
- Payment Pending: A payment might be pending if there’s a problem with the funding source (e.g., insufficient funds, expired card) or if Venmo’s fraud detection system has flagged it for review. Check your email for messages from Venmo and review your linked payment methods for accuracy.
- Payment Sent to Wrong Person: As mentioned, Venmo payments are often irreversible. If you’ve sent money to the wrong person, immediately contact the recipient and request the money back. If they are unresponsive or refuse, contact Venmo Support with all transaction details. Venmo may be able to help in specific circumstances, but there’s no guarantee of recovery.
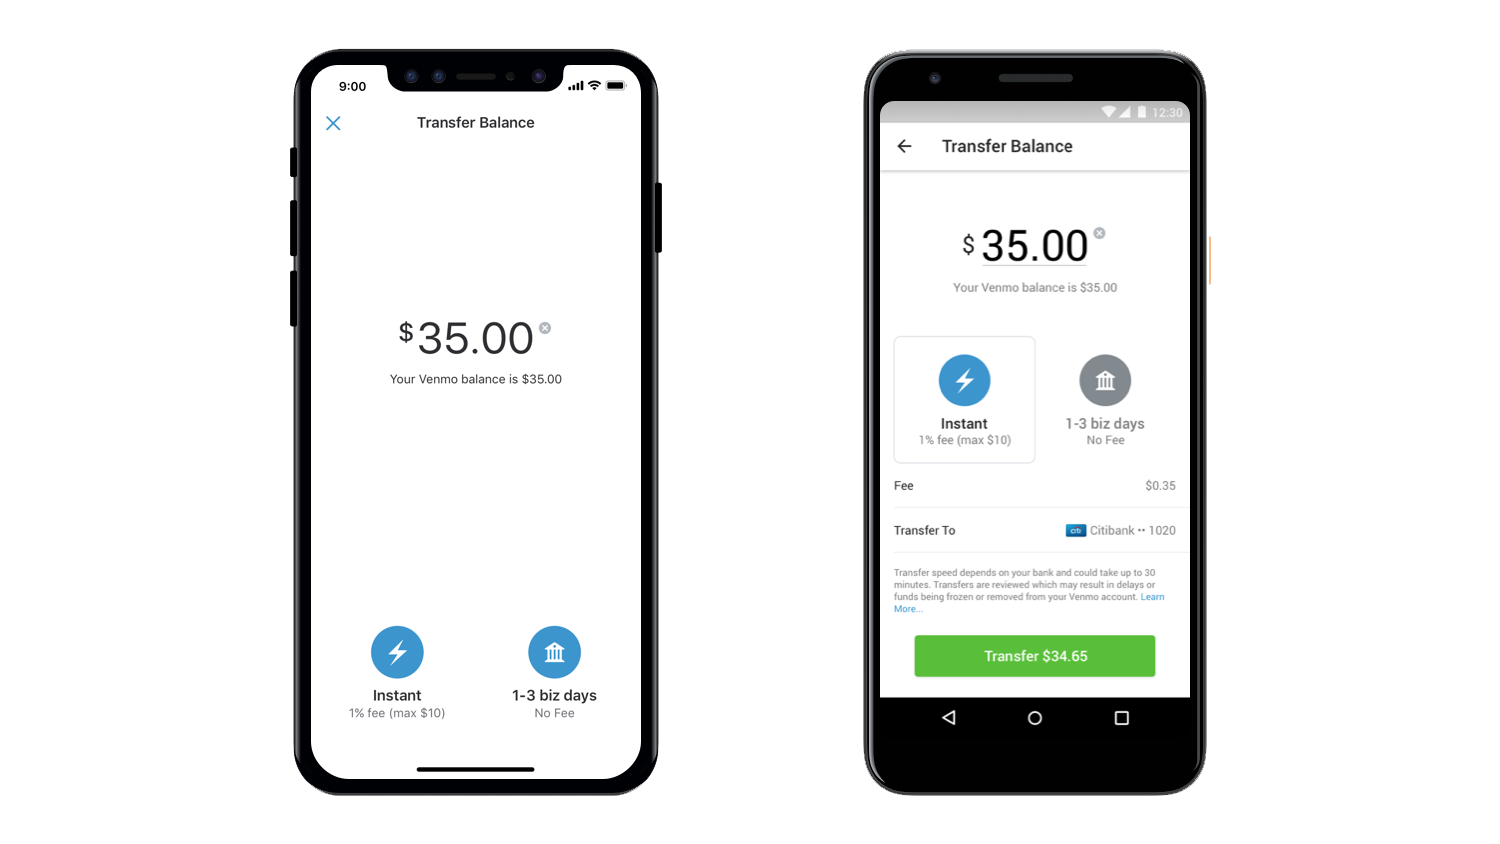
- Failed Bank Transfers: If a transfer from your Venmo balance to your bank account fails, ensure your bank details are correct. Transfers typically take 1-3 business days. If it’s taking longer, or if you receive an error message, contact both your bank and Venmo Support.
- Frozen Account: Accounts can be temporarily frozen for security reasons (e.g., suspicious activity, unverified identity). Follow Venmo’s instructions to provide any requested information to unfreeze your account.
Customer Support and Resources
When self-troubleshooting isn’t enough, Venmo provides several avenues for customer assistance:
- Help Center: The in-app and website-based Help Center offers a comprehensive database of FAQs, guides, and troubleshooting articles covering most common issues.
- Email Support: For non-urgent issues, you can typically contact Venmo Support via email through their app or website.
- In-App Chat/Phone Support: For more immediate or complex issues, Venmo often provides in-app chat options or a dedicated phone number during business hours. Accessing these through the app ensures you’re reaching legitimate support channels.
- Security Focus: When contacting support, always be prepared to verify your identity but be cautious about sharing sensitive information unless you are certain you are communicating with an official Venmo representative.
By proactively managing settings, understanding common issues, and knowing how to access support, users can ensure their Venmo experience remains smooth, secure, and highly efficient. Venmo continues to evolve, integrating new technologies and features to serve its user base, and staying informed is key to harnessing its full potential as a leading digital payment platform.
aViewFromTheCave is a participant in the Amazon Services LLC Associates Program, an affiliate advertising program designed to provide a means for sites to earn advertising fees by advertising and linking to Amazon.com. Amazon, the Amazon logo, AmazonSupply, and the AmazonSupply logo are trademarks of Amazon.com, Inc. or its affiliates. As an Amazon Associate we earn affiliate commissions from qualifying purchases.