In the digital age, our Macs have become central to our work, creativity, and daily lives. From powerful productivity suites to essential communication tools and entertaining games, we install a myriad of applications to tailor our computing experience. However, just as we regularly declutter our physical spaces, maintaining a tidy digital environment is crucial for optimal performance, security, and storage management. Over time, an accumulation of unused or unwanted software can bog down your system, consume valuable disk space, and potentially even pose security risks.
This guide delves deep into the various methods for completely and efficiently removing installed software from your Mac. Whether you’re a casual user looking for a quick fix or a power user aiming for a forensic-level clean, we’ll equip you with the knowledge and tools to effectively manage your applications. We’ll explore everything from the simplest drag-and-drop techniques to advanced manual file deletion and the benefits of third-party uninstaller tools. By the end of this article, you’ll be well-versed in maintaining a lean, fast, and secure Mac, optimizing your technology investment and boosting your digital productivity.
Why a Clean Mac Matters: Performance, Security, and Storage
Before diving into the “how-to,” it’s essential to understand the “why.” Uninstalling software might seem like a simple chore, but its impact on your Mac’s health is significant, touching upon core aspects of its functionality and your digital well-being.
Reclaiming Valuable Disk Space
One of the most immediate and tangible benefits of uninstalling software is freeing up disk space. Modern applications, especially those with extensive features, can easily consume gigabytes of storage. Even after an app is “uninstalled” by simply dragging it to the Trash, it often leaves behind residual files—caches, preferences, support documents, and logs—that continue to occupy space. Over time, these remnants from dozens of uninstalled apps can accumulate, silently eating into your drive, especially problematic for users with smaller SSDs. Reclaiming this space means more room for important files, projects, and new software you actually want to use.
Boosting System Performance
Unused applications, particularly those designed to run in the background or launch at startup, can significantly impact your Mac’s performance. They can consume CPU cycles, RAM, and network resources, even when you’re not actively using them. This background activity can lead to a slower Mac, longer boot times, app crashes, and overall system sluggishness. A clean slate, free from unnecessary processes and bloated application data, allows your Mac to allocate its resources more efficiently to the tasks you care about, resulting in a snappier, more responsive user experience. Think of it as spring cleaning for your digital workspace – removing the clutter allows everything else to breathe and function better.
Enhancing Digital Security and Privacy
Beyond performance and storage, removing unwanted software is a critical step in safeguarding your digital security and privacy. Old, outdated applications might contain vulnerabilities that could be exploited by malicious actors. Even if an app isn’t actively being used, its outdated components could provide a backdoor into your system if not properly removed. Furthermore, some applications might collect data or maintain permissions that you no longer wish to grant. By completely uninstalling software, you reduce your attack surface, minimize potential data breaches, and ensure that only trusted applications with up-to-date security patches are running on your system. This proactive approach is a cornerstone of robust digital security practices.
Core Methods for Uninstalling Applications on macOS
macOS offers several built-in ways to remove applications, ranging from simple to more comprehensive. Understanding these methods is the first step towards effectively managing your software.
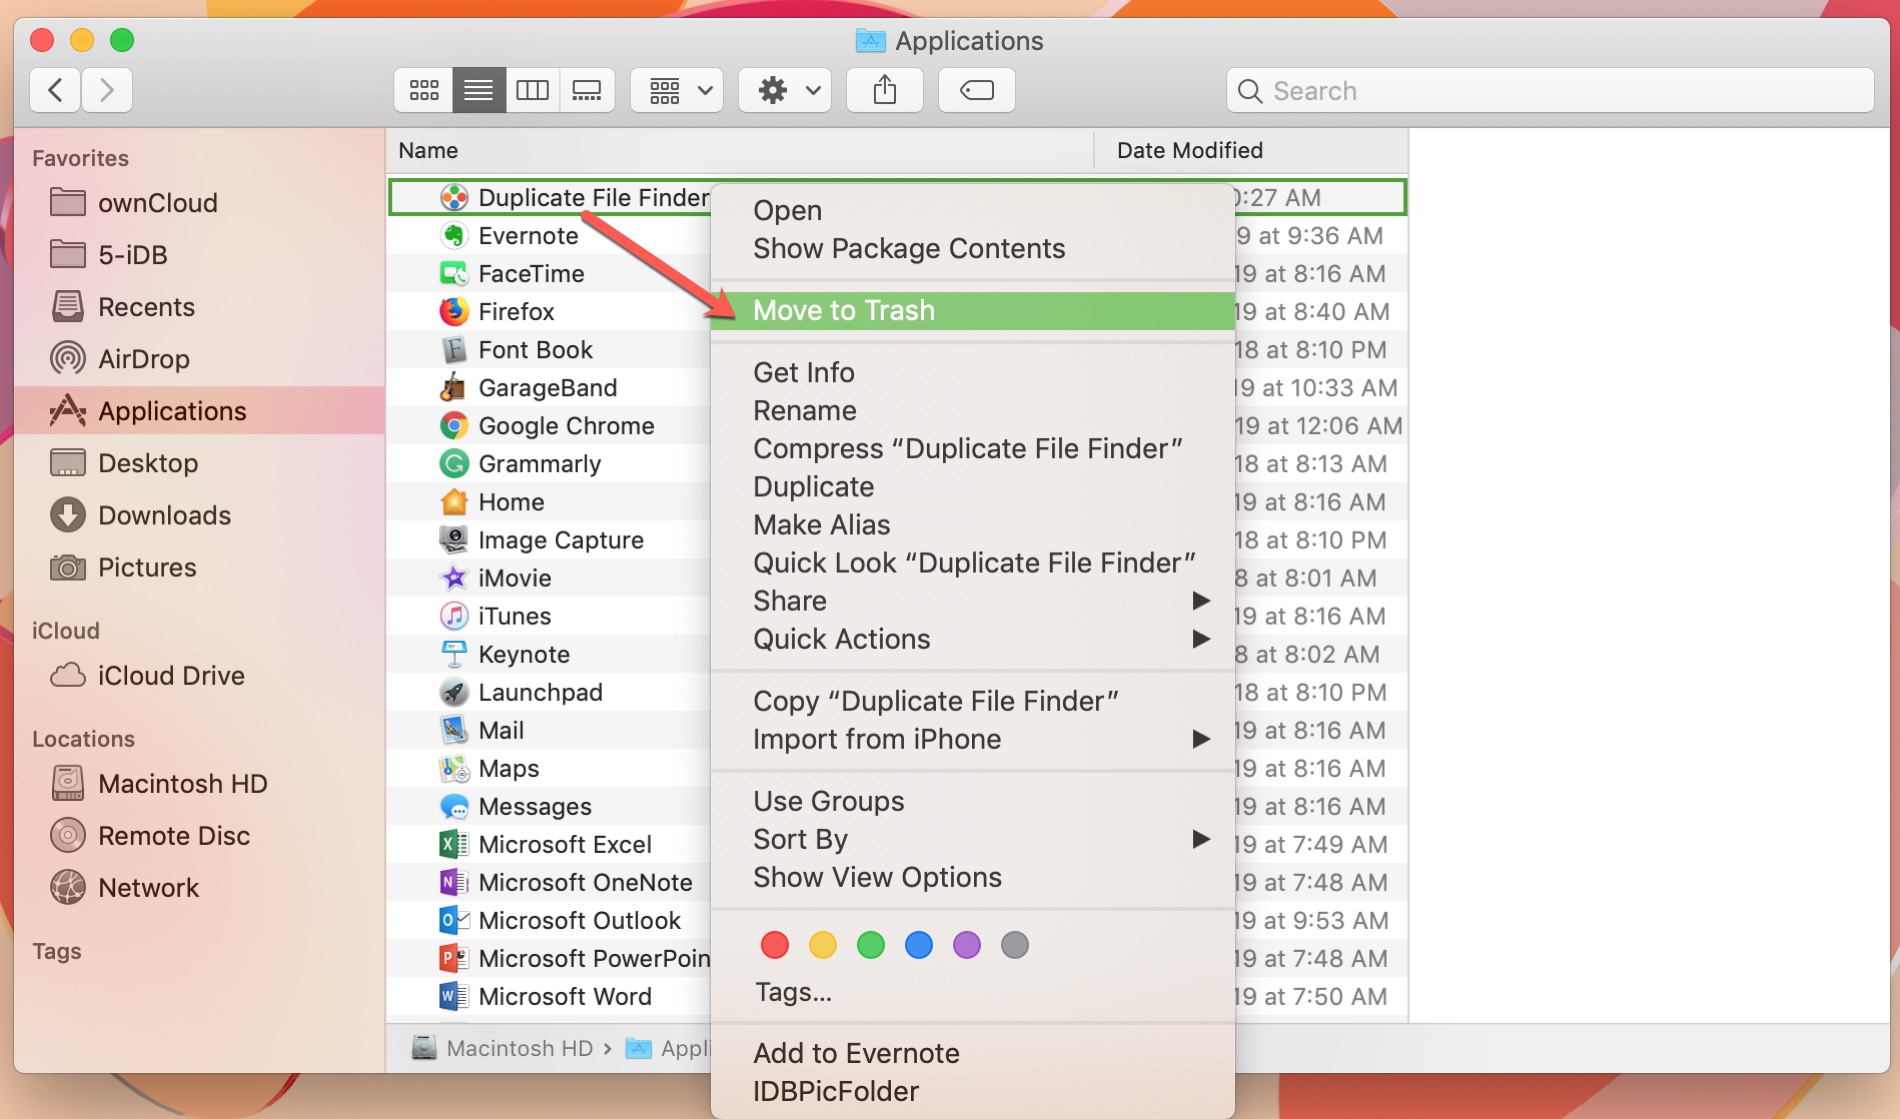
The Drag-and-Drop Method: Simple, But Often Incomplete
The most intuitive and commonly used method for uninstalling an application on a Mac is the drag-and-drop technique.
- Open Finder: Click on the Finder icon in your Dock.
- Navigate to Applications: In the Finder sidebar, click on “Applications.”
- Locate the App: Find the application you wish to uninstall.
- Drag to Trash: Click and drag the application icon from the Applications folder directly to the Trash icon in your Dock.
- Empty Trash: Right-click (or Control-click) on the Trash icon and select “Empty Trash” to permanently delete the application. You might be prompted to enter your administrator password.
While incredibly simple, this method has a significant drawback: it often leaves behind associated files. These include preference files (.plist), cache files, application support folders, and logs that reside in various system directories. Over time, these lingering files can accumulate, consuming disk space and potentially causing conflicts with other software. For a truly clean uninstall, you’ll need to go a step further.
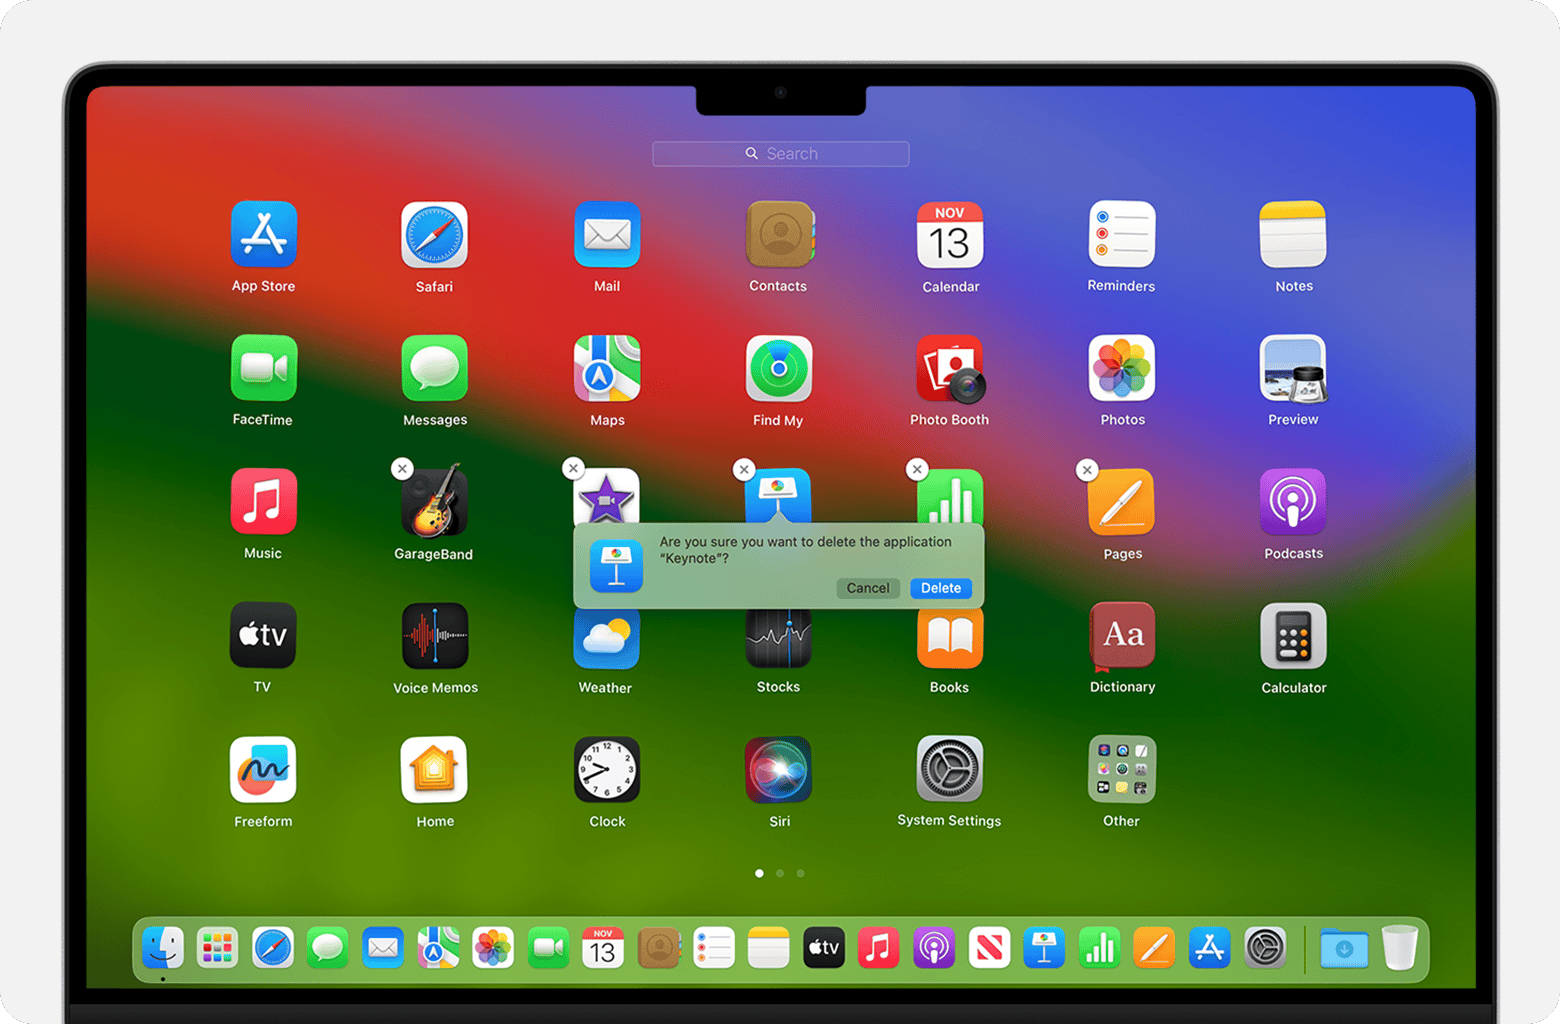
Utilizing Launchpad for App Store Downloads
For applications downloaded directly from the Mac App Store, Launchpad offers a streamlined uninstallation process that’s akin to deleting apps on an iPhone or iPad.
- Open Launchpad: Click on the Launchpad icon in your Dock (it looks like a rocket).
- Enter Jiggle Mode: Click and hold down on any app icon until all icons begin to “jiggle” and an ‘X’ appears in the top-left corner of the icons (for deletable apps).
- Delete the App: Click the ‘X’ next to the application you want to remove.
- Confirm: A dialog box will appear asking you to confirm if you want to delete the application. Click “Delete.”
This method is generally more thorough for App Store applications than the basic drag-and-drop, as it often removes more of the associated files. However, it’s not foolproof, and some scattered files might still remain, especially if the app created data outside of its sandboxed environment.
The Application’s Own Uninstaller: For Complex Software Suites
Some more complex software, particularly large suites or applications with deep system integrations (like antivirus programs, virtualization software, or professional creative tools), come with their own dedicated uninstaller applications. These uninstallers are specifically designed by the developer to remove all components of their software, including drivers, plugins, and system-level files, ensuring a cleaner removal than macOS’s native methods.
- Check the Application Folder: Often, the uninstaller utility is located within the application’s folder itself, nested alongside the main app icon in your Applications directory.
- Look in Utilities: Sometimes, uninstallers are placed in the
/Applications/Utilitiesfolder. - Consult Developer Documentation: If you can’t find an uninstaller, visit the software developer’s website. They usually provide detailed instructions or direct links to their uninstallation tool.
- Run the Uninstaller: Double-click the uninstaller application and follow the on-screen prompts. This usually involves granting administrator privileges and confirming the deletion.
Using the official uninstaller is almost always the preferred method for such software, as it minimizes the risk of leaving behind problematic files or inadvertently damaging system integrity.
Advanced Strategies for a Pristine Mac: Going Beyond the Basics
For those who demand a truly clean uninstall and want to ensure no digital crumbs are left behind, advanced strategies involving manual file deletion and powerful third-party tools are essential.
Manual Deletion of Leftover Files: The Deep Clean
After using the drag-and-drop or Launchpad methods, many applications leave behind preference files, cache data, and application support folders. Manually hunting down and deleting these files ensures a more complete removal. This process requires caution, as deleting critical system files by mistake can lead to instability.
- Open Finder: Click on the Finder icon.
- Go to Folder: From the Finder menu bar, click “Go” > “Go to Folder…” (or use the keyboard shortcut Shift + Command + G).
- Navigate to Library Folders: In the “Go to Folder” dialog box, you’ll need to check several common locations where application remnants are stored. These are typically hidden folders.
*   **User-Specific Library:** Type `~/Library/` and press Enter. This takes you to your user's Library folder. Here, look for folders with the application's name or the developer's name in:
    *   `Application Support/`: Contains data files created by applications.
    *   `Caches/`: Stores temporary files to speed up app performance.
    *   `Preferences/`: Contains preference files, usually with a `.plist` extension (e.g., `com.developer.appname.plist`).
    *   `Containers/`: For sandboxed App Store apps, though their data is usually removed more cleanly by Launchpad.
    *   `LaunchAgents/`: May contain files that launch background processes.

*   **System-Wide Library:** After checking your user's Library, repeat step 3, but this time type `/Library/` (without the tilde `~`). This takes you to the system-wide Library folder. Again, look for folders with the app's or developer's name in:
    *   `Application Support/`
    *   `Caches/`
    *   `LaunchDaemons/`: Similar to `LaunchAgents`, but for system-wide background processes.
    *   `PreferencePanes/`: For certain system extensions.
    *   `StartupItems/`: Less common in modern macOS, but worth a check.
-
Identify and Delete Related Files/Folders: Within these locations, carefully look for folders or files that clearly bear the name of the uninstalled application or its developer. For example, if you uninstalled “MyCoolApp,” you might look for folders named “MyCoolApp” or “MyCoolApp Developer,” or files like
com.mycoolapp.plist. -
Move to Trash: Drag the identified files and folders to the Trash.
-
Empty Trash: Once you’re confident you’ve found all relevant items, empty the Trash.
Important Warning: Exercise extreme caution when manually deleting files from the Library folders. Do not delete anything unless you are absolutely certain it belongs to the application you’re uninstalling. Deleting essential system files can severely damage your macOS installation, potentially requiring a complete reinstall. When in doubt, leave it, or use a trusted third-party uninstaller.
Using Terminal for Stubborn Applications (Advanced Users Only)
For advanced users comfortable with the command line, Terminal offers a powerful way to remove applications, especially those that are stubborn or have become corrupted. However, this method is highly destructive if misused and should only be attempted by those who understand the commands.
- Open Terminal: You can find Terminal in
/Applications/Utilities/or by searching for it with Spotlight (Command + Spacebar). - Use the
rmcommand: The basic command to remove an application is:
sudo rm -rf /Applications/AppName.appsudo: Grants superuser (administrator) privileges for the command. You will be prompted for your administrator password.rm: The “remove” command.-rf:rstands for recursive (deletes directories and their contents), andfstands for force (deletes without prompting for confirmation)./Applications/AppName.app: ReplaceAppName.appwith the actual name and full path of the application you want to delete. A helpful trick is to typesudo rm -rf(with a space at the end), then drag the application from your Applications folder directly into the Terminal window. This will auto-fill the correct path.
- Execute the Command: Press Enter. Enter your administrator password when prompted (it won’t show characters as you type).
Extreme Caution: The rm -rf command is irreversible and unforgiving. There is no “undo.” If you accidentally type the wrong path, you could permanently delete critical system files, leading to data loss or a non-functional Mac. This method typically only deletes the main application bundle and still requires manual cleanup of associated Library files for a truly complete removal, just like the drag-and-drop method.
Leveraging Third-Party Uninstaller Tools: Automation and Thoroughness
For users who want the thoroughness of manual deletion without the risk or hassle, third-party uninstaller applications are an excellent solution. These tools are designed to scan your system, identify all files associated with a given application, and remove them safely and efficiently.
Popular and reputable third-party uninstallers include:
- CleanMyMac X: A comprehensive Mac cleaner that includes a powerful uninstaller module. It identifies leftover files, preferences, and even “broken” applications. It also offers other utilities like system cleanup, malware removal, and performance optimization.
- AppCleaner: A free and lightweight tool specifically designed for uninstalling applications. You simply drag an application into AppCleaner, and it will find all related files for you to review and delete.
- Onyx: A versatile macOS utility that can perform various maintenance tasks, including deep cleaning and uninstallation of applications and their associated files. It’s more of a Swiss Army knife for Mac maintenance.
- MacClean: Another utility focused on cleaning and optimizing your Mac, with a dedicated uninstaller feature that helps remove apps and their leftovers.
How They Work:
Typically, you launch the uninstaller tool, select the application you wish to remove from a list, and the tool will then present you with a list of all detected files associated with that app (main application bundle, preferences, caches, application support, logs, etc.). You can review the list and confirm the deletion.
Benefits:
- Thoroughness: They go far beyond basic drag-and-drop, finding hidden files you might miss manually.
- Convenience: Automates a tedious and potentially risky manual process.
- Safety: Designed to identify and remove only app-related files, minimizing the risk of accidental system file deletion (though always use reputable software).
- Efficiency: Saves time compared to manual searching.
Considerations:
While many free options exist, some of the more comprehensive tools might require a purchase. Always download these tools from their official websites or the Mac App Store to avoid malware or fake software. Before using any new tool, it’s a good practice to back up your Mac, especially if it’s your first time using such software for a deep clean.
Best Practices for Mac Software Management
Beyond just uninstalling, a proactive approach to software management can prevent clutter and maintain your Mac’s health in the long run.
Regularly Review Installed Applications
Make it a habit to periodically review your Applications folder. Set a reminder every few months to scroll through your installed software and identify anything you no longer use or recognize. This simple practice can catch forgotten apps and prevent them from accumulating. If you haven’t used an app in six months or a year, chances are you don’t need it.
Be Mindful of What You Install
Prevention is always better than cure. Before installing new software, especially freeware or shareware from the internet, take a moment to consider if you truly need it. Research the application, read reviews, and check its developer’s reputation. Be wary of installers that bundle unwanted extra software (PUPs – Potentially Unwanted Programs) or browser extensions. Always download software from trusted sources, such as the Mac App Store or the developer’s official website.
Keep macOS and Apps Updated
While this guide focuses on removing software, keeping the software you do use updated is equally important. Updates often include critical security patches, bug fixes, and performance enhancements. Outdated software can be a security vulnerability and can also lead to compatibility issues and system instability. Enable automatic updates for macOS and regularly check for updates for your installed applications.
Backup Your Data Regularly
Regardless of how careful you are, unexpected issues can arise. Whether you’re experimenting with Terminal commands or using a third-party cleaner, having a current backup of your Mac is paramount. Utilize Time Machine, iCloud, or a third-party backup solution to regularly save your data. This provides peace of mind, knowing that you can always restore your system if something goes wrong during a cleanup or uninstallation process.
Understand What You’re Deleting
Especially when venturing into manual file deletion, always take a moment to understand what you’re about to delete. If a file or folder’s name isn’t clearly associated with the app you’re targeting, or if it has a generic name that could belong to the system, err on the side of caution. When in doubt, search online for information about the file before deleting it. A few minutes of research can save you hours of troubleshooting or a full system reinstall.

Conclusion
A well-maintained Mac is a productive Mac. Understanding how to thoroughly remove installed software is an essential skill for any Mac user committed to optimizing their system’s performance, safeguarding their digital security, and maximizing their available storage. From the simplicity of dragging an icon to the Trash to the precision of manual file deletion in the Library folders and the efficiency of third-party uninstallers, you now have a comprehensive toolkit at your disposal.
By adopting a proactive approach to software management, regularly decluttering your applications, and exercising caution when dealing with system files, you can ensure your Mac remains fast, responsive, and secure for years to come. Embrace these practices, and you’ll not only free up valuable resources but also foster a healthier, more enjoyable digital experience, aligning perfectly with the principles of smart technology management and digital productivity.
aViewFromTheCave is a participant in the Amazon Services LLC Associates Program, an affiliate advertising program designed to provide a means for sites to earn advertising fees by advertising and linking to Amazon.com. Amazon, the Amazon logo, AmazonSupply, and the AmazonSupply logo are trademarks of Amazon.com, Inc. or its affiliates. As an Amazon Associate we earn affiliate commissions from qualifying purchases.