In an increasingly digitized world, the ability to transfer money quickly, securely, and conveniently has become an essential aspect of modern life. Among the myriad of digital payment platforms available, Venmo stands out as a pioneering and immensely popular mobile application, redefining peer-to-peer (P2P) transactions with its user-friendly interface and integrated social features. What began as a simple way to split dinner bills among friends has evolved into a robust financial tool, facilitating everything from rent payments to small business transactions.
This comprehensive guide delves into the technical intricacies and practical steps involved in paying someone on Venmo, ensuring that both new and experienced users can navigate the app with confidence and efficiency. We’ll explore the setup process, the mechanics of sending payments, advanced features, and crucial security considerations, all framed within the context of leveraging this powerful technology for your financial interactions.

Getting Started with Venmo: Setting Up Your Digital Wallet
Before you can send or receive money, the first step is to establish your presence within the Venmo ecosystem. This involves downloading the application, creating an account, and linking a funding source, essentially setting up your personal digital wallet within the app’s secure framework.
Downloading and Installing the Venmo App
Venmo is primarily a mobile-first platform, meaning its core functionality is accessed via its dedicated application. It boasts broad compatibility, available for both major mobile operating systems: iOS and Android.
To begin, locate the official Venmo app in your device’s respective app store:
- For Apple devices (iPhone, iPad): Open the App Store, search for “Venmo,” and tap the “Get” button. You may need to authenticate the download using Face ID, Touch ID, or your Apple ID password.
- For Android devices: Open the Google Play Store, search for “Venmo,” and tap the “Install” button.
Ensure you are downloading the official application from PayPal, Inc. to avoid fraudulent imitations. Once downloaded, the app icon will appear on your home screen or in your app drawer, signaling readiness for the next step.
Creating Your Venmo Account
Upon launching the Venmo app for the first time, you’ll be prompted to create a new account. This process is designed to be straightforward, collecting necessary information to establish your unique user profile.
- Sign Up: Tap “Sign up” and choose to register using your phone number or email address. Using your phone number is often recommended for easier discovery by contacts.
- Verification: Venmo will send a verification code (via SMS or email) to confirm ownership of the provided contact information. Enter this code into the app.
- Personal Details: You’ll be asked to provide your legal first name, last name, and date of birth. This information is crucial for identity verification and compliance with financial regulations.
- Username and Password: Choose a unique Venmo username. This is your public identifier on the platform and how others can find you. Create a strong, memorable password, preferably one that combines uppercase and lowercase letters, numbers, and symbols.
- Privacy Settings: Venmo offers robust privacy controls for your transactions. You can set the default privacy for all future payments to “Public,” “Friends,” or “Private.” While “Public” allows anyone on Venmo to see your transactions (excluding the amount), “Friends” limits visibility to your Venmo friends, and “Private” ensures only you and the recipient can see the details. You can always adjust this on a per-transaction basis.
- Terms and Conditions: Review and accept Venmo’s User Agreement and Privacy Policy.
Linking a Funding Source
The final, critical step in preparing your Venmo account for payments is linking a funding source. This allows you to transfer money from your traditional bank accounts or cards into your Venmo balance to make payments.
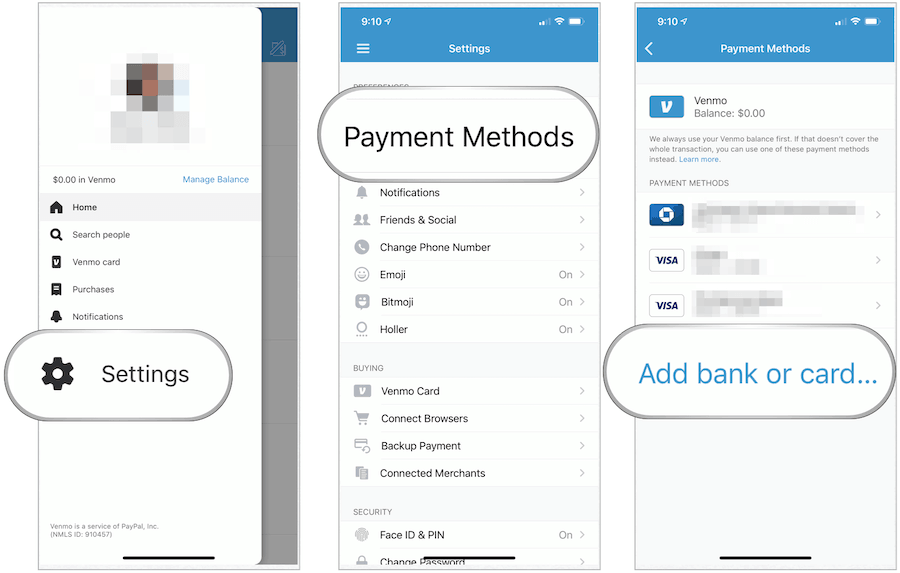
- Navigate to Settings: From the main Venmo screen, tap on your profile icon (usually top right), then the gear icon for settings. Select “Payment Methods.”
- Add Bank or Card: You’ll have options to link a bank account or a debit/credit card.
- Bank Account: This is the most common method. You can link your bank account instantly using your online banking login credentials (via services like Plaid, which securely connects to your bank) or manually by entering your account and routing numbers. Manual verification involves Venmo sending two small deposits to your bank account, which you then verify in the app (this can take 1-3 business days).
- Debit Card: Linking a debit card allows for quick transactions directly from your checking account. This is often faster for initial setup and less prone to issues than credit cards for sending money.
- Credit Card: While you can link a credit card, Venmo typically charges a 3% fee for sending money via a credit card to cover processing costs. It’s generally free to send money using your Venmo balance, bank account, or debit card.
- Default Payment Method: You can set a preferred default payment method for convenience.
Once a funding source is linked and verified, your Venmo digital wallet is fully operational, ready to send and receive funds.
The Core Mechanics: Sending a Payment on Venmo
The primary function of Venmo is to facilitate P2P payments. The app’s design emphasizes simplicity and speed, making the process of sending money intuitive, even for first-time users.
Finding Your Recipient
To send money, you first need to identify the person you’re paying. Venmo offers several flexible ways to locate a recipient:
- Search by Username: This is the most common and reliable method. If you know the recipient’s unique Venmo username (e.g., @johnsmith123), simply type it into the search bar.
- Search by Phone Number or Email: If the recipient has linked their phone number or email to their Venmo account, you can search using these details. Venmo will match them to their profile.
- Via QR Code: Venmo includes a built-in QR code scanner. If you’re physically with the person you want to pay, they can display their personal Venmo QR code (found in their profile), and you can scan it directly from your app, instantly bringing up their profile. This is particularly useful in social settings or for small businesses.
- From Your Friends List: If the person is already one of your Venmo friends, they’ll appear in your friends list, making them easy to select.
- Recent Transactions: For frequent payers, Venmo remembers recent transaction partners, making repeat payments quick to initiate.
Initiating a Payment
Once you’ve identified your recipient, the process to start a payment is straightforward:
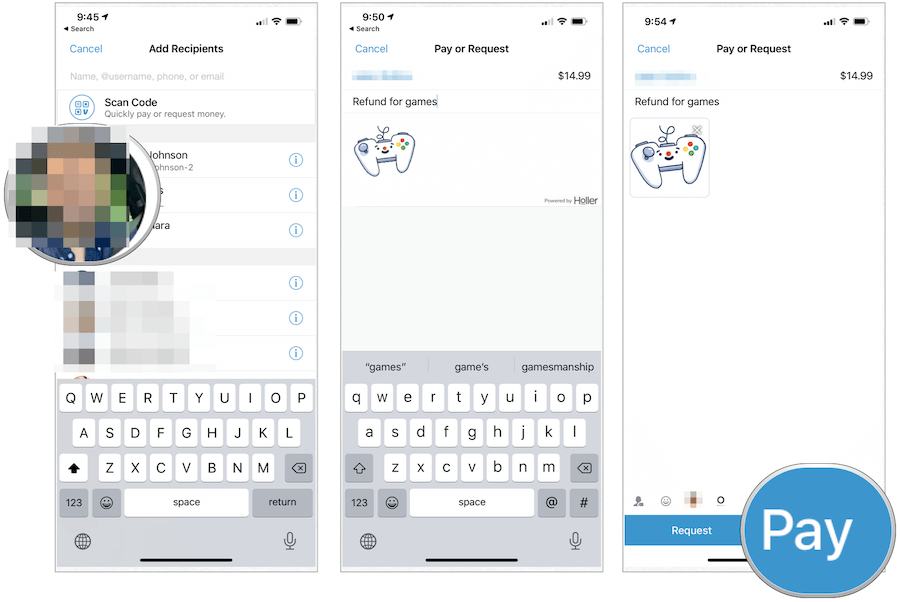
- Tap “Pay & Request”: On the main Venmo screen, usually at the bottom, there’s a prominent button (often a blue circular icon with a pen or a dollar sign) labeled “Pay & Request.” Tap this to initiate a new transaction.
- Select Recipient: From the subsequent screen, you can use the search bar to find the recipient by username, name, phone, or email. Alternatively, you can select them from your list of Venmo friends or recent contacts. Once selected, their profile picture and name will appear at the top.
- Enter Amount: Input the exact dollar amount you wish to send. The app will clearly display this amount.
Specifying Payment Details
Accuracy and clarity are key when sending money. Venmo allows you to add important context to each transaction.
- Add a Memo/Note: This is an essential step. Venmo requires you to include a note or memo describing the payment (e.g., “Dinner,” “Rent for April,” “Concert tickets”). This helps both parties remember the purpose of the transaction. You can use text, emojis, and even attach photos or GIFs to make it more engaging.
- Choose Privacy Setting: Below the memo field, you’ll see a privacy selector (globe for Public, two people for Friends, lock for Private). You can override your default privacy setting for this specific transaction here. For most personal payments, “Friends” or “Private” is recommended.
- Select Funding Source: By default, Venmo will attempt to use your Venmo balance first. If your balance is insufficient, or if you prefer a different method, you can tap on the currently selected payment method (e.g., “Venmo Balance” or your linked debit card) and choose another linked bank account, debit card, or credit card (remembering the 3% fee for credit cards).
Reviewing and Confirming the Transaction
Before the money is sent, Venmo provides a final review screen. This is your last chance to double-check all details:
- Verify Recipient: Ensure the correct recipient’s name and username are displayed.
- Confirm Amount: Check that the dollar amount is accurate.
- Review Memo: Make sure the note correctly describes the payment.
- Confirm Privacy: Verify the desired privacy setting.
- Final Tap: Once everything looks correct, tap the “Pay” button (usually green or blue).
Venmo may prompt you for your PIN, Face ID, or Touch ID to authorize the payment, adding an extra layer of security. Upon successful confirmation, the payment is typically instant, and both you and the recipient will receive a notification within the app and potentially via email or SMS. The transaction will then appear in your personal Venmo feed and transaction history.
Enhancing Your Venmo Experience: Advanced Features and Best Practices
Venmo is more than just a payment sender; it’s a versatile digital tool with features that extend its utility beyond simple P2P transfers. Understanding these can significantly enhance your experience.
Understanding Venmo’s Social Feed
One of Venmo’s distinguishing features is its integrated social feed. By default, many transactions are visible to your network (or even publicly), showcasing who paid whom for what. This social layer adds a unique dimension, fostering a sense of community around financial interactions.
- Customization: As mentioned, you control the privacy of each transaction. While the public feed might be fun for social interactions, many users opt for “Friends” or “Private” for most transactions to maintain financial discretion.
- Engagement: You can “like” and comment on friends’ transactions, much like a traditional social media feed. This is part of Venmo’s original vision to make payments more engaging.
Requesting Money and Splitting Bills
Beyond sending, Venmo makes it incredibly easy to request money from others, a feature invaluable for bill splitting or reminding someone they owe you.
- Sending a Request: From the “Pay & Request” screen, after selecting the contact and entering the amount and note, simply tap the “Request” button instead of “Pay.” The recipient will receive a notification and can easily pay you back.
- Group Payments: Venmo also facilitates group requests, allowing you to ask multiple people for specific amounts, making it ideal for splitting shared expenses like rent, utilities, or vacation costs among several individuals.
Utilizing Venmo for Business Transactions
While predominantly a P2P app, Venmo has expanded its capabilities to support small business transactions, offering an alternative to traditional card processors for certain scenarios.
- Venmo Business Profiles: Users can create dedicated Business Profiles separate from their personal accounts. These profiles come with unique QR codes that merchants can display, allowing customers to pay quickly by scanning. This feature provides a simple, tech-driven solution for accepting payments, particularly useful for freelancers, small vendors, or pop-up shops.
- In-App Payments: Many online retailers and apps now offer Venmo as a payment option at checkout, leveraging the app’s established user base and ease of use. This integrates Venmo seamlessly into broader e-commerce platforms.
Managing Your Venmo Balance
Any money you receive on Venmo accumulates in your Venmo balance. This balance can be used directly for future payments, or you can transfer it out.
- Cashing Out: You can transfer your Venmo balance to your linked bank account.
- Standard Transfer: This is free and typically takes 1-3 business days.
- Instant Transfer: For a small fee (usually 1.75% of the amount, with a minimum of $0.25 and maximum of $25.00), you can transfer funds instantly to a linked debit card or eligible bank account. This highlights Venmo’s technological capability for expedited financial operations.
- Venmo Debit Card/Credit Card: For even more direct access, Venmo offers a physical debit card that draws directly from your Venmo balance, allowing you to spend it anywhere Mastercard is accepted. They also offer a Venmo Credit Card for eligible users.
Ensuring Security and Troubleshooting Common Issues
As with any digital financial tool, understanding and utilizing Venmo’s security features, along with knowing how to troubleshoot common issues, is paramount to protecting your funds and personal information. This is a critical aspect of responsible technology use.
Venmo’s Security Features
Venmo employs several layers of security to safeguard your account and transactions:
- PINs and Biometric Authentication: You can set a PIN for your Venmo account, and enable biometric security like Face ID or Touch ID, requiring authentication for app access or sending payments. This prevents unauthorized access to your account if your phone is lost or stolen.
- Data Encryption: All transactions and sensitive data exchanged between your device and Venmo’s servers are encrypted, protecting it from interception.
- Fraud Monitoring: Venmo utilizes sophisticated algorithms and monitoring systems to detect and flag suspicious activity, helping to prevent unauthorized transactions.
- Purchase Protection: For eligible business transactions, Venmo offers purchase protection, similar to what you might find with credit cards, providing recourse in case of non-delivery or misrepresented items.
Handling Payment Errors and Disputes
Mistakes can happen, but Venmo provides mechanisms to address them:
- Cancelling Payments: If you accidentally send money to the wrong person, you might be able to cancel it if the recipient has not yet claimed the money or if it’s still pending. Check your transaction history for a “Cancel Payment” option. If it’s not available, you’ll need to contact the recipient directly and ask them to send the money back.
- Reporting Unauthorized Transactions: If you notice a payment you didn’t authorize, immediately change your Venmo password, unlink suspicious funding sources, and contact Venmo Support. They have dedicated teams to investigate and resolve fraudulent activity.
- Contacting Support: For any issues not covered by in-app solutions, Venmo’s customer support can be reached via the app’s help section, email, or phone. Providing clear details of your issue will expedite the resolution process.
Protecting Your Account from Scams
The digital landscape, while convenient, also harbors risks. Be vigilant against common scams:
- Phishing Attempts: Be wary of emails or messages purporting to be from Venmo that ask for your login credentials or personal information. Always access Venmo directly through the app or official website.
- “Accidental” Overpayments: A common scam involves someone sending you more money than requested, then asking you to send the “extra” back to a different account. The original payment often turns out to be fraudulent, leaving you out of pocket.
- Strong Passwords and Two-Factor Authentication (2FA): Always use strong, unique passwords for your Venmo account and enable 2FA if available. This adds an extra layer of security, requiring a code from your phone in addition to your password to log in.
Conclusion
Venmo has revolutionized the way we approach peer-to-peer payments, transforming complex financial transfers into simple, immediate digital interactions. By understanding how to effectively set up your account, navigate the payment sending process, leverage advanced features like requests and business profiles, and prioritize robust security practices, you can fully harness the power of this intuitive application.
Whether you’re splitting a lunch bill with a colleague, paying your roommate for utilities, or supporting a local vendor, Venmo offers a seamless and engaging technological solution. Its emphasis on user experience, coupled with essential security protocols, positions it as a cornerstone in the modern digital finance landscape. Embrace Venmo, and experience the future of convenient, connected payments.
aViewFromTheCave is a participant in the Amazon Services LLC Associates Program, an affiliate advertising program designed to provide a means for sites to earn advertising fees by advertising and linking to Amazon.com. Amazon, the Amazon logo, AmazonSupply, and the AmazonSupply logo are trademarks of Amazon.com, Inc. or its affiliates. As an Amazon Associate we earn affiliate commissions from qualifying purchases.