
In the rapidly evolving landscape of digital finance, cryptocurrencies have emerged as a transformative asset class. While platforms like Coinbase offer accessible gateways for buying and selling these digital assets, many users eventually seek greater autonomy and control over their holdings. The process of moving crypto from a centralized exchange, such as Coinbase, to a personal, self-custodied wallet is a fundamental skill for any serious cryptocurrency holder. This guide will walk you through the technical intricacies and best practices for securely transferring your digital assets, empowering you with true ownership in the decentralized ecosystem.
The Imperative of Self-Custody: Understanding the “Why” Behind Wallet Transfers
For newcomers to the crypto space, centralized exchanges like Coinbase serve as a convenient on-ramp, simplifying the process of acquiring digital assets. However, keeping significant amounts of cryptocurrency on an exchange, while convenient, carries inherent risks and limitations. The decision to move assets to a personal wallet, often referred to as self-custody, is a crucial step towards embracing the core tenets of decentralization and enhancing your digital security posture.
Enhanced Security and Control
When your cryptocurrencies reside on an exchange, you don’t directly hold the private keys associated with those assets. Instead, the exchange holds them on your behalf. This model is akin to keeping your money in a bank; you trust the institution to safeguard your funds. While reputable exchanges employ robust security measures, they remain centralized targets for hackers. Should an exchange suffer a breach, users’ funds could be compromised.
By transferring your crypto to a personal wallet, you gain direct control over your private keys. These keys are cryptographic strings that prove ownership of your digital assets and enable transactions. With private keys in your possession, you become the sole guardian of your funds, removing the reliance on a third party. This shift from “IOU” (I Owe You) assets on an exchange to genuine, self-custodied assets significantly bolsters your security. You are no longer subject to potential exchange failures, freezes, or regulatory interventions that might restrict access to your funds.
Avoiding Exchange-Specific Risks and Limitations
Centralized exchanges, by their nature, operate under specific terms of service and regulatory frameworks. This can lead to various limitations and risks that self-custody circumvents:
- Platform Downtime and Service Interruptions: Exchanges can experience technical issues, maintenance periods, or even unexpected shutdowns, which can prevent you from accessing or transacting with your funds precisely when you need to.
- Withdrawal Limits and Fees: Exchanges often impose daily or monthly withdrawal limits, which can be inconvenient for larger transfers. They also charge withdrawal fees, which, while sometimes negligible, can accumulate.
- Account Freezes and KYC Requirements: Your account could be temporarily or permanently frozen due to suspicious activity, regulatory compliance checks (KYC/AML), or terms of service violations. During such periods, your funds become inaccessible.
- Exit Scams or Insolvency: While less common with established platforms like Coinbase, smaller exchanges can disappear overnight, taking user funds with them. Even large exchanges can face insolvency, as seen with historical examples, leaving users with significant losses.
Self-custody mitigates these risks by placing control directly in your hands. Your access to funds is limited only by your ability to secure and manage your private keys.
Exploring Decentralized Finance (DeFi) and DApps
Beyond security, self-custody unlocks a vast ecosystem of decentralized applications (DApps) and services that are inaccessible with funds held on an exchange. The burgeoning world of Decentralized Finance (DeFi) offers lending protocols, decentralized exchanges (DEXs), yield farming opportunities, and NFT marketplaces. These platforms require direct interaction with your personal wallet, allowing you to connect, sign transactions, and participate in the decentralized economy without an intermediary. Moving your crypto to a wallet is the first step towards actively engaging with these innovative technological frontiers.
Choosing Your Digital Fortress: Types of Crypto Wallets
Before initiating any transfer, it’s crucial to select the right type of personal wallet that suits your security needs, technical comfort level, and the specific cryptocurrencies you wish to store. Crypto wallets are essentially software or hardware that manage your public and private keys, allowing you to send, receive, and monitor your digital assets on the blockchain.
Hot Wallets: Software Wallets (Mobile, Desktop, Browser Extensions)
Hot wallets are software-based applications that are connected to the internet, making them convenient for frequent transactions but generally less secure than cold wallets for large holdings.
- Mobile Wallets: Applications like Trust Wallet, Exodus, or Atomic Wallet for iOS and Android devices. They offer convenience for on-the-go transactions and often integrate with DApps via built-in browsers.
- Desktop Wallets: Software installed directly on your computer, such as Exodus or Electrum. They can offer a robust interface and better security than browser extensions, provided your computer is free from malware.
- Browser Extension Wallets: Wallets like MetaMask or Phantom are installed as browser plugins. They are incredibly popular for interacting with DApps and DeFi protocols directly from your web browser.
Pros of Hot Wallets: High convenience, easy to set up and use, often free, good for small amounts and frequent transactions, excellent for DApp interaction.
Cons of Hot Wallets: Online connectivity makes them more vulnerable to hacking, malware, and phishing attacks if your device is compromised.
Cold Wallets: Hardware Wallets
Cold wallets are physical devices designed specifically to store your private keys offline. They are widely considered the most secure option for storing significant amounts of cryptocurrency.
- Hardware Wallets: Devices such as Ledger (Nano S Plus, Nano X) or Trezor (Model One, Model T). These are small, USB-like devices that store your private keys in a secure chip, isolated from your internet-connected computer. Transactions are signed on the device itself, and only the signed transaction is sent online, never your private keys.
Pros of Cold Wallets: Superior security due to offline storage of private keys, resistant to online hacking, malware, and viruses, ideal for long-term storage of large amounts of crypto.
Cons of Cold Wallets: Higher cost, less convenient for frequent transactions, requires physical possession and care, potential for loss or damage (though funds are recoverable with a seed phrase).
Key Considerations for Wallet Selection
When choosing your wallet, weigh the following:
- Security vs. Convenience: For significant holdings, security should be paramount, pointing towards cold storage. For active DeFi participation or small amounts, hot wallets offer more convenience.
- Supported Assets: Ensure the wallet supports the specific cryptocurrencies you intend to transfer. Most wallets support popular assets like Bitcoin (BTC) and Ethereum (ETH), but support for smaller altcoins can vary.
- User Interface and Ease of Use: A wallet with an intuitive interface can significantly reduce the risk of errors during transactions.
- Backup and Recovery: All reputable wallets provide a “seed phrase” (a list of 12-24 words). This phrase is crucial for recovering your funds if your wallet device is lost, stolen, or damaged. Never share your seed phrase with anyone and store it securely offline.
For moving assets from Coinbase, a hardware wallet is generally recommended for long-term security. However, if you’re experimenting with DeFi or making smaller transfers, a well-secured mobile or browser wallet can suffice.
The Pre-Transfer Checklist: Preparing for a Smooth Transaction
Before you initiate the transfer from Coinbase, a series of meticulous checks and preparations can prevent common pitfalls and ensure your assets reach their destination safely. Technical diligence at this stage is paramount in the crypto world, where transactions are irreversible.
Verifying Wallet Compatibility (Network and Asset Type)

This is perhaps the most critical technical check. Every cryptocurrency exists on its own specific blockchain network (e.g., Bitcoin on the Bitcoin network, Ethereum on the Ethereum network, Solana on the Solana network). Many tokens also exist on specific layers on top of a primary blockchain (e.g., ERC-20 tokens on Ethereum, BEP-20 tokens on Binance Smart Chain).
- Asset Type: Ensure your receiving wallet is capable of holding the specific cryptocurrency you’re sending. For instance, you cannot send Bitcoin to an Ethereum address, nor can you typically send an ERC-20 token to a Bitcoin address. Most modern wallets are multi-currency, but always double-check.
- Network Compatibility: This is where many errors occur. If you are sending an ERC-20 token (e.g., USDC on Ethereum), you must send it to an Ethereum address. If you accidentally send it to an address on a different network (e.g., Binance Smart Chain), your funds could be permanently lost. Coinbase typically makes this clear, but always verify the network displayed for your receiving address matches the network of the asset you’re withdrawing.
Understanding Transaction Fees and Network Congestion
Blockchain transactions incur fees, paid to the network validators or miners who process and secure the transactions. These fees can fluctuate based on network demand and congestion.
- Coinbase Withdrawal Fees: While Coinbase often covers the blockchain network fee for you (or incorporates it into the withdrawal cost), they may also charge their own service fee. Always review the final amount you will receive and the fees applied before confirming.
- Network Fees (Gas Fees): On networks like Ethereum, “gas fees” can vary dramatically. During periods of high network activity, fees can spike, making transfers expensive. While Coinbase usually handles the exact gas calculation for you, being aware of network conditions can help you decide if it’s an opportune time to transfer. Higher fees generally mean faster confirmation times, but Coinbase usually offers standard speeds.
Double-Checking Wallet Addresses: The Golden Rule
Crypto transactions are irreversible. If you send funds to the wrong address, there is no “undo” button, no customer support line to call, and no bank to reverse the charge. This makes verifying the recipient wallet address of utmost importance.
- Copy and Paste: Always copy the wallet address directly from your receiving wallet and paste it into Coinbase. Do not attempt to type it out manually.
- Visual Inspection (First and Last Characters): After pasting, visually inspect the first 4-5 characters and the last 4-5 characters of the pasted address against the original address in your wallet. This helps catch common errors or even sophisticated malware that can subtly alter copied addresses (clipboard hijackers).
- QR Codes: Many wallets and exchanges offer QR codes for addresses. While convenient, ensure the QR code is generated securely by your wallet and not from an untrusted source.
Small Test Transfers: A Prudent Practice
For your first transfer to a new wallet, or when sending a large sum, it is highly recommended to perform a small “test” transaction first.
- Minimum Amount: Send a minimal amount of the cryptocurrency (e.g., $5-$10 worth) to your personal wallet.
- Verify Receipt: Wait for this small amount to appear in your receiving wallet and confirm it successfully arrived.
- Proceed with Confidence: Once the test transaction is successful, you can proceed with the larger transfer with significantly more confidence, knowing your wallet address is correct and the network path is clear.
Executing the Transfer: A Step-by-Step Walkthrough
With your wallet chosen and your pre-transfer checklist complete, you are ready to initiate the transfer from Coinbase. The process is designed to be user-friendly, but attention to detail is crucial.
Navigating Coinbase: Initiating a Withdrawal
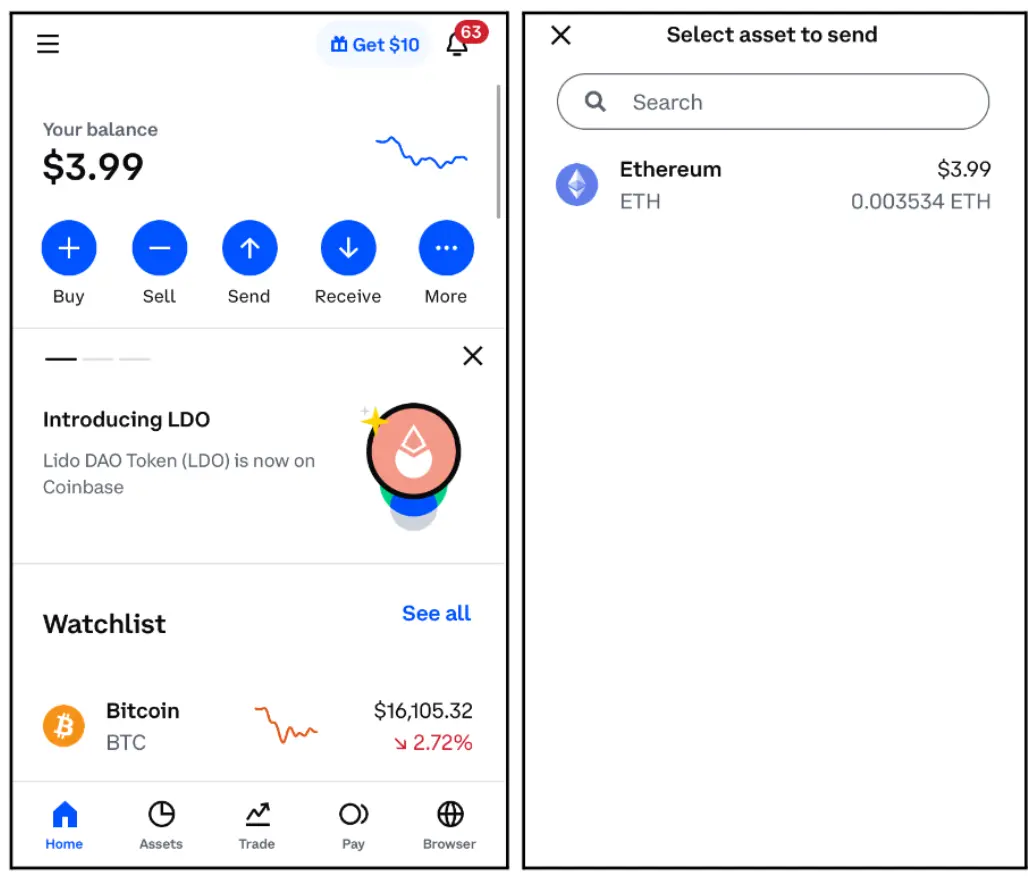
- Log In to Coinbase: Access your Coinbase account via their website or mobile app.
- Navigate to Assets/Portfolio: From your dashboard, locate your portfolio or assets section, which lists all the cryptocurrencies you hold.
- Select the Cryptocurrency: Click on the specific cryptocurrency you wish to transfer (e.g., Bitcoin, Ethereum, USDC). This will take you to its dedicated page.
- Initiate Send/Withdraw: Look for an option like “Send,” “Withdraw,” or an arrow icon indicating an outgoing transaction. On Coinbase, it’s typically a “Send/Receive” button. Click “Send.”
Inputting Your Wallet Address
- Enter Recipient Address: In the “To” field, paste the wallet address you copied from your personal wallet (e.g., your Ledger, Trezor, or MetaMask address).
- Verify Address (Again): This is your final opportunity to verify the address using the first and last characters check. Double-check that it matches your receiving wallet precisely. Coinbase may also perform a basic format validation.
Specifying Amount and Reviewing Details
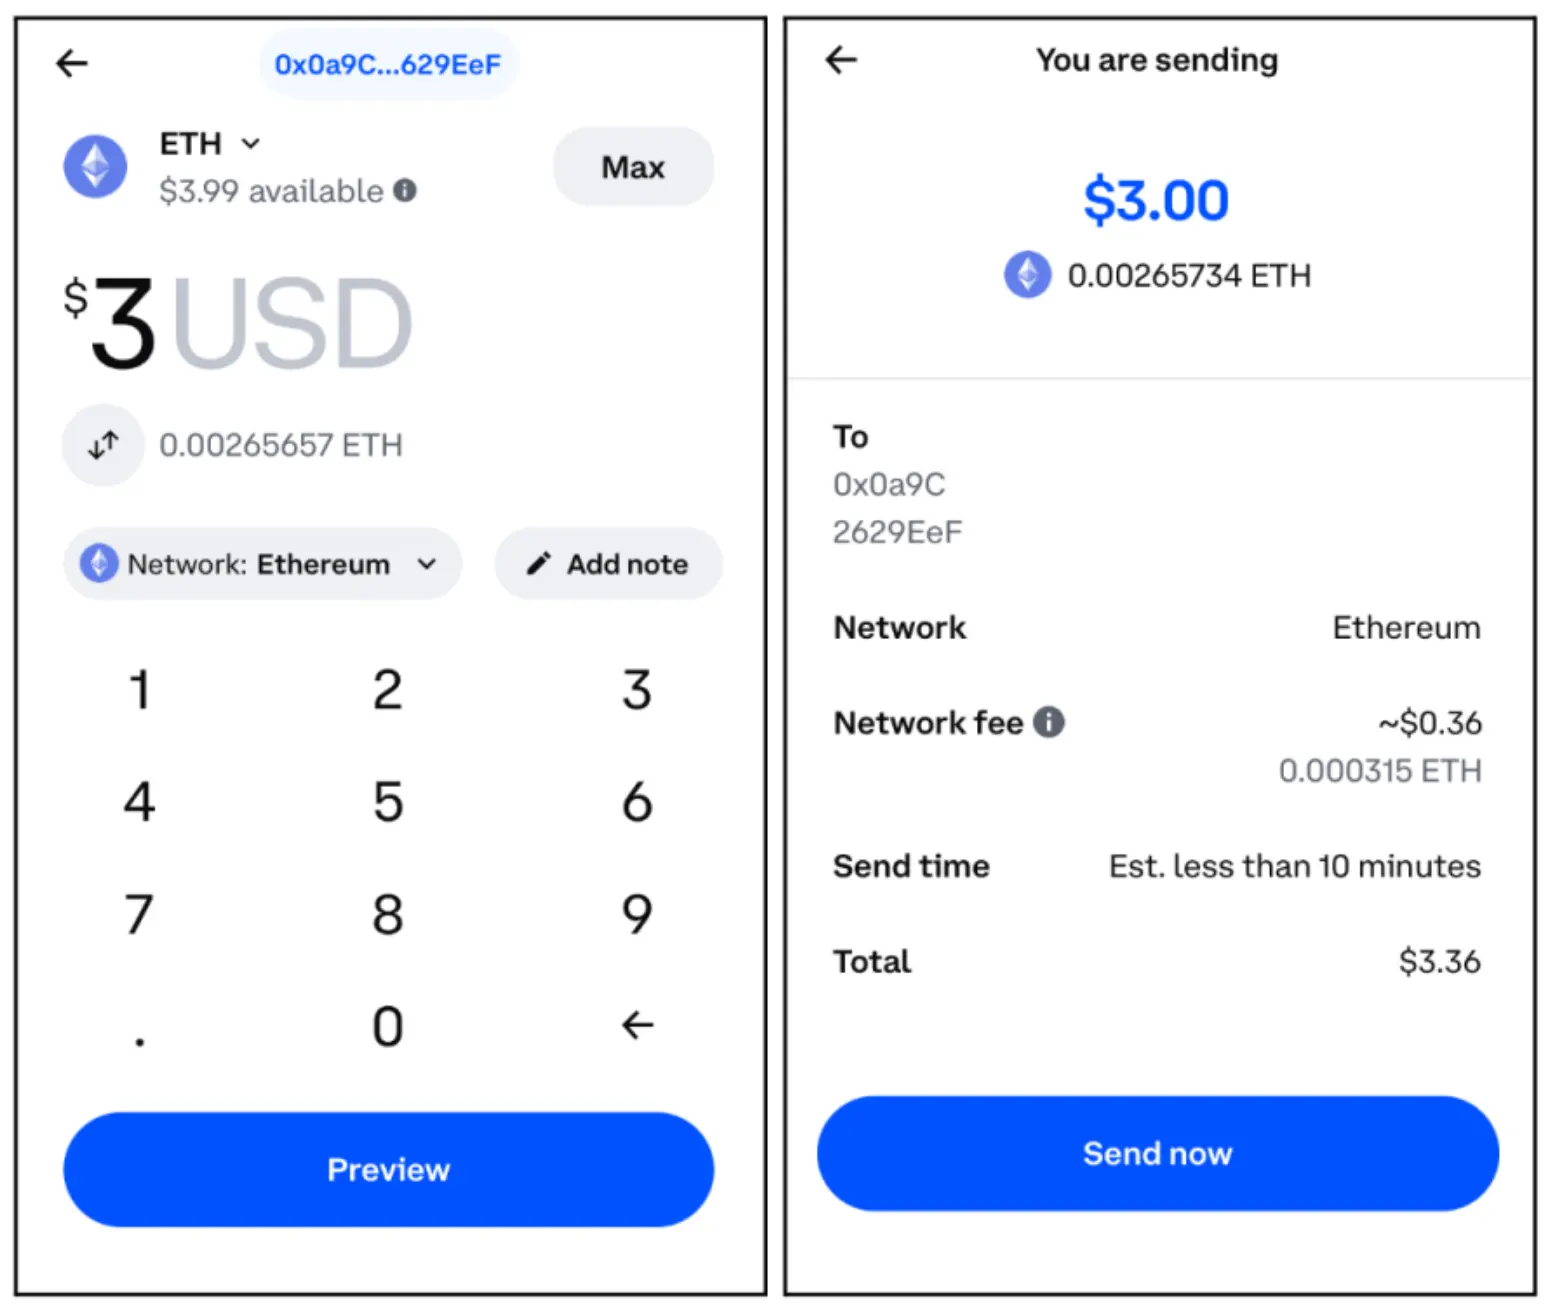
- Enter Amount: Input the amount of cryptocurrency you wish to send. You can often specify the amount in crypto units (e.g., 0.5 ETH) or its equivalent fiat value (e.g., $1000 USD worth of ETH).
- Review Transaction Details: Before proceeding, Coinbase will present a summary of the transaction. This typically includes:
- Recipient Address
- Amount to Send
- Network Fee (if any, often covered or included by Coinbase)
- Coinbase Fee (if any)
- Total Amount to be Deducted
- Estimated Arrival Time (this can vary)
- Network (e.g., Ethereum Network, Bitcoin Network) – Crucially confirm this matches your receiving wallet’s network.
Carefully review all these details. Ensure the final amount you expect to receive in your wallet after fees is correct.
Authorizing and Confirming the Transaction
- Confirm Transaction: Once you’re satisfied with all the details, click “Continue” or “Confirm.”
- Two-Factor Authentication (2FA): Coinbase will almost certainly require you to enter a 2FA code (from an authenticator app like Google Authenticator or Authy, or an SMS code). This is a critical security step to prevent unauthorized withdrawals.
- Final Confirmation: After entering the 2FA, you’ll usually be prompted for a final confirmation. Once confirmed, the transaction is broadcast to the blockchain.
Post-Transfer Vigilance: Verifying and Securing Your Assets
The process doesn’t end the moment you click “Confirm” on Coinbase. Blockchain transactions take time to be processed and confirmed by the network. Monitoring and verifying the successful arrival of your funds is an essential final step.
Monitoring Transaction Status on the Blockchain
- Transaction ID (TxID/Hash): Immediately after confirming the withdrawal, Coinbase will provide you with a transaction ID (also known as a transaction hash or TxID). This is a unique identifier for your transaction on the blockchain.
- Blockchain Explorer: Copy this TxID and paste it into a relevant blockchain explorer for the network you used (e.g., Etherscan for Ethereum, Blockchain.com for Bitcoin).
- Check Status: The blockchain explorer will show you the real-time status of your transaction, including:
- Status: Pending, confirmed, or failed.
- Confirmations: The number of blocks that have been added to the blockchain since your transaction. More confirmations mean greater finality and security.
- Recipient Address: Confirm it matches your wallet’s address.
- Amount: Verify the correct amount was sent.
Depending on network congestion, confirmations can take anywhere from a few minutes to several hours. For Bitcoin, 3-6 confirmations are often considered secure, while Ethereum transactions are usually faster.
Confirming Receipt in Your Wallet
- Open Your Personal Wallet: Once the transaction shows a sufficient number of confirmations on the blockchain explorer, open your personal wallet application (hardware wallet interface, mobile app, or browser extension).
- Verify Balance: Your transferred cryptocurrency should now appear in your wallet’s balance. Check that the amount received matches what you sent from Coinbase (minus any network fees). If it doesn’t appear immediately, refresh your wallet or ensure it’s properly synced with the blockchain. Sometimes, older wallets might need to be updated to display new assets.
Implementing Best Practices for Wallet Security
Now that your assets are in your self-custodied wallet, maintaining vigilance is key.
- Secure Your Seed Phrase: Your seed phrase is the master key to your funds. Store it offline, in multiple secure, discreet locations (e.g., fireproof safe, safety deposit box). Never store it digitally or share it with anyone.
- Update Wallet Software: Regularly update your wallet software (for hot wallets) to benefit from the latest security patches and features.
- Use Strong Passwords/PINs: For hot wallets and hardware wallets, use strong, unique passwords or PINs.
- Beware of Phishing: Be extremely cautious of suspicious links, emails, or messages asking for your wallet details or seed phrase. Legitimate wallet providers will never ask for this information.
- Enable 2FA: If your wallet application supports it, enable two-factor authentication for added security.
- Regular Backups: While your seed phrase is the ultimate backup, understanding how to restore your wallet and regularly ensuring your backup methods are sound is crucial.
By diligently following these technical steps and security best practices, you can confidently move your cryptocurrency from Coinbase to your personal wallet, taking full control of your digital assets and solidifying your presence in the decentralized future. This mastery over your own funds is not just a technical procedure; it’s a fundamental embrace of financial sovereignty in the digital age.
aViewFromTheCave is a participant in the Amazon Services LLC Associates Program, an affiliate advertising program designed to provide a means for sites to earn advertising fees by advertising and linking to Amazon.com. Amazon, the Amazon logo, AmazonSupply, and the AmazonSupply logo are trademarks of Amazon.com, Inc. or its affiliates. As an Amazon Associate we earn affiliate commissions from qualifying purchases.