
Java, a ubiquitous programming language, powers everything from mobile applications and enterprise systems to web servers and scientific tools. Whether you’re embarking on your coding journey, looking to expand your development toolkit, or simply need Java for a specific application, understanding how to install it correctly is a fundamental first step. This guide will walk you through the process of installing Java, often referred to as the Java Development Kit (JDK), covering the essential components, different versions, and considerations for both Windows and macOS users.
The Java ecosystem is vast, and for developers, the JDK is the gateway to creating Java applications. It’s not just about running Java programs; it’s about compiling, debugging, and building them. This article will delve into the practical aspects of getting Java set up on your machine, ensuring you have a robust environment ready for your projects. We’ll also touch upon how this seemingly technical installation intersects with broader themes of technology trends, productivity, and even the financial aspects of software development and the tech industry.

Understanding the Java Development Kit (JDK)
Before diving into the installation itself, it’s crucial to understand what the Java Development Kit (JDK) entails. The JDK is a suite of tools that allows developers to write and execute Java programs. It’s built upon the Java Runtime Environment (JRE), which provides the necessary components to run Java applications.
What’s Inside the JDK?
The JDK comprises several key components:
- Java Compiler (javac): This is the core tool that translates your human-readable Java source code (.java files) into Java bytecode (.class files), which the Java Virtual Machine (JVM) can understand and execute.
- Java Runtime Environment (JRE): As mentioned, the JRE is included within the JDK. It consists of the JVM and a set of standard libraries.
- Java Virtual Machine (JVM): The JVM is an abstract computing machine that enables your computer to run Java programs. It acts as an interpreter, converting bytecode into machine code specific to your operating system and hardware. This is the “write once, run anywhere” principle that Java is famous for.
- Development Tools: Beyond the compiler and JRE, the JDK offers a suite of other useful tools for developers. These include:
- Debugger (jdb): Essential for finding and fixing errors in your code.
- Archiver (jar): Used to package multiple Java classes and resources into a single JAR file, making distribution and deployment easier.
- Documentation Generator (javadoc): Automatically generates API documentation from your source code comments, a vital aspect of software engineering and brand consistency in how your code is presented.
- Other utilities: A variety of other command-line tools for tasks like monitoring, management, and more.
Java Versions and Editions: Choosing the Right One
The Java landscape has evolved significantly, with different versions and editions catering to various needs. Understanding these differences is key to selecting the appropriate JDK for your project.
- Java SE (Standard Edition): This is the core platform for Java development. It’s suitable for developing desktop applications, applets, and applications that run on servers. When most people refer to installing “Java,” they are typically referring to Java SE.
- Java EE (Enterprise Edition): Built on top of Java SE, Java EE is designed for building large-scale, multi-tiered, and network-centric applications. This includes web applications, business applications, and more. While you’ll still need the core Java SE installation, Java EE involves additional frameworks and servers.
- Java ME (Micro Edition): This edition is tailored for developing applications for resource-constrained devices such as mobile phones, embedded systems, and IoT devices.
Which Version to Install?
For most new developers and general-purpose Java development, the latest Java SE LTS (Long-Term Support) version is highly recommended. LTS versions receive updates and support for an extended period, making them ideal for stability and long-term projects. As of my last update, recent LTS versions include Java 11, Java 17, and more recently, Java 21. Newer non-LTS versions are released every six months and offer the latest features but have shorter support cycles.
When it comes to choosing a specific JDK distribution, you’ll find several popular options:
- Oracle JDK: The official JDK from Oracle. Historically, it had licensing changes, so it’s important to check the current licensing terms for commercial use.
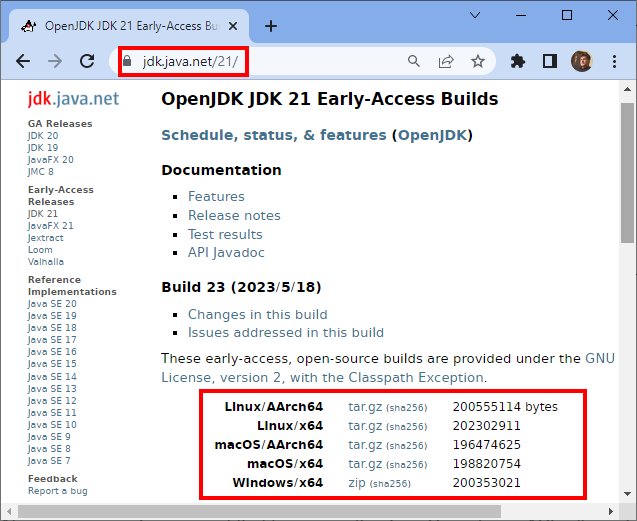
- OpenJDK: An open-source implementation of the Java Platform, Standard Edition. Many other JDK distributions are based on OpenJDK.
- Adoptium Temurin (formerly AdoptOpenJDK): A community-driven, open-source project providing high-quality, TCK-certified builds of OpenJDK. This is a very popular choice for its ease of use and licensing.
- Amazon Corretto: A free, multiplatform, production-ready distribution of the OpenJDK from Amazon.
- Microsoft Build of OpenJDK: Microsoft’s distribution of OpenJDK.
For beginners and most developers, Adoptium Temurin or Oracle JDK (checking licensing) are excellent starting points.
Installing Java (JDK) on Windows
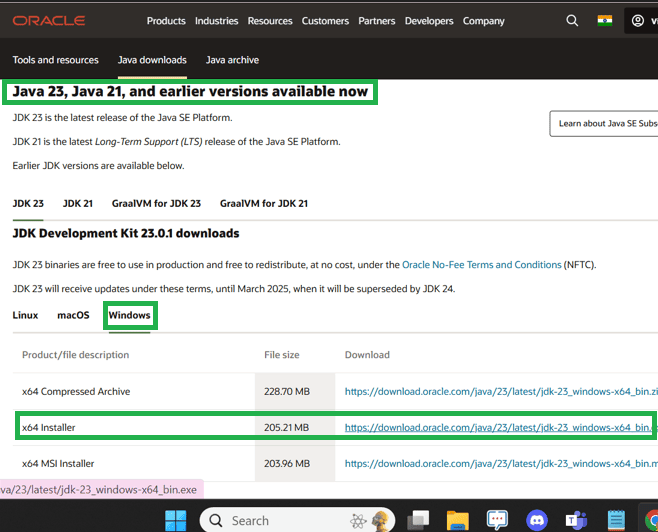
Installing the Java Development Kit on Windows is a straightforward process. You’ll primarily download an installer and follow the on-screen prompts.
Step 1: Download the JDK Installer
- Choose Your JDK Distribution: As discussed, decide which distribution and version you want. For this guide, we’ll assume you’re downloading Adoptium Temurin (OpenJDK), as it’s a widely recommended, free, and open-source option.
- Navigate to the Download Page: Go to the Adoptium website (https://adoptium.net/).
- Select Your Operating System and Architecture: Choose “Windows” and your system’s architecture (usually x64 for modern computers).
- Pick a Version: Select the latest LTS version (e.g., Temurin 17 LTS or Temurin 21 LTS) or a specific version you require.
- Download the Installer: Click on the download link for the
.msiinstaller.
Step 2: Run the Installer
- Locate the Downloaded File: Once the download is complete, find the
.msifile (e.g.,OpenJDK17U-jdk_x64_windows_hotspot_...msi). - Run as Administrator (Recommended): Right-click on the
.msifile and select “Run as administrator.” This helps ensure the installer has the necessary permissions to make system-wide changes. - Follow the Setup Wizard:
- Welcome Screen: Click “Next.”
- Custom Setup: This is a crucial step. Ensure that “Java Development Kit” and “Java Runtime Environment” are selected. You can also choose the installation directory. It’s generally recommended to install Java in a directory without spaces in its name (e.g.,
C:Program FilesJavajdk-XXis fine, but avoid paths likeC:My Java Programsjdk-XX). You can also choose to set theJAVA_HOMEenvironment variable during installation. If the option is available, check the box to “Set JAVA_HOME variable.” This is extremely important for many development tools to find your Java installation. - Ready to Install: Click “Install.”
- User Account Control (UAC): If prompted by Windows UAC, click “Yes” to allow the installer to make changes.
- Installation Complete: Once the installation is finished, click “Finish.”
Step 3: Verify the Installation
After the installation, it’s essential to verify that Java has been installed correctly and that your system can find it.
- Open Command Prompt: Press the
Windows key + R, typecmd, and press Enter to open the Command Prompt. - Check Java Version: In the Command Prompt, type the following command and press Enter:
bash

java -version
You should see output indicating the Java version you just installed, for example:
openjdk version "17.0.9" 2023-10-17

OpenJDK Runtime Environment Temurin-17.0.9+9 (build 17.0.9+9-LTS)

OpenJDK 64-Bit Server VM Temurin-17.0.9+9 (build 17.0.9+9-LTS, mixed mode, sharing)
- Check Java Compiler Version: Next, check if the Java compiler is recognized:
bash

javac -version
You should see output like:
javac 17.0.9
If both commands execute successfully and show the correct version, your Java installation is complete and properly configured.
Step 4: Setting JAVA_HOME Environment Variable (If Not Done During Installation)
If you didn’t check the option to set JAVA_HOME during installation, or if you want to verify and set it manually, follow these steps:
- Find Your JDK Installation Path: Navigate to the directory where you installed the JDK (e.g.,
C:Program FilesJavajdk-17.0.9). Copy this path. This is yourJAVA_HOMEdirectory. - Open System Properties: Search for “environment variables” in the Windows search bar and select “Edit the system environment variables.”
- Click “Environment Variables…”: In the System Properties window, click the “Environment Variables…” button.
- Create or Edit JAVA_HOME:
- Under “User variables for [your username]”: Click “New…” to create a new variable.
- Variable name:
JAVA_HOME - Variable value: Paste the JDK installation path you copied earlier (e.g.,
C:Program FilesJavajdk-17.0.9).
- Variable name:
- Under “System variables”: You can also set it here for all users. The process is the same.
- Under “User variables for [your username]”: Click “New…” to create a new variable.
- Add JDK to PATH: This step is crucial for running
javaandjavaccommands from any directory.- In the “System variables” section, find the variable named
Pathand select it. - Click “Edit…”
- Click “New” and add the path to the
bindirectory within your JDK installation (e.g.,C:Program FilesJavajdk-17.0.9bin). - Click “OK” on all open windows to save the changes.
- In the “System variables” section, find the variable named
- Restart Command Prompt: Close any open Command Prompt windows and open a new one. This is necessary for the changes to take effect.
- Re-verify: Run
java -versionandjavac -versionagain to confirm they work correctly.
Setting JAVA_HOME is fundamental for many development tools, build systems (like Maven and Gradle), and application servers to locate your Java installation. This is a critical aspect of setting up a productive development environment, directly impacting your ability to leverage the vast technological ecosystem.
Installing Java (JDK) on macOS
Installing Java on macOS is also a streamlined process, often involving downloading a .dmg file and running an installer.
Step 1: Download the JDK Installer
- Choose Your JDK Distribution: Similar to Windows, select your preferred distribution and version. Adoptium Temurin (OpenJDK) is a good choice for macOS as well.
- Navigate to the Download Page: Visit the Adoptium website (https://adoptium.net/).
- Select Your Operating System and Architecture: Choose “macOS” and your system’s architecture (usually x64 or AArch64 for Apple Silicon/M1/M2 chips).
- Pick a Version: Select the latest LTS version or the specific version you need.
- Download the Installer: Click on the download link for the
.pkginstaller.
Step 2: Run the Installer
- Locate the Downloaded File: Find the
.pkgfile in your Downloads folder (e.g.,OpenJDK17U-jdk_x64_macOS_hotspot_...pkg). - Open the Installer: Double-click the
.pkgfile to launch the installer. - Follow the Installation Wizard:
- Introduction, Read Me, License: Click “Continue” through these initial screens. You’ll need to agree to the license terms.
- Installation Type: The installer will usually default to installing in a standard location (e.g.,
/Library/Java/JavaVirtualMachines/). Click “Install.” - Enter Password: You’ll be prompted to enter your macOS user password to authorize the installation.
- Installation Successful: Once complete, you’ll see a confirmation message. Click “Close.”
Step 3: Verify the Installation
After installation, you need to confirm that Java is correctly set up and accessible from your terminal.
- Open Terminal: You can find the Terminal application in
Applications > Utilitiesor by searching for it using Spotlight (Cmd + Space, then type “Terminal”). - Check Java Version: In the Terminal window, type the following command and press Enter:
bash

java -version
You should see output similar to this (version numbers may vary):
openjdk version "17.0.9" 2023-10-17

OpenJDK Runtime Environment Temurin-17.0.9+9 (build 17.0.9+9-LTS)

OpenJDK 64-Bit Server VM Temurin-17.0.9+9 (build 17.0.9+9-LTS, mixed mode, sharing)
- Check Java Compiler Version: To verify the compiler:
bash

javac -version
Expected output:
javac 17.0.9
If both commands display the correct version information, your Java installation on macOS is successful.
Step 4: Setting JAVA_HOME Environment Variable (macOS)
While the macOS installer often handles the basic setup, explicitly setting JAVA_HOME is still a best practice, especially for command-line tools and build systems.
-
Identify Your JDK Path: The JDKs are typically installed in
/Library/Java/JavaVirtualMachines/. You can list the installed JDKs by running:/usr/libexec/java_home -VThis will show you the version numbers and their installation paths. For example, you might see something like:
Matching Java Virtual Machines (1):
    17.0.9 (x86_64) "Eclipse Temurin" - "Eclipse Temurin 17.0.9" /Library/Java/JavaVirtualMachines/temurin-17.jdk/Contents/Home
Copy the path that points to the
Contents/Homedirectory of your desired JDK. -
Edit Your Shell Profile: You’ll need to edit your shell’s configuration file. This is typically
~/.zshrcfor Zsh (the default shell on newer macOS versions) or~/.bash_profile(or~/.bashrc) for Bash.- For Zsh: Open your
.zshrcfile with a text editor:
bash

nano ~/.zshrc
- For Bash: Open your
.bash_profilefile:
bash

nano ~/.bash_profile
- For Zsh: Open your
-
Add the JAVA_HOME Export Line: Add the following line to the end of your configuration file, replacing
/path/to/your/jdkwith the actual path you identified in step 1.export JAVA_HOME="/Library/Java/JavaVirtualMachines/temurin-17.jdk/Contents/Home"- Tip for Dynamic JAVA_HOME: A more robust way to set
JAVA_HOMEis to use the/usr/libexec/java_homecommand directly, which automatically finds the newest installed JDK. Add this to your~/.zshrcor~/.bash_profile:
bash

export JAVA_HOME=$(/usr/libexec/java_home)
If you need a specific version, you can specify it:
bash

export JAVA_HOME=$(/usr/libexec/java_home -v 17) # For Java 17
- Tip for Dynamic JAVA_HOME: A more robust way to set
-
Save and Exit:
- In
nano, pressCtrl + X, thenYto confirm saving, andEnterto confirm the filename.
- In
-
Reload Your Shell Configuration: For the changes to take effect immediately, either close and reopen your Terminal, or run:
- For Zsh:
source ~/.zshrc - For Bash:
source ~/.bash_profile
- For Zsh:
-
Re-verify: Run
java -versionandjavac -versionagain to ensure they are recognized and pointing to the correct version.
Beyond Installation: Integrating Java into Your Workflow
Installing Java is just the beginning. A proper setup extends to how you integrate it into your broader technological workflow.
IDEs and Code Editors
Once Java is installed, the next logical step for any developer is to choose an Integrated Development Environment (IDE) or a code editor. These tools provide features like syntax highlighting, code completion, debugging interfaces, and build automation that significantly enhance productivity.
Popular choices include:
- IntelliJ IDEA: A powerful, feature-rich IDE from JetBrains, widely considered one of the best for Java development. It offers a free Community Edition and a paid Ultimate Edition.
- Eclipse: A long-standing, open-source IDE that is highly extensible through plugins. It’s a popular choice for many Java developers.
- Apache NetBeans: Another open-source IDE with robust support for Java, as well as other languages.
- Visual Studio Code (VS Code): While not a traditional IDE, VS Code with the Java Development Kit (JDK) extension pack provides a lightweight yet powerful environment for Java development.
Each of these tools relies on your JDK installation to compile and run your code. Properly setting JAVA_HOME ensures these IDEs can locate and utilize your JDK without manual configuration. This seamless integration is a cornerstone of efficient tech development, aligning with broader trends in productivity and the use of specialized tools.
Build Tools and Dependency Management
For any non-trivial Java project, you’ll encounter build tools and dependency managers. These are essential for automating the compilation, testing, packaging, and deployment of your applications, and for managing external libraries (dependencies) your project needs.
- Maven: A widely adopted build automation and project management tool. It uses an XML-based configuration file (
pom.xml) to define project structure, dependencies, and build lifecycle. - Gradle: A more modern and flexible build automation tool that uses a Groovy or Kotlin-based DSL. It’s known for its speed and extensibility.
Both Maven and Gradle use the JAVA_HOME environment variable to find the JDK they need to execute their tasks. This underscores the importance of correctly configuring JAVA_HOME for any serious Java development. Understanding and utilizing these tools is a key aspect of professional software development and contributes to efficient project management, which has direct implications for brand reputation and project delivery timelines in a business context.
The Financial and Brand Implications of Java Development
While the technical act of installing Java is free and accessible, its broader impact touches upon financial and brand considerations within the tech industry.
- Cost-Effectiveness of Open Source: The widespread adoption of OpenJDK and the availability of free distributions like Adoptium Temurin make Java development incredibly cost-effective for individuals and businesses. This democratizes access to powerful development capabilities, fostering innovation and entrepreneurship.
- Enterprise Applications and Scalability: Java’s strength in building robust, scalable enterprise applications means it’s a foundational technology for many businesses. The financial investment in Java expertise and infrastructure is significant, but the return on investment comes from the reliability and performance of applications that drive core business operations.
- Personal Branding and Career Growth: For individuals, mastering Java and its associated tools can significantly enhance personal branding within the tech industry. Proficiency in Java is a highly sought-after skill, opening doors to lucrative career opportunities in software engineering, data science, and more. Building a portfolio of Java projects, contributing to open-source Java projects, and showcasing your skills are all ways to leverage your technical expertise for career advancement.
- Brand Identity through Software: For companies, the software they deliver is a direct extension of their brand. Applications built with Java that are stable, performant, and user-friendly contribute positively to customer perception and brand loyalty. Conversely, poorly performing or buggy software can damage a company’s reputation. Therefore, a solid development foundation, starting with a correct Java installation, is crucial for brand integrity.
In conclusion, installing Java is a fundamental step for anyone interested in software development. By understanding the components of the JDK, choosing the right version, and correctly configuring your system, you lay the groundwork for building powerful applications. This technical process, while seemingly simple, is deeply intertwined with the broader themes of technological advancement, personal and corporate branding, and the economic landscape of the digital world.
aViewFromTheCave is a participant in the Amazon Services LLC Associates Program, an affiliate advertising program designed to provide a means for sites to earn advertising fees by advertising and linking to Amazon.com. Amazon, the Amazon logo, AmazonSupply, and the AmazonSupply logo are trademarks of Amazon.com, Inc. or its affiliates. As an Amazon Associate we earn affiliate commissions from qualifying purchases.