In the vast and ever-evolving landscape of operating systems, Linux stands as a beacon of open-source innovation, security, and flexibility. Yet, for many users transitioning from Windows or needing specific proprietary software, the hurdle of application compatibility can seem daunting. This is precisely where WineHQ steps in, bridging the gap between the Windows software ecosystem and the Linux world. Far from being an emulator, Wine (which recursively stands for “Wine Is Not an Emulator”) is a compatibility layer designed to allow Windows applications to run directly on Linux, macOS, and BSD by translating Windows API calls into POSIX calls on-the-fly.

This comprehensive guide will walk you through the process of installing WineHQ, providing you with the most up-to-date methods and best practices. Whether you’re a seasoned Linux user or a newcomer looking to expand your system’s capabilities, understanding how to properly install WineHQ is a crucial step towards maximizing your productivity and leveraging a wider array of software on your preferred open-source platform. We’ll cover everything from initial preparations to distribution-specific installation steps, post-installation configuration, and essential tips for a smooth experience.
Unlocking Windows Applications on Linux: What is WineHQ?
Before diving into the installation specifics, it’s essential to grasp what WineHQ truly is and why it’s a critical tool for many Linux users. Understanding its purpose and the distinction between WineHQ and other Wine packages will set the stage for a successful setup.
The Core Concept of Wine
At its heart, Wine is a sophisticated compatibility layer that translates Windows API calls into their equivalent POSIX calls. This allows Windows programs to run natively on Linux systems without the overhead of emulation or virtualization. Unlike a virtual machine, which simulates an entire operating system, Wine runs Windows applications directly on your Linux desktop, leading to better performance and more seamless integration with your existing environment. It effectively creates a “virtual C: drive” and a Windows registry-like environment within your Linux file system, mimicking the structure Windows applications expect. This ingenious design has enabled countless users to run games, productivity suites, and specialized tools that were once exclusive to Microsoft’s operating system.
Why Choose WineHQ Over Distribution Packages?
Many Linux distributions include a version of Wine in their default repositories. While convenient, these packages often lag behind the latest developments and might not offer the cutting-edge features, bug fixes, or performance improvements available in the official WineHQ releases. The “HQ” in WineHQ signifies that you are installing directly from the official Wine project’s repositories. This provides several key advantages:
- Latest Versions: WineHQ offers access to the most recent stable, development, and staging branches of Wine. This is crucial for compatibility with newer Windows applications and games, as well as for benefiting from the latest performance optimizations and bug fixes.
- Wider Compatibility: Newer Wine versions often bring improved compatibility with a broader range of Windows software. If you encounter issues with a particular application using an older Wine version from your distro’s repository, an update from WineHQ might resolve it.
- Access to Staging Branch: The staging branch includes experimental features and patches that are still under review but often provide significant improvements for certain applications. While potentially less stable, it’s invaluable for testing and early adoption.
- Consistent Updates: By using the official WineHQ repositories, you ensure that your Wine installation receives timely updates directly from the developers, keeping your compatibility layer current and robust.
For anyone serious about running a variety of Windows applications on Linux, opting for the official WineHQ installation is almost always the recommended path.
Essential Preparations Before Installation
A smooth installation process always starts with proper preparation. Before you begin adding repositories and running commands, there are a couple of crucial steps to take to ensure your system is ready for WineHQ.
Enabling 32-bit Architecture Support
Most modern Linux systems are 64-bit, but many Windows applications, particularly older ones or certain components, are still 32-bit. WineHQ often requires 32-bit libraries to function correctly, regardless of whether you’re installing a 64-bit version of Wine. Failing to enable 32-bit architecture support (also known as multiarch) before installing Wine can lead to missing dependencies and an incomplete or non-functional installation.
For Debian/Ubuntu-based systems (e.g., Ubuntu, Linux Mint, Debian):
Open your terminal and execute the following command:
sudo dpkg --add-architecture i386
sudo apt update
The first command adds the i386 architecture, allowing your system to install 32-bit packages. The second command refreshes your package lists to recognize the newly added architecture and its available packages.
For Fedora/RHEL-based systems (e.g., Fedora, CentOS Stream, Rocky Linux):
While Fedora typically handles 32-bit compatibility better by default when installing 64-bit packages, ensuring that you have necessary 32-bit libraries installed is good practice. The dnf package manager usually resolves 32-bit dependencies automatically. If you encounter issues, you might need to install specific i686 packages, but for Wine, the system often handles it.
For Arch Linux and Derivatives (e.g., Manjaro):
You need to enable the multilib repository in your /etc/pacman.conf file. Uncomment the [multilib] section and its Include line:
[multilib]
Include = /etc/pacman.d/mirrorlist
After modifying the file, save it and update your system’s package database:
sudo pacman -Sy
Selecting Your Preferred WineHQ Branch (Stable, Staging, Development)
WineHQ offers three main branches, each catering to different user needs and risk tolerances:
- Stable: This is the recommended branch for most users. It contains the most thoroughly tested and stable releases, offering the best balance of compatibility and reliability. If you prioritize stability and fewer bugs, this is your go-to.
- Staging: This branch includes bug fixes and features that are in the process of being integrated into the stable branch but haven’t been fully tested or released yet. It can offer better compatibility for certain applications or games that might not work well on the stable branch, but it comes with a slightly higher risk of introducing new bugs. It’s often favored by gamers for its performance patches.
- Development: This branch contains the absolute latest code, including new features and experimental changes. It’s primarily for developers and advanced users who want to test the bleeding edge of Wine development. This branch is the least stable and most prone to bugs, making it generally unsuitable for everyday use.
For the purpose of this guide, we will primarily focus on installing the Stable branch, as it provides the most consistent experience for the majority of users. However, the steps for Staging and Development are very similar, usually involving a slight change in the package name.
Step-by-Step WineHQ Installation Across Major Linux Distributions
The installation process for WineHQ involves adding the official WineHQ repository to your system, importing its GPG key for package verification, and then using your distribution’s package manager to install the desired WineHQ branch.
For Debian/Ubuntu-Based Systems
This section covers distributions like Ubuntu, Linux Mint, Debian, and their derivatives.
-
Import the WineHQ GPG Key:
This key is used to verify the authenticity of the WineHQ packages, ensuring that they haven’t been tampered with.sudo mkdir -pm755 /etc/apt/keyrings sudo wget -O /etc/apt/keyrings/winehq-archive.key https://dl.winehq.org/wine-builds/winehq.keyNote: For older Ubuntu/Debian versions (e.g., Ubuntu 20.04 or Debian 10), you might need to use
sudo apt-key add winehq.keyafter downloading the key. For modern systems, the/etc/apt/keyringsmethod is preferred. -
Add the WineHQ Repository:
The repository URL depends on your specific Debian or Ubuntu version.-
For Ubuntu: Find your Ubuntu version codename (e.g.,
jammyfor 22.04,noblefor 24.04). You can check withlsb_release -cs.echo "deb [signed-by=/etc/apt/keyrings/winehq-archive.key] https://dl.winehq.org/wine-builds/ubuntu/ YOUR_UBUNTU_CODENAME main" | sudo tee /etc/apt/sources.list.d/winehq.listReplace
YOUR_UBUNTU_CODENAMEwith your actual codename. -
For Debian: Find your Debian version codename (e.g.,
bookwormfor Debian 12,sidfor unstable).
bash

echo "deb [signed-by=/etc/apt/keyrings/winehq-archive.key] https://dl.winehq.org/wine-builds/debian/ YOUR_DEBIAN_CODENAME main" | sudo tee /etc/apt/sources.list.d/winehq.list
ReplaceYOUR_DEBIAN_CODENAMEwith your actual codename.
-
-
Update Package Lists:
After adding the new repository, you must update your package lists so your system recognizes the available WineHQ packages.sudo apt updateIf you encounter
NO_PUBKEYerrors, double-check that you imported the GPG key correctly and the repository URL is correct. -
Install WineHQ:
Now you can install the desired WineHQ branch.-
Stable Branch:
sudo apt install --install-recommends winehq-stable -
Staging Branch: (If you prefer the staging branch)
sudo apt install --install-recommends winehq-staging -
Development Branch: (If you prefer the development branch)
bash

sudo apt install --install-recommends winehq-devel
The
--install-recommendsflag ensures that all recommended packages, which often include crucial components for Wine’s functionality, are also installed. -
For Fedora/RHEL-Based Systems
This section applies to Fedora, CentOS Stream, Rocky Linux, and similar distributions.
-
Add the WineHQ Repository:
The repository for Fedora is straightforward. For RHEL/CentOS Stream, ensure you have EPEL (Extra Packages for Enterprise Linux) enabled if you encounter dependency issues.sudo dnf config-manager --add-repo https://dl.winehq.org/wine-builds/fedora/39/winehq.repoNote: Replace
39with your Fedora version number (e.g.,40for Fedora 40). For CentOS Stream/Rocky Linux, you might need to adjust the path, typically pointing to the RHEL equivalent. -
Install WineHQ:
Usednfto install your chosen WineHQ branch.- Stable Branch:
bash

sudo dnf install winehq-stable
- Stable Branch:
*   **Staging Branch:**
    ```bash
    sudo dnf install winehq-staging
    ```

*   **Development Branch:**
    ```bash
    sudo dnf install winehq-devel
    ```

`dnf` will automatically resolve and install necessary 32-bit dependencies.
For Arch Linux and Derivatives
Arch Linux and its derivatives (like Manjaro) benefit from the multilib repository, which typically includes the latest Wine versions. While you can technically add external WineHQ repositories, the multilib packages are usually very up-to-date and well-maintained.
-
Enable Multilib Repository (if you haven’t already):
As mentioned in the “Preparations” section, uncomment the[multilib]section in/etc/pacman.confand updatepacman:sudo nano /etc/pacman.conf # (Uncomment [multilib] and its Include line) sudo pacman -Sy -
Install Wine:
Arch Linux typically provides a singlewinepackage that often corresponds to the stable or a very recent development version. You can also installwine-stagingif you prefer.-
Stable/Latest (from
multilib):sudo pacman -S wine wine-gecko wine-monowine-geckoandwine-monoare often required by Windows applications, so it’s good practice to install them alongside Wine. -
Staging Branch:
bash

sudo pacman -S wine-staging wine-gecko wine-mono
-
Verifying Your WineHQ Installation
After the installation is complete, it’s a good idea to verify that WineHQ has been installed correctly and is accessible from your terminal.
Open your terminal and type:
wine --version
This command should output the installed WineHQ version (e.g., wine-8.0.2 or wine-9.0-rc1). If you see a version number, congratulations, WineHQ is installed! If you get a “command not found” error, review the installation steps for your distribution carefully.
Post-Installation: Configuration and Enhancing Your WineHQ Experience
Installing WineHQ is just the first step. To ensure optimal performance and compatibility with your Windows applications, some initial configuration and the installation of essential tools are highly recommended.
Initial Setup with winecfg
The winecfg utility is Wine’s graphical configuration tool, which allows you to adjust various settings that can impact application compatibility and behavior. The first time you run a Wine command, it will typically prompt you to create a “Wine prefix” (the virtual C: drive environment) and install some necessary components like Wine Mono and Wine Gecko.
-
Initialize the Wine Prefix:
Runwinecfgfrom your terminal:winecfgUpon the first run, Wine will ask to install Wine Mono and Wine Gecko. Click “Install” for both. These components are often required by .NET and web-based Windows applications.
Once the initial setup is complete, the
winecfgwindow will appear. Here, you can:- Applications Tab: Add application-specific settings (e.g., set a different Windows version for a particular program).
- Libraries Tab: Override specific DLLs. This is an advanced feature usually used for troubleshooting or optimizing specific applications.
- Graphics Tab: Adjust screen resolution, enable or disable Vertex Shader support, and configure other graphics-related options.
- Drives Tab: Map Linux directories to drive letters within Wine.
- Desktop Integration: Change themes, associate file types.
- Audio Tab: Configure audio drivers.
For most users, the default settings are a good starting point. You might only need to adjust settings if a specific application requires it. It’s often recommended to change the Windows version on the “Applications” tab for demanding games or software to a more modern version like “Windows 10” for better compatibility, but some older applications might perform better with “Windows XP” or “Windows 7”.
Mastering Application Compatibility with Winetricks
Winetricks is an invaluable helper script for Wine that allows you to easily install various runtime libraries, DLLs, and components that Windows applications often rely on. This includes things like DirectX versions, .NET Framework, Visual C++ runtimes, and various fonts. Without these, many Windows programs will simply refuse to run or display errors.
-
Install Winetricks:
Winetricks is usually available in your distribution’s default repositories.- Debian/Ubuntu:
bash

sudo apt install winetricks
- Fedora:
bash

sudo dnf install winetricks
- Arch Linux:
bash

sudo pacman -S winetricks
- Debian/Ubuntu:
-
Using Winetricks:
Once installed, you can launch Winetricks from your terminal:winetricksThis will open a graphical interface where you can:
- Select the default wineprefix: Usually
Default. - Install a Windows DLL or component: This is the most common use. You can select items like
directx9,dotnet45,vcrun2015, etc. - Install a font: Essential for some applications.
- Change settings: For example, change the Wine prefix Windows version, or enable/disable specific features.
When an application fails to launch or displays an error about a missing DLL, Winetricks is often the first place to look for a solution. It simplifies the process of installing these crucial dependencies.
- Select the default wineprefix: Usually
Running Your First Windows Application
With WineHQ installed and basic configuration done, you’re ready to run a Windows application.
-
Navigate to the Application:
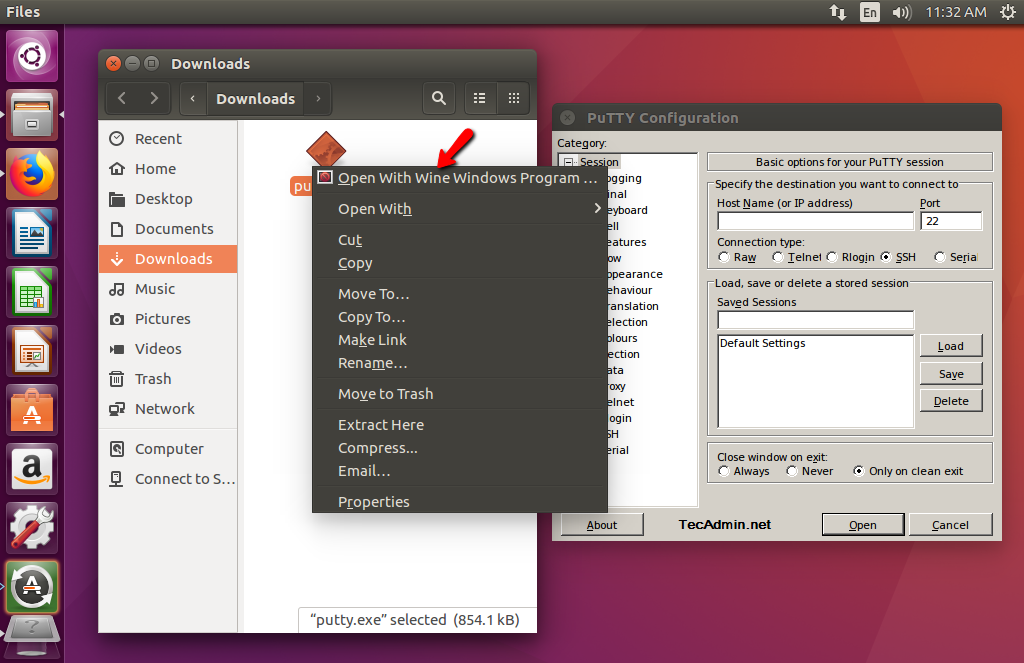
Open your file manager, navigate to the.exefile of the Windows application you want to run. -
Execute the Application:
- From the File Manager: In most desktop environments (GNOME, KDE Plasma, XFCE), you can simply right-click the
.exefile and select “Open With Wine Windows Program Loader” or double-click it. - From the Terminal:
bash

wine /path/to/your/application.exe
For example:wine ~/Downloads/MyAppInstaller.exe
Wine will then attempt to run the application. The first time, it might take a moment as Wine sets up the necessary environment. If the application requires an installer, proceed through it as you would on Windows. Installed applications typically appear in your desktop environment’s application menu under a “Wine” or “Windows Applications” category.
- From the File Manager: In most desktop environments (GNOME, KDE Plasma, XFCE), you can simply right-click the
Maintaining and Troubleshooting Your WineHQ Setup
Like any complex software, WineHQ benefits from regular maintenance and sometimes requires troubleshooting. Knowing how to keep it updated and address common issues will ensure a smoother experience.
Keeping WineHQ Updated
Regularly updating WineHQ is crucial for maintaining compatibility with newer Windows applications, benefiting from performance improvements, and receiving important bug fixes.
-
For Debian/Ubuntu-based systems:
Since you’ve added the WineHQ repository, regular system updates will include WineHQ updates.sudo apt update sudo apt upgrade -
For Fedora/RHEL-based systems:
Similarly, WineHQ updates will be part of your standard system updates.sudo dnf update -
For Arch Linux and Derivatives:
Updates from themultilibrepository are part of your regular system synchronization.
bash

sudo pacman -Syu
It’s always a good idea to perform these updates periodically to ensure your WineHQ installation is current.
Addressing Common Issues and Seeking Support
While WineHQ is incredibly powerful, it’s not perfect, and you might encounter issues. Here are some common problems and how to approach them:
-
Application Doesn’t Launch or Crashes Immediately:
- Check
winecfg: Try setting a different Windows version (e.g., Windows 10 for newer apps, Windows 7 or XP for older ones). - Use Winetricks: Install missing DLLs or components like specific DirectX versions, .NET Framework, or Visual C++ runtimes.
- Terminal Output: Run the application from the terminal (
wine /path/to/app.exe) and observe the output. Error messages can provide clues about missing libraries or issues. - ProtonDB/Wine AppDB: Consult the Wine AppDB or ProtonDB (for games, which also uses Wine) for specific application compatibility reports, workarounds, and required Winetricks installations.
- Check
-
Graphics Glitches or Poor Performance:
- Graphics Drivers: Ensure your graphics drivers are up-to-date and correctly installed for your GPU (NVIDIA, AMD, Intel). This is paramount for Wine performance, especially with games.
winecfgGraphics Tab: Experiment with settings like enabling or disabling Vertex Shader support.- DXVK/VKD3D: For modern games, consider using DXVK (DirectX 9/10/11 to Vulkan) or VKD3D-Proton (DirectX 12 to Vulkan). These are highly recommended for performance and compatibility and can often be installed via Winetricks or specific Wine versions (like Wine-GE or Proton).
- Staging Branch: If you’re on Stable, try the Staging branch, as it often includes performance-enhancing patches.
-
Sound Problems:
winecfgAudio Tab: Ensure the correct audio driver is selected (usually PulseAudio or ALSA).- Pulseaudio/ALSA: Verify your system’s audio setup is working correctly.
-
Font Issues:
- Winetricks: Use Winetricks to install common Microsoft fonts (e.g.,
corefonts).
- Winetricks: Use Winetricks to install common Microsoft fonts (e.g.,
Seeking Further Support:
- WineHQ Forums: The official WineHQ forums are an excellent resource for detailed discussions and troubleshooting.
- Distribution Forums/Communities: Your Linux distribution’s forums or Discord/Telegram groups can also offer specific advice tailored to your system.
- IRC/Discord: Many Linux and gaming communities have dedicated channels for Wine support.
Remember that WineHQ is a continuous work in progress, and while it achieves impressive compatibility, some applications may still not run perfectly or at all. Patience, experimentation, and leveraging community resources are key to a successful Wine experience.
Installing WineHQ on your Linux system opens up a world of possibilities, allowing you to run a vast array of Windows applications directly on your open-source desktop. By following the detailed steps outlined in this guide – from enabling 32-bit architecture and selecting your preferred WineHQ branch to running distribution-specific commands and configuring winecfg and Winetricks – you’ve equipped your system with a powerful compatibility layer.
While the initial setup might seem intricate, the benefits of having access to crucial Windows software without resorting to a full-fledged virtual machine or dual-boot setup are immense. You now have the tools and knowledge to explore, experiment, and troubleshoot, ensuring that your Linux experience is as productive and versatile as possible. Embrace the flexibility that WineHQ offers, and continue to delve into the capabilities of your Linux system, confident in your ability to bridge the application gap.
aViewFromTheCave is a participant in the Amazon Services LLC Associates Program, an affiliate advertising program designed to provide a means for sites to earn advertising fees by advertising and linking to Amazon.com. Amazon, the Amazon logo, AmazonSupply, and the AmazonSupply logo are trademarks of Amazon.com, Inc. or its affiliates. As an Amazon Associate we earn affiliate commissions from qualifying purchases.