
Embarking on the journey with a new PC is an exciting prospect, promising enhanced performance, cutting-edge technology, and a fresh start for your digital life. Whether you’ve just built a custom rig, purchased a barebones system, or simply need to reinstall Windows for a clean slate, understanding the installation process is a fundamental skill for any tech enthusiast. This comprehensive guide will walk you through every step of installing Windows on your new machine, ensuring a smooth, secure, and optimized setup from the very first boot.
In today’s fast-evolving technological landscape, mastering core software installations like Windows is crucial for harnessing the full potential of your hardware. A proper installation not only ensures system stability and efficiency but also lays the groundwork for robust digital security and maximum productivity. We’ll delve into everything from preparing your system and creating installation media to navigating the setup wizard and configuring post-installation essentials, integrating best practices that align with modern tech trends and digital security imperatives.
Preparing for Your Windows Installation: Essential Prerequisites
Before you even think about plugging in a USB drive, a thorough preparation phase is critical. This initial stage ensures you have all the necessary tools, information, and safeguards in place, preventing potential headaches down the line and setting the stage for a seamless installation.
Choosing Your Windows Version and Edition
The first decision involves selecting the appropriate version and edition of Windows. Currently, Windows 11 is the latest iteration, offering a modernized interface, enhanced performance, and new features designed for productivity and creativity, including deeper integration with cloud services and AI tools. However, Windows 10 remains a stable and widely supported option, especially for older hardware or specific software compatibility needs.
- Windows 11 Home: Ideal for most personal users, offering essential features for daily computing, browsing, and entertainment.
- Windows 11 Pro: Geared towards power users, small businesses, and professionals, it includes advanced features like BitLocker encryption, Remote Desktop, and Group Policy management.
- Windows 10 Home/Pro: Similar distinctions apply to Windows 10. Consider your specific requirements for security, network capabilities, and advanced functionalities when making your choice.
Ensure your chosen version is compatible with your new PC’s hardware. Windows 11, for instance, has stricter hardware requirements, including TPM 2.0 and Secure Boot, which are important digital security features. Check Microsoft’s official system requirements before proceeding.
Gathering Necessary Hardware and Software
Beyond the Windows operating system itself, you’ll need a few other items to facilitate the installation:
- A Reliable Internet Connection: Essential for downloading the Windows Media Creation Tool, system updates, and drivers. A wired Ethernet connection is recommended during installation for stability, though Wi-Fi can work.
- Another Working PC: You’ll need access to a functional computer to download the Windows Media Creation Tool and create your bootable installation media.
- A USB Flash Drive (8GB or larger): This will be your primary installation media. Ensure it’s empty, as the creation process will erase all data on it. While DVDs were once common, USB drives are now the preferred, faster, and more convenient method.
- Your Windows Product Key (Optional but Recommended): While you can often install Windows without immediately entering a product key and activate it later, having it ready ensures a smooth process. The key is typically found on a sticker with your PC (if pre-built), in your email confirmation (for digital purchases), or linked to your Microsoft account.
- External Storage for Data Backup (If applicable): If you’re reinstalling Windows on a PC that previously had data, ensure all critical files are backed up to an external hard drive or cloud storage. This step is paramount for data security and preventing irretrievable loss.
- Essential Drivers (Optional, but Smart): While Windows typically includes generic drivers, having the latest drivers for your motherboard chipset, graphics card, network adapter, and any other crucial components downloaded to a separate USB drive can save time. You can get these from your hardware manufacturers’ official websites.
Data Backup and System Requirements
Even on a “new” PC, if it’s replacing an older system or has previously been used, backing up any existing data is non-negotiable. For a truly new, empty PC, this step is less critical but still good practice if you start adding files before the OS is fully set up.
Always double-check the minimum system requirements for your chosen Windows version. These include processor speed, RAM, storage space, graphics card, and display resolution. For Windows 11, specifically, ensure your system meets the requirements for Trusted Platform Module (TPM) version 2.0 and Secure Boot, which are vital components of its enhanced digital security framework. These features are usually enabled in your PC’s UEFI/BIOS settings.
Creating Your Windows Installation Media
With your preparations complete, the next crucial step is to create a bootable USB drive or DVD that contains the Windows installation files. This media will allow your new PC to load the setup program before an operating system is present.
Downloading the Windows Media Creation Tool
Microsoft provides an official and free tool called the “Media Creation Tool” which simplifies this process.
- Access Microsoft’s Website: On your working PC, open your web browser and navigate to the official Microsoft download page for Windows 10 or Windows 11.
- Download the Tool: Locate the section for “Create Windows 10/11 installation media” and click the “Download tool now” button. Save the executable file to your computer.
- Run the Tool: Once downloaded, double-click the
MediaCreationTool.exefile. Accept the license terms to proceed.
Using a USB Drive vs. DVD
While the Media Creation Tool offers the option to create an ISO file (which can then be burned to a DVD), using a USB flash drive is overwhelmingly recommended due to its speed, convenience, and the decreasing prevalence of optical drives in modern PCs.
The Process of Media Creation
Follow these steps once the Media Creation Tool is running:
- Select Language, Architecture, and Edition: The tool will often auto-detect your current PC’s settings. You can choose to “Use the recommended options for this PC” or uncheck it to manually select the language, Windows edition (e.g., Windows 11 Home/Pro), and architecture (64-bit). For modern systems, 64-bit is the standard.
- Choose Media Type: When prompted, select “USB flash drive” as the media you want to use.
- Select Your USB Drive: The tool will display a list of connected USB drives. Carefully select the correct drive, as all data on it will be erased. Double-check to avoid accidentally formatting another important drive.
- Wait for the Process to Complete: The tool will now download the Windows installation files and write them to your USB drive, making it bootable. This process can take some time, depending on your internet speed and the speed of your USB drive. Do not remove the USB drive until the tool indicates that it’s finished.
Once complete, safely eject the USB drive from your working PC. You now have your bootable Windows installation media ready.
The Step-by-Step Windows Installation Process
This is where your new PC truly comes to life. With your installation media in hand, it’s time to begin installing Windows.
Booting from the Installation Media
- Connect the USB Drive: Insert the bootable Windows USB flash drive into an available USB port on your new PC.
- Power On and Enter BIOS/UEFI: Turn on your PC. As soon as it starts, you’ll need to rapidly press a specific key to enter the BIOS or UEFI firmware settings. Common keys include
Delete,F2,F10,F12, orEsc. The exact key often flashes briefly on the screen during startup. If you miss it, restart and try again. - Configure Boot Order: Once in the BIOS/UEFI, navigate to the “Boot” or “Boot Options” section. Here, you need to change the boot order to prioritize your USB drive. Move the USB drive (it might be listed by its brand name or as “Removable Device”) to the top of the boot priority list. This tells your PC to look for an operating system on the USB drive first, rather than an empty hard drive.
- Enable Secure Boot (for Windows 11): If installing Windows 11, ensure “Secure Boot” is enabled in the BIOS/UEFI settings, usually found under “Boot” or “Security.” Also, check that your boot mode is set to “UEFI” rather than “Legacy” or “CSM.”
- Save and Exit: Save your changes (often by pressing
F10) and exit the BIOS/UEFI. Your PC will restart and should now boot from the USB drive.
Navigating the Setup Wizard: Language, Time, and Keyboard
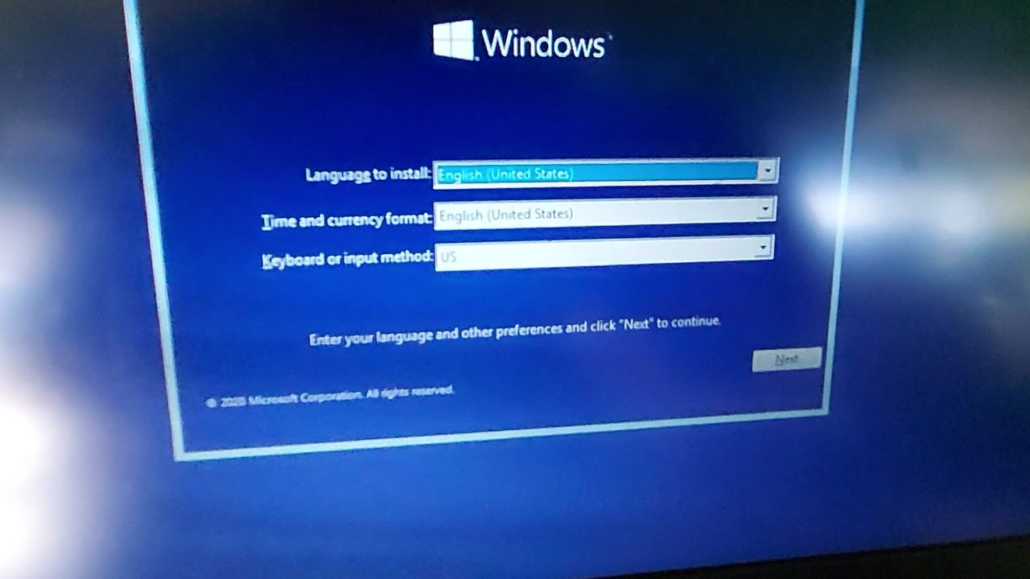
After booting from the USB drive, you’ll see the Windows setup screen:
- Windows Setup Language: Select your preferred language, time and currency format, and keyboard or input method. Click “Next.”
- Install Now: Click the large “Install now” button in the center of the screen.
Entering Your Product Key (or Skipping for Later)
- Enter Product Key: If you have your product key ready, enter it now.
- “I don’t have a product key”: If you don’t have a product key or plan to activate later, click “I don’t have a product key.” Windows will still install, but you’ll need to activate it to unlock full functionality and customization options. Your digital license may activate automatically if linked to your Microsoft account once you log in later.
- Select Operating System: If you skipped the product key, you’ll be prompted to select the version of Windows you want to install (e.g., Windows 11 Home, Windows 11 Pro). Ensure this matches the version your product key is for (if you plan to activate later).
- Accept License Terms: Read and accept the Microsoft Software License Terms. Click “Next.”
Choosing Installation Type: Upgrade vs. Custom (Clean Install)
This is a critical decision, especially for a new PC.
- Which type of installation do you want?
- Upgrade: Install Windows and keep files, settings, and applications: This option is not for a new PC without an existing OS. It’s used when updating an older version of Windows to a newer one while preserving your data.
- Custom: Install Windows only (advanced): This is the option you must choose for a new PC or for a complete, clean installation. It allows you to manage partitions and install Windows to a specific drive.
Select “Custom: Install Windows only (advanced).”

Partitioning and Selecting Your Drive
This is arguably the most important step for a clean install.
-
Where do you want to install Windows? You’ll see a list of drives and partitions.
- For a truly new, empty drive: You’ll likely see “Drive 0 Unallocated Space.” Select this unallocated space.
- For an existing drive that you want to wipe: Select each existing partition (e.g., “Drive 0 Partition 1,” “Drive 0 Partition 2”) and click “Delete.” Confirm any warnings. Repeat until the entire drive is “Unallocated Space.”
- Create New Partition: With the “Unallocated Space” selected, click “New.” Windows will usually suggest a partition size that uses the entire drive. Click “Apply.” Windows will then create a few small, essential system partitions (e.g., System, Recovery, MSR) and your main primary partition (C: drive).
- Select Primary Partition: Ensure the largest “Primary” partition (usually the one designated as your C: drive later) is selected. This is where Windows will be installed.
-
Format (Optional but Recommended for existing drives): If you’re reusing a drive, after deleting partitions and creating a new one, you might choose to “Format” the primary partition to ensure it’s completely clean, though a clean install usually takes care of this.
-
Click “Next”: With the correct primary partition selected, click “Next.”
Completing the Initial Files Copy and Restart
Windows will now begin copying files and installing features. This process is fully automated:
- Copying Windows files
- Getting files ready for installation
- Installing features
- Installing updates
- Finishing up
Your PC will restart several times during this phase. DO NOT remove the USB drive until Windows has fully installed and begins the out-of-box experience (OOBE) setup. The system will eventually boot into the initial setup screens for Windows.
Post-Installation Setup and Optimization
Congratulations, Windows is now installed! However, your journey isn’t quite over. The post-installation phase involves configuring your new operating system to your preferences, ensuring it’s secure, and optimizing it for peak productivity.
Initial Configuration: Region, Keyboard Layout, and Network
Upon the first boot into Windows, you’ll be greeted by a series of setup screens:
- Region: Select your country or region.
- Keyboard Layout: Confirm your keyboard layout. You can add a second layout if needed.
- Connect to a Network: Connect to your Wi-Fi network (if applicable) or ensure your Ethernet cable is plugged in. This is crucial for subsequent steps like updates and account setup.
- Check for Updates: Windows will typically perform a quick check for critical updates at this stage.
Account Setup: Microsoft Account vs. Local Account
This is a significant choice affecting your digital security and cloud integration:
- Sign in with your Microsoft account:
- Benefits: Seamless integration with Microsoft services (OneDrive, Office, Xbox), device synchronization, cloud backups, and easier digital license activation. This aligns with modern technology trends favoring cloud-connected ecosystems.
- Process: Enter your Microsoft email, phone, or Skype name, then your password. You might be prompted to create a PIN for faster login.
- Offline account (Local Account):
- Benefits: More privacy-focused, no cloud integration.
- Process: Look for an option like “Offline account” or “Skip for now” on the Microsoft account sign-in screen (this option can sometimes be slightly hidden, e.g., under “Sign-in options” or by disconnecting from the internet during setup). You’ll then create a local username and password.
For most users, a Microsoft account offers significant productivity and convenience advantages. If you choose a local account, remember you can link a Microsoft account later.
Privacy Settings and Cortana Configuration
Windows will then present a series of privacy settings:
- Location, Diagnostic data, Tailored experiences, Advertising ID, Speech recognition: Carefully review each option. While some data collection helps improve Windows and provide personalized experiences, you have the right to control your privacy. Adjust these settings according to your comfort level.
- Cortana: You may be asked if you want to enable Cortana, Microsoft’s virtual assistant. You can choose to enable it or skip this for now. You can always enable or disable it later.
Driver Installation and System Updates
This is arguably the most critical post-installation step for performance and stability.
- Windows Update: The first thing you should do after reaching the desktop is run Windows Update.
- Go to
Settings > Windows Update. - Click “Check for updates.” Let Windows download and install all available updates. This includes security patches, bug fixes, and often, many generic drivers for your hardware. Restart your PC as prompted. Repeat this process until no more updates are found. This is vital for digital security and system performance.
- Go to
- Manufacturer Drivers: While Windows Update handles many drivers, it’s always best to install the latest, optimized drivers directly from your hardware manufacturers’ websites:
- Motherboard Chipset Drivers: Go to your motherboard manufacturer’s website (e.g., ASUS, MSI, Gigabyte, ASRock) and download the latest chipset drivers for your specific model.
- Graphics Card Drivers: Visit NVIDIA, AMD, or Intel’s website (depending on your GPU) and download the latest drivers. These are crucial for gaming and demanding graphical applications.
- Network Adapter Drivers: If you encounter network issues, manually install LAN/Ethernet and Wi-Fi drivers from your motherboard’s support page.
- Other Peripherals: Install drivers for any specialized peripherals (printers, external sound cards, webcams) as needed.
Installing the correct and latest drivers ensures your hardware functions at its best, maximizing performance and compatibility.
Installing Essential Software and Security Measures
With your system updated and drivers installed, it’s time to equip your PC for productivity and security:
- Antivirus/Antimalware: Windows Defender is built-in and offers robust baseline protection. Ensure it’s active. If you prefer a third-party antivirus, install it now.
- Web Browser: Download and install your preferred web browser (Chrome, Firefox, Edge, Brave, etc.).
- Productivity Suite: Install your office suite (Microsoft Office, LibreOffice, Google Workspace apps).
- Utilities: Consider installing file archivers (7-Zip, WinRAR), media players (VLC), and any other essential utilities.
- Cloud Storage: Set up OneDrive, Google Drive, or Dropbox for easy file synchronization and backup. This is a key aspect of modern digital productivity.
- Backup Solution: Configure a robust backup strategy, whether it’s local backups to an external drive or cloud-based solutions, to protect your valuable data.
Common Challenges and Troubleshooting Tips
While the Windows installation process is generally smooth, issues can arise. Knowing how to troubleshoot common problems can save you a lot of time and frustration.
Boot Order Issues and BIOS/UEFI Settings
- Symptom: Your PC won’t boot from the USB drive; it might try to boot from an empty hard drive or display an error message.
- Solution: Re-enter BIOS/UEFI settings (usually by pressing
Delor anFkey during startup) and carefully verify the boot order. Ensure the USB drive is at the very top. Also, check that “Secure Boot” is enabled and the boot mode is set to “UEFI” if installing Windows 11. Sometimes, disabling “Fast Boot” in BIOS can help.
Drive Partitioning Errors
- Symptom: “Windows cannot be installed to this disk. The selected disk has an MBR partition table. On EFI systems, Windows can only be installed to GPT disks.” or similar errors.
- Solution: This typically means your drive uses an older MBR (Master Boot Record) partitioning style, while your system (especially for Windows 11) requires GPT (GUID Partition Table) for UEFI booting. To fix this, when you’re at the “Where do you want to install Windows?” screen:
- Press
Shift + F10to open Command Prompt. - Type
diskpartand press Enter. - Type
list diskand press Enter. Identify your installation drive (usually Disk 0, based on size). - Type
select disk X(replaceXwith your disk number, e.g.,select disk 0) and press Enter. - WARNING: This will erase ALL data on the selected disk. Type
cleanand press Enter. - Type
convert gptand press Enter. - Type
exitand press Enter. Close Command Prompt. - Click “Refresh” on the drive selection screen. You should now see “Unallocated Space” for that drive. Proceed to create new partitions as described earlier.
- Press
Post-Installation Driver Problems
- Symptom: No internet, low screen resolution, missing sound, or other hardware not functioning correctly.
- Solution: This is almost always a driver issue.
- Check Device Manager: Press
Windows Key + Xand select “Device Manager.” Look for any devices with yellow exclamation marks, indicating missing or problematic drivers. - Use Another PC (if no internet): If you have no network connectivity, you’ll need to use another PC to download the crucial network drivers (Ethernet and Wi-Fi) for your motherboard/laptop model. Transfer them via USB.
- Install Drivers from Manufacturer Websites: As stressed earlier, always prioritize drivers from your motherboard, graphics card, and other component manufacturers. Windows Update provides generic drivers, but manufacturer-specific drivers are optimized for performance and stability.
- Check Device Manager: Press
Activation Troubleshoooting
- Symptom: Windows isn’t activated, or you receive an activation error.
- Solution:
- Check Internet Connection: Ensure your PC is connected to the internet.
- Enter Product Key: Go to
Settings > System > Activationand try entering your product key if you skipped it earlier. - Microsoft Account Link: If your digital license is linked to your Microsoft account, sign in with that account. The activation should happen automatically.
- Troubleshooter: In the Activation settings, there’s often a “Troubleshoot” option that can help diagnose and fix common activation issues.
- Contact Microsoft Support: If all else fails, contact Microsoft support with your product key or proof of purchase.
Conclusion: A Foundation for Digital Excellence
Installing Windows on a new PC is more than just loading an operating system; it’s about meticulously preparing your digital foundation for optimal performance, robust security, and enhanced productivity. By following these detailed steps, you’ve not only set up a functional computer but also ensured that it’s updated, secure, and ready to meet the demands of modern computing.
Embracing the latest technology trends and implementing best practices for digital security from the outset will empower you to fully leverage your new PC. From enjoying blazing-fast performance to exploring new software and AI tools, a properly installed and configured Windows system is your gateway to an efficient and secure digital experience. Remember to keep your system updated, maintain strong digital security habits, and explore the vast ecosystem of apps and features that Windows offers to maximize your technological investment.
aViewFromTheCave is a participant in the Amazon Services LLC Associates Program, an affiliate advertising program designed to provide a means for sites to earn advertising fees by advertising and linking to Amazon.com. Amazon, the Amazon logo, AmazonSupply, and the AmazonSupply logo are trademarks of Amazon.com, Inc. or its affiliates. As an Amazon Associate we earn affiliate commissions from qualifying purchases.