Embarking on the journey with a brand-new computer is an exciting prospect. Whether you’ve just built a custom PC, purchased a barebones system, or are simply looking to perform a clean installation on an existing machine, installing Windows is the fundamental first step to unlocking its full potential. While it might seem like a daunting technical task, with the right guidance, it’s a straightforward process that anyone can master. This comprehensive guide will walk you through every step, from preparation to the final touches, ensuring a smooth and successful Windows installation.
A clean installation of Windows not only provides a fresh start free from bloatware and previous issues but also optimizes your system for peak performance and digital security from day one. By understanding each phase, you empower yourself with essential tech knowledge, paving the way for a more productive and secure computing experience. Let’s dive in.
Preparing for Your Windows Installation: The Essential Checklist
Before you even think about plugging in your new machine or pressing the power button, a critical preparation phase is required. Skipping these initial steps can lead to unnecessary delays, frustration, or even data loss. Think of it as laying the groundwork for a solid foundation – crucial for any successful project, especially one that involves your primary operating system.
Gathering Your Tools: What You’ll Need
Having the right tools at hand makes the installation process significantly smoother. This isn’t just about physical items; it also involves crucial digital components and information.
- A Reliable USB Flash Drive (8GB or more): This is your primary medium for the Windows installation files. Ensure it’s empty, or that you’ve backed up any data on it, as the process will completely erase its contents. USB 3.0 or higher is recommended for faster file transfer speeds, which can shave valuable minutes off the installation media creation process.
- A Stable Internet Connection: You’ll need this to download the Windows Media Creation Tool and the Windows ISO file. A wired connection is always preferred for stability, but a strong Wi-Fi connection will suffice. Post-installation, an internet connection will be vital for downloading critical updates and drivers, ensuring your system is secure and fully functional.
- Your Windows Product Key (Optional, but Recommended): While you can often install Windows without immediately entering a product key, having it ready streamlines the activation process. The product key is a 25-character code that authenticates your copy of Windows. If you bought a retail copy, it’s usually on a sticker or a card. If your computer came pre-installed with Windows, it might be embedded in the motherboard (digital license), which Windows will detect automatically. For custom builds or machines with a prior digital license linked to your Microsoft account, the key might not be strictly necessary during installation but will be required for activation.
- Backup Your Data (Crucial for Existing Machines): If you’re installing Windows on a computer that previously had an operating system, even if it’s “new” to you but not factory-fresh, meticulously back up all important files. This includes documents, photos, videos, and any software installers. A clean installation typically involves formatting the drive, which permanently erases all data. External hard drives, cloud storage services (like OneDrive, Google Drive, Dropbox), or network-attached storage (NAS) are excellent backup solutions. For truly new computers with an empty drive, this step can be skipped.
- An Empty Hard Drive or Solid State Drive (SSD): Since you’re installing Windows on a new computer, this usually means an unformatted, blank storage device. Ensure your primary drive (where Windows will reside) is ready. If you have multiple drives, decide which one will host the operating system. Typically, an SSD is preferred for its superior speed and responsiveness, drastically improving boot times and application loading.
Downloading the Windows Installation Media
With your tools ready, the next step is to acquire the Windows installation files. Microsoft provides a free and official tool to create bootable media, ensuring you get a legitimate and up-to-date version of Windows.
- Using the Official Media Creation Tool: Navigate to the official Microsoft website (search for “Windows Media Creation Tool”). This tool allows you to download a disc image (ISO file) of Windows and directly create a bootable USB flash drive or burn it to a DVD.
- Why Official Sources are Crucial for Security: Always download the Media Creation Tool directly from Microsoft. Using unofficial sources carries significant risks, including downloading corrupted files, outdated versions, or even compromised installations embedded with malware. Digital security starts with legitimate software, and ensuring your operating system is untampered with is paramount. An uncompromised installation protects your data and helps maintain system integrity, aligning with best practices for digital security outlined in our Tech topics.
Creating Your Bootable Windows Installation Media
Once the Media Creation Tool is downloaded, the process of turning your USB drive into a bootable Windows installer is straightforward. This step is where the magic happens, transforming your empty USB stick into the key to unlocking your new computer’s capabilities.
Step-by-Step with the Media Creation Tool
- Download and Run the Tool: Locate the
MediaCreationTool.exefile you downloaded and double-click to run it. You might need administrator privileges, so click “Yes” if prompted by User Account Control. - Accept License Terms: Read and accept the applicable notices and license terms to proceed.
- Choose What You Want to Do: Select the option “Create installation media (USB flash drive, DVD, or ISO file) for another PC.” This is crucial for installing Windows on your new computer.
- Select Language, Edition, and Architecture: The tool will often suggest options based on your current PC. However, for a new computer, you can uncheck “Use recommended options for this PC” to manually select:
- Language: Choose your preferred language (e.g., English (United States)).
- Edition: Select the Windows edition you want to install (e.g., Windows 11 Home, Windows 11 Pro). Ensure this matches your product key if you have one.
- Architecture: Most modern computers are 64-bit (x64). If you’re unsure, 64-bit is almost always the correct choice for new hardware.
- Choose Media Type: Select “USB flash drive” as your desired media type. Make sure your USB drive is plugged into your computer at this point.
- Select the USB Flash Drive: From the list of available drives, carefully select the correct USB flash drive. Double-check this step! Selecting the wrong drive will erase its contents, potentially leading to data loss if it’s not your designated installation drive.
- Wait for the Creation Process: The tool will now download the Windows ISO file and write it to your USB drive, making it bootable. This process can take anywhere from 15 minutes to an hour or more, depending on your internet speed and the speed of your USB drive. Be patient and avoid disconnecting the drive or shutting down your computer during this time.
- Completion: Once finished, the tool will indicate that your USB flash drive is ready. Click “Finish.”
Verifying Your Bootable Drive
While not strictly necessary, a quick check can provide peace of mind. Safely eject the USB drive and then plug it back in. When you open “This PC” (or “My Computer”), you should see the USB drive with a new icon and label, often “ESD-USB” or similar, indicating it contains the Windows installation files. You should also see several files and folders, including setup.exe, at its root. This confirms your drive is ready for action.
Booting Up and Initiating the Windows Setup
With your bootable USB in hand, it’s time to introduce your new computer to its operating system. This involves instructing your computer to start from the USB drive rather than an empty hard drive.
Accessing Your Computer’s BIOS/UEFI Settings
The BIOS (Basic Input/Output System) or its modern successor, UEFI (Unified Extensible Firmware Interface), is the firmware that initializes your computer’s hardware before the operating system loads. You need to access it to change the boot order.
- Plug in the USB Drive: Insert your bootable Windows USB flash drive into an available USB port on your new computer. For desktops, try a port directly on the motherboard (rear ports).
- Power On and Press the BIOS/UEFI Key: Turn on your computer and immediately begin pressing the designated key to enter BIOS/UEFI setup. This key varies by manufacturer but is commonly one of the following: Delete (Del), F2, F10, F12, or Esc. The exact key is often displayed on the screen during the very first moments of startup (e.g., “Press F2 to enter Setup”). If you miss it, restart and try again.
- Navigating the Interface: BIOS/UEFI interfaces can differ widely, but they generally use keyboard navigation (arrow keys, Enter, Esc). Look for sections like “Boot,” “Boot Order,” “Boot Options,” or “Startup.”
- Setting Boot Order Priority: Within the “Boot” section, you’ll find a list of boot devices. You need to move your USB flash drive (it might be listed by brand, model, or simply “USB Device”) to the top of this list, making it the first device your computer attempts to boot from.
- Save and Exit: Once the boot order is configured, save your changes and exit the BIOS/UEFI. The option is usually labeled “Save and Exit” or “Exit Saving Changes.” Your computer will then restart.
Starting the Windows Installation Process
Upon restart, if the boot order was set correctly, your computer will boot directly from the USB drive, and you’ll see the initial Windows Setup screen.
- Boot from the USB Drive: You might see a message like “Press any key to boot from USB…” If so, press a key quickly.
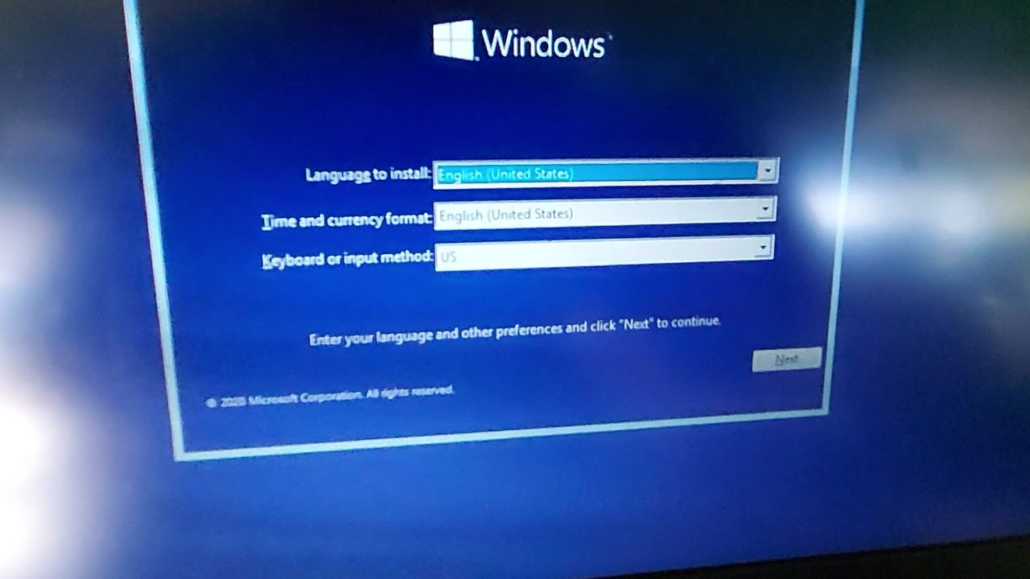
- Initial Setup Screen: The first screen will prompt you to select your language, time and currency format, and keyboard or input method. Make your selections and click “Next.”
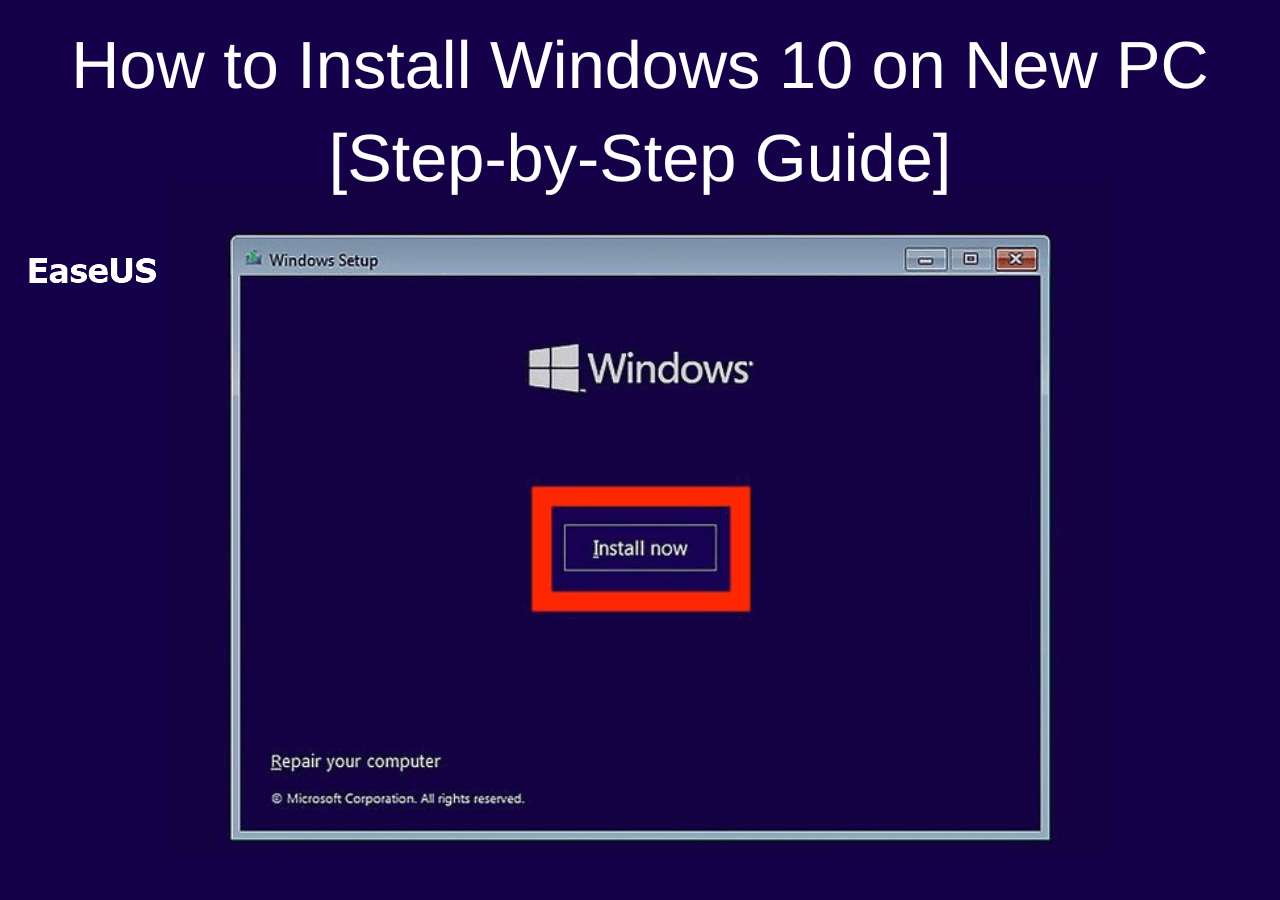
- Click “Install now”: On the subsequent screen, click the large “Install now” button to begin the actual installation.
Navigating the Windows Installation Wizard
This phase is where you make crucial decisions about where Windows will be installed and how your storage drive will be configured. Pay close attention to these steps to ensure a clean and optimized installation.
Product Key and License Agreement
- Enter Product Key: The installer will ask for your product key.
- If you have it, enter it now and click “Next.”
- If your computer has a digital license or you plan to activate later, click “I don’t have a product key” or “Do this later.” Windows will typically activate automatically once connected to the internet if a digital license is linked to your hardware or Microsoft account.
- Accept License Terms: Read the Microsoft Software License Terms. If you agree, check the box “I accept the license terms” and click “Next.”
Choosing Installation Type: Custom vs. Upgrade
This is a critical choice, especially for a new computer.
- Which type of installation do you want?
- Upgrade: Install Windows and keep files, settings, and applications: This option is not for a new computer. It’s used to upgrade an existing Windows version while retaining your data.
- Custom: Install Windows only (advanced): This is the option you must choose for a new computer or for a clean installation on an existing one. It allows you to select and configure the drive where Windows will be installed.
Partitioning Your Drive for Optimal Performance
The “Custom” installation option takes you to the drive partitioning screen. This is where you prepare your storage device for Windows.
- Identifying Your Drive(s): You’ll see a list of detected drives (e.g., “Drive 0,” “Drive 1”). For a new computer, you might only see one “Drive 0 Unallocated Space.” If you see multiple drives, ensure you select the correct one for Windows.
- Deleting Existing Partitions (If Applicable): If your drive isn’t truly empty or was previously used, you might see existing partitions (e.g., “Recovery,” “System,” “Primary”). For a completely clean install on a new drive, it’s best practice to delete all of these partitions associated with your chosen drive until it shows as a single block of “Unallocated Space.” Select each partition and click “Delete.” Be extremely careful here; deleting the wrong partition will erase data on that drive.
- Creating New Partitions: Once you have “Unallocated Space” on your target drive, select it and click “New.”
- You can choose to let Windows automatically create the necessary partitions (a small system partition and a larger primary partition for the OS). This is recommended for most users.
- Alternatively, you can manually specify the size for your primary Windows partition. For instance, if you have a 1TB drive, you might allocate 250GB for Windows and system files, leaving the rest as unallocated space to create a separate “Data” partition later. However, for simplicity and performance on an SSD, a single large primary partition is often sufficient.
- Selecting the Installation Destination: After creating partitions, you will see a “Primary” partition (or multiple if you chose to create more). Select the largest primary partition, which is where Windows will be installed. Click “Next.”
The Core Installation Process
Once you’ve selected your destination drive, the main installation begins.
- Copying Files: Windows will start copying installation files from your USB drive to your computer’s storage.
- Installing Features and Updates: It will then install various Windows features, components, and any included updates.
- Automatic Restarts: Your computer will restart multiple times during this phase. Do not remove the USB drive until Windows has completely finished setting up and you see the desktop. The computer might try to boot from the USB again after a restart; simply ignore the “Press any key to boot from USB…” message this time, and it will continue loading from the newly installed Windows on your internal drive.
This stage is largely automated. Sit back, relax, and let Windows do its job.
Post-Installation Setup and Optimization
The core Windows installation is complete, but your journey isn’t over. Several crucial steps remain to fully configure your new computer, enhance its security, and optimize it for productivity.
Initial Configuration: User Accounts and Privacy Settings
After the final restart, you’ll be guided through the initial setup wizard, personalizing your Windows experience.
- Region and Keyboard Layout: Confirm your region and keyboard layout.
- Network Connection: Connect to a Wi-Fi network or plug in an Ethernet cable. An internet connection is crucial for Microsoft account login and updates.
- User Accounts:
- Microsoft Account: Windows will strongly encourage you to sign in with or create a Microsoft account. This links your Windows installation to cloud services, allows synchronization of settings across devices, and simplifies access to Microsoft Store apps. For most users, this is the recommended path.
- Local Account: If you prefer not to use a Microsoft account, look for options like “Offline account” or “Skip for now” during the Microsoft account setup. You can then create a local username and password.
- Privacy Choices: You’ll be presented with several privacy settings regarding location, diagnostic data, tailored experiences, advertising ID, etc. Review these carefully and choose what you’re comfortable with. While some data sharing can improve services, limiting unnecessary data collection is a good practice for personal branding and digital security.
- Cortana Setup: You might be prompted to set up Cortana. You can choose to enable it or decline.
- Windows Hello: If your computer supports it (e.g., fingerprint reader, facial recognition camera), you can set up Windows Hello for faster, more secure logins.
Essential First Steps: Drivers, Updates, and Software
Once you reach the desktop, your computer is functional but not yet fully optimized. This phase is critical for system stability, security, and performance.
- Windows Update (Critical for Security and Stability): This is the absolute first thing you should do.
- Go to
Settings > Windows Updateand click “Check for updates.” - Download and install all available updates. Windows updates include crucial security patches, bug fixes, and performance enhancements. Keeping your system up-to-date is the cornerstone of digital security and ensures your system remains productive and resilient against emerging threats. You might need to check for updates multiple times and restart your computer repeatedly until no more updates are found.
- Go to
- Driver Installation: While Windows Update often installs generic drivers, your new computer’s hardware (especially graphics cards, chipsets, and network adapters) may benefit from manufacturer-specific drivers.
- Graphics Card (GPU): Visit the website of your GPU manufacturer (NVIDIA, AMD, Intel) to download the latest drivers for your specific model. This is crucial for gaming, video editing, and overall display performance.
- Motherboard Chipset Drivers: Check your motherboard manufacturer’s website for the latest chipset drivers. These are essential for optimal communication between different components.
- Other Peripherals: For specialized hardware (e.g., high-end audio cards, specific network adapters, or even monitor drivers), visit the respective manufacturer’s websites.
- Antivirus and Essential Applications:
- Antivirus: Windows Defender is built-in and offers robust protection, but you may prefer a third-party antivirus solution. Ensure your chosen security software is up-to-date.
- Web Browser: Download your preferred web browser (Chrome, Firefox, Edge, Brave).
- Productivity Suite: Install your office suite (Microsoft 365, LibreOffice, Google Workspace desktop apps).
- Other Essential Software: Install any other applications you regularly use (e.g., media players, communication apps, photo editors). This proactive approach to software installation ensures you’re set up for maximum productivity immediately.
Personalization and Productivity Boosters
With the technicalities out of the way, it’s time to make Windows truly yours and set up your workflow.
- Desktop Background and Themes: Customize your desktop background, themes, and accent colors to reflect your personal brand or preferences.
- Pin Frequently Used Apps: Pin your most-used applications to the Taskbar and Start Menu for quick access, significantly boosting your daily productivity.
- Cloud Storage Setup: If you use cloud storage services like OneDrive, Google Drive, or Dropbox, install their desktop clients and sync your files. This ensures your important documents are accessible across devices and backed up automatically.
- Power Options: Configure power settings (e.g., screen off time, sleep mode) to balance energy saving and quick access, especially relevant for laptops.
- Notifications and Focus Assist: Fine-tune notification settings and utilize Focus Assist to minimize distractions when you need to concentrate, enhancing your work efficiency.
Conclusion
Installing Windows on a new computer is a foundational skill that empowers you to take full control of your digital environment. By carefully following these steps – from meticulous preparation and the creation of reliable installation media to navigating the setup wizard and performing crucial post-installation optimizations – you ensure a clean, secure, and high-performing operating system from the get-go.
This comprehensive guide not only walks you through the technical process but also imbues you with the confidence to tackle future tech challenges. A well-installed and optimized Windows system is the bedrock of productivity, digital security, and an efficient user experience. Embrace the possibilities your newly configured machine offers, knowing that you’ve laid a solid, technically sound foundation for all your computing endeavors.
aViewFromTheCave is a participant in the Amazon Services LLC Associates Program, an affiliate advertising program designed to provide a means for sites to earn advertising fees by advertising and linking to Amazon.com. Amazon, the Amazon logo, AmazonSupply, and the AmazonSupply logo are trademarks of Amazon.com, Inc. or its affiliates. As an Amazon Associate we earn affiliate commissions from qualifying purchases.