
In an increasingly connected world, the idea of performing a major operating system installation without an internet connection might seem counter-intuitive, if not impossible. Yet, whether you’re dealing with unreliable Wi-Fi, deploying multiple systems in an isolated environment, or simply prefer an uninterrupted setup process, knowing how to install Windows 11 offline is a remarkably valuable skill. This comprehensive guide will walk you through every step, transforming what seems like a daunting task into a straightforward procedure, ensuring you can bring Microsoft’s latest operating system to life on your machine, no matter your network status.
Windows 11, with its refreshed interface, enhanced security features, and performance optimizations, is an enticing upgrade for many. However, its installation process often assumes a stable internet connection, especially for initial setup, account creation, and driver downloads. For users in remote areas, those with data caps, or IT professionals setting up multiple workstations, this dependency can be a significant bottleneck. This article delves into the nuances of an offline installation, providing a robust pathway for a smooth transition to Windows 11, free from connectivity concerns.
The Imperative of Offline Installation: Why and When You Need It
While online installations are convenient for many, specific scenarios make an offline approach not just preferable, but essential. Understanding these contexts highlights the utility and often the necessity of mastering this installation method.
Overcoming Connectivity Challenges
One of the most obvious reasons for an offline installation is the absence of a reliable internet connection. Imagine you’re setting up a new PC in a remote cabin, or your home internet service is temporarily down. In such situations, waiting for connectivity is not an option if you need your system up and running promptly. An offline installation bypasses the need for network access during the critical phases of OS deployment, allowing you to proceed unhindered. This is particularly crucial for users who live in areas with limited broadband infrastructure or those who frequently travel to locations with poor internet coverage. Having the ability to install an operating system without relying on an external connection provides a significant degree of self-sufficiency and control over your computing environment.
Streamlining Multiple Deployments
For IT administrators, small business owners, or even power users building several custom PCs, installing Windows 11 on multiple machines can be a time-consuming affair if each requires an internet connection. Each online installation might involve repeated downloads of updates, drivers, and language packs, consuming considerable bandwidth and time. An offline installation, leveraging a pre-prepared bootable USB drive, allows for rapid, consistent deployment across numerous systems. You prepare your installation media once, and then use it repeatedly without the need to connect to the internet for each subsequent setup. This method not only saves time but also ensures uniformity across all installations, reducing potential discrepancies that might arise from varying online update cycles. It’s an efficient strategy for bulk deployments, making it a cornerstone for professional system integrators and IT departments.
Ensuring a Clean and Uninterrupted Setup
Another compelling reason for choosing an offline installation is to guarantee a clean and uninterrupted setup experience. Online installations can sometimes be susceptible to interruptions due to network drops, server issues, or even slow download speeds, which can prolong the process or even lead to corrupted installations. By using a local ISO file and a bootable USB, the entire installation data is present on the physical media, virtually eliminating external dependencies during the critical phases. This ensures a faster, more predictable installation without the potential for data corruption or prolonged wait times due to internet-related factors. Furthermore, an offline setup allows you to delay the download of certain updates or telemetry data until you’ve had a chance to configure your system preferences, offering a greater sense of privacy and control from the outset. It empowers you to complete the core OS installation quickly and then selectively introduce network connectivity when you’re ready to manage updates and cloud services on your own terms.
Essential Preparations for an Offline Windows 11 Installation
Before embarking on the actual installation, a few critical preparatory steps are required. These steps ensure your system meets Windows 11’s requirements, you have the necessary installation media, and your data is safe. Ignoring these preparations can lead to frustration and potential data loss.
Verifying System Compatibility (TPM 2.0, Secure Boot)
Windows 11 introduced stricter hardware requirements compared to its predecessors, most notably the mandatory presence of a Trusted Platform Module (TPM) version 2.0 and Secure Boot enabled in the UEFI firmware. These features are critical for the enhanced security architecture of Windows 11. Before you begin, it’s imperative to verify that your system meets these specifications.
- Checking TPM 2.0: You can quickly check your TPM status by pressing
Win + R, typingtpm.msc, and hitting Enter. The TPM Management console will inform you about the TPM version and status. If it’s not detected or shows an older version, you might need to enable it in your BIOS/UEFI settings. - Checking Secure Boot: Access your system’s BIOS/UEFI settings (usually by pressing
Del,F2,F10, orF12during boot-up) and navigate to the “Boot” or “Security” tab. Look for “Secure Boot” and ensure it is enabled. If it’s disabled, enable it and save your changes.
If your system doesn’t natively support TPM 2.0 or Secure Boot, or if they cannot be enabled, you might still be able to install Windows 11 by bypassing these checks using tools like Rufus when creating your bootable media. However, be aware that this is an unsupported method by Microsoft and might lead to future compatibility issues or lack of updates. It’s always best to meet the official requirements if possible.
Acquiring the Windows 11 ISO File
The cornerstone of any offline installation is the Windows 11 ISO file. This is a complete disk image of the operating system. You’ll need to download this file from Microsoft’s official website using a computer that does have internet access.
- Visit Microsoft’s Download Page: Go to the official Windows 11 download page on Microsoft’s website.
- Download Windows 11 Disk Image (ISO): Scroll down to the “Download Windows 11 Disk Image (ISO)” section.
- Select Edition and Language: Choose “Windows 11 (multi-edition ISO)” and confirm. Then, select your desired product language.
- Initiate Download: Click the 64-bit Download button. The ISO file is several gigabytes in size, so the download might take some time depending on your internet speed. Save it to a location you can easily access.
This ISO file contains all the necessary components for the installation, eliminating the need for further downloads during the setup process on your target machine.
Crafting a Bootable USB Drive (Using Rufus or Media Creation Tool)
Once you have the ISO file, the next step is to create a bootable USB drive. This USB drive will act as your installation media. You’ll need a USB flash drive with at least 8GB of storage space.
Option 1: Using Rufus (Recommended for Offline Installation and Bypassing Checks)
Rufus is a free, open-source utility that is highly efficient for creating bootable USB drives. It’s particularly useful because it offers options to bypass TPM 2.0, Secure Boot, and the Microsoft account requirement during the installation process.
- Download Rufus: Download the latest version of Rufus from its official website.
- Insert USB Drive: Plug your USB drive into the computer where you downloaded Rufus and the ISO.
- Launch Rufus: Run the Rufus executable.
- Configure Settings:
- Device: Select your USB drive from the dropdown.
- Boot selection: Click
SELECTand choose your downloaded Windows 11 ISO file. - Image Option: This is where Rufus shines. After selecting the ISO, Rufus will typically detect that it’s a Windows 11 ISO. You might see options like “Standard Windows 11 Installation” or “Windows 11 Installation (No TPM/Secure Boot/RAM Check).” Choose the option that best suits your needs, especially if you intend to bypass hardware checks or the online account requirement.
- Partition scheme: Usually,
GPTfor UEFI systems (most modern PCs) orMBRfor legacy BIOS. If unsure,GPTis generally safe for newer hardware. - Target system: UEFI (non CSM) or BIOS (or UEFI-CSM). This will usually automatically align with your partition scheme.
- Volume label: You can leave the default or change it (e.g., “Win11_Offline”).
- File system:
NTFSis usually recommended. - Cluster size: Leave as default.
- Start Creation: Click
START. Rufus will warn you that all data on the USB drive will be destroyed. Confirm to proceed. - Wait for Completion: The process can take 10-20 minutes. Once complete, you’ll have your bootable Windows 11 USB drive.
Option 2: Using Microsoft’s Media Creation Tool (Requires Internet during creation, doesn’t bypass checks)
While the Media Creation Tool is Microsoft’s official utility, it downloads the Windows 11 files during the creation process, requiring an active internet connection on the machine you’re using to create the media. It also doesn’t offer the bypass options that Rufus does. However, it’s a reliable method if you’re creating the media on an internet-connected machine for use offline later, and your target PC meets all requirements.
- Download Media Creation Tool: From Microsoft’s official Windows 11 download page, click “Download Now” under the “Create Windows 11 Installation Media” section.
- Run the Tool: Execute the downloaded file.
- Accept Terms: Agree to the license terms.
- Select Language and Edition: Confirm the language and edition (Windows 11 is usually the only option).
- Choose Media: Select “USB flash drive” and click
Next. - Select USB Drive: Choose your USB drive from the list.
- Download and Create: The tool will download the necessary files and create the bootable USB drive. This process requires an active internet connection and can take a significant amount of time.
For true offline preparation and the flexibility of bypassing checks, Rufus is the superior choice for this specific scenario.
Backing Up Your Data: A Non-Negotiable Step
Before initiating any operating system installation, especially a clean install, backing up your important data is absolutely crucial. While the aim is a smooth installation, unforeseen issues can arise, potentially leading to data loss.
- External Hard Drive: Copy all your essential documents, photos, videos, and other files to an external hard drive.
- Cloud Storage: Utilize cloud services like OneDrive, Google Drive, or Dropbox to sync your critical files. This also offers an additional layer of redundancy.
- System Image: For advanced users, creating a full system image of your current operating system can provide a complete recovery point, allowing you to revert to your previous state if necessary.
This step cannot be overemphasized. A few minutes spent backing up can save you from hours or even days of anguish if something goes wrong.
Step-by-Step Guide: Installing Windows 11 Without an Internet Connection
With your bootable USB drive ready and your data backed up, you’re now prepared to install Windows 11 on your target computer. This section details the actual installation process, emphasizing steps relevant to an offline setup.

Initiating the Installation Process (Booting from USB)
The first step is to instruct your computer to boot from the USB drive rather than its internal hard drive.
- Insert USB Drive: Plug the bootable Windows 11 USB drive into the computer where you want to install Windows 11.
- Access Boot Menu/BIOS: Restart your computer. As it starts up, repeatedly press the key that grants access to your BIOS/UEFI settings or the Boot Menu. Common keys include
F2,Del,F10,F12, orEsc.- Boot Menu: If you can access a dedicated Boot Menu, simply select your USB drive from the list and press Enter.
- BIOS/UEFI Settings: If you enter the BIOS/UEFI, navigate to the “Boot Order” or “Boot Priority” section. Move your USB drive (it might be listed as a “Removable Device” or by its brand name) to the top of the boot order. Save changes and exit.
- Start Setup: The computer will now boot from the USB drive, and you should see the Windows 11 setup screen appear.
Navigating the Setup Wizard Offline
The Windows 11 setup wizard is designed to guide you through the process. The key here is to consciously avoid connecting to the internet when prompted.
- Language, Time, and Keyboard: On the initial screen, select your preferred language, time and currency format, and keyboard input method. Click
Next. - Install Now: Click the
Install nowbutton. - Product Key:
- If you have a product key, enter it here.
- If you don’t have one, or plan to activate later, click
I don't have a product key. Windows 11 will still install, and you can activate it once you connect to the internet later.
- Select Operating System: Choose the edition of Windows 11 you wish to install (e.g., Windows 11 Home, Pro). Ensure this matches your product key if you’re using one. Click
Next. - License Terms: Read and accept the Microsoft Software License Terms by checking the box and clicking
Next. - Installation Type:
- Upgrade: If you’re upgrading from a previous version of Windows (e.g., Windows 10) and booting from the existing OS, this option keeps your files and settings. However, for a truly clean offline install, this isn’t usually the goal.
- Custom: Install Windows only (advanced): This is the recommended option for a clean offline installation. Select this.
- Drive Partitioning:
- You will see a list of drives and partitions. Carefully select the drive where you want to install Windows 11.
- For a clean install: You might want to delete existing partitions (especially the primary OS partition) to start fresh. Select each partition associated with your previous OS and click
Delete. Be absolutely sure you’re deleting the correct partitions, as this action is irreversible and will erase all data on them. - Once you have unallocated space, select it and click
Newto create new partitions, or simply clickNextto let Windows create the necessary partitions automatically. - Select the main partition where Windows will be installed and click
Next.
- Copying Files: Windows will now begin copying files and installing features. Your computer may restart several times during this phase. Do NOT remove the USB drive until the first part of the installation is complete and the system reboots to the setup screens.
Handling Account Creation and Privacy Settings
After the initial file copying and reboots, you’ll be guided through the OOBE (Out-Of-Box Experience) to set up your user account and privacy settings. This is where the offline aspect becomes critical for certain options.
- Region and Keyboard Layout: Select your country/region and keyboard layout. You can also add a second keyboard layout if needed.
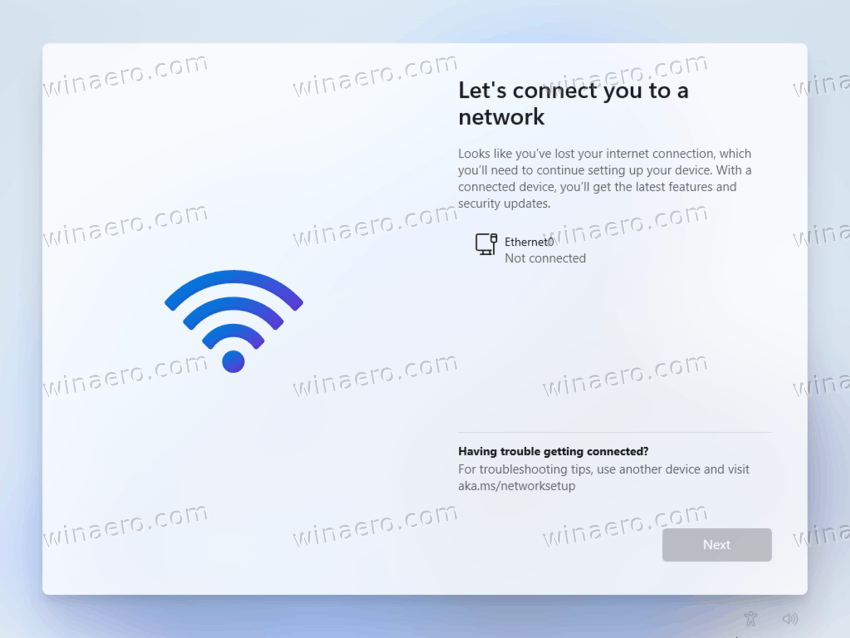
- Network Connection (Crucial for Offline Setup): This is the most important part for an offline installation.
- If you used Rufus to create the USB and selected the “bypass Microsoft account” option, you will likely see an option like “I don’t have internet” or a skip button directly. Click this.
- If you don’t see an immediate skip option (which is common with standard ISOs or the Media Creation Tool), you might need a small workaround:
- When prompted to connect to a network, press
Shift + F10to open Command Prompt. - Type
OOBEBYPASSNRO(without quotes) and press Enter. - Your computer will restart. After rebooting, you should now see an option like “I don’t have internet” or “Continue with limited setup” at the network connection screen. Select this option. This command effectively tells Windows to skip the online network requirement.
- When prompted to connect to a network, press
- Local Account Creation: Since you’ve bypassed the internet connection, Windows will now allow you to create a local user account. Enter your desired name for the user, set a password (optional but highly recommended), and provide security questions.
- Privacy Settings: Review the various privacy settings (Location, Find my device, Diagnostic data, Tailored experiences, Advertising ID). Toggle them on or off according to your preferences. Remember, you can always adjust these later in Settings. Click
Accept.
Completing the Initial Setup
The final stage involves Windows performing some last-minute configurations before presenting you with the desktop.
- “Hi” Screen: You’ll see several “Hi,” “We’re getting things ready for you,” and “This might take a few minutes” screens. This is normal as Windows prepares your user profile and desktop environment.
- Welcome to Windows 11: Eventually, you will be greeted by the Windows 11 desktop. Congratulations, you have successfully installed Windows 11 without an internet connection!
Post-Installation Essentials: Optimizing Your Offline Windows 11 System
While the core operating system is now installed, your journey isn’t quite complete. A few critical steps remain to ensure your new Windows 11 system is fully functional and secure, especially after an offline installation.
Installing Essential Drivers (Offline)
After an offline installation, it’s highly likely that your system is running on generic drivers provided by Windows, or it might be missing drivers entirely for certain components. This can lead to suboptimal performance, display issues, non-functional peripherals, or even stability problems.
- Identify Missing Drivers:
- Right-click the
Startbutton and selectDevice Manager. - Look for any devices with a yellow exclamation mark or question mark next to them. These indicate missing or problematic drivers. Common culprits include graphics cards, network adapters (Wi-Fi/Ethernet), audio devices, and chipsets.
- Right-click the
- Pre-download Drivers (Crucial for Offline Setup): Before disconnecting from the internet on another machine (or if you briefly connect your newly installed PC), you should have already downloaded the necessary drivers.
- Visit the official website of your computer’s manufacturer (e.g., Dell, HP, Lenovo) or the individual component manufacturers (e.g., NVIDIA, AMD, Intel, Realtek).
- Enter your specific model number to find the correct drivers for Windows 11 (64-bit).
- Prioritize downloading drivers for your chipset, graphics card, and network adapter (both Ethernet and Wi-Fi if applicable). Having network drivers ensures you can eventually connect to the internet for further updates.
- Save these driver setup files to another USB drive or an easily accessible folder.
- Install Drivers:
- Transfer the downloaded driver files to your newly installed Windows 11 PC (if you haven’t already).
- Run the installer for each driver. Start with chipset drivers, then network drivers, and finally graphics and audio drivers. Follow the on-screen prompts and restart your PC when requested.
- After installing the network drivers, you can cautiously connect to the internet if you feel ready.
The First Connection: Updates and Security
Once your system has essential drivers, and you’re ready, connecting to the internet is vital for crucial updates and security enhancements.
- Connect to the Internet: Plug in an Ethernet cable or connect to your Wi-Fi network using the newly installed network drivers.
- Windows Update:
- Go to
Settings > Windows Update. - Click
Check for updates. - Windows will download and install all pending security patches, feature updates, and potentially additional drivers. This process can take a significant amount of time and multiple restarts. Allow it to complete thoroughly to ensure your system is secure and up-to-date.
- Go to
- Activate Windows (if not done previously): If you skipped entering a product key during installation, go to
Settings > System > Activationand enter your product key to activate Windows 11. - Microsoft Account (Optional): If you desire to link a Microsoft account for cloud services, synchronization, and access to the Microsoft Store, you can do so now via
Settings > Accounts > Your info.
Recommended Offline Software Installations
Even without an internet connection, you can install essential applications if you’ve prepared them beforehand.
- Web Browser: While Edge is pre-installed, you might prefer Chrome, Firefox, or Brave. Download their offline installers from another PC.
- Office Suite: If you have a license, install Microsoft Office (download the full offline installer) or use a free alternative like LibreOffice or OpenOffice.
- Antivirus/Security Software: While Windows Defender is built-in, you might prefer a third-party antivirus. Download its offline installer.
- Essential Utilities: File archivers (7-Zip, WinRAR), media players (VLC), PDF readers (Adobe Acrobat Reader DC offline installer), etc.
- Productivity Tools: Any specific software you rely on for work or personal use, provided you have their offline installers.
Having these prepared on a separate USB drive significantly enhances your immediate productivity after an offline Windows 11 installation.
Troubleshooting Common Offline Installation Hurdles
Even with careful preparation, unforeseen issues can sometimes arise. Knowing how to diagnose and address common problems can save you considerable time and frustration.
Addressing Boot Issues
One of the most frequent problems is the computer failing to boot from the USB drive.
- Check Boot Order: Double-check your BIOS/UEFI settings to ensure the USB drive is indeed set as the primary boot device.
- UEFI/Legacy Mismatch: Modern Windows 11 installations typically require UEFI mode. If your BIOS is set to Legacy BIOS (CSM – Compatibility Support Module), it might not recognize the UEFI bootable USB. Try switching your BIOS to UEFI mode. Conversely, if your system is older, it might require MBR/Legacy. Rufus offers options for both GPT (UEFI) and MBR (BIOS) partition schemes when creating the USB. Ensure consistency between your USB’s setup and your BIOS settings.
- Corrupted USB Drive: The USB drive or the ISO file might be corrupted. Re-download the ISO and recreate the bootable USB drive using Rufus. Try a different USB drive if possible.
- Fast Boot/Secure Boot Conflicts: Temporarily disable “Fast Boot” or “Quick Boot” options in your BIOS/UEFI, as these can sometimes interfere with detecting USB drives during startup. If you’re using a standard ISO, ensure Secure Boot is enabled (if required by Windows 11) or disabled if you’re bypassing it.
Resolving Compatibility Warnings
If you encounter warnings about TPM 2.0, Secure Boot, or insufficient RAM during the installation, despite following the offline guide:
- Rufus Bypass Confirmation: Ensure you explicitly selected the “No TPM / No Secure Boot / 8GB RAM” bypass option when creating your bootable USB with Rufus. If you used a standard ISO or Media Creation Tool, these checks will occur.
- BIOS/UEFI Configuration: Re-enter your BIOS/UEFI settings.
- For TPM, ensure it’s enabled and set to “TPM 2.0” (often listed under
SecurityorAdvancedoptions, sometimes calledPTTorfTPM). - For Secure Boot, ensure it’s enabled and configured correctly (often requires setting to
Standard ModeorWindows UEFI Mode). You might need to disableCSM(Compatibility Support Module) for Secure Boot to fully function.
- For TPM, ensure it’s enabled and set to “TPM 2.0” (often listed under
- Minimum Requirements: If your hardware truly falls below the minimum (e.g., less than 4GB RAM or a very old CPU), even bypasses might struggle, and stability issues could persist.

Dealing with Installation Freezes
If the installation process freezes at a certain percentage or specific step:
- Patience: Sometimes the process appears frozen but is simply taking a long time. Give it ample time (e.g., an hour or more if it’s during file copying).
- Hardware Issues: Installation freezes can often indicate underlying hardware problems, such as faulty RAM or a failing hard drive.
- RAM: If you have multiple RAM sticks, try installing with only one stick at a time.
- Storage Drive: Run a diagnostic check on your target storage drive (SSD/HDD) from another system if possible, or use a bootable diagnostic utility.
- Corrupted Media: The installation media itself might be corrupt. Try recreating the bootable USB drive with Rufus, ensuring a fresh download of the ISO file.
- BIOS/UEFI Update: In rare cases, an outdated BIOS/UEFI firmware can cause installation issues. Check your motherboard manufacturer’s website for any available updates, but proceed with caution as BIOS updates carry a small risk.
By understanding these potential pitfalls and having a methodical approach to troubleshooting, you can navigate the complexities of an offline Windows 11 installation with confidence, ensuring a successful setup regardless of your internet access.
aViewFromTheCave is a participant in the Amazon Services LLC Associates Program, an affiliate advertising program designed to provide a means for sites to earn advertising fees by advertising and linking to Amazon.com. Amazon, the Amazon logo, AmazonSupply, and the AmazonSupply logo are trademarks of Amazon.com, Inc. or its affiliates. As an Amazon Associate we earn affiliate commissions from qualifying purchases.