Embarking on the journey of setting up a new computer, whether it’s a custom-built powerhouse, a barebones kit, or simply a machine needing a fresh start, begins with installing its operating system. Windows 10 remains a dominant force in the PC world, offering a robust, feature-rich, and user-friendly experience for millions. Installing it to a new PC might seem daunting at first, but with a clear, step-by-step guide, it transforms into an empowering and straightforward process. This comprehensive tutorial will walk you through every stage, from essential preparations to post-installation optimizations, ensuring your new system is up and running flawlessly, reflecting the precision and foresight of a seasoned tech enthusiast.
Beyond the immediate goal of getting Windows 10 operational, performing a clean installation offers numerous benefits. It ensures optimal performance from day one, free from bloatware or pre-existing issues that might plague factory installations. It’s a foundational step that contributes to the long-term health, security, and productivity of your digital workspace, embodying the “Tech” ethos of efficiency and cutting-edge setup. Moreover, mastering this skill not only saves you potential technician fees – a nod to “Money” savvy – but also builds confidence in managing your digital assets. Let’s dive in and transform that collection of components into a functional, high-performing computing platform.
Getting Started: Essential Preparations for a Flawless Installation
Before you even think about plugging in your USB drive, a successful Windows 10 installation hinges on thorough preparation. Skipping these crucial steps can lead to frustrating delays, missing drivers, or even corrupted installations. This section outlines all the prerequisites and pre-installation checks you need to perform, setting the stage for a smooth and efficient setup. Thinking strategically at this stage aligns with sound “Brand” principles, ensuring a reliable and professional outcome from the very beginning.
What You’ll Need: Gathering Your Tools and Essentials
To ensure you have everything at your fingertips when the time comes, assemble the following items:
- A Valid Windows 10 Product Key: While you can install Windows 10 without immediately entering a product key, you’ll eventually need one to activate your copy and unlock all features. You can purchase a retail key directly from Microsoft, obtain one through legitimate third-party vendors, or if you’re upgrading, your previous Windows 7/8 key might still activate Windows 10 (though this method is less officially supported now). For a completely new build, a new license is typically required. Budgeting for this ensures a fully legal and supported operating system, safeguarding your investment.
- A USB Flash Drive (Minimum 8GB): This will serve as your bootable installation media. Ensure it’s empty, as the process will format it, erasing all existing data. Opt for a reputable brand to minimize potential read/write errors during creation.
- An Internet Connection: Essential for downloading the Windows 10 Media Creation Tool, as well as for subsequent driver downloads and Windows updates after installation.
- Another Working Computer: You’ll need this to download the Media Creation Tool and create the bootable USB drive. This can be another desktop, a laptop, or even a friend’s computer.
- The New PC Itself: Naturally, you’ll need the computer you intend to install Windows 10 on. Ensure all hardware components (CPU, RAM, motherboard, storage drive, GPU if applicable, power supply) are correctly installed and connected.
Important Pre-Installation Checks: Laying the Groundwork
Beyond gathering the physical tools, a few critical checks can prevent headaches down the line:
- Hardware Compatibility: Double-check that your new PC’s components meet or exceed Windows 10’s minimum system requirements (1 GHz processor, 1 GB RAM for 32-bit or 2 GB for 64-bit, 16 GB storage for 32-bit or 32 GB for 64-bit, DirectX 9 graphics card). Most modern hardware will easily surpass these, but it’s good practice, especially for older components or specialized builds.
- Gathering Drivers: For a brand-new PC, particularly a custom build, it’s highly recommended to download essential drivers before installing Windows. Visit the motherboard manufacturer’s website and download the latest chipset, network (Ethernet and Wi-Fi), and audio drivers. If you have a dedicated graphics card, download its drivers from NVIDIA, AMD, or Intel. Store these on a separate USB drive or an accessible location. The reason? Windows 10 might not have native drivers for all your new hardware, especially the network adapter, preventing internet access right after installation – which then prevents further driver downloads! Proactive driver gathering is a hallmark of an efficient tech setup, minimizing downtime and maximizing productivity.
- Backup Existing Data (If Applicable): While this guide focuses on a “new” PC, sometimes “new” means installing Windows on a drive that previously held data. If there’s any data on the target drive that you wish to keep, back it up to an external drive or cloud storage before starting the installation. A clean install will wipe the drive completely.
Creating Your Windows 10 Installation Media
With your preparations complete, the next crucial step is to create the bootable USB drive that will initiate the Windows 10 installation. Microsoft provides an official and straightforward tool for this purpose, simplifying what used to be a more complex process. This stage is where your “Tech” knowledge truly begins to shine, as you prepare the digital cornerstone of your new system.
Downloading the Media Creation Tool
The Windows 10 Media Creation Tool is Microsoft’s official utility for downloading Windows 10 ISO files and creating bootable installation media.
- Open a Web Browser: On your working computer, open your preferred web browser (Edge, Chrome, Firefox, etc.).
- Navigate to Microsoft’s Download Page: Go to the official Microsoft Windows 10 download page. A quick search for “Windows 10 Media Creation Tool” will usually lead you directly there.
- Download the Tool: Look for the section titled “Create Windows 10 installation media” and click the “Download tool now” button. Save the executable file to your desktop or downloads folder.
Building the Bootable USB Drive
Once the Media Creation Tool is downloaded, follow these detailed steps to create your bootable USB:
- Run the Tool: Locate the downloaded
MediaCreationToolxxxx.exefile (wherexxxxis the version number) and double-click it to run. You might need to grant administrator permissions. - Accept License Terms: Read through the applicable notices and license terms. Click “Accept” to proceed.
- Choose Your Action: On the “What do you want to do?” screen, select the option “Create installation media (USB flash drive, DVD, or ISO file) for another PC.” Click “Next.”
- Select Language, Edition, and Architecture:
- By default, the tool will recommend options based on your current PC. If you’re installing Windows 10 on a different PC or need specific settings, uncheck “Use the recommended options for this PC.”
- Choose your desired Language (e.g., English (United States)).
- Select the Edition (usually “Windows 10”).
- Choose the Architecture (32-bit, 64-bit, or both). For most modern PCs, you’ll want 64-bit. If you’re unsure, or want maximum compatibility, selecting “Both” is an option, but it will take up more space and time. Click “Next.”
- Choose Media Type: On the “Choose which media to use” screen, select “USB flash drive.” Ensure your USB drive is plugged into the working computer. Click “Next.”
- Select Your USB Drive: The tool will list available USB drives. Carefully select the correct USB flash drive from the list. Double-check to ensure you’re not selecting another drive, as the tool will format the chosen drive, erasing all its contents. Click “Next.”
- Download and Create: The tool will now begin downloading the Windows 10 files and then write them to your selected USB flash drive, making it bootable. This process can take a significant amount of time, depending on your internet speed and the speed of your USB drive. Do not remove the USB drive or shut down your computer during this phase.
- Completion: Once the process is finished, the tool will display a message like “Your USB flash drive is ready.” Click “Finish.”
You now have a fully bootable Windows 10 installation media, ready to bring your new PC to life.
The Installation Process: Step-by-Step Guide
With your bootable USB drive prepared, it’s time for the main event: installing Windows 10 on your new PC. This section will guide you through connecting the media, configuring your PC to boot from it, and navigating the Windows Setup Wizard to install the operating system onto your storage drive. This is where the fruits of your “Tech” labor begin to materialize, transforming hardware into a functional system.
Booting from the USB Drive
The first step on your new PC is to instruct it to boot from the USB drive rather than an empty hard drive.
- Connect the USB Drive: Insert the bootable Windows 10 USB flash drive into an available USB port on your new PC. For best results, use a USB 2.0 port if you encounter issues with USB 3.0 ports during early boot, though most modern systems handle both fine.
- Power On and Access BIOS/UEFI: Turn on your PC. Immediately after pressing the power button, you’ll need to rapidly press a specific key to enter your computer’s BIOS (Basic Input/Output System) or UEFI (Unified Extensible Firmware Interface) settings, or to bring up a one-time boot menu. Common keys include
Del,F2,F10,F12, orEsc. The key varies by motherboard manufacturer (e.g., ASUS, Gigabyte, MSI, ASRock) and is often displayed briefly on the screen during startup. If you miss it, restart and try again. - Change Boot Order (or use Boot Menu):
- Using the Boot Menu (Recommended): If your PC has a dedicated boot menu (usually accessed via
F12orF10), select it. This allows you to choose your USB drive from a list of bootable devices without permanently changing BIOS settings. - Changing Boot Order in BIOS/UEFI: If no dedicated boot menu, navigate to the “Boot” or “Boot Options” section within the BIOS/UEFI settings. Find “Boot Priority” or “Boot Order” and set your USB drive as the first boot device. Ensure your drive is recognized (it might appear as “UEFI: [USB Drive Name]” or simply “[USB Drive Name]”).
- UEFI vs. Legacy/CSM: For modern systems and drives larger than 2TB, it’s generally best to install in UEFI mode. Ensure your BIOS/UEFI is set to UEFI mode (often under “Boot” or “Security” settings) and that “Secure Boot” is either disabled or configured correctly for Windows. If you run into issues, switching to “Legacy” or “CSM” (Compatibility Support Module) might be an option, but UEFI is the modern standard.
- Using the Boot Menu (Recommended): If your PC has a dedicated boot menu (usually accessed via
- Save Changes and Exit: Once you’ve configured the boot order, save your changes (usually
F10) and exit the BIOS/UEFI setup. Your PC will restart and should now boot from the USB drive.
Navigating the Windows Setup Wizard
After booting from the USB drive, the Windows Setup Wizard will appear.
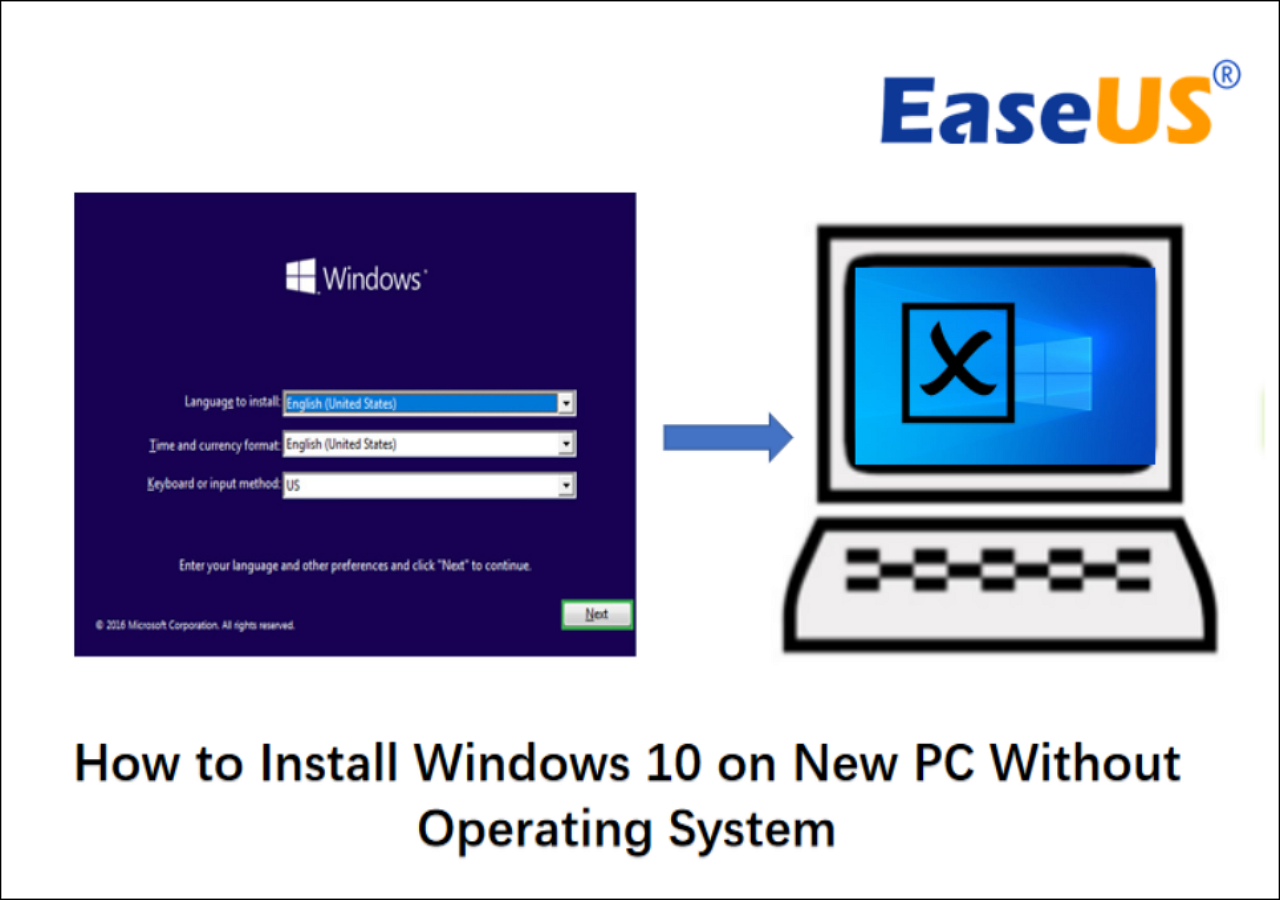
- Windows Setup Screen: The first screen prompts you to select your Language to install, Time and currency format, and Keyboard or input method. Make your selections and click “Next.”
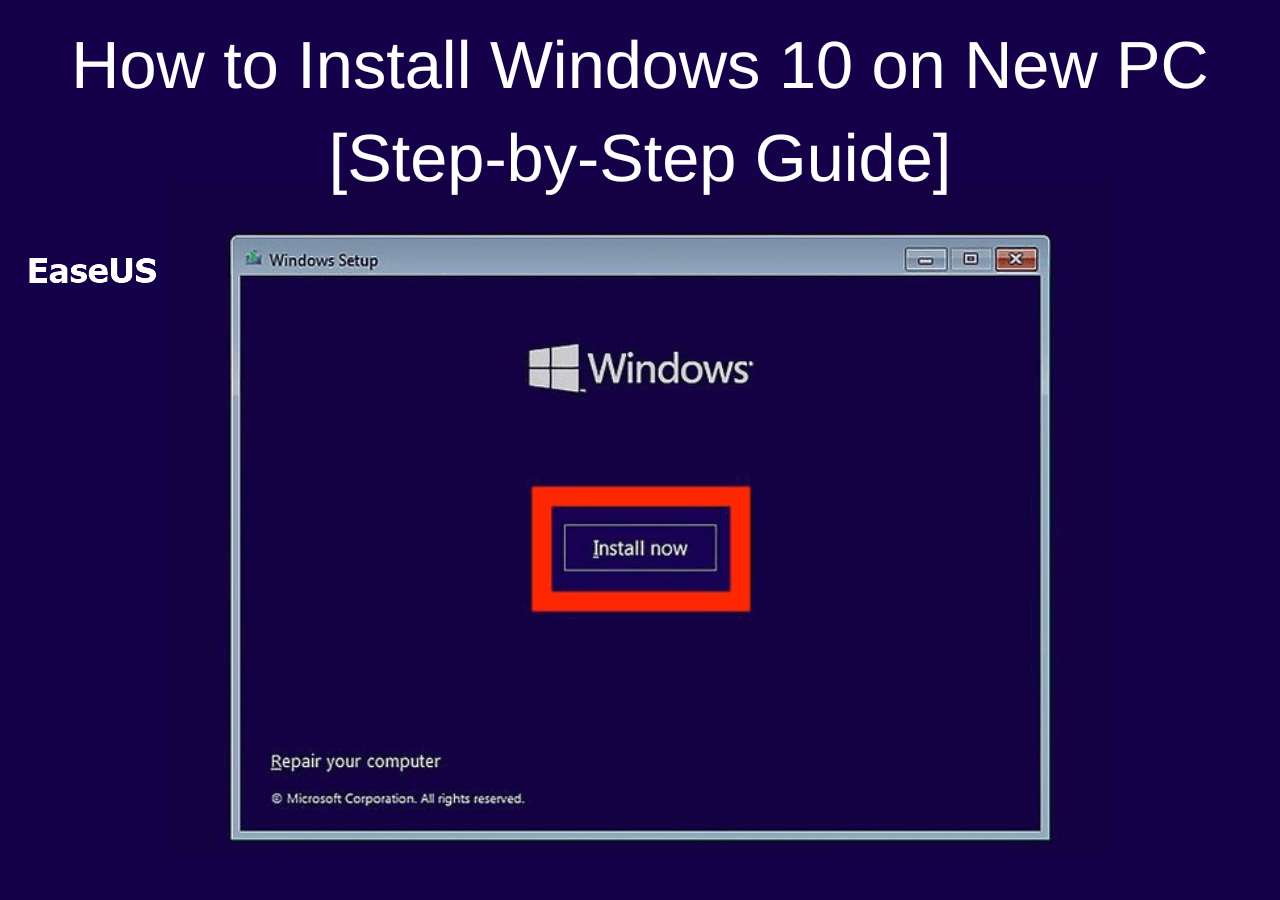
- Install Now: Click the prominent “Install now” button.
- Product Key:
- You’ll be asked to enter your product key. If you have one, enter it now.
- If you don’t have a product key or plan to activate later, click “I don’t have a product key.” Windows will still install, but you’ll need to activate it later.
- Select Operating System (if applicable): If your product key covers multiple editions, you might be asked to select the specific Windows 10 edition (e.g., Home, Pro). Choose the one your license is for. Click “Next.”
- License Terms: Read the Microsoft Software License Terms. Check the box “I accept the license terms” and click “Next.”
- Type of Installation: This is a crucial step.
- Select “Custom: Install Windows only (advanced).” This option allows you to manage your hard drive partitions, which is essential for a clean installation on a new PC. Do NOT choose “Upgrade,” as it’s for keeping files and settings when installing over an existing Windows version.
Partitioning Your Hard Drive
This is arguably the most critical step for a new PC, as it determines how your storage space is organized.
- Drive Selection Screen: You’ll see a list of drives and partitions. Since this is a new PC, you’ll likely see “Drive 0 Unallocated Space” or a single partition if the drive was pre-formatted.
- Deleting Existing Partitions (if necessary for a truly clean slate): If your drive already has partitions (e.g., from a previous OS or pre-formatting), select each one (e.g., “Drive 0 Partition 1”) and click “Delete.” Confirm any warnings. Your goal is to get back to “Drive 0 Unallocated Space.”
- Creating a New Partition:
- Select the “Drive 0 Unallocated Space.”
- Click “New.” You can specify the size for a primary partition. If you want to use the entire drive for Windows, simply click “Apply” without changing the size. Windows will then create the necessary system partitions (e.g., Recovery, EFI System, MSR) automatically, alongside your primary C: drive partition.
- Click “OK” when prompted about Windows creating additional system partitions.
- Select Primary Partition for Installation: Once partitions are created, select the largest partition (which will be your primary drive, usually labeled “Primary”) and click “Next.” This is where Windows 10 will be installed.
Copying Files and Initial Restart
Windows will now begin the core installation process:
- Installing Windows: The setup will copy Windows files, install features, and install updates. This process takes some time. Your PC will restart multiple times during this phase. Do not remove the USB drive until after the first major reboot and you see the “Getting devices ready” screen. Usually, it’s safe to remove it when the PC restarts and tries to boot from the hard drive for the first time.
- “Getting Ready” Screens: After the reboots, you’ll see various “Getting devices ready,” “Getting ready,” and “Just a moment” screens. Be patient; this is normal.
Initial Configuration (Out-of-Box Experience – OOBE)
Once the core installation is complete, you’ll enter the Out-of-Box Experience (OOBE) to configure your personal settings.
- Region: Select your country/region and click “Yes.”
- Keyboard Layout: Choose your preferred keyboard layout and click “Yes.” You can add a second layout if needed.
- Network Connection: Connect to a network. If you have an Ethernet cable plugged in, it might connect automatically. Otherwise, select your Wi-Fi network and enter the password. Connecting to the internet is important for later updates and driver downloads.
- Sign in with Microsoft Account:
- Microsoft encourages you to sign in with a Microsoft account (Outlook.com, Live.com, Hotmail.com). Enter your email and password.
- To create a Local Account instead (if you prefer not to link to a Microsoft account immediately), look for an option like “Offline account” or “Skip for now.” Note that some features like OneDrive sync or Windows Store purchases are tied to a Microsoft account.
- PIN Setup: Microsoft will prompt you to create a PIN for faster sign-ins. This is generally a good security practice.
- Privacy Settings: Review the privacy settings (location, diagnostic data, tailored experiences). Adjust them to your preference. Microsoft typically recommends enabling most, but you have the choice to disable certain options.
- Cortana Setup: Decide if you want to enable Cortana, Microsoft’s digital assistant. You can choose to accept or decline.
- Final Touches: Windows will go through a few more “Just a moment” screens, preparing your desktop. Eventually, you’ll see your Windows 10 desktop.
Congratulations! Windows 10 is now installed on your new PC.
Post-Installation: Essential Steps for a Smooth Experience
Installing Windows 10 is a significant milestone, but it’s just the beginning. To ensure your new PC performs optimally, remains secure, and provides a seamless user experience, there are several crucial post-installation steps. These tasks are vital for completing the “Tech” setup, enhancing “Productivity,” and safeguarding your digital environment.
Install Drivers: Unleashing Your Hardware’s Full Potential
One of the most critical post-installation tasks is to install the correct drivers for all your hardware components. While Windows 10 includes many generic drivers, specific manufacturer drivers often provide better performance, stability, and access to unique features.
- Check Device Manager: Right-click the Start button, then select “Device Manager.” Look for any devices with yellow exclamation marks. These indicate missing or improperly installed drivers.
- Install Essential Drivers (from your pre-downloaded collection):
- Chipset Drivers: Always install these first from your motherboard manufacturer’s website. They are fundamental for communication between your CPU and other components.
- Network Drivers (Ethernet/Wi-Fi): If you don’t have internet access, install these next from your pre-downloaded files. Once installed, your PC can connect to the internet, simplifying subsequent driver installations.
- Graphics Card Drivers: Install the latest drivers from NVIDIA, AMD, or Intel (depending on your GPU). These are crucial for display performance, gaming, and video playback.
- Audio Drivers: Install drivers from your motherboard manufacturer or dedicated sound card manufacturer for optimal sound quality.
- Other Drivers: Install drivers for any other specialized hardware, such as USB controllers, card readers, or peripherals.
- Manufacturer Utility Software: Many motherboard and GPU manufacturers offer utility software that can help manage and update drivers, monitor system health, and even overclock components. While not strictly necessary, they can be useful.
Update Windows: Staying Secure and Up-to-Date
Keeping Windows 10 updated is paramount for security, performance, and accessing new features.
- Access Windows Update: Click the Start button, then “Settings” (the gear icon). Navigate to “Update & Security” > “Windows Update.”
- Check for Updates: Click the “Check for updates” button. Windows will download and install any available updates. This process might involve multiple restarts. Be patient and allow it to complete.
- Optional Updates: Occasionally, you might find “Optional updates” for drivers or other components. Review these and install if recommended.
- Restart as Needed: Allow your PC to restart whenever prompted to ensure updates are fully applied. This might happen several times.
Activate Windows: Confirming Your License
While you might have skipped the product key entry during installation, activating Windows is essential for full functionality and to remove activation reminders.
- Check Activation Status: Go to “Settings” > “Update & Security” > “Activation.”
- Enter Product Key: If Windows is not activated, click “Change product key” and enter your 25-character product key.
- Troubleshooting Activation: If you encounter issues, ensure you have an internet connection. If activating a digital license linked to a Microsoft account, sign in with that account. For other problems, the troubleshooter on the activation page can often help. Legitimate activation ensures long-term “Money” value and avoids issues associated with unofficial copies.
Install Essential Software: Building Your Digital Workspace
With the operating system and drivers in place, it’s time to install the applications you need for productivity, communication, and entertainment.
- Web Browser: While Edge is included, you might prefer Chrome, Firefox, or Brave. Download and install your choice.
- Antivirus/Security Software: Windows Defender provides good baseline protection, but many users opt for third-party antivirus suites for additional features or perceived stronger protection.
- Productivity Suites: Install office software like Microsoft Office (Word, Excel, PowerPoint) or free alternatives like LibreOffice.
- Media Players: VLC Media Player or other preferred media players for video and audio.
- Cloud Storage Sync: Install clients for OneDrive, Dropbox, Google Drive if you use cloud storage.
- Communication Tools: Zoom, Discord, Slack, etc.
Optimizing Your New PC: Tips and Troubleshooting
A clean Windows 10 installation provides a fantastic foundation, but a truly great user experience comes from ongoing optimization and the ability to troubleshoot common issues. These tips will help maintain peak performance and address potential snags, reinforcing your “Tech” mastery and ensuring long-term “Productivity” and “Money” savings by avoiding costly repairs.
Performance Tips: Keeping Your PC Running Smoothly
Even a new PC can benefit from a few performance tweaks to keep it snappy.
- Disk Cleanup: Periodically run the Disk Cleanup utility (search for it in the Start menu) to remove temporary files, old system files, and other clutter that accumulates over time. For more advanced cleaning, consider third-party tools (with caution).
- Manage Startup Apps: Many applications automatically launch when Windows starts, slowing down boot times and consuming resources. Go to “Task Manager” (Ctrl+Shift+Esc), navigate to the “Startup” tab, and disable any unnecessary programs from starting with Windows.
- Power Settings: For desktops, ensure your power plan is set to “High performance” (or a custom plan) if you prioritize speed over energy efficiency. Go to “Settings” > “System” > “Power & sleep” > “Additional power settings.”
- Regular Updates: As mentioned, keeping Windows and your drivers updated is crucial for both security and performance, as updates often include bug fixes and optimizations.
- Maintain Good Ventilation: Ensure your PC case has good airflow and that fans are clean. Overheating can lead to performance throttling and hardware degradation.
- Defragment Hard Drives (HDD only): If you’re using a traditional Hard Disk Drive (HDD), regularly defragmenting it can improve performance. Solid State Drives (SSDs) do not need defragmentation; Windows handles their optimization automatically.
Common Installation Issues & Solutions: Navigating the Bumps
Even with careful preparation, you might encounter issues. Here are some common ones and their solutions:
- “Windows can’t be installed to this disk” Errors:
- MBR/GPT Partition Style: This often means your disk’s partition style (MBR or GPT) doesn’t match your BIOS/UEFI boot mode. If installing in UEFI mode, the disk needs to be GPT. If in Legacy/CSM, it needs to be MBR. During the partition selection step, if you get this error, you might need to use
Diskpart(accessible by pressingShift+F10to open Command Prompt during setup) tocleanthe disk and thenconvert gptorconvert mbras needed. Warning:cleancommand will erase all data. - Missing Drivers (e.g., NVMe): Some new NVMe SSDs or RAID configurations might not be detected by Windows Setup without specific drivers. Download these drivers from your motherboard or storage controller manufacturer’s website beforehand, put them on a separate USB drive, and use the “Load driver” option during the partition selection screen.
- MBR/GPT Partition Style: This often means your disk’s partition style (MBR or GPT) doesn’t match your BIOS/UEFI boot mode. If installing in UEFI mode, the disk needs to be GPT. If in Legacy/CSM, it needs to be MBR. During the partition selection step, if you get this error, you might need to use
- Boot Loop After Installation: If your PC gets stuck in a boot loop after the first restart, it might be trying to boot from the USB drive again. Remove the USB drive and ensure your BIOS/UEFI boot order prioritizes the hard drive where Windows 10 was installed.
- Activation Problems: If your Windows 10 doesn’t activate, double-check your internet connection. If you have a digital license linked to a Microsoft account, ensure you’re signed in with that account. If you used an upgrade license from Windows 7/8, Microsoft’s activation servers might sometimes take longer or require you to run the activation troubleshooter.
- No Internet After Installation: This is almost always due to missing network drivers. Install the Ethernet or Wi-Fi drivers you (hopefully) downloaded beforehand. If not, use another PC to download them to a USB drive and transfer them.
Digital Security and Productivity Considerations: Long-Term Vision
A new PC is a clean slate not just for software, but for establishing good digital habits.
- Strong Passwords & Two-Factor Authentication (2FA): Always use strong, unique passwords for your Microsoft account and other services. Enable 2FA wherever possible for an extra layer of security. This is paramount for “Digital Security.”
- Backup Strategy: Implement a regular backup strategy for your important files. Use cloud storage (OneDrive, Google Drive, Dropbox) or external hard drives. Data loss can be costly, both in terms of “Money” and “Productivity.”
- Cloud Services Integration: Leverage cloud services for seamless access to your documents, photos, and settings across devices.
- Customize for Productivity: Personalize your desktop, organize your files, and customize settings to create a workspace that enhances your efficiency. Explore Windows 10 features like Virtual Desktops, Snap Assist, and Focus Assist.
In conclusion, installing Windows 10 on a new PC is a foundational skill for any tech-savvy individual. It’s an investment in your system’s performance, security, and longevity. By meticulously following these steps, from thoughtful preparation to post-installation optimization, you’ve not only set up a powerful machine but also gained valuable experience. Remember, a well-maintained system is a productive system, allowing you to get the most out of your technology and focus on what truly matters, whether it’s work, creativity, or entertainment. Welcome to your new, optimized digital world!
aViewFromTheCave is a participant in the Amazon Services LLC Associates Program, an affiliate advertising program designed to provide a means for sites to earn advertising fees by advertising and linking to Amazon.com. Amazon, the Amazon logo, AmazonSupply, and the AmazonSupply logo are trademarks of Amazon.com, Inc. or its affiliates. As an Amazon Associate we earn affiliate commissions from qualifying purchases.