
Setting up a new computer is an exciting prospect, offering a fresh start with enhanced performance and the latest technological capabilities. At the heart of this new experience for many lies Windows 10, Microsoft’s robust and widely-used operating system. While the idea of installing an OS might seem daunting, it’s a straightforward process that anyone can accomplish with the right guidance. This comprehensive guide will walk you through every step of installing Windows 10 on your new machine, ensuring a smooth, secure, and optimal setup from the very beginning. From preparing your installation media to post-installation configurations, we’ll cover everything you need to know to get your new system up and running efficiently.
Why Choose Windows 10 for Your New Machine?
Even with newer versions like Windows 11 available, Windows 10 remains an incredibly popular and stable choice for many users, especially on new hardware that might not meet the strict requirements for its successor, or for those who simply prefer its established interface and compatibility.
Windows 10 offers a fantastic blend of traditional desktop functionality and modern features. Its interface is familiar yet refined, with the Start Menu making a welcome return, alongside innovations like the Cortana digital assistant, a streamlined Action Center, and the Microsoft Edge browser. For a new computer, installing Windows 10 means instant access to a vast ecosystem of software, games, and peripherals. It boasts excellent hardware compatibility, ensuring that your new components – be it the latest GPU, a speedy NVMe SSD, or a high-resolution monitor – will work seamlessly.
Furthermore, Windows 10 continues to receive crucial security updates and feature enhancements, maintaining its relevance and protecting your digital life. Its built-in security features, such as Windows Defender and SmartScreen, offer robust protection against malware and phishing attempts right out of the box, aligning perfectly with our focus on digital security and productivity on a fresh system. For those prioritizing a stable, well-supported, and versatile operating system, Windows 10 is an excellent foundation for any new computer.
Essential Preparations Before You Begin
Before you dive into the installation process, a little preparation goes a long way in ensuring a smooth and successful setup. Skipping these crucial preliminary steps can lead to unnecessary headaches or delays.
Gathering Your Tools and Information
First, you’ll need a few essential items and pieces of information:
- A working computer: This is necessary to download the Windows 10 installation media.
- A USB flash drive (8GB or larger): This will be your primary installation media. Ensure it’s empty or that you’ve backed up any important data, as it will be formatted during the process. While DVD installation is possible, USB drives are faster and more common for modern computers.
- Your Windows 10 product key (optional but recommended): If you’ve purchased a retail copy or have a digital license, having your 25-character product key handy will simplify activation later. If you’re reinstalling on a machine that previously had an activated Windows 10, or if your new computer comes with a digital license linked to your Microsoft account, the activation process might be automatic after installation.
- Internet access: Required for downloading the Media Creation Tool and for post-installation updates.
- Backup of existing data (if applicable): Although this guide focuses on a new computer, if you’re replacing an old drive or have any existing partitions you wish to preserve, ensure all critical data is backed up to an external drive or cloud storage.
Understanding Your Hardware and BIOS
Familiarizing yourself with your new computer’s hardware, particularly its motherboard and storage devices, is beneficial. Knowing whether you have a traditional Hard Disk Drive (HDD) or a Solid State Drive (SSD), and its capacity, can inform your partitioning decisions. More importantly, you’ll need to know how to access your computer’s BIOS/UEFI settings.
- BIOS/UEFI: This is the firmware that starts your computer before the operating system loads. You’ll need to enter it to change the boot order, instructing your computer to start from your USB installation media instead of the empty internal drive. The key to enter BIOS/UEFI varies by manufacturer (common keys include
Del,F2,F10,F12,Esc). Consult your motherboard manual or the computer manufacturer’s website for specifics. - Secure Boot and CSM (Compatibility Support Module): In some UEFI systems, you might need to temporarily disable ‘Secure Boot’ or enable ‘CSM’ (Legacy Boot) if you encounter issues booting from your USB drive. Most modern systems can boot from UEFI USB drives directly, but it’s a good troubleshooting step to keep in mind.
Creating Your Windows 10 Installation Media
The most reliable and recommended way to create Windows 10 installation media is by using Microsoft’s official Media Creation Tool. This tool ensures you download the latest stable version of Windows 10 directly from Microsoft.
Downloading the Media Creation Tool
- Access Microsoft’s website: On your working computer, open a web browser and navigate to the official Windows 10 download page on Microsoft’s website. Search for “Download Windows 10” if you can’t find it directly.
- Download the tool: Look for the section titled “Create Windows 10 installation media” and click on the “Download tool now” button. Save the
MediaCreationTool.exefile to your desktop or downloads folder.
Preparing Your USB Drive
- Run the Media Creation Tool: Locate the
MediaCreationTool.exefile you just downloaded and double-click it to run. You might be prompted by User Account Control; click “Yes” to proceed. - Accept terms: Read through the license terms and click “Accept.”
- Choose what you want to do: On the “What do you want to do?” screen, select “Create installation media (USB flash drive, DVD, or ISO file) for another PC” and click “Next.”
- Select language, edition, and architecture: The tool will usually recommend options based on your current PC. If these are suitable, simply click “Next.” If you need to change them (e.g., if you’re installing on a system with different architecture like 32-bit, though 64-bit is standard for new computers), uncheck “Use the recommended options for this PC” and make your selections. For a new computer, “Windows 10” (Home/Pro combined) and “64-bit (x64)” are almost always the correct choices. Click “Next.”
- Choose media type: Select “USB flash drive” and click “Next.”
- Select the USB drive: From the list of available drives, carefully select your 8GB or larger USB flash drive. Double-check that you’re selecting the correct drive, as all data on it will be erased. Click “Next.”
- Download and creation: The tool will now download the Windows 10 files and create the bootable USB installation media. This process can take some time depending on your internet speed and the speed of your USB drive. Do not remove the USB drive until the process is complete.
- Finish: Once the tool reports “Your USB flash drive is ready,” click “Finish.” Safely eject your USB drive from the working computer.
The Step-by-Step Windows 10 Installation Process
With your bootable USB drive ready, it’s time to install Windows 10 on your new computer. This is where your new machine truly begins to come to life.
Booting from the Installation Media
- Insert the USB drive: Plug your Windows 10 bootable USB flash drive into an available USB port on your new computer.
- Start your computer: Power on your new computer. As it starts, repeatedly press the designated key to enter the BIOS/UEFI settings or to access the boot menu. (Common keys:
Del,F2,F10,F12,Esc). - Change boot order:
- Using Boot Menu: If you can access a “Boot Menu,” select your USB drive (it might appear as “UEFI: [USB Drive Name]” or just “[USB Drive Name]”) and press Enter. This is usually the quickest method.
- Using BIOS/UEFI Settings: If you need to go into the full BIOS/UEFI, navigate to the “Boot” tab or section. Change the “Boot Order” or “Boot Priority” to make your USB drive the first boot device. Save your changes and exit (often
F10). Your computer will then restart and boot from the USB drive.
- Press any key to boot: You might see a “Press any key to boot from USB…” message. Do so quickly.
Navigating the Setup Wizard
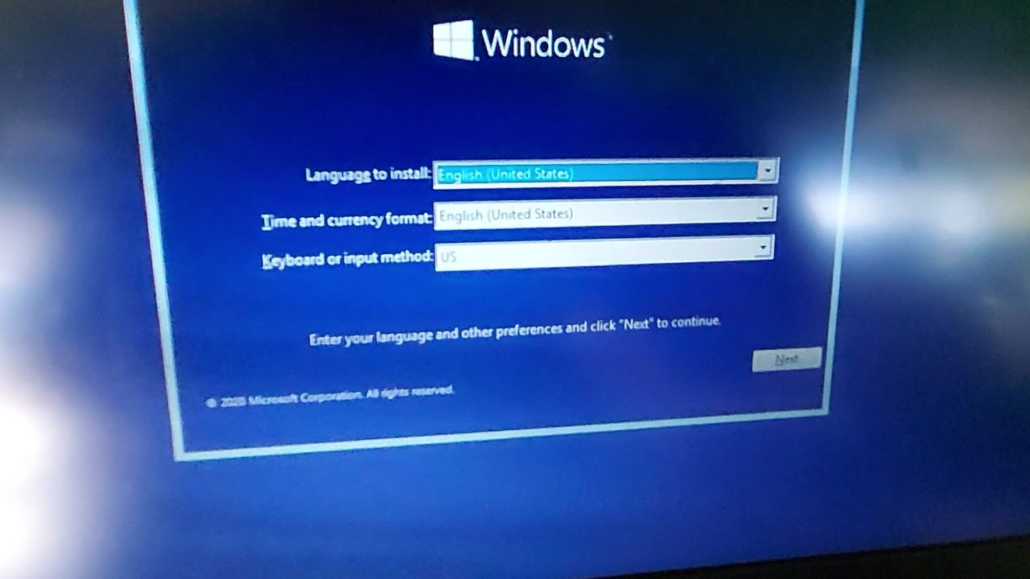
- Windows Setup screen: The Windows 10 setup will load. On the first screen, confirm your language, time and currency format, and keyboard or input method. Make any necessary adjustments and click “Next.”
- Install Now: Click the “Install now” button.
- Product Key: If you have a product key, enter it here. If you don’t, or if you plan to activate later with a digital license linked to your Microsoft account, click “I don’t have a product key.” Windows 10 will still install, and you can activate it later.
- Choose Operating System: If your installation media contains multiple versions (e.g., Windows 10 Home and Pro), select the edition you have a license for or intend to use, and click “Next.”
- Accept license terms: Read the Microsoft Software License Terms, check the “I accept the license terms” box, and click “Next.”
- Choose installation type: Select “Custom: Install Windows only (advanced).” This option allows you to manage your disk partitions, which is crucial for a new computer.
Partitioning Your Drive
This is a critical step, especially on a new computer with an unformatted drive.
- Disk management: You will see a list of drives and partitions. On a brand-new computer, you’ll likely see “Drive 0 Unallocated Space.”
- Create new partition:
- Select the “Drive 0 Unallocated Space.”
- Click “New.” You can choose to use the entire space for Windows (which is common for single-drive systems) or specify a smaller size if you want to create multiple partitions (e.g., one for Windows and programs, another for data). For most users, using the full available space is sufficient.
- Click “Apply.” Windows will inform you that it needs to create additional partitions for system files (like recovery partitions). Click “OK.”
- Select primary partition: You will now see several smaller partitions created (System Reserved, Recovery, MSR) and a larger “Primary” partition. Select the large “Primary” partition (this is where Windows will be installed) and click “Next.”
Completing the Installation
- Installation begins: Windows will now start copying files, installing features, and applying updates. This process involves multiple restarts. Let the computer restart automatically; do not remove the USB drive until after the first major set of restarts, when you see the Out-of-Box Experience (OOBE) setup screens.
- Out-of-Box Experience (OOBE): Once the installation files are copied, and the computer restarts a few times, you’ll be greeted by the Windows 10 OOBE. This is where you configure initial settings.
- Region and Keyboard layout: Select your country/region and keyboard layout. You can add a second keyboard layout if needed.
- Network connection: Connect to your Wi-Fi or plug in an Ethernet cable. An internet connection is highly recommended to complete setup and download critical updates.
- Microsoft account vs. Local account:
- Microsoft account: Sign in with your Microsoft account (Outlook, Hotmail, Live). This links your PC to cloud services, allows synchronization of settings, and simplifies app purchases.
- Local account: If you prefer not to use a Microsoft account immediately, you can often find an option to create an offline account (sometimes hidden as “Offline account” or “Skip for now”). Be aware that some features require a Microsoft account.
- PIN creation: Create a PIN for faster, more secure login.
- Privacy settings: Review the privacy settings (location, diagnostics, advertising ID, etc.) and choose your preferences. Microsoft defaults often prioritize data collection, so consider disabling what you’re uncomfortable with.
- Cortana: Choose whether to enable or disable Cortana.
- OneDrive: Decide if you want to use OneDrive for cloud storage.
- Finishing touches: Windows will go through some final setup screens (“Hi,” “Getting things ready for you,” “This might take a few minutes”).
- Welcome to Windows 10: Eventually, you will be presented with the Windows 10 desktop. Congratulations, you have successfully installed Windows 10 on your new computer!
Post-Installation Essentials for Optimal Performance
Installing Windows 10 is just the beginning. To ensure your new computer runs optimally, securely, and productively, there are several crucial steps to take immediately after installation.
Installing Drivers and Updates
This is arguably the most critical post-installation step for performance and stability.
- Windows Updates:
- Click the Start button, go to
Settings > Update & Security > Windows Update. - Click “Check for updates.” Let Windows download and install all available updates. This includes security patches, feature updates, and often, many device drivers. You’ll likely need to restart your computer multiple times. Repeat this process until no more updates are found.
- Click the Start button, go to
- Device Drivers: While Windows Update handles many drivers, some essential ones, particularly for graphics cards (NVIDIA, AMD), chipsets, and specialized peripherals, are best installed directly from the manufacturer’s website.
- Graphics Card: Go to NVIDIA or AMD’s website, use their auto-detect tools, or manually select your GPU model to download the latest drivers.
- Motherboard Chipset/LAN/Audio: Visit your motherboard manufacturer’s website (e.g., ASUS, MSI, Gigabyte, ASRock) and download the latest drivers for your specific model.
- Peripherals: If you have high-end peripherals (gaming mouse, keyboard, printer, etc.), download their specific software and drivers from the manufacturer.
- Device Manager Check: After installing drivers, open Device Manager (right-click Start button > Device Manager) and check for any devices with yellow exclamation marks. These indicate missing or problematic drivers.
Activating Windows 10
If you didn’t enter a product key during installation, now is the time to activate Windows.
- Activation Settings: Go to
Settings > Update & Security > Activation. - Enter product key: If you have a product key, click “Change product key” and enter it.
- Digital License: If your Windows 10 license is tied to your Microsoft account (common for upgrades or new OEM PCs), simply signing into your Microsoft account on the activated machine should automatically activate Windows. If not, follow the prompts in the Activation section, which may include a troubleshooting option.
Setting Up Your User Environment
Personalizing your system and installing essential software is next.
- Install essential software:
- Web Browser: Download your preferred browser (Chrome, Firefox, Brave, Edge is already there).
- Antivirus: While Windows Defender is excellent, some users prefer third-party antivirus solutions. Install yours now if desired.
- Productivity Suite: Install Microsoft Office, LibreOffice, or other productivity tools.
- Communication Apps: Zoom, Discord, Slack, etc.
- Utilities: File archivers (7-Zip, WinRAR), media players (VLC), PDF readers.
- Personalization:
- Change your desktop background, theme, and lock screen images (
Settings > Personalization). - Adjust display settings, resolution, and scaling (
Settings > System > Display). - Configure sound settings (
Settings > System > Sound).
- Change your desktop background, theme, and lock screen images (
- User Account Settings:
- Set up strong passwords and, if available, enable Windows Hello (facial recognition or fingerprint) for convenient and secure login.
- Review User Account Control (UAC) settings (
Control Panel > User Accounts > Change User Account Control settings).
Enhancing Security and Productivity
A new computer is a blank slate for good habits.
- Security Best Practices:
- Strong Passwords: Use unique, strong passwords for your Microsoft account and other services. Consider a password manager.
- Two-Factor Authentication (2FA): Enable 2FA for your Microsoft account and any other critical services.
- Windows Security: Regularly check the Windows Security dashboard (
Settings > Update & Security > Windows Security) to ensure all protections are active. - Firewall: Ensure Windows Defender Firewall is enabled (
Settings > Update & Security > Windows Security > Firewall & network protection).
- Productivity Optimizations:
- Disk Cleanup: Use the built-in Disk Cleanup tool periodically to remove temporary files.
- Taskbar & Start Menu: Pin frequently used applications to the taskbar and customize the Start menu for quick access.
- Cloud Integration: If you use cloud storage (OneDrive, Dropbox, Google Drive), set up synchronization.
- Backup Strategy: Plan your backup strategy. Even on a new system, data loss can occur. Use external drives or cloud services for regular backups.
By following these post-installation steps, you’re not just installing an operating system; you’re building a foundation for a reliable, secure, and productive computing experience on your brand-new machine. Enjoy your freshly installed Windows 10 system!
aViewFromTheCave is a participant in the Amazon Services LLC Associates Program, an affiliate advertising program designed to provide a means for sites to earn advertising fees by advertising and linking to Amazon.com. Amazon, the Amazon logo, AmazonSupply, and the AmazonSupply logo are trademarks of Amazon.com, Inc. or its affiliates. As an Amazon Associate we earn affiliate commissions from qualifying purchases.