
In an increasingly interconnected world, reliable and fast internet access is not just a convenience, but a fundamental necessity. While Ethernet cables offer unparalleled stability and speed for stationary setups, the freedom and flexibility of wireless connectivity are indispensable for many PC users. Whether you’re cutting the cord to reduce clutter, moving your PC to a location without easy wired access, or upgrading an older system, installing a Wi-Fi card is a straightforward process that can significantly enhance your computing experience. This comprehensive guide will walk you through everything you need to know, from understanding different Wi-Fi card types to the step-by-step installation and post-setup optimization.

The Indispensable Need for PC Wi-Fi Connectivity
The era of every device needing a physical cable is rapidly fading. Integrating Wi-Fi into your desktop PC frees it from the constraints of wired connections, opening up a world of possibilities.
Why Ditch the Ethernet Cable?
The most obvious benefit of Wi-Fi is the freedom of placement. Your PC no longer needs to be tethered directly to your router or a wall port. This allows for greater flexibility in arranging your office or gaming setup, optimizing space, and reducing unsightly cable clutter. For those living in rented accommodations or with non-IT savvy housemates, drilling holes or running long cables is often impractical or impossible. Wi-Fi offers a clean, elegant solution that keeps your space tidy and adaptable.
Beyond aesthetics, Wi-Fi also brings portability within a building. While a desktop PC isn’t inherently portable like a laptop, having Wi-Fi means you can temporarily relocate it for different tasks or entertainment, like moving it to a living room TV for a gaming session or a different room for a quiet workspace, without the hassle of re-cabling your entire network.
Modern Demands for Seamless Wireless Access
Today’s digital landscape is characterized by high-bandwidth activities. From 4K video streaming and competitive online gaming to extensive cloud synchronization and smart home device management, a robust wireless connection is crucial. A dedicated Wi-Fi card, especially a modern one, can offer speeds and stability comparable to wired connections for most common tasks, ensuring a smooth, uninterrupted experience.
Many modern applications and services, such as seamless integration with smartphones, tablets, and other IoT devices, rely heavily on a shared wireless network. A Wi-Fi-enabled PC becomes a central hub in this ecosystem, allowing for easy file sharing, screen mirroring, and device management without the need for cumbersome direct connections.
Beyond the Basics: Enhancing Network Performance
It’s not just about getting online; it’s about getting online efficiently. A high-quality Wi-Fi card can significantly improve your network performance. Older PCs might come with outdated Wi-Fi standards (like 802.11n), which cannot take advantage of modern router capabilities or faster internet plans. Upgrading to a newer card (e.g., Wi-Fi 6/6E) can unlock significantly faster speeds, lower latency, and better signal stability, especially in crowded wireless environments. This translates to quicker downloads, smoother online gaming, and a more responsive overall internet experience.
Understanding Wi-Fi Card Types and Compatibility
Before diving into installation, it’s crucial to understand the different types of Wi-Fi cards available and ensure compatibility with your existing PC hardware. Choosing the right card is half the battle.
Internal vs. External Wi-Fi Solutions
Wi-Fi cards primarily come in two forms for desktop PCs: internal and external.
-
Internal Wi-Fi Cards: These are the most common and preferred solution for desktop PCs due to their integration and often superior performance. They typically come in two form factors:
-
PCIe (PCI Express): These cards slot directly into an available PCIe x1, x4, x8, or x16 slot on your motherboard. They are highly stable, offer excellent performance, and often include external antennas that screw onto the card’s rear bracket, which protrude from the back of your PC for optimal signal reception. Many also integrate Bluetooth functionality.
-
M.2: Smaller and more compact, M.2 Wi-Fi modules are often found in laptops but are also increasingly present on modern desktop motherboards, particularly mini-ITX boards. They slot into a dedicated M.2 E-key slot. These often require external antenna cables to be routed from the M.2 module to screw-in antenna connectors on a separate bracket or directly to the rear I/O shield, providing a cleaner internal look.
-
-
External Wi-Fi Adapters (USB Dongles): These are plug-and-play devices that connect via a USB port. While convenient for their ease of use and portability, they often offer less performance and stability compared to internal cards. They are a good option for temporary use or if your PC lacks available internal expansion slots. However, for a permanent, high-performance solution, an internal card is generally recommended.
Decoding Wi-Fi Standards: 802.11ac, Wi-Fi 6, and Beyond
Wi-Fi technology evolves, and understanding these standards is vital for selecting a compatible and future-proof card:
-
802.11n (Wi-Fi 4): An older standard, operating on both 2.4 GHz and 5 GHz bands, offering theoretical speeds up to 600 Mbps. Still functional but often a bottleneck for modern internet speeds.
-
802.11ac (Wi-Fi 5): A significant upgrade, primarily using the 5 GHz band, with theoretical speeds reaching several gigabits per second. Offers better performance in less congested environments.
-
802.11ax (Wi-Fi 6): The current mainstream standard, operating on both 2.4 GHz and 5 GHz bands. It brings substantial improvements in speed, efficiency, and performance in dense network environments, thanks to technologies like OFDMA and MU-MIMO. Wi-Fi 6 is ideal for multi-device households.
-
802.11ax (Wi-Fi 6E): An extension of Wi-Fi 6 that adds support for the 6 GHz band. This provides a massive, uncongested spectrum for even faster speeds and lower latency, especially beneficial in very dense urban environments or for high-demand applications. To utilize Wi-Fi 6E, both your router and your Wi-Fi card must support it.
When choosing a card, ensure its standard is compatible with or superior to your router’s capabilities to maximize performance.
Ensuring Hardware Compatibility with Your Motherboard
Compatibility is key. For PCIe cards, you’ll need an available PCIe x1 slot (or a larger x4, x8, x16 slot, as x1 cards can fit in any larger slot). Most motherboards have at least one or two x1 slots. Check your motherboard manual or visually inspect your motherboard for these slots.
For M.2 cards, you’ll need an available M.2 slot that supports “E-key” modules. M.2 slots come in different keyings (B, M, E) for various devices (SSDs, Wi-Fi). Again, consult your motherboard manual to confirm the presence and keying of your M.2 slots. If your motherboard lacks an M.2 E-key slot but has an open PCIe slot, you can purchase an M.2 Wi-Fi module alongside a PCIe adapter card for it.
Always check the physical dimensions of the card and your PC case to ensure there’s enough space, especially for the antennas.
Pre-Installation Checklist: Gathering Your Tools and Knowledge
Preparation is crucial for a smooth installation process. Before you even open your PC case, take a few moments to gather your tools and ensure you have all the necessary information.
Essential Tools for the Task
You won’t need a professional toolkit, but a few basic items will make the job much easier and safer:
-
Philips Head Screwdriver: The most common type of screwdriver needed to open your PC case and secure internal components. Ensure it’s magnetized to avoid dropping screws inside the case.
-
Anti-Static Wrist Strap (Recommended): This prevents electrostatic discharge (ESD) from damaging sensitive electronic components. If you don’t have one, regularly touch a grounded metal object (like your PC’s unpainted metal frame while it’s still plugged into the wall, but switched off) to discharge static electricity.
-
Small Pliers or Nut Driver (Optional): May be useful for tightening the small nuts that secure external antennas to the card’s bracket.
-
Small Container: To hold any screws you remove, preventing them from getting lost.
-
Flashlight (Optional): Can be helpful for illuminating dark areas inside your PC case.
Critical Safety Precautions
Working inside a computer requires adherence to a few safety guidelines to protect both yourself and your hardware:
-
Power Down and Unplug: Completely shut down your PC, then unplug the power cable from both the wall outlet and the power supply unit. This is paramount to prevent electrical shock and component damage.
-
Discharge Static Electricity: As mentioned, use an anti-static wrist strap. If not available, regularly touch a grounded metal object. This prevents ESD, which can permanently damage components, even if you don’t feel a shock. Avoid working on carpeted surfaces.
-
Work in a Clean, Well-Lit Area: Ensure you have enough space and light to see what you’re doing.
Verifying System Specifications and Driver Downloads
Before the physical installation, gather some vital information and prepare your drivers:
-
Identify Your Operating System: Know whether you’re running Windows (and which version), Linux, or another OS, as driver installation procedures can vary.
-
Check Your Motherboard Manual: This will confirm available PCIe or M.2 slots, their types, and any specific instructions for expansion card installation. It can also help locate specific headers if your Wi-Fi card includes Bluetooth that requires an internal USB connection.
-
Download Drivers in Advance: Most new Wi-Fi cards require specific drivers to function optimally. Visit the manufacturer’s official website (e.g., Intel, TP-Link, ASUS) for your specific card model and download the latest drivers for your operating system. Save them to a USB drive or your desktop. This is crucial because you won’t have internet access immediately after installing the card, unless you have another internet connection.
-
Consider Bluetooth (If Applicable): Many internal Wi-Fi cards also include Bluetooth functionality. For PCIe cards, this often means connecting a small USB cable from the card to an available internal USB 2.0 header on your motherboard. If your card has this feature, ensure you have an available header.
A Step-by-Step Guide to Wi-Fi Card Installation
With preparations complete, you’re ready to physically install the Wi-Fi card into your PC. This section covers the common steps for PCIe and M.2 installations.
Preparing Your PC: Power Down and Open Up
-
Power Down: Ensure your PC is completely shut down and unplugged from the wall.
-
Move to a Work Surface: Place your PC on a flat, stable, and clean surface.
-
Remove Side Panel: Unscrew and remove the side panel of your PC case (usually the left side when viewed from the front) to expose the motherboard and internal components. Refer to your PC case manual if unsure.
-
Discharge Static: Touch a grounded metal object or wear your anti-static wrist strap.
Locating and Preparing the Installation Slot
-
Identify Available Slot: Locate an available PCIe x1 slot (for PCIe cards) or an M.2 E-key slot (for M.2 cards) on your motherboard. PCIe slots are typically long, narrow slots. M.2 slots are much smaller, often with a screw stand-off nearby.
-
Remove Slot Cover (PCIe): For PCIe cards, you’ll need to remove the metal bracket cover on the back of your PC case that corresponds to the chosen PCIe slot. This is usually held in place by a small screw or a latch mechanism. Keep the screw safe.
-
Prepare M.2 Stand-off (M.2): If installing an M.2 card, ensure the correct-sized stand-off screw is in place for your module’s length. Your motherboard usually comes with various stand-offs and screws in a small bag.
Securely Installing the Wi-Fi Card
For PCIe Wi-Fi Cards:
-
Align and Insert: Carefully align the gold-plated connector of the Wi-Fi card with the PCIe slot. Apply firm, even pressure to both ends of the card until it clicks securely into place. Do not force it.
-
Secure the Card: Once seated, use the screw you saved from the slot cover to fasten the card’s metal bracket to the PC case. This prevents the card from wiggling loose.
-
Attach Antennas: Screw the included external antennas onto the connectors on the rear bracket of the Wi-Fi card. Hand-tighten them until snug; do not overtighten. Orient them for best signal reception, usually upright.
For M.2 Wi-Fi Cards:
-
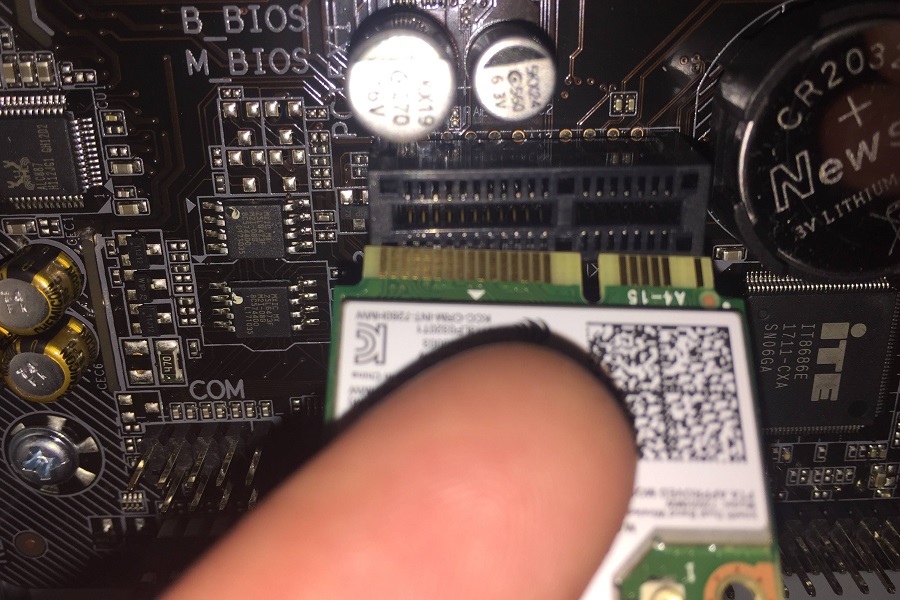
Align and Insert: Carefully slide the M.2 Wi-Fi module into the M.2 E-key slot at a slight angle (usually 30 degrees) until it’s fully seated.
-
Secure the Module: Gently push the module down until it’s parallel with the motherboard, then secure it with the small screw into the stand-off.
-
Connect Antennas (if separate): M.2 modules typically don’t have built-in antenna connectors on the module itself. You’ll need to connect the tiny U.FL/IPEX connectors from the included antenna cables to the corresponding points on the M.2 module. This can be fiddly, so be gentle. Route these cables to the included external antenna bracket that attaches to an open PCIe slot cover or to your motherboard’s pre-installed antenna ports (if it supports it).
Connecting Internal Cables (If Applicable)
If your Wi-Fi card includes Bluetooth functionality that requires an internal USB connection (common for PCIe cards), locate an available internal USB 2.0 header on your motherboard. Connect the small USB cable from the Wi-Fi card to this header. Consult your motherboard manual for the exact location of these headers.
Reassemble PC and Power On
-
Replace Side Panel: Once the card is securely installed and all cables are connected, replace the PC’s side panel and screw it back into place.
-
Reconnect Power: Plug the power cable back into your PC and the wall outlet.
-
Power On: Start your PC as usual.
Driver Installation: Bringing Your Card to Life
After your PC boots up, Windows might automatically detect and install a generic driver for your new Wi-Fi card. However, for optimal performance and full feature support (like Bluetooth), it’s best to install the specific drivers you downloaded earlier.
-
Access Device Manager: Right-click the Start button (Windows logo) and select “Device Manager.”
-
Locate Wi-Fi Adapter: Look for “Network adapters.” You should see your new Wi-Fi card listed, possibly with a yellow exclamation mark if drivers aren’t fully installed.
-
Install Drivers: Right-click on your Wi-Fi adapter, select “Update driver,” and then “Browse my computer for drivers.” Navigate to the folder where you saved your downloaded drivers and proceed with the installation.
-
Install Bluetooth Drivers (if applicable): If your card has Bluetooth, you might find it listed under “Bluetooth” or “Other devices” in Device Manager. Install its drivers similarly.
-
Restart PC: After driver installation, it’s always a good idea to restart your PC to ensure all changes take effect.
Post-Installation: Connecting, Optimizing, and Troubleshooting
Your Wi-Fi card is installed, and drivers are in place. Now it’s time to get online, optimize your connection, and be prepared for potential issues.
Connecting to Your Wireless Network
Once your PC restarts, you should see the Wi-Fi icon in your system tray (bottom-right corner of the taskbar).
-
Click Wi-Fi Icon: Click on the Wi-Fi icon.
-
Select Network: A list of available wireless networks will appear. Select your network (SSID).
-
Enter Password: Enter your Wi-Fi password (network security key) when prompted.
-
Connect: Click “Connect.” If successful, your PC will now be connected to the internet wirelessly.
Test your connection by browsing websites or streaming content. If you also installed Bluetooth, check your system settings to ensure it’s enabled and functioning.
Optimizing Wi-Fi Performance
Even with a great Wi-Fi card, small adjustments can yield better performance:
-
Antenna Placement: Experiment with the orientation of your external antennas. Sometimes, positioning them at different angles can improve signal strength. Avoid placing your PC or antennas directly against metal objects or walls, as these can interfere with the signal.
-
Router Placement: Ensure your Wi-Fi router is centrally located and free from obstructions. The fewer walls or large objects between your PC and the router, the better.
-
Driver Updates: Regularly check the Wi-Fi card manufacturer’s website for updated drivers. These can often improve performance, add new features, or fix bugs.
-
Router Firmware: Ensure your router’s firmware is up to date.
-
Channel Selection: In crowded Wi-Fi environments (e.g., apartments), your router might be on a congested channel. Tools like Wi-Fi analyzer apps can help identify less used channels. You can usually change your router’s Wi-Fi channel in its settings. The 5 GHz and 6 GHz bands generally offer more channels and less congestion than 2.4 GHz.
Common Installation Issues and How to Resolve Them
Even with careful installation, you might encounter issues. Here are some common ones and their solutions:
-
Wi-Fi Card Not Detected:
-
Check Physical Connection: Power off, unplug, open the case, and ensure the card is firmly seated in its slot.
-
Check Device Manager: Look for “Network adapters” or “Other devices.” If the card appears with a warning, it’s a driver issue. If it’s not there, it might not be properly installed or could be faulty.
-
Try Another Slot: If available, try installing the card in a different PCIe or M.2 slot.
-
Check BIOS/UEFI: Ensure the PCIe slot is enabled in your motherboard’s BIOS/UEFI settings (rarely an issue, but worth checking if all else fails).
-
-
No Internet Connection After Installation:
-
Verify Drivers: Double-check that the correct drivers are installed via Device Manager. Reinstall them if necessary.
-
Correct Password: Ensure you’re entering the correct Wi-Fi network password.
-
Router Functionality: Check if other devices can connect to your Wi-Fi network. Restart your router.
-
Windows Network Troubleshooter: Use the built-in Windows network troubleshooter.
-
-
Slow Speeds or Dropping Connections:
-
Antennae: Ensure antennas are securely attached and properly positioned.
-
Interference: Move your PC or router away from other electronics (microwaves, cordless phones) that might cause interference.
-
Driver Updates: Update to the latest drivers for your Wi-Fi card and router firmware.
-
Signal Strength: Use network tools to check your signal strength. If it’s weak, consider a Wi-Fi repeater/mesh system or relocating your router.
-
Band Congestion: Switch to the 5 GHz or 6 GHz band if available, as the 2.4 GHz band is often congested.
-
-
Bluetooth Not Working (if applicable):
-
Internal USB Cable: If your card has an internal USB header connection for Bluetooth, ensure the cable is properly connected to both the card and an available USB 2.0 header on your motherboard.
-
Bluetooth Drivers: Install the specific Bluetooth drivers for your card.
-
Windows Settings: Ensure Bluetooth is enabled in Windows settings.
-

Maintaining Your Wi-Fi Card: Driver Updates and Best Practices
Like any PC component, your Wi-Fi card benefits from occasional maintenance. Regularly checking for and installing the latest drivers from the manufacturer’s website will ensure you have the best performance, security, and compatibility. Periodically clean your PC’s interior to prevent dust buildup, which can affect airflow and component longevity. By following these steps, your Wi-Fi card will provide reliable wireless connectivity for years to come.
aViewFromTheCave is a participant in the Amazon Services LLC Associates Program, an affiliate advertising program designed to provide a means for sites to earn advertising fees by advertising and linking to Amazon.com. Amazon, the Amazon logo, AmazonSupply, and the AmazonSupply logo are trademarks of Amazon.com, Inc. or its affiliates. As an Amazon Associate we earn affiliate commissions from qualifying purchases.