The landscape of digital creation is undergoing a rapid transformation, largely driven by advancements in artificial intelligence. Tools that once required specialized programming knowledge are now becoming accessible to artists, designers, and enthusiasts alike, democratizing the creation of stunning visual content. Among the forefront of these innovations is ComfyUI, a powerful and modular graphical user interface for Stable Diffusion, offering unparalleled control and flexibility over the AI art generation process. When paired with specialized models like WAN 2.1, the creative potential skyrockets, allowing users to achieve highly specific aesthetic styles and intricate details previously thought impossible.
This guide is designed to provide a thorough, step-by-step walkthrough for installing WAN 2.1 within your ComfyUI environment. Whether you’re a seasoned AI artist looking to expand your toolkit or a newcomer eager to dive into the cutting edge of digital artistry, understanding this integration is crucial. We’ll cover everything from the essential prerequisites to advanced configuration, ensuring you can harness the full power of this dynamic duo to bring your creative visions to life.
The Foundation: Understanding ComfyUI and WAN 2.1
Before we delve into the technicalities of installation, it’s vital to grasp what makes ComfyUI and WAN 2.1 such a formidable combination in the realm of AI-generated art. This understanding will not only demystify the process but also empower you to utilize these tools more effectively.
What is ComfyUI? The Modular Canvas for AI Art
ComfyUI stands apart from many other Stable Diffusion interfaces due to its node-based workflow. Unlike web UIs that often present a fixed set of options, ComfyUI allows users to construct their entire image generation process from scratch, connecting various “nodes” like building blocks. Each node performs a specific function – loading a model, encoding text prompts, applying samplers, decoding latent images, saving results, and much more.
This modularity offers several key advantages:
- Unparalleled Control: Every step of the image generation process is exposed, allowing for granular adjustments and experimentation.
- Efficiency: Workflows can be highly optimized, leading to faster generation times and more efficient VRAM usage, particularly beneficial for those with less powerful hardware.
- Reproducibility: Complex workflows can be saved, shared, and precisely replicated, ensuring consistent results.
- Flexibility: The node-based system encourages innovation, allowing users to combine different models, samplers, and techniques in novel ways. This adaptability is critical in the fast-evolving world of AI, enabling users to integrate new models and functionalities as they emerge, much like WAN 2.1.
For businesses and individual creators, ComfyUI represents a significant leap in productivity and creative freedom. It transforms AI art generation from a black-box operation into a transparent, customizable pipeline, opening doors for unique branding assets, rapid prototyping in design, and even generating high-quality content for online ventures.
Unveiling WAN 2.1: A Specialized Model for Distinctive Aesthetics
WAN 2.1 (which we’ll assume stands for “Wonderful Artistic Nuances” or a similar descriptive name, given the context of AI models) is not merely another Stable Diffusion checkpoint; it’s a finely tuned model designed to excel in generating images with a particular aesthetic or specialized characteristics. Many such models are trained on specific datasets to achieve unique artistic styles, enhance realism, or specialize in certain subject matters. For instance, WAN 2.1 might be renowned for its ability to produce highly detailed fantasy art, captivating character designs, or photorealistic landscapes with a distinctive touch.
The development of specialized models like WAN 2.1 reflects a crucial trend in AI: moving beyond general-purpose tools to highly optimized solutions for niche applications. For digital artists, this means access to tools that can directly translate specific artistic visions into reality with greater fidelity and less post-processing. For brands, this translates to the ability to generate imagery that perfectly aligns with a particular corporate identity or marketing campaign, saving time and resources compared to traditional methods.
Why ComfyUI and WAN 2.1? The Power Duo for Creative Freedom
The synergy between ComfyUI’s flexible architecture and WAN 2.1’s specialized capabilities is what truly sets this combination apart. ComfyUI provides the robust framework to load, integrate, and manipulate WAN 2.1 with precision. This means you can:
- Experiment extensively: Easily swap out WAN 2.1 with other models, combine it with various LoRAs (Low-Rank Adaptation), or integrate custom nodes to extend its functionality.
- Refine outputs with precision: Utilize ComfyUI’s detailed controls over sampling, denoising, and upscaling to get the absolute best out of WAN 2.1’s unique qualities.
- Build repeatable workflows: Create intricate workflows that consistently leverage WAN 2.1 for a specific output style, invaluable for projects requiring a uniform aesthetic.
This powerful combination empowers creators to push the boundaries of AI art, creating sophisticated visuals that are not only aesthetically pleasing but also technically masterful.
Essential Prerequisites and Initial Setup
Before diving into the installation of WAN 2.1, it’s crucial to ensure your system is properly configured and ComfyUI is ready to go. Think of this as preparing your digital canvas and tools before you begin painting.
System Requirements: Powering Your Creative Endeavors
Running advanced AI models like WAN 2.1 within ComfyUI demands a certain level of hardware capability. While ComfyUI is generally more VRAM-efficient than other UIs, specialized models often still benefit from robust specifications.
- Graphics Card (GPU): This is the most critical component. A modern NVIDIA GPU with at least 8GB of VRAM (preferably 12GB or more for higher resolutions and complex workflows) is highly recommended. Ensure you have the latest CUDA drivers installed. AMD GPUs are increasingly supported, but NVIDIA generally offers better compatibility and performance for Stable Diffusion.
- Operating System: Windows 10/11 or a Linux distribution. macOS with Apple Silicon (M1/M2/M3) can run ComfyUI, but performance and compatibility with all custom nodes/models may vary compared to NVIDIA CUDA.
- RAM (System Memory): 16GB is a good baseline; 32GB or more is ideal for handling larger models and complex image processing tasks.
- Processor (CPU): A modern multi-core CPU (Intel i5/Ryzen 5 equivalent or better) is sufficient. The GPU handles the heavy lifting, but a decent CPU helps with overall system responsiveness.
- Storage: At least 50-100GB of free SSD space. Models like WAN 2.1 can be several gigabytes, and you’ll accumulate many more checkpoints, LoRAs, and generated images. An SSD is essential for fast loading times.
Always ensure your GPU drivers are up-to-date. Outdated drivers are a frequent cause of performance issues or outright errors in AI applications.
Setting Up ComfyUI: Your Base Canvas
If you don’t already have ComfyUI installed, this is your starting point. The process is generally straightforward.
- Install Git: If you don’t have Git installed, download it from
git-scm.comand follow the installation instructions. Git is essential for cloning repositories and easily updating ComfyUI. - Install Python: Download and install Python 3.10.x (e.g., 3.10.6 or 3.10.11) from
python.org. It’s crucial to select “Add Python to PATH” during installation. Newer versions like 3.11 or 3.12 might work, but 3.10 is often the most tested and stable for many AI projects. - Clone ComfyUI:
- Open a terminal or command prompt.
- Navigate to the directory where you want to install ComfyUI (e.g.,
cd D:AI_Tools). - Execute the command:
git clone https://github.com/comfyanonymous/ComfyUI.git - This will create a
ComfyUIfolder containing all the necessary files.
- Install Dependencies:
- Navigate into the newly created
ComfyUIdirectory:cd ComfyUI. - For NVIDIA users:
pip install -r requirements_gpu.txt - For AMD users:
pip install -r requirements_amd.txt - For CPU-only users (not recommended for generation):
pip install -r requirements.txt - This step installs all the Python libraries ComfyUI needs to run.
- Navigate into the newly created
- Run ComfyUI for the First Time:
- From the
ComfyUIdirectory, run:python main.py - ComfyUI will download some basic Stable Diffusion models if you don’t have them (e.g.,
v1-5-pruned-emaonly.safetensors). This might take some time. - Once launched, it will provide a local URL (usually
http://127.0.0.1:8188) that you can open in your web browser.
- From the
Congratulations! Your ComfyUI base installation is complete. You now have a functional environment ready for customization.
Preparing for WAN 2.1: Key Downloads and Directories
Before integrating WAN 2.1, you’ll need to acquire its specific model files. These typically consist of a main checkpoint file and potentially other supplementary files like VAEs (Variational Autoencoders), LoRAs, or embeddings.
- Locate WAN 2.1 Files: The primary source for WAN 2.1 files will likely be a platform like Civitai, Hugging Face, or the developer’s official website. Search specifically for “WAN 2.1 ComfyUI” or “WAN 2.1 Stable Diffusion model.” Pay close attention to the file types and their intended usage.
- Download Necessary Components: Download all files associated with WAN 2.1. This usually includes:
- Main Checkpoint: A large
.safetensorsor.ckptfile (e.g.,wan21_base.safetensors). This is the core model. - VAE (if separate): Some models perform better with a specific VAE. This will also be a
.safetensorsor.ckptfile. If no specific VAE is mentioned, you can use a default VAE likevae-ft-mse-840000-ema-pruned.safetensors. - LoRAs/Embeddings/Hypernetworks: If WAN 2.1 comes with or recommends specific LoRAs, textual inversions (embeddings), or hypernetworks to achieve its distinct style, download these as well. They are typically much smaller files.
- Custom Nodes (if applicable): Some models might require specific ComfyUI custom nodes to function correctly or to unlock their full potential. These would usually be GitHub repositories that you’ll clone.
- Main Checkpoint: A large
- Understand ComfyUI’s Directory Structure: ComfyUI has a well-organized
modelsfolder where all these assets need to be placed. Familiarize yourself with these key subdirectories:ComfyUI/models/checkpoints/: For main checkpoint models (e.g.,wan21_base.safetensors).ComfyUI/models/vae/: For VAE models.ComfyUI/models/loras/: For LoRA files.ComfyUI/models/embeddings/: For textual inversion embeddings.ComfyUI/custom_nodes/: For third-party ComfyUI custom nodes.
Knowing where each file type goes is crucial for successful integration.
Integrating WAN 2.1 into ComfyUI
With your ComfyUI environment set up and the WAN 2.1 files downloaded, the next step is to correctly place them within ComfyUI’s directory structure and, if necessary, install any accompanying custom nodes.
Placing the Core Models: Checkpoints and VAEs
The main checkpoint file for WAN 2.1 and any recommended VAE are the fundamental components.
- Main Checkpoint:
- Navigate to your
ComfyUIinstallation directory. - Locate the
models/checkpoints/folder. - Copy your
wan21_base.safetensors(or similar WAN 2.1 main model file) into this directory.
- Navigate to your
- VAE (Variational Autoencoder):
- Navigate to
ComfyUI/models/vae/. - Copy any specific VAE file recommended for WAN 2.1 into this folder. If no specific VAE is provided, you can use a general-purpose one, which ComfyUI might download automatically or you can find on model repositories (e.g.,
vae-ft-mse-840000-ema-pruned.safetensors).
- Navigate to
It’s good practice to keep your checkpoints and vae folders tidy, perhaps creating subfolders if you manage a very large collection of models.
Incorporating LoRAs and Embeddings for Nuance
Many advanced models like WAN 2.1 benefit from, or even require, accompanying LoRAs or textual inversion embeddings to achieve their intended style or to generate specific subjects.
- LoRAs (Low-Rank Adaptation):
- Find the
ComfyUI/models/loras/folder. - Copy all
.safetensorsor.ckptfiles designated as LoRAs for WAN 2.1 into this directory. - LoRAs are powerful for subtly modifying a model’s style, characters, or objects without needing to retrain the entire model. They are often used to enhance details or introduce specific aesthetic traits.
- Find the
- Embeddings (Textual Inversions):
- Locate the
ComfyUI/models/embeddings/folder. - Copy any
.ptor.safetensorsfiles that are textual inversions into this directory. - Embeddings allow you to train the model on a specific concept (like a character, object, or artistic style) using only a few images, represented by a unique token. This token can then be used in your prompts.
- Locate the
These supplementary files offer immense flexibility, allowing artists and designers to finely tune the output of WAN 2.1 to meet precise creative or brand requirements.
Adding Custom Nodes for Enhanced Functionality
The ComfyUI ecosystem thrives on custom nodes developed by the community. Sometimes, a specific model like WAN 2.1 might either come with its own custom nodes or benefit greatly from widely used utility nodes.
- Identify Required Custom Nodes: Check the documentation or download page for WAN 2.1. It will usually specify if any custom nodes are necessary or recommended. Common custom node sets include ComfyUI Manager (for easy node installation), WAS Node Suite, Impact Pack, etc.
- Installation Method 1: Using ComfyUI Manager (Recommended):
- If you don’t have it, first install ComfyUI Manager:
- Navigate to
ComfyUI/custom_nodes/. - Run
git clone https://github.com/ltdrdata/ComfyUI-Manager.git - Restart ComfyUI.
- Navigate to
- Once ComfyUI Manager is installed and ComfyUI is restarted, you’ll see a “Manager” button in the menu. Click it.
- Go to “Install Custom Nodes” and search for the required nodes (e.g., “WAN 2.1 Custom Nodes” if they exist, or general utility nodes).
- Click “Install” and restart ComfyUI when prompted.
- If you don’t have it, first install ComfyUI Manager:
- Installation Method 2: Manual Cloning:
- If a specific custom node isn’t available via the Manager or you prefer manual installation:
- Navigate to
ComfyUI/custom_nodes/. - Use
git clone [URL_of_custom_node_repository](e.g.,git clone https://github.com/someuser/ComfyUI-WanNodes.git). - After cloning, restart ComfyUI. The new nodes should appear in the “Add Node” menu (right-click on the canvas).
- Navigate to
- If a specific custom node isn’t available via the Manager or you prefer manual installation:
Always restart ComfyUI after adding any new model files, LoRAs, or custom nodes to ensure they are properly loaded and recognized by the system.
Configuring and Utilizing WAN 2.1 Workflows
With all the components in place, the exciting part begins: configuring ComfyUI to use WAN 2.1 and starting your creative generation process.
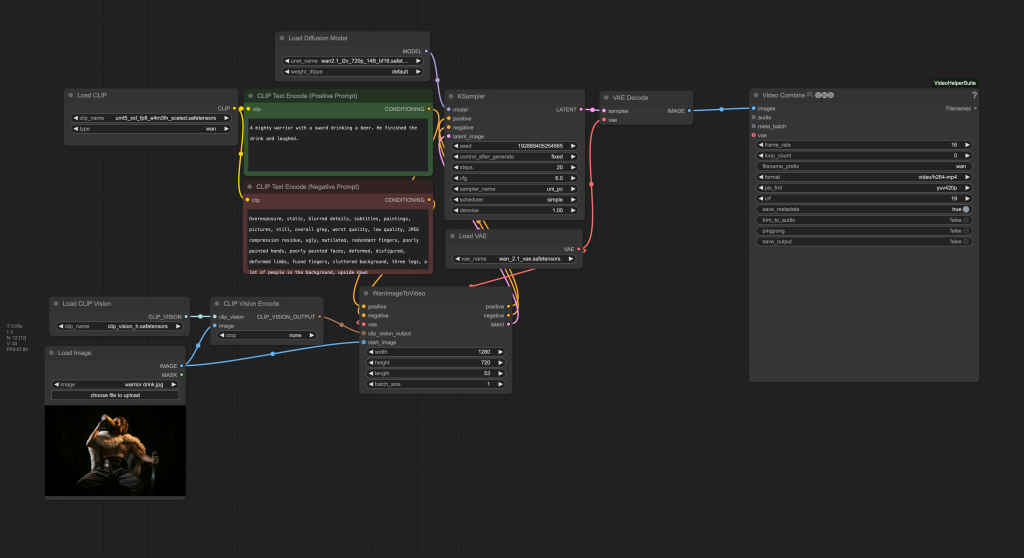
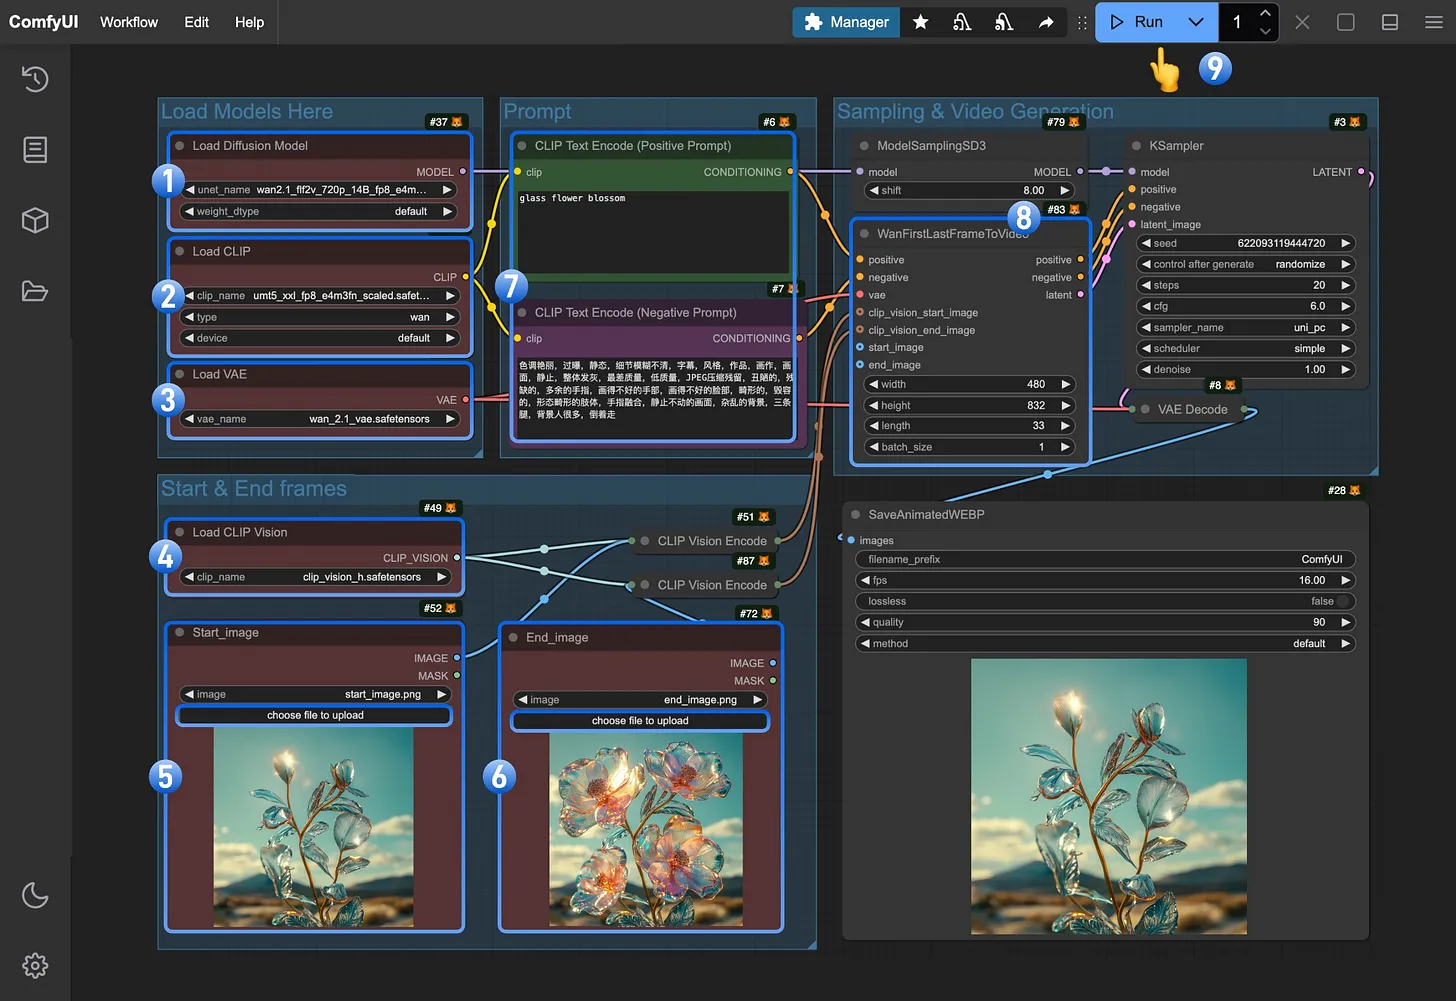
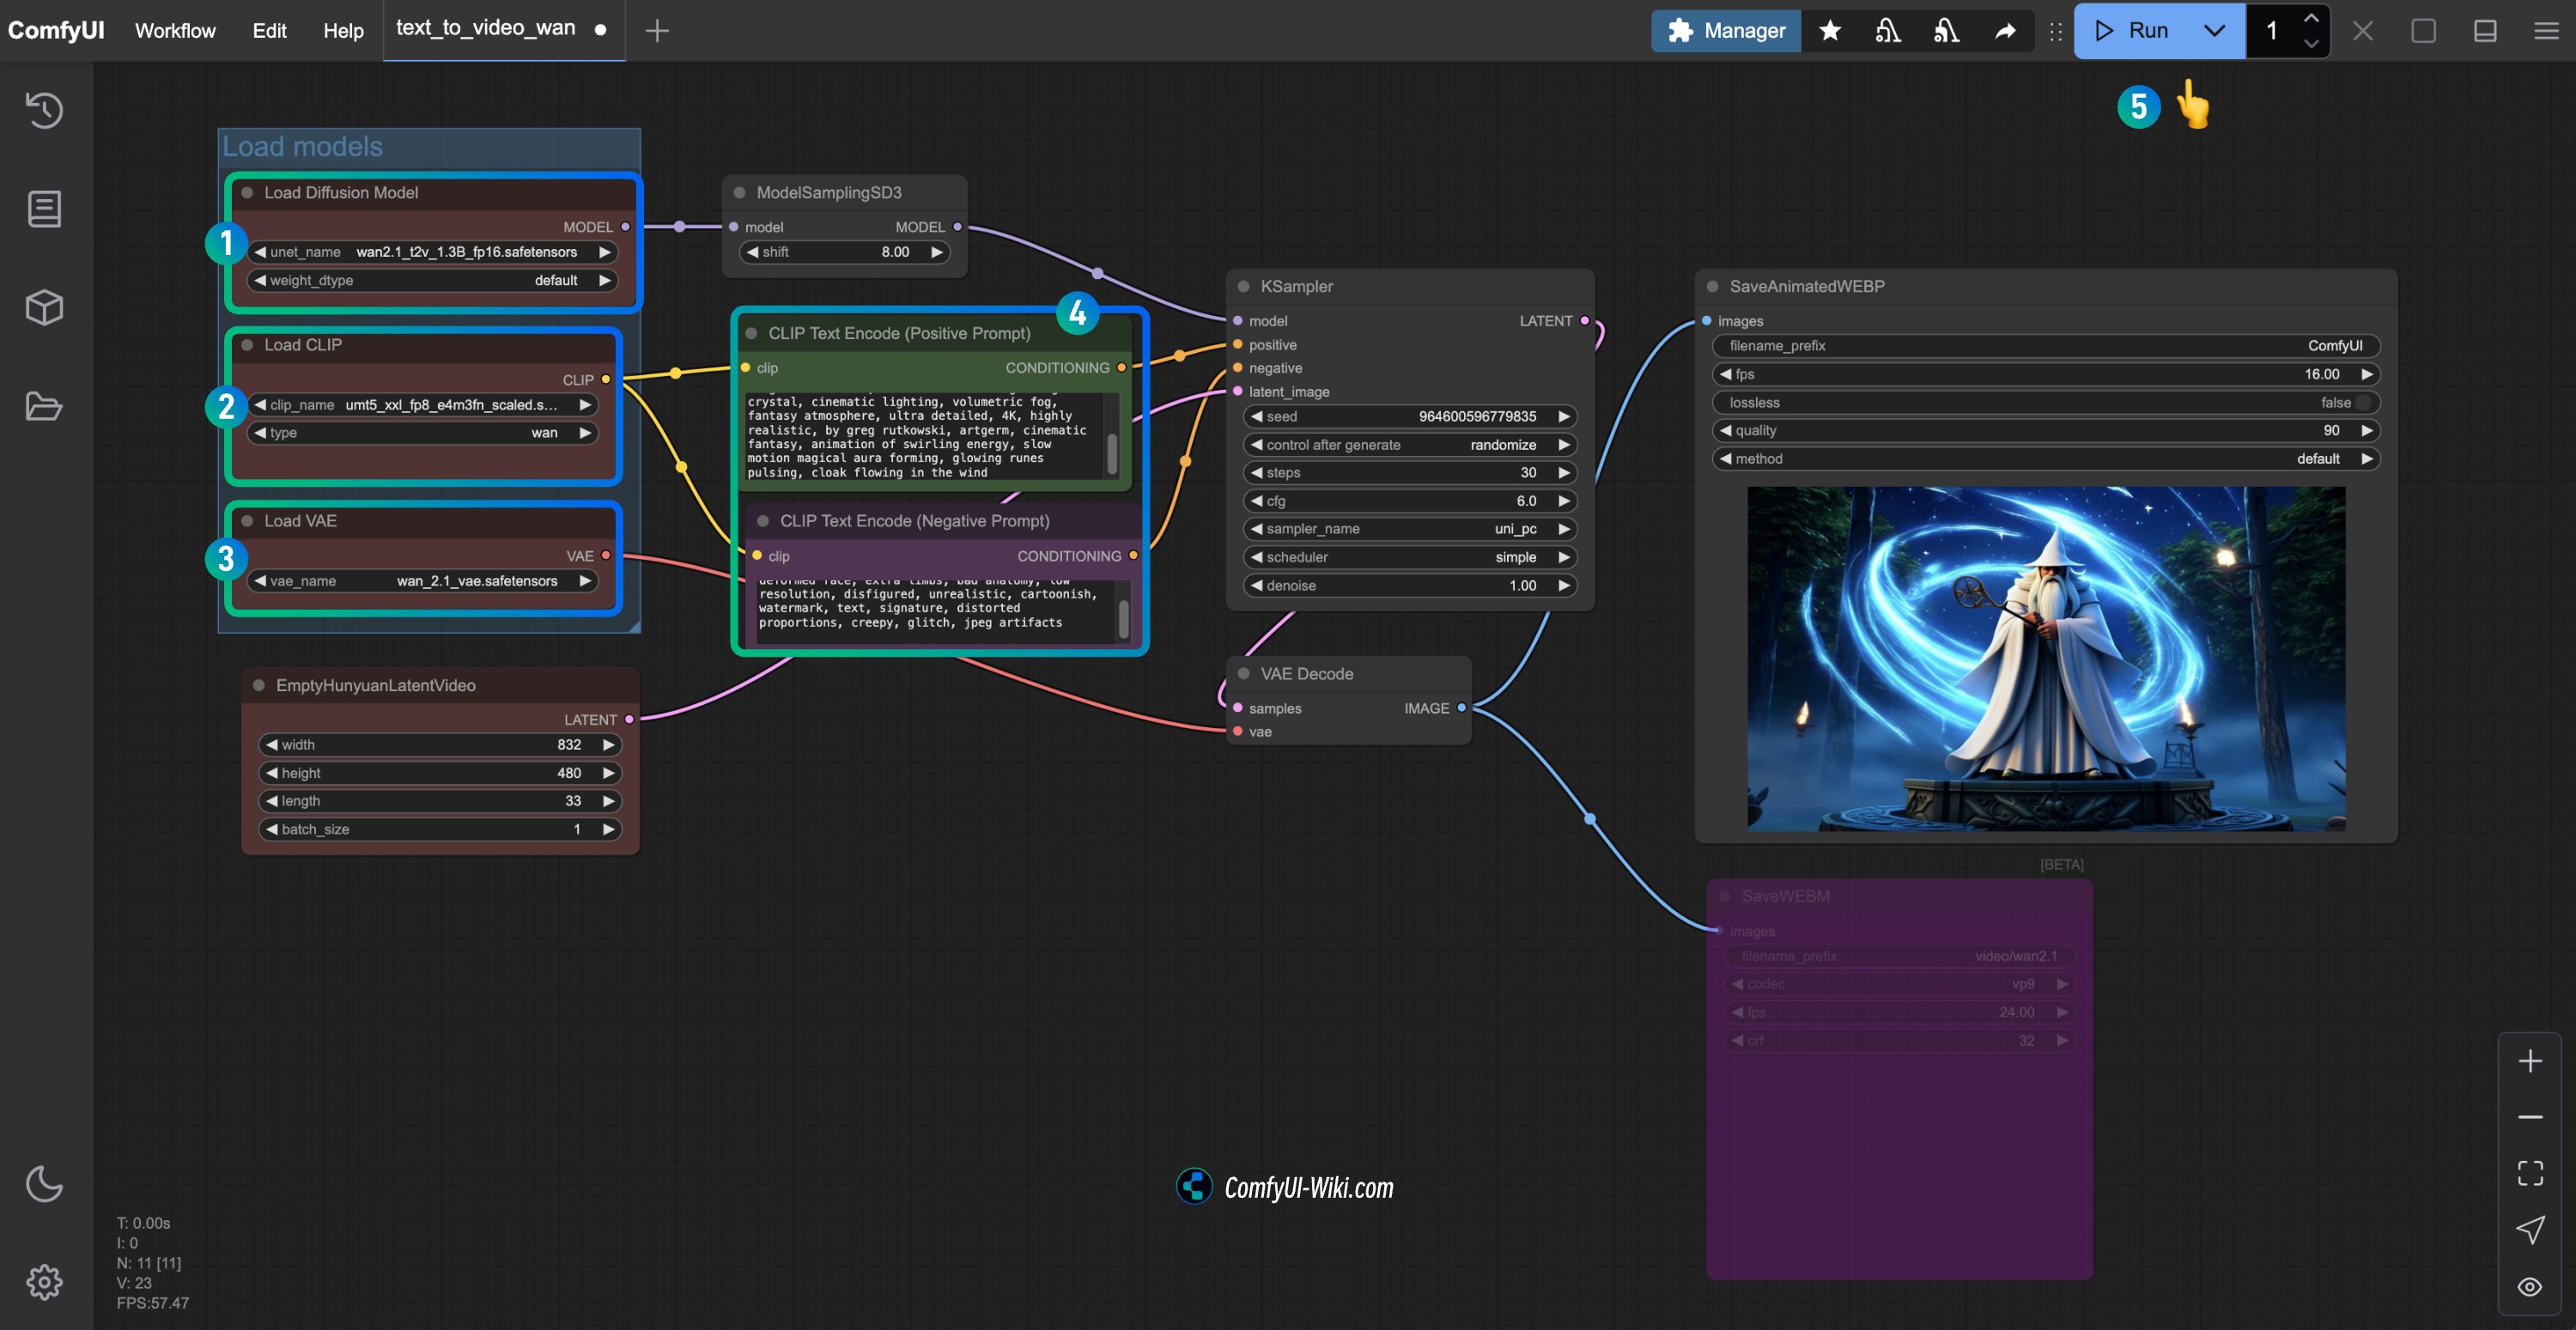
Loading and Understanding WAN 2.1 Workflows
The beauty of ComfyUI is its workflow system. Developers of models often provide example workflows (.json files) that demonstrate how to best use their models.
- Acquire WAN 2.1 Workflows: Look for example workflows on the model’s download page or community forums. These files contain the exact node arrangement and settings to achieve specific results with WAN 2.1.
- Load a Workflow:
- Open ComfyUI in your web browser.
- Drag and drop the
.jsonworkflow file directly onto the ComfyUI canvas. Alternatively, click “Load” (or “Load Default” and then “Load Workflow”) and select the.jsonfile. - ComfyUI will automatically arrange the nodes as defined in the workflow.
- Inspect and Adjust:
- Checkpoints and VAEs: Verify that the “Load Checkpoint” node is set to
wan21_base.safetensors(or your WAN 2.1 model). Similarly, ensure the correct VAE is selected in the “VAE Decode” or “Load VAE” node. - LoRAs: If the workflow uses LoRAs, ensure the “LoRA Loader” nodes are pointing to the correct
.safetensorsfiles you placed earlier. Adjust the strength values (strength_model,strength_clip) as needed. - Prompts: Modify the positive and negative prompt text boxes to reflect your desired image content. This is where your creativity comes into play.
- Sampler and Scheduler: Experiment with different samplers (e.g., DPM++ 2M Karras, Euler A) and schedulers. WAN 2.1 might perform optimally with specific combinations; refer to its documentation.
- Dimensions: Adjust the width and height of the image. Be mindful that larger images consume more VRAM and take longer to generate. Starting with 512×512 or 768×768 is common.
- Batch Size: For generating multiple images at once.
- Checkpoints and VAEs: Verify that the “Load Checkpoint” node is set to
Understanding how to read and modify these workflows is key to unlocking ComfyUI’s power and tailoring WAN 2.1’s output to your precise needs.
Generating Your First Images with WAN 2.1
Once your workflow is loaded and adjusted, it’s time to generate your first AI-powered masterpiece.
- Queue Prompt: Click the “Queue Prompt” button in the ComfyUI interface.
- Monitor Progress: ComfyUI will process the nodes sequentially. You’ll see progress indicators, and the generated image will appear in the “Save Image” or “Preview Image” node once complete.
- Iterate and Refine: AI art generation is an iterative process. Don’t expect perfect results immediately.
- Adjust Prompts: Refine your positive prompt for clarity and detail. Use negative prompts to steer the AI away from undesirable elements.
- Sampler Settings: Experiment with different steps (e.g., 20-40) and CFG Scale (e.g., 5-9) to control how closely the AI adheres to your prompt.
- LoRA Strengths: Tweak LoRA strengths to control their influence.
- Seeds: Use a fixed seed to explore variations of the same base image, or randomize for completely new compositions.
Generating images with WAN 2.1 in ComfyUI is a highly interactive and rewarding experience. Each generation offers insights into how the model interprets your inputs, guiding your next iteration.
Optimizing Performance and Output Quality
To get the most out of WAN 2.1 and ComfyUI, consider these optimization tips:
- VRAM Management:
- Close other GPU-intensive applications.
- Use lower batch sizes.
- Start with smaller image resolutions and upscale later using dedicated upscaling nodes (e.g., Ultimate SD Upscale, KSampler (Upscale)).
- ComfyUI automatically unloads models from VRAM when not in use, but you can explicitly use “Empty VRAM” nodes in complex workflows.
- Workflow Efficiency:
- Simplify your workflows when starting out. Add complexity gradually.
- Pre-calculate static parts of a workflow (like text embeddings for fixed prompts) where possible.
- Prompt Engineering: Learning effective prompt engineering techniques is paramount. Leverage descriptive language, use commas to separate concepts, and be specific.
- Community Resources: The ComfyUI and WAN 2.1 communities (Discord, forums, Reddit) are invaluable for finding new workflows, custom nodes, and troubleshooting tips.
By consistently applying these optimizations, you can significantly enhance both the speed of your generation and the quality of your final output, making your creative process more efficient and enjoyable.
Troubleshooting and Maximizing Your Experience
Even with a detailed guide, you might encounter issues. This section offers solutions to common problems and tips for further exploration.
Common Installation Hurdles and Solutions
- ComfyUI Won’t Launch/Errors on Startup:
- Python Version: Ensure you are using Python 3.10.x and that it was added to PATH during installation.
- Dependencies: Re-run
pip install -r requirements_gpu.txt(or appropriate version) to ensure all libraries are installed. - GPU Drivers: Update your NVIDIA CUDA drivers.
- VRAM: If you’re running out of memory, try closing other applications or launching ComfyUI with
--cpu(for testing, not generation). - Firewall/Antivirus: Temporarily disable them to check if they’re blocking the application.
- Model Not Appearing in Load Checkpoint Node:
- Correct Directory: Double-check that
wan21_base.safetensorsis exactly inComfyUI/models/checkpoints/. - File Extension: Ensure the file extension is correct (
.safetensorsor.ckpt). - Restart ComfyUI: Always restart ComfyUI after adding new model files.
- Correct Directory: Double-check that
- Custom Node Not Appearing/Workflow Errors:
- Correct Directory: Custom nodes must be in
ComfyUI/custom_nodes/. - Restart ComfyUI: Absolutely necessary after adding new custom nodes.
- Dependencies: Some custom nodes have their own
requirements.txtwhich need to be installed (often done automatically by ComfyUI Manager). - Manager Issues: If using ComfyUI Manager, ensure it’s up-to-date. If a node installation fails, try manual cloning.
- Correct Directory: Custom nodes must be in
- CUDA Out Of Memory (OOM) Errors:
- Reduce image resolution.
- Reduce batch size.
- Lower the number of inference steps (slightly).
- Check for unnecessary nodes in your workflow.
- If using an NVIDIA card, ensure your system is clean of other processes consuming VRAM.
Patience and methodical troubleshooting are your best friends. The ComfyUI community is also a fantastic resource for specific error messages.
Advanced Tips for Creative Exploration
Once you’re comfortable with the basics, expand your horizons:
- Node Library Exploration: Spend time browsing the “Add Node” menu (right-click on canvas). There are hundreds of nodes for image manipulation, control (ControlNet, IP-Adapter), conditioning, and more.
- ControlNet Integration: For precise control over composition and pose, integrate ControlNet models with WAN 2.1. This allows you to guide the AI with reference images, depth maps, or line art.
- Prompt Weighting: Learn to use prompt weighting (e.g.,
(word:1.2)) to emphasize certain terms and guide WAN 2.1’s focus. - Image-to-Image and Inpainting/Outpainting: Utilize ComfyUI’s capabilities for modifying existing images, expanding their boundaries, or filling in missing parts, all while leveraging WAN 2.1’s style.
- Batch Processing and Automation: For generating many similar images (e.g., for variations for a brand campaign), learn to set up batch processing workflows.
- Experiment with Checkpoint Merging: Advanced users can experiment with merging WAN 2.1 with other checkpoints to create entirely new hybrid models, opening up unprecedented creative avenues.
Embrace the experimental nature of AI art. Every new node, every parameter tweak, and every prompt modification offers a chance to discover something unique.
Conclusion: Unleashing Your Creative Potential with WAN 2.1 and ComfyUI
The integration of specialized AI models like WAN 2.1 with the flexible architecture of ComfyUI represents a significant leap forward for digital creators. This powerful combination not only streamlines the artistic process but also empowers users with granular control, reproducibility, and access to unique aesthetic styles. From generating captivating artwork for personal projects to creating distinctive marketing assets for businesses, the potential applications are vast and ever-expanding.
By following this comprehensive guide, you’ve equipped yourself with the knowledge and tools to navigate the installation process, troubleshoot common issues, and begin your journey into advanced AI art generation. The world of AI is constantly evolving, and staying abreast of these technologies offers a competitive edge, whether you’re a solopreneur crafting a unique brand identity, a designer exploring new creative workflows, or an artist pushing the boundaries of what’s possible.
Remember, the true power of these tools lies not just in their technical capabilities, but in how you wield them creatively. Experiment, explore, and let WAN 2.1 and ComfyUI be the engine for your next innovative visual masterpiece. The future of digital creation is here, and you are now equipped to be a part of it.
aViewFromTheCave is a participant in the Amazon Services LLC Associates Program, an affiliate advertising program designed to provide a means for sites to earn advertising fees by advertising and linking to Amazon.com. Amazon, the Amazon logo, AmazonSupply, and the AmazonSupply logo are trademarks of Amazon.com, Inc. or its affiliates. As an Amazon Associate we earn affiliate commissions from qualifying purchases.