In the ever-evolving landscape of software development, having a robust, versatile, and efficient code editor is paramount. Among the plethora of options available, Visual Studio Code (VS Code) has emerged as an undisputed leader, captivating millions of developers, engineers, and tech enthusiasts worldwide. From its lightweight design to its powerful features and expansive ecosystem of extensions, VS Code has redefined what a modern code editor can be. Whether you’re an aspiring programmer, a seasoned developer, or simply someone looking to explore the world of coding, setting up VS Code is a foundational step towards enhancing your productivity and streamlining your workflow.

This comprehensive guide will walk you through the entire process of installing Visual Studio Code across various operating systems. We’ll delve into its core benefits, prepare you for a smooth installation, provide detailed step-by-step instructions, and cover essential post-installation configurations to get you coding efficiently from the get-go. By the end of this tutorial, you’ll not only have VS Code running on your machine but also understand how to leverage its powerful capabilities to their fullest potential, making it an indispensable tool in your tech arsenal.
Understanding Visual Studio Code: More Than Just a Code Editor
Before we dive into the installation process, it’s beneficial to understand what Visual Studio Code is and why it has garnered such immense popularity within the tech community. Developed by Microsoft, VS Code is a free, open-source, and cross-platform code editor that supports a vast array of programming languages, frameworks, and technologies. It’s built on Electron, allowing it to run seamlessly on Windows, macOS, and Linux, providing a consistent experience across different environments.
What Makes VS Code Stand Out?
VS Code isn’t just a basic text editor; it’s an Integrated Development Environment (IDE) in a lightweight package. Its feature set is rich and constantly expanding, making it suitable for everything from simple script writing to complex application development.
- IntelliSense: This intelligent code completion feature provides smart completions based on variable types, function definitions, and imported modules. It significantly speeds up coding and reduces errors.
- Built-in Debugging: VS Code includes a powerful debugger that allows you to step through your code, inspect variables, and set breakpoints directly within the editor. This streamlines the troubleshooting process, a critical aspect of efficient software development.
- Integrated Terminal: You don’t need to switch between your editor and a separate terminal application. VS Code has an integrated terminal that supports various shells, allowing you to run commands, scripts, and build tasks without leaving your workspace.
- Git Integration: Source control management, specifically Git, is deeply integrated into VS Code. You can commit, pull, push, branch, and resolve merge conflicts directly from the editor, making version control an intuitive part of your development flow.
- Extensibility: Perhaps the most compelling feature of VS Code is its vast marketplace of extensions. These add-ons can introduce new languages, themes, debuggers, and tools, allowing you to tailor the editor precisely to your needs. This extensibility is what transforms VS Code from a great editor into an exceptionally powerful and adaptable IDE.
- Customization: From themes and icons to keyboard shortcuts and user settings, almost every aspect of VS Code can be customized to match your personal preferences and workflow, further enhancing productivity.
Who Benefits from Using VS Code?
Given its versatility, VS Code caters to a broad audience across the tech spectrum:
- Web Developers: With excellent support for HTML, CSS, JavaScript, TypeScript, React, Angular, and Vue.js, VS Code is a go-to for front-end and back-end web development.
- Python Developers: Its strong Python extension offers debugging, linting, intelligent code completion, and virtual environment support, making it ideal for data science, machine learning, and web development with frameworks like Django and Flask.
- Mobile Developers: While not a native mobile IDE, VS Code is widely used for cross-platform mobile development with frameworks like React Native and Flutter.
- Cloud Engineers: With extensions for AWS, Azure, and Google Cloud, developers can manage and deploy cloud resources directly from VS Code.
- Students and Educators: Its user-friendliness and free nature make it an excellent choice for learning programming.
- DevOps Engineers: The integrated terminal, Git support, and various extensions for Docker, Kubernetes, and scripting languages make it valuable for automation and infrastructure management.
In essence, if you write code or scripts, manipulate data, or work within a tech-related field, VS Code offers a powerful, flexible, and free solution to boost your productivity.
Preparing for Installation: System Requirements and Best Practices
Before you embark on the installation journey, it’s crucial to ensure your system meets the basic requirements and to follow some best practices for a smooth setup.
Minimum System Requirements
Visual Studio Code is designed to be lightweight, but like any software, it has certain minimum requirements to run optimally.
- Operating System:
- Windows: Windows 8.1 or newer (64-bit recommended).
- macOS: macOS Yosemite (10.10) or newer.
- Linux: Debian/Ubuntu based (e.g., Ubuntu 16.04+), Fedora/RHEL based (e.g., RHEL 7+), or other distributions supporting snap or flatpak.
- Processor: 1.6 GHz or faster processor.
- RAM: 1 GB RAM (4 GB recommended for larger projects and multiple extensions).
- Storage: 200 MB of available disk space.
- Internet Connection: Required for downloading the installer and installing extensions.
While these are minimums, having a more powerful machine will significantly enhance your experience, especially when working with large projects or resource-intensive extensions.
Choosing the Right Version: Stable vs. Insiders
VS Code offers two main release channels:
- Stable Build: This is the recommended version for most users. It’s thoroughly tested, highly stable, and updated roughly once a month with new features and bug fixes.
- Insiders Build: This is the daily updated build that includes the latest features, bug fixes, and experiments from the development team. It’s less stable than the regular release and is intended for those who want to try out features early and provide feedback. Unless you have a specific reason to use the Insiders build (e.g., testing new features for an extension you’re developing), stick with the Stable build. You can even install both versions side-by-side if needed.
Pre-Installation Checks
A few quick checks can prevent common installation hiccups:
- Administrator Privileges: Ensure you have administrator rights on your system, especially on Windows and Linux, as installation often requires modifying system files or directories.
- Stable Internet Connection: The installer needs to download files, and a stable connection will prevent interruptions.
- Close Running Applications: While not strictly necessary, closing other demanding applications can free up resources and ensure the installation process runs smoothly without conflicts.
Step-by-Step Installation Guides for Major Operating Systems
The installation process varies slightly depending on your operating system. We’ll cover Windows, macOS, and Linux in detail.
Installing VS Code on Windows
Windows is the most common platform for VS Code users. The process is straightforward using a graphical installer.
-
Download the Installer:
- Open your web browser and navigate to the official Visual Studio Code website:
code.visualstudio.com. - Look for the prominent “Download for Windows” button. Click it to download the
VSCodeSetup.exefile. The website usually detects your operating system automatically. - Pro Tip: You might see options for “User Installer” and “System Installer.” The User Installer (default) installs VS Code in your user directory, meaning you don’t need administrator privileges, and it updates automatically. The System Installer requires admin rights and installs for all users on the machine. For most individual developers, the User Installer is sufficient and recommended.
- Open your web browser and navigate to the official Visual Studio Code website:
-
Run the Installer:
- Once the download is complete, locate the
VSCodeSetup.exefile in your Downloads folder and double-click it to launch the installer. - Accept the License Agreement: Read through the license agreement (GNU Lesser General Public License) and click “I accept the agreement,” then “Next.”
- Choose Installation Location: The installer will suggest a default installation path, usually
C:Users<YourUsername>AppDataLocalProgramsMicrosoft VS Codefor the User Installer. For most users, this default is fine. Click “Next.” - Select Start Menu Folder: Choose a name for the Start Menu folder or keep the default “Visual Studio Code.” Click “Next.”
- Select Additional Tasks (Important!): This is a crucial step for enhancing your workflow.
- “Create a desktop icon”: Optional, for quick access.
- “Add ‘Open with Code’ action to Windows Explorer file context menu”: Highly recommended. This allows you to right-click on any file and open it directly in VS Code.
- “Add ‘Open with Code’ action to Windows Explorer directory context menu”: Highly recommended. This lets you right-click on a folder and open that entire folder as a workspace in VS Code.
- “Register Code as an editor for supported file types”: Recommended if you want VS Code to be your default editor for common code files.
- “Add to PATH (requires shell restart)”: Crucial. This adds VS Code to your system’s PATH environment variable, allowing you to launch VS Code from any command prompt or PowerShell window by typing
code .(to open the current directory) orcode <filename>. Make sure this is checked.
- Click “Next,” then “Install.”
- Once the download is complete, locate the
-
Complete Installation and First Launch:
- The installer will copy files and configure your system. Once finished, ensure “Launch Visual Studio Code” is checked and click “Finish.”
- VS Code will now launch, greeting you with a Welcome screen.
Installing VS Code on macOS
Mac users have a similarly straightforward installation process, typically involving a drag-and-drop operation.
-
Download the Installer:
- Go to
code.visualstudio.com. - Click the “Download for Mac” button. This will download a
VSCode-darwin-universal.zip(or similar) file to your Downloads folder.
- Go to
-
Extract and Move to Applications:
- Open your Downloads folder. Double-click the downloaded
.zipfile to extract its contents. This will create an application bundle named “Visual Studio Code.app.” - Drag the “Visual Studio Code.app” from your Downloads folder to your Applications folder. This is the standard way to install applications on macOS.
- Open your Downloads folder. Double-click the downloaded
-
First Launch and PATH Setup:
- Open your Applications folder and double-click “Visual Studio Code.app” to launch it.
- The first time you launch it, macOS might ask for confirmation because it’s an application downloaded from the internet. Click “Open.”
- Add
codeto PATH (Optional but Recommended): For command-line access, open VS Code, pressCmd + Shift + P(or go toView > Command Palette...), typeshell command, and select “Shell Command: Install ‘code’ command in PATH.” This allows you to launch VS Code from any terminal window using thecode .command. You might need to provide your administrator password.
Installing VS Code on Linux
Linux offers several methods for installing VS Code, catering to different distributions and preferences. We’ll cover the most common ones.
-
Download from the Official Website (Recommended for most users):
-
Visit
code.visualstudio.com. -
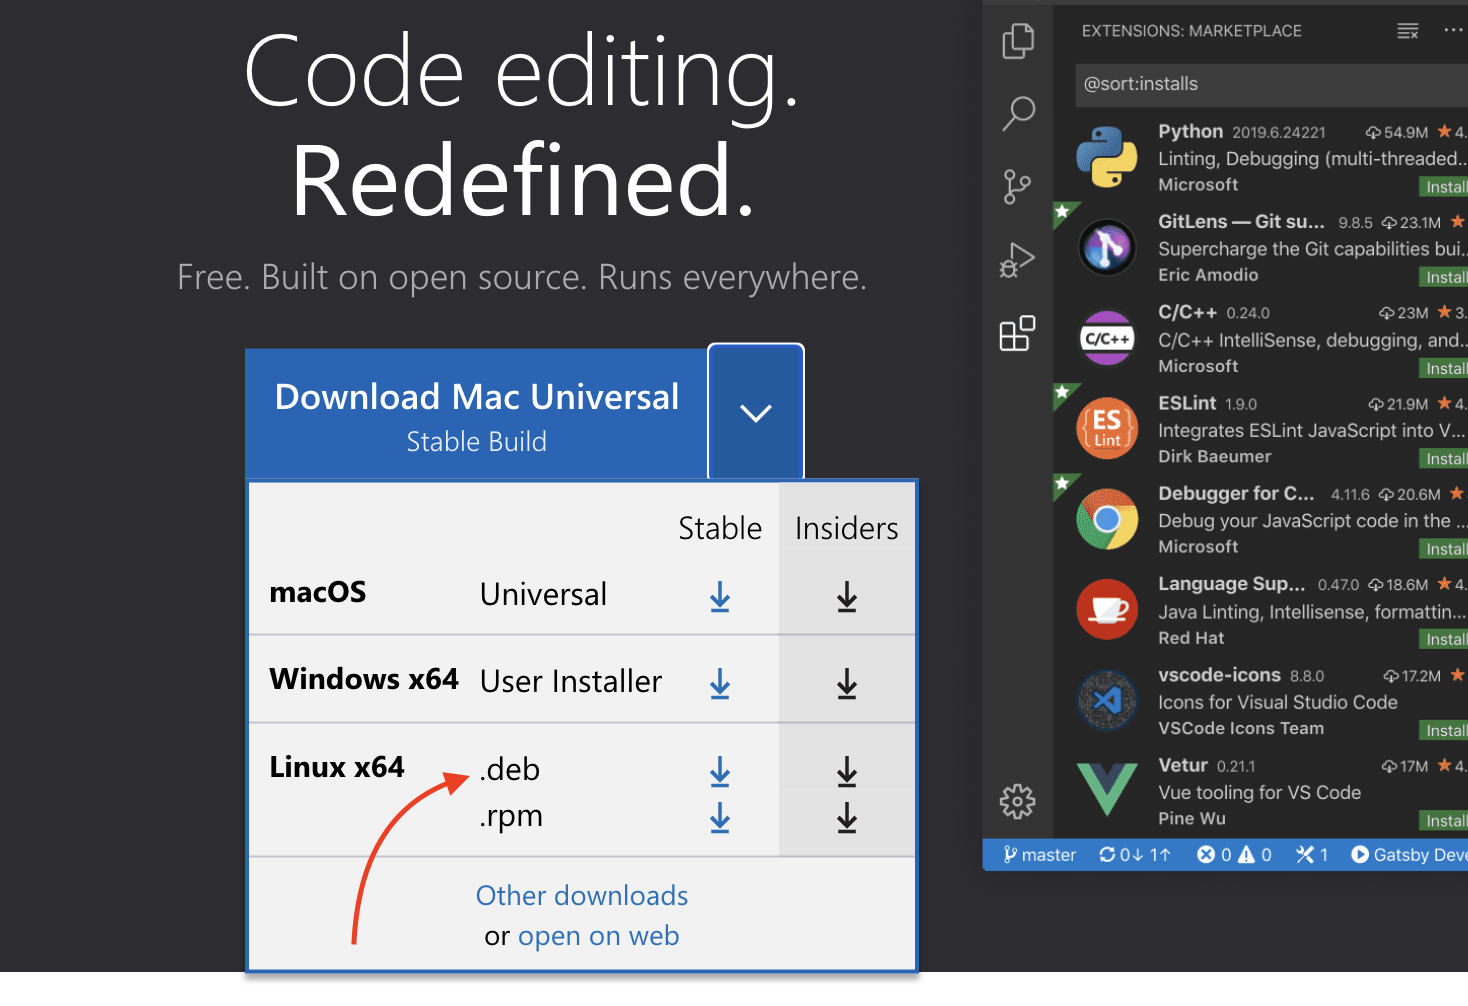
You’ll find options for
.deb(for Debian/Ubuntu based systems) and.rpm(for Fedora/RHEL based systems). Download the appropriate package for your distribution. -
For Debian/Ubuntu-based systems (e.g., Ubuntu, Linux Mint):
- Download the
.debpackage. - Open your terminal and navigate to your Downloads directory (
cd ~/Downloads). - Install using
sudo dpkg -i <filename>.deb(replace<filename>.debwith the downloaded file name, e.g.,code_1.87.0-1709669539_amd64.deb). - If there are dependency issues, run
sudo apt --fix-broken install. - Alternatively, you can often just double-click the
.debfile in your file manager, and it will open with a software installer (like Ubuntu Software Center) to complete the installation.
- Download the
-
*   **For Fedora/RHEL-based systems (e.g., Fedora, CentOS, RHEL):**
    *   Download the `.rpm` package.
    *   Open your terminal and navigate to your Downloads directory (`cd ~/Downloads`).
    *   Install using `sudo dnf install <filename>.rpm` (for Fedora 22+) or `sudo yum install <filename>.rpm` (for older RHEL/CentOS).
-
Using Package Managers (Recommended for staying updated):
-
Debian/Ubuntu (apt):
- VS Code maintains its own
aptrepository. To add it and install:
bash

sudo apt-get update

sudo apt-get install -y software-properties-common apt-transport-https wget

wget -q https://packages.microsoft.com/keys/microsoft.asc -O- | sudo apt-key add -

sudo add-apt-repository "deb [arch=amd64] https://packages.microsoft.com/repos/vscode stable main"

sudo apt-get update

sudo apt-get install code
- VS Code maintains its own
-
Fedora/RHEL (yum/dnf):
- Similarly, VS Code provides a
yumrepository.
bash

sudo rpm --import https://packages.microsoft.com/keys/microsoft.asc

sudo sh -c 'echo -e "[code]nname=Visual Studio Codenbaseurl=https://packages.microsoft.com/yumrepos/vscodenenabled=1ngpgcheck=1ngpgkey=https://packages.microsoft.com/keys/microsoft.asc" > /etc/yum.repos.d/vscode.repo'

# For Fedora

sudo dnf check-update

sudo dnf install code

# For RHEL/CentOS

sudo yum check-update

sudo yum install code
- Similarly, VS Code provides a
-
-
Snap or Flatpak (Universal Linux Packages):
- If your distribution supports Snap or Flatpak, these offer sandboxed, easy-to-update installations.
- Snap:
bash

sudo snap install --classic code # or code-insiders for the Insiders build
- Flatpak:
bash

flatpak install flathub com.visualstudio.Code # For stable

flatpak install flathub com.visualstudio.Code.Insiders # For Insiders
-
Launch VS Code:
- After installation, you can typically find VS Code in your applications menu.
- You can also launch it from the terminal by typing
code.
Post-Installation: Initial Setup and Essential Configuration
With VS Code successfully installed, the next step is to configure it to your liking and install essential tools to supercharge your development workflow.
First Impressions: The Welcome Screen and Interface Tour
Upon its first launch, VS Code presents a Welcome screen that offers quick links to common tasks: opening files/folders, learning the basics, and customizing settings. Take a moment to explore the interface:
- Activity Bar (Leftmost): Contains icons for different views (Explorer, Search, Source Control, Run and Debug, Extensions, Remote Explorer).
- Sidebar: Displays content related to the selected Activity Bar icon (e.g., file tree, search results).
- Editor Group: Where you view and edit your code. You can have multiple editor groups.
- Panel (Bottom): Houses the integrated terminal, output, debug console, and problems view.
- Status Bar (Bottommost): Shows information about your current project, language mode, Git branch, and more.
Installing Key Extensions
Extensions are where VS Code truly shines, allowing you to add language support, debuggers, themes, and various development tools. Access the Extensions view by clicking the square icon on the Activity Bar or pressing Ctrl+Shift+X (Windows/Linux) / Cmd+Shift+X (macOS).
Here are some universally useful extensions to consider:
- Language Support: Install extensions for the languages you work with (e.g., Python, JavaScript (ES6 Code Snippets), HTML CSS Support, C#, Java). These provide syntax highlighting, IntelliSense, linting, and debugging.
- Prettier – Code formatter: Automatically formats your code to adhere to consistent style guidelines, making your code cleaner and more readable.
- ESLint: (For JavaScript/TypeScript) Lints your code for potential errors and style violations.
- Live Server: (For Web Development) Launches a local development server with live reload feature for static and dynamic pages.
- GitLens — Git supercharged: Enhances Git capabilities within VS Code, showing inline blame annotations, recent changes, and more.
- Material Icon Theme / vscode-icons: Provides attractive file icons, making it easier to distinguish file types in your explorer.
- Docker: Essential for containerized development, offering Dockerfile and Docker Compose support.
- Remote Development (Extension Pack): Allows you to open any folder on a remote machine, container, or WSL (Windows Subsystem for Linux) instance directly in VS Code, treating it as if it were local. This is a game-changer for cloud development and cross-platform work.
To install an extension, search for its name, click on it, and then click the “Install” button.
Customizing Settings
VS Code is highly customizable. You can modify settings via File > Preferences > Settings (Windows/Linux) or Code > Preferences > Settings (macOS), or by pressing Ctrl+, / Cmd+,.
Key settings to consider customizing:
- Theme: Change the color scheme of the editor (
Workbench: Color ThemeandFile Icon Theme). - Font: Adjust the font family and size for the editor and terminal.
- Auto Save: Set
Files: Auto SavetoonFocusChangeorafterDelayto automatically save your work. - Tab Size: Configure
Editor: Tab SizeandEditor: Detect Indentationto match your project’s coding style. - Word Wrap: Enable
Editor: Word Wrapto prevent horizontal scrolling for long lines of code.
These settings can be applied globally (User settings) or for specific projects (Workspace settings), allowing for fine-grained control.
Integrating with Git
VS Code’s built-in Git integration is robust. If you have Git installed on your system, VS Code will automatically detect it. You can initialize repositories, stage changes, commit, push, pull, and manage branches directly from the Source Control view (the third icon down in the Activity Bar). This seamless integration significantly speeds up the version control aspect of development.
Using the Integrated Terminal
The integrated terminal is accessed via View > Terminal or Ctrl+ / “` (backtick). It supports various shells like PowerShell, Git Bash, or WSL on Windows; Bash or Zsh on macOS and Linux. Using the terminal within VS Code means you don’t have to switch contexts, making operations like running build commands, tests, or scripts incredibly efficient.
Advanced Tips and Troubleshooting
To fully harness the power of VS Code and ensure a smooth experience, consider these advanced tips and common troubleshooting solutions.
Keeping VS Code Up-to-Date
VS Code releases monthly updates that bring new features, performance improvements, and bug fixes.
- Windows/macOS: VS Code automatically checks for updates and prompts you to install them. Simply click “Update Now” when prompted or go to
Help > Check for Updates. - Linux: If you installed using a package manager (
apt,dnf), updates will be handled by your system’s package manager when you runsudo apt update && sudo apt upgradeorsudo dnf update. If installed via Snap or Flatpak, they also handle updates automatically.
Performance Optimization Tips
While lightweight, VS Code can become sluggish with many extensions or large projects.
- Disable Unused Extensions: Regularly review your installed extensions and disable or uninstall those you don’t frequently use.
- Workspace-Specific Extensions: Use the “Disable (Workspace)” option for extensions that are only needed in specific project types.
- Reduce Open Files/Folders: Keep your workspace clean by closing unnecessary files and folders.
- Hardware Acceleration: Ensure your GPU drivers are up-to-date, as VS Code can leverage hardware acceleration.
- Increase Node.js Memory Limit: For very large JavaScript/TypeScript projects, you might need to increase the memory limit for Node.js processes VS Code spawns. Search
node memoryin settings.
Common Installation Issues and Solutions
codecommand not found in terminal (Windows/macOS/Linux):- Windows: Ensure “Add to PATH” was checked during installation. If not, reinstall or manually add VS Code to your system’s PATH environment variable. Remember to restart your terminal.
- macOS: Use the “Shell Command: Install ‘code’ command in PATH” from the Command Palette (
Cmd + Shift + P). - Linux: Ensure you either used a package manager that sets up the PATH or manually added it. If using
.deb/.rpm, the PATH is usually set up.
- Permission Errors:
- Ensure you have administrator privileges during installation.
- On Linux, if you encounter issues, try prefixing commands with
sudo.
- Corrupted Download: If installation fails repeatedly, try re-downloading the installer from the official website, as the original download might have been corrupted.
- VS Code not launching: Check your system’s event logs for errors. Try reinstalling. Ensure your system meets the minimum requirements.
Exploring Remote Development
As mentioned, the Remote Development extension pack is a powerful feature that deserves special mention, particularly for cloud engineers, container users, and those working with WSL on Windows. This pack allows you to:
- Connect to Remote SSH Hosts: Seamlessly work on code located on a remote server as if it were local, leveraging the server’s computing resources.
- Develop in Containers: Attach to a running Docker container or define a dev container in your project, ensuring consistent development environments.
- Utilize WSL (Windows Subsystem for Linux): Develop in a Linux environment directly from Windows, integrating effortlessly with your Windows file system and tools.
These features make VS Code incredibly flexible for modern, distributed development workflows, aligning perfectly with “Technology Trends” and “AI Tools” sections of the website by enabling powerful remote compute access.

Conclusion
Installing Visual Studio Code is the first step on a journey toward more efficient, productive, and enjoyable coding. Its blend of lightweight design, powerful features, and unparalleled extensibility makes it an indispensable tool for anyone involved in software development or the broader tech landscape. From setting up your environment on Windows, macOS, or Linux, to customizing it with essential extensions and leveraging its integrated capabilities, you’re now equipped to dive into your next coding project with confidence.
Remember that the true power of VS Code lies in its adaptability. Don’t hesitate to explore the Extensions Marketplace, tweak your settings, and experiment with different features. As you become more familiar with the editor, you’ll discover countless ways to optimize it for your specific needs, transforming it into a truly personal development powerhouse. So go ahead, launch VS Code, open your first project, and start coding – the possibilities are endless!
aViewFromTheCave is a participant in the Amazon Services LLC Associates Program, an affiliate advertising program designed to provide a means for sites to earn advertising fees by advertising and linking to Amazon.com. Amazon, the Amazon logo, AmazonSupply, and the AmazonSupply logo are trademarks of Amazon.com, Inc. or its affiliates. As an Amazon Associate we earn affiliate commissions from qualifying purchases.