In today’s rapidly evolving technological landscape, having the ability to experiment with different operating systems without impacting your primary machine is invaluable. Whether you’re a developer eager to test applications on a new platform, a student exploring the world of Linux, a cybersecurity enthusiast looking for a safe sandbox environment, or simply a tech-savvy individual curious about Ubuntu, VirtualBox offers a powerful and accessible solution. This comprehensive guide will walk you through the entire process of installing Ubuntu on Oracle VM VirtualBox, empowering you to create a fully functional Linux environment right within your existing operating system.
Virtualization, the technology underpinning VirtualBox, allows you to run one or more operating systems as “virtual machines” on top of your existing host operating system. This means you can have Windows, macOS, or even another Linux distribution running simultaneously, each isolated from the other. This isolation is crucial for security, allowing you to test software, explore potentially risky websites, or develop applications without fear of compromising your main system.
Ubuntu, a popular and user-friendly Linux distribution, is an excellent choice for those venturing into the Linux world. Its intuitive interface, vast software repository, and strong community support make it accessible to beginners while offering the power and flexibility that experienced users demand. By combining Ubuntu with VirtualBox, you unlock a world of possibilities for learning, development, and experimentation.
This article will guide you through each step, from downloading the necessary software to the final configuration of your Ubuntu virtual machine. We’ll cover everything you need to know to get your Ubuntu installation up and running smoothly.
Prerequisites: What You’ll Need Before You Begin
Before diving into the installation process, it’s essential to ensure you have everything ready. This preparation will make the installation smooth and hassle-free.
Download VirtualBox
The first crucial component is Oracle VM VirtualBox itself. This free and open-source virtualization software is the engine that will run your Ubuntu operating system.
Steps to Download VirtualBox:
- Navigate to the Official VirtualBox Website: Open your preferred web browser and go to the official VirtualBox download page. You can typically find this by searching for “VirtualBox download” on any search engine, or by directly visiting
virtualbox.org. - Select Your Host Operating System: On the download page, you’ll see links for different host operating systems (Windows, macOS, Linux distributions, Solaris). Click on the link that corresponds to the operating system you are currently using. For example, if you’re on a Windows machine, click “Windows hosts.”
- Download the Installer: The download will begin automatically. Save the installer file to a convenient location on your computer, such as your Desktop or Downloads folder.
- Consider the Extension Pack (Optional but Recommended): While not strictly necessary for a basic installation, the VirtualBox Extension Pack adds valuable features like USB 2.0 and 3.0 support, RDP (Remote Desktop Protocol) capabilities, disk encryption, and NVMe support. It’s highly recommended to download this as well. You’ll find the link for the Extension Pack on the same download page. Ensure you download the version that matches your VirtualBox installation.
Download Ubuntu ISO Image
The second essential piece of software is the Ubuntu operating system itself, in the form of an ISO image file. This file acts as a virtual CD/DVD that VirtualBox will use to install Ubuntu.
Steps to Download Ubuntu:
- Navigate to the Official Ubuntu Website: Open your web browser and go to the official Ubuntu download page. You can find this by searching for “Ubuntu download” or by visiting
ubuntu.com/download. - Choose the Ubuntu Desktop Version: Ubuntu offers different versions, but for most users, the “Ubuntu Desktop” version is what you’ll want. Look for the latest Long-Term Support (LTS) version, which is generally recommended for stability and ongoing support. Click on the download button for the desired version.
- Download the ISO File: The download of the Ubuntu ISO image will begin. This file can be quite large (several gigabytes), so ensure you have a stable internet connection and sufficient disk space. Save the ISO file to a location you can easily find, such as your Downloads folder.
System Requirements and Considerations
Before you start, it’s worth noting the system resources required for running a virtual machine smoothly. While VirtualBox is designed to be efficient, running an operating system within another will naturally consume more of your computer’s resources.
- RAM: A minimum of 4GB of RAM is recommended for your host machine to comfortably run both your host OS and a virtual machine. For better performance, 8GB or more is ideal. When allocating RAM to your Ubuntu VM, aim for at least 2GB, and ideally 4GB or more for a smoother experience.
- CPU: A modern multi-core processor is beneficial. VirtualBox can utilize multiple CPU cores for your virtual machine, significantly improving performance.
- Disk Space: You’ll need sufficient free disk space on your host machine for both the VirtualBox software, the Ubuntu ISO image, and the virtual hard disk that will store Ubuntu’s files and any applications you install. Allocate at least 20-30GB for the virtual hard disk, and more if you plan to install many applications or store large files within Ubuntu.
- Virtualization Technology (VT-x/AMD-V): Ensure that virtualization technology is enabled in your computer’s BIOS/UEFI settings. This is usually enabled by default on most modern computers, but it’s worth checking if you encounter issues.
Setting Up Your Ubuntu Virtual Machine in VirtualBox
With VirtualBox and the Ubuntu ISO downloaded, you’re ready to create your virtual machine. This involves configuring the virtual hardware that Ubuntu will see and interact with.
Creating a New Virtual Machine
This is the core step where you define the parameters of your Ubuntu environment.
Steps to Create a New VM:
- Launch VirtualBox: Open Oracle VM VirtualBox from your applications menu or desktop shortcut.
- Click “New”: In the main VirtualBox Manager window, click the “New” button. This will open the “Create Virtual Machine” wizard.
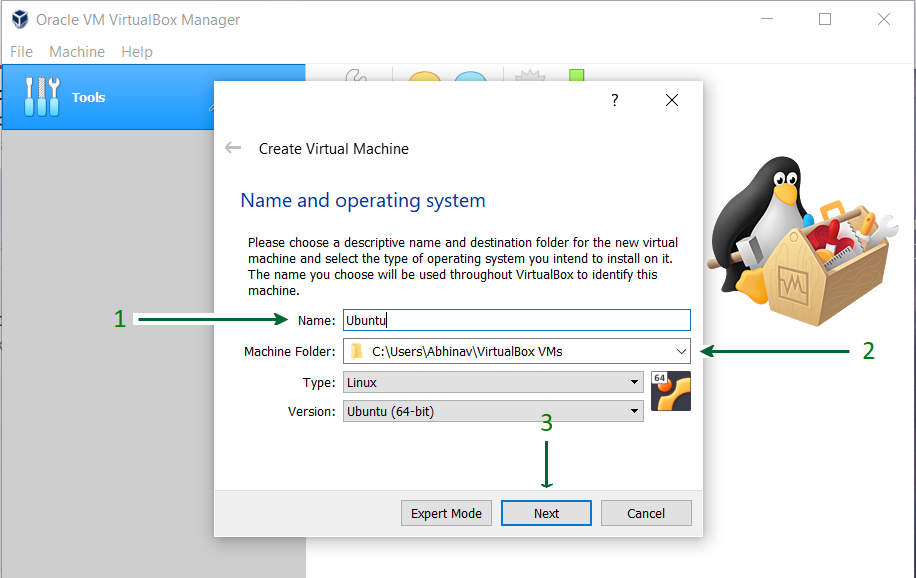
- Name and Operating System:
- Name: Give your virtual machine a descriptive name, such as “Ubuntu 22.04 LTS” or “My Ubuntu Dev Machine.”
- Machine Folder: Choose a location on your hard drive where the virtual machine files will be stored. The default is usually fine, but you can change it if you have specific storage preferences.
- Type: Select “Linux” from the dropdown menu.
- Version: Select the specific Ubuntu version you downloaded (e.g., “Ubuntu (64-bit)”). If your exact version isn’t listed, choose the closest one, such as “Other Linux (64-bit).”
- Memory Size: Allocate RAM to your virtual machine. As mentioned earlier, a minimum of 2GB is recommended, but 4GB or more will provide a significantly better experience. Drag the slider to your desired amount, ensuring you don’t allocate more than half of your host machine’s total RAM.
- Hard Disk: This is where Ubuntu will be installed.
- Create a virtual hard disk now: Select this option.
- Hard disk file type: For most users, “VDI (VirtualBox Disk Image)” is the default and recommended choice.
- Storage on physical hard disk:
- Dynamically allocated: This is generally preferred. The virtual hard disk file will only grow as you fill it up, saving space on your host machine.
- Fixed size: The virtual hard disk file will be created at its maximum size immediately. This can offer slightly better performance but uses more disk space upfront.
- File location and size: You can adjust the location of the virtual hard disk file if needed. Set the size for your virtual hard disk. A minimum of 20GB is recommended, but 30GB or more is advisable for comfort.
- Click “Create”: Once you’ve configured these settings, click “Create” to finish the initial VM setup.
Configuring VM Settings
After creating the VM, there are a few more settings to tweak for optimal performance and to prepare for the Ubuntu installation.
Steps to Configure VM Settings:

- Select Your VM: In the VirtualBox Manager window, click on the Ubuntu VM you just created.
- Click “Settings”: Click the “Settings” button.
- System:
- Processor: Assign more CPU cores to your VM if your host machine has them available. Two cores are usually a good starting point for a smooth experience.
- Enable PAE/NX: Ensure this is checked for compatibility.
- Display:
- Screen: Increase the “Video Memory” to the maximum allowed (usually 128MB).
- Graphics Controller: For most Ubuntu versions, “VBoxSVGA” is a good choice. Experiment with others if you encounter display issues.
- Enable 3D Acceleration: This can improve graphical performance, especially for desktop effects. Check this box if available.
- Storage: This is where you’ll attach the Ubuntu ISO image.
- Click on the “Controller: IDE” entry.
- Under “Storage Devices,” click on the CD icon that says “Empty.”
- On the right-hand side, under “Attributes,” click the CD icon and select “Choose/Create a Virtual Optical Disk…”
- Navigate to where you saved your Ubuntu ISO file and select it.
- Click “OK” to save the settings.
- Network: The default “NAT” (Network Address Translation) setting is usually sufficient for internet access within the VM. If you have specific networking needs, you can explore other options like “Bridged Adapter.”
- USB: If you downloaded the Extension Pack, you can configure USB device access here.
Installing Ubuntu on Your Virtual Machine
Now that your virtual machine is configured, it’s time to boot it up and go through the Ubuntu installation process.
Starting the VM and Booting from the ISO
Steps to Start the VM and Boot:
- Select Your VM: In the VirtualBox Manager, select your Ubuntu VM.
- Click “Start”: Click the “Start” button.
- Ubuntu Boot Menu: The VM window will open, and it will boot from the Ubuntu ISO image you attached. You’ll be presented with the Ubuntu boot menu.
- Choose “Try or Install Ubuntu”: Select this option and press Enter.
The Ubuntu Installation Process
You’ll now enter the Ubuntu installer. Follow the on-screen prompts carefully.
Key Steps in the Ubuntu Installer:
-
Welcome Screen: Select your preferred language for the installation process and the running Ubuntu system. Click “Continue.”
-
Keyboard Layout: Choose your keyboard layout. You can test your layout in the text box provided. Click “Continue.”
-
Updates and Other Software:
- Normal installation: Recommended for most users. Installs web browsers, utilities, office software, games, and media players.
- Minimal installation: Installs a web browser and basic utilities.
- Other options: You can choose to download updates while installing Ubuntu and install third-party software for graphics and Wi-Fi hardware, Flash, MP3, and other media. It’s generally a good idea to check these boxes if you have an internet connection. Click “Continue.”
-
Installation Type: This is a critical step.
- Erase disk and install Ubuntu: This is the recommended and simplest option for a virtual machine. It will erase the entire virtual hard disk you created and install Ubuntu on it. Do not worry, this will not affect your host operating system or its data.
- Something else: This option allows for manual partitioning of the virtual disk, which is useful for advanced users or dual-booting scenarios (though less common within a VM).
- Other options: There might be options for encrypting your Ubuntu installation or using LVM (Logical Volume Management), but these are generally not needed for a basic VM.
Select “Erase disk and install Ubuntu” and click “Install Now.” You’ll be prompted to confirm the changes to the virtual disk. Click “Continue.”
-
Where are you? Select your time zone by clicking on the map. Click “Continue.”
-
Who are you?
- Your name: Enter your name.
- Your computer’s name: This is the name your computer will have on the network.
- Pick a username: Create a username for your login.
- Choose a password: Create a strong password.
- Confirm your password: Re-enter your password.
- Log in automatically or Require my password to log in: For security, it’s recommended to choose “Require my password to log in.”
- Click “Continue.”
-
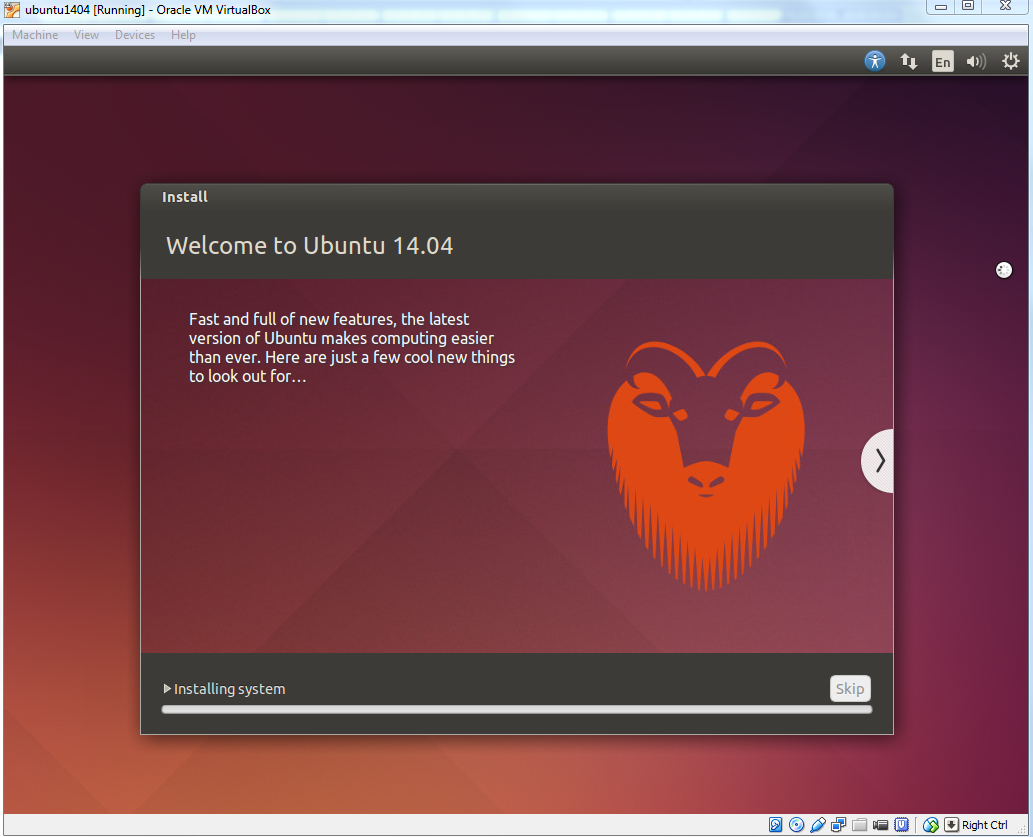
Installation Progress: The installer will now copy files and install Ubuntu. This process can take some time, depending on your computer’s speed and the options you selected. You can watch the slideshow that provides interesting information about Ubuntu.
-
Installation Complete: Once the installation is finished, you’ll see a message indicating that the installation is complete. You’ll be prompted to restart the computer. Click “Restart Now.”
Post-Installation Steps and Guest Additions
After restarting, your Ubuntu virtual machine will boot into your new Ubuntu desktop environment. Before you can fully enjoy the benefits of your virtualized Ubuntu, there are a couple of important post-installation steps.
1. Removing the Installation Media:
- When prompted to “Please remove the installation medium, then press ENTER,” you need to tell VirtualBox to detach the Ubuntu ISO.
- In the VM window, go to Devices > Optical Drives > Remove disk from virtual drive.
- Then, press Enter in the VM window.
2. Installing VirtualBox Guest Additions:
VirtualBox Guest Additions are a set of device drivers and system applications that are optimized for VirtualBox virtual machines. Installing them significantly enhances the performance and usability of your guest operating system. They enable features like:
- Seamless mouse integration (no need to press a key to capture/release the mouse).
- Better video performance and higher screen resolutions.
- Shared folders between the host and guest.
- Drag and drop functionality.
- Clipboard sharing.
Steps to Install Guest Additions:
- Boot Ubuntu VM: Start your Ubuntu virtual machine.
- Insert Guest Additions CD Image: In the VM window, go to Devices > Insert Guest Additions CD image…
- Run the Installer:
- A CD icon might appear on your Ubuntu desktop, or you might get a prompt asking if you want to run the software on the disk.
- If you get a prompt, click “Run.”
- If no prompt appears, open the File Manager, navigate to the mounted CD drive (usually named “VBoxGAs…”), right-click in an empty area, and select “Open in Terminal.”
- In the terminal, type the following command and press Enter:
bash

sudo ./VBoxLinuxAdditions.run
- You will be prompted for your Ubuntu password. Enter it and press Enter.
- Wait for Installation: The installation process will run in the terminal.
- Restart the VM: Once the installation is complete, you will be prompted to restart your virtual machine. Click “Restart” or manually restart from the Ubuntu menu.
After the restart, you should notice significant improvements in performance, screen resolution, and overall usability. You can now resize the VM window, and the Ubuntu desktop will adjust accordingly.
Conclusion: Your Ubuntu Virtualization Journey Begins
Congratulations! You have successfully installed Ubuntu on VirtualBox and enhanced its functionality with Guest Additions. You now have a fully operational Linux environment that you can use for a variety of purposes without any risk to your primary operating system.
From here, the possibilities are vast. You can explore the extensive Ubuntu software repositories to install applications for development, productivity, or entertainment. Learn new programming languages, experiment with server technologies, or simply enjoy the freedom and flexibility that Linux offers.
Remember that this virtual machine is a sandbox. Feel free to experiment, install, and even break things within the VM without concern. If something goes wrong, you can always revert to a previous snapshot (a saved state of your VM) or simply delete and recreate the virtual machine.
VirtualBox and Ubuntu are powerful tools for anyone interested in technology, development, or simply expanding their digital horizons. We hope this guide has provided you with the knowledge and confidence to embark on your Ubuntu virtualization journey. Happy exploring!
aViewFromTheCave is a participant in the Amazon Services LLC Associates Program, an affiliate advertising program designed to provide a means for sites to earn advertising fees by advertising and linking to Amazon.com. Amazon, the Amazon logo, AmazonSupply, and the AmazonSupply logo are trademarks of Amazon.com, Inc. or its affiliates. As an Amazon Associate we earn affiliate commissions from qualifying purchases.